

Bootstrap에서 양식 유효성 검사 플러그인 bootstrapValidator를 사용하는 방법은 무엇입니까? (코드 예)

이 글의 내용은 Bootstrap에서 양식 검증 플러그인 bootstrapValidator를 사용하는 방법을 소개하는 것입니다. 도움이 필요한 친구들이 참고할 수 있기를 바랍니다. 더 많은 부트스트랩 관련 튜토리얼을 배우고 얻으려면 부트스트랩 튜토리얼을 방문하세요!
플러그인 다운로드 : http://www.jq22.com/jquery-info522
플러그인 소개
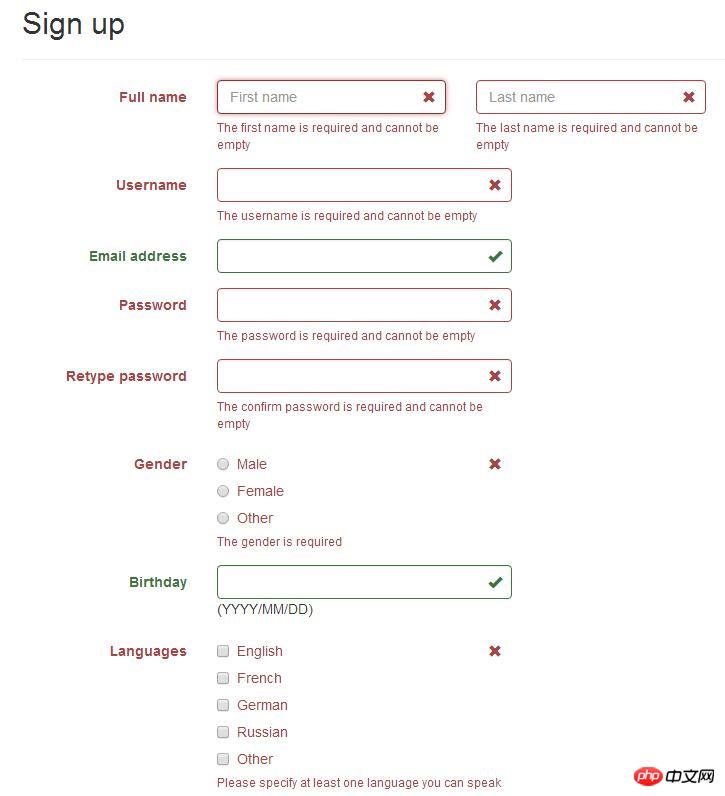
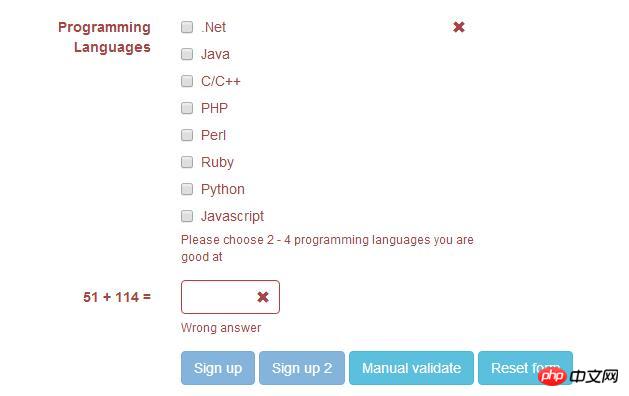
첫번째 사진 :
다운로드 주소 : https://github.com /nghuuphuoc /bootstrapvalidator
사용 방법: http://www.cnblogs.com/huangcong/p/5335376.html
사용 팁
중국 문화:
플러그인을 다운로드한 후 jsbootstrapValidator언어zh_CN.js를 소개하세요. 즉, 구현 문화
제출 전 확인 양식:
더 풍부한 양식 확인 예: http://www.jq22.com/yanshi522, 코드로 직접 이동:
1 <!DOCTYPE html>
2 <html>
3 <head>
4 <title>BootstrapValidator demo</title>
5
6 <link rel="stylesheet" href="vendor/bootstrap/css/bootstrap.css"/>
7 <link rel="stylesheet" href="dist/css/bootstrapValidator.css"/>
8
9 <!-- Include the FontAwesome CSS if you want to use feedback icons provided by FontAwesome -->
10 <!--<link rel="stylesheet" href="http://netdna.bootstrapcdn.com/font-awesome/4.0.3/css/font-awesome.css" />-->
11
12 <script type="text/javascript" src="vendor/jquery/jquery-1.10.2.min.js"></script>
13 <script type="text/javascript" src="vendor/bootstrap/js/bootstrap.min.js"></script>
14 <script type="text/javascript" src="dist/js/bootstrapValidator.js"></script>
15 </head>
16 <body>
17 <p class="container">
18 <p class="row">
19 <!-- form: -->
20 <section>
21 <p class="col-lg-8 col-lg-offset-2">
22 <p class="page-header">
23 <h2>Sign up</h2>
24 </p>
25
26 <form id="defaultForm" method="post" class="form-horizontal" action="target.php">
27 <p class="form-group">
28 <label class="col-lg-3 control-label">Full name</label>
29 <p class="col-lg-4">
30 <input type="text" class="form-control" name="firstName" placeholder="First name" />
31 </p>
32 <p class="col-lg-4">
33 <input type="text" class="form-control" name="lastName" placeholder="Last name" />
34 </p>
35 </p>
36
37 <p class="form-group">
38 <label class="col-lg-3 control-label">Username</label>
39 <p class="col-lg-5">
40 <input type="text" class="form-control" name="username" />
41 </p>
42 </p>
43
44 <p class="form-group">
45 <label class="col-lg-3 control-label">Email address</label>
46 <p class="col-lg-5">
47 <input type="text" class="form-control" name="email" />
48 </p>
49 </p>
50
51 <p class="form-group">
52 <label class="col-lg-3 control-label">Password</label>
53 <p class="col-lg-5">
54 <input type="password" class="form-control" name="password" />
55 </p>
56 </p>
57
58 <p class="form-group">
59 <label class="col-lg-3 control-label">Retype password</label>
60 <p class="col-lg-5">
61 <input type="password" class="form-control" name="confirmPassword" />
62 </p>
63 </p>
64
65 <p class="form-group">
66 <label class="col-lg-3 control-label">Gender</label>
67 <p class="col-lg-5">
68 <p class="radio">
69 <label>
70 <input type="radio" name="gender" value="male" /> Male
71 </label>
72 </p>
73 <p class="radio">
74 <label>
75 <input type="radio" name="gender" value="female" /> Female
76 </label>
77 </p>
78 <p class="radio">
79 <label>
80 <input type="radio" name="gender" value="other" /> Other
81 </label>
82 </p>
83 </p>
84 </p>
85
86 <p class="form-group">
87 <label class="col-lg-3 control-label">Birthday</label>
88 <p class="col-lg-5">
89 <input type="text" class="form-control" name="birthday" /> (YYYY/MM/DD)
90 </p>
91 </p>
92
93 <p class="form-group">
94 <label class="col-lg-3 control-label">Languages</label>
95 <p class="col-lg-5">
96 <p class="checkbox">
97 <label>
98 <input type="checkbox" name="languages[]" value="english" /> English
99 </label>
100 </p>
101 <p class="checkbox">
102 <label>
103 <input type="checkbox" name="languages[]" value="french" /> French
104 </label>
105 </p>
106 <p class="checkbox">
107 <label>
108 <input type="checkbox" name="languages[]" value="german" /> German
109 </label>
110 </p>
111 <p class="checkbox">
112 <label>
113 <input type="checkbox" name="languages[]" value="russian" /> Russian
114 </label>
115 </p>
116 <p class="checkbox">
117 <label>
118 <input type="checkbox" name="languages[]" value="other" /> Other
119 </label>
120 </p>
121 </p>
122 </p>
123
124 <p class="form-group">
125 <label class="col-lg-3 control-label">Programming Languages</label>
126 <p class="col-lg-5">
127 <p class="checkbox">
128 <label>
129 <input type="checkbox" name="programs[]" value="net" /> .Net
130 </label>
131 </p>
132 <p class="checkbox">
133 <label>
134 <input type="checkbox" name="programs[]" value="java" /> Java
135 </label>
136 </p>
137 <p class="checkbox">
138 <label>
139 <input type="checkbox" name="programs[]" value="c" /> C/C++
140 </label>
141 </p>
142 <p class="checkbox">
143 <label>
144 <input type="checkbox" name="programs[]" value="php" /> PHP
145 </label>
146 </p>
147 <p class="checkbox">
148 <label>
149 <input type="checkbox" name="programs[]" value="perl" /> Perl
150 </label>
151 </p>
152 <p class="checkbox">
153 <label>
154 <input type="checkbox" name="programs[]" value="ruby" /> Ruby
155 </label>
156 </p>
157 <p class="checkbox">
158 <label>
159 <input type="checkbox" name="programs[]" value="python" /> Python
160 </label>
161 </p>
162 <p class="checkbox">
163 <label>
164 <input type="checkbox" name="programs[]" value="javascript" /> Javascript
165 </label>
166 </p>
167 </p>
168 </p>
169
170 <p class="form-group">
171 <label class="col-lg-3 control-label" id="captchaOperation"></label>
172 <p class="col-lg-2">
173 <input type="text" class="form-control" name="captcha" />
174 </p>
175 </p>
176
177 <p class="form-group">
178 <p class="col-lg-9 col-lg-offset-3">
179 <button type="submit" class="btn btn-primary" name="signup" value="Sign up">Sign up</button>
180 <button type="submit" class="btn btn-primary" name="signup2" value="Sign up 2">Sign up 2</button>
181 <button type="button" class="btn btn-info" id="validateBtn">Manual validate</button>
182 <button type="button" class="btn btn-info" id="resetBtn">Reset form</button>
183 </p>
184 </p>
185 </form>
186 </p>
187 </section>
188 <!-- :form -->
189 </p>
190 </p>
191
192 <script type="text/javascript">
193 $(document).ready(function() {
194 // Generate a simple captcha
195 function randomNumber(min, max) {
196 return Math.floor(Math.random() * (max - min + 1) + min);
197 };
198 $('#captchaOperation').html([randomNumber(1, 100), '+', randomNumber(1, 200), '='].join(' '));
199
200 $('#defaultForm').bootstrapValidator({
201 // live: 'disabled',
202 message: 'This value is not valid',
203 feedbackIcons: {
204 valid: 'glyphicon glyphicon-ok',
205 invalid: 'glyphicon glyphicon-remove',
206 validating: 'glyphicon glyphicon-refresh'
207 },
208 fields: {
209 firstName: {
210 validators: {
211 notEmpty: {
212 message: 'The first name is required and cannot be empty'
213 }
214 }
215 },
216 lastName: {
217 validators: {
218 notEmpty: {
219 message: 'The last name is required and cannot be empty'
220 }
221 }
222 },
223 username: {
224 message: 'The username is not valid',
225 validators: {
226 notEmpty: {
227 message: 'The username is required and cannot be empty'
228 },
229 stringLength: {
230 min: 6,
231 max: 30,
232 message: 'The username must be more than 6 and less than 30 characters long'
233 },
234 regexp: {
235 regexp: /^[a-zA-Z0-9_\.]+$/,
236 message: 'The username can only consist of alphabetical, number, dot and underscore'
237 },
238 remote: {
239 url: 'remote.php',
240 message: 'The username is not available'
241 },
242 different: {
243 field: 'password',
244 message: 'The username and password cannot be the same as each other'
245 }
246 }
247 },
248 email: {
249 validators: {
250 emailAddress: {
251 message: 'The input is not a valid email address'
252 }
253 }
254 },
255 password: {
256 validators: {
257 notEmpty: {
258 message: 'The password is required and cannot be empty'
259 },
260 identical: {
261 field: 'confirmPassword',
262 message: 'The password and its confirm are not the same'
263 },
264 different: {
265 field: 'username',
266 message: 'The password cannot be the same as username'
267 }
268 }
269 },
270 confirmPassword: {
271 validators: {
272 notEmpty: {
273 message: 'The confirm password is required and cannot be empty'
274 },
275 identical: {
276 field: 'password',
277 message: 'The password and its confirm are not the same'
278 },
279 different: {
280 field: 'username',
281 message: 'The password cannot be the same as username'
282 }
283 }
284 },
285 birthday: {
286 validators: {
287 date: {
288 format: 'YYYY/MM/DD',
289 message: 'The birthday is not valid'
290 }
291 }
292 },
293 gender: {
294 validators: {
295 notEmpty: {
296 message: 'The gender is required'
297 }
298 }
299 },
300 'languages[]': {
301 validators: {
302 notEmpty: {
303 message: 'Please specify at least one language you can speak'
304 }
305 }
306 },
307 'programs[]': {
308 validators: {
309 choice: {
310 min: 2,
311 max: 4,
312 message: 'Please choose 2 - 4 programming languages you are good at'
313 }
314 }
315 },
316 captcha: {
317 validators: {
318 callback: {
319 message: 'Wrong answer',
320 callback: function(value, validator) {
321 var items = $('#captchaOperation').html().split(' '), sum = parseInt(items[0]) + parseInt(items[2]);
322 return value == sum;
323 }
324 }
325 }
326 }
327 }
328 });
329
330 // Validate the form manually
331 $('#validateBtn').click(function() {
332 $('#defaultForm').bootstrapValidator('validate');
333 });
334
335 $('#resetBtn').click(function() {
336 $('#defaultForm').data('bootstrapValidator').resetForm(true);
337 });
338 });
339 </script>
340 </body>
341 </html>라인 331을 보세요. , 제출을 클릭할 때
$('#defaultForm').bootstrapValidator('validate');
양식 유효성 검사 트리거
여기에 직면하게 되는 함정이 있습니다:
bootstrapValidator의 기본 논리는 양식 유효성 검사가 실패할 때 버튼을 회색으로 바꾸는 것입니다.
하지만 프로젝트에서는 버튼이 폼 내부에 있지 않고 이벤트 바인딩을 통해 Ajax를 통해 제출됩니다. 그러면 문제가 발생합니다.
프로젝트는 양식 확인이 실패할 때 바인딩된 후속 이벤트를 실행하지 않아야 합니다. Baidu는 오랫동안 관련 정보를 찾을 수 없었고 결국 Google에 의존해야 했습니다.
$("#yourform").submit(function(ev){ev.preventDefault();});
$("#submit").on("click", function(){

   var bootstrapValidator = $("#yourform").data('bootstrapValidator');
   bootstrapValidator.validate();
   if(bootstrapValidator.isValid())
     $("#yourform").submit();
   else return;

});Jiang Zi는 양식 확인의 통과 여부를 확인할 수 있습니다.
위 내용은 Bootstrap에서 양식 유효성 검사 플러그인 bootstrapValidator를 사용하는 방법은 무엇입니까? (코드 예)의 상세 내용입니다. 자세한 내용은 PHP 중국어 웹사이트의 기타 관련 기사를 참조하세요!

핫 AI 도구

Undresser.AI Undress
사실적인 누드 사진을 만들기 위한 AI 기반 앱

AI Clothes Remover
사진에서 옷을 제거하는 온라인 AI 도구입니다.

Undress AI Tool
무료로 이미지를 벗다

Clothoff.io
AI 옷 제거제

AI Hentai Generator
AI Hentai를 무료로 생성하십시오.

인기 기사
뜨거운 도구

메모장++7.3.1
사용하기 쉬운 무료 코드 편집기

SublimeText3 중국어 버전
중국어 버전, 사용하기 매우 쉽습니다.

스튜디오 13.0.1 보내기
강력한 PHP 통합 개발 환경

드림위버 CS6
시각적 웹 개발 도구

SublimeText3 Mac 버전
신 수준의 코드 편집 소프트웨어(SublimeText3)
뜨거운 주제
 7514
7514
 15
1378
52
79
11
53
19
19
64
15
1378
52
79
11
53
19
19
64

 부트 스트랩 검색 창을 얻는 방법
Apr 07, 2025 pm 03:33 PM
부트 스트랩 검색 창을 얻는 방법
Apr 07, 2025 pm 03:33 PM
부트 스트랩을 사용하여 검색 표시 줄의 값을 얻는 방법 : 검색 표시 줄의 ID 또는 이름을 결정하십시오. JavaScript를 사용하여 DOM 요소를 얻으십시오. 요소의 값을 가져옵니다. 필요한 작업을 수행하십시오.
 부트 스트랩의 수직 중심을 수행하는 방법
Apr 07, 2025 pm 03:21 PM
부트 스트랩의 수직 중심을 수행하는 방법
Apr 07, 2025 pm 03:21 PM
부트 스트랩을 사용하여 수직 센터링을 구현하여 : Flexbox Method : D-Flex, 정당화 컨텐츠 중심 및 정렬 중심 센터 클래스를 사용하여 Flexbox 컨테이너에 요소를 배치하십시오. Align-Items-Center 클래스 방법 : Flexbox를 지원하지 않는 브라우저의 경우 상위 요소의 높이가 정의 된 경우 Align-Items 중심 클래스를 사용하십시오.
 부트 스트랩에 분할 라인을 작성하는 방법
Apr 07, 2025 pm 03:12 PM
부트 스트랩에 분할 라인을 작성하는 방법
Apr 07, 2025 pm 03:12 PM
부트 스트랩 분할 라인을 만드는 두 가지 방법이 있습니다 : 태그를 사용하여 수평 분할 라인이 생성됩니다. CSS 테두리 속성을 사용하여 사용자 정의 스타일 분할 라인을 만듭니다.
 부트 스트랩에 사진을 삽입하는 방법
Apr 07, 2025 pm 03:30 PM
부트 스트랩에 사진을 삽입하는 방법
Apr 07, 2025 pm 03:30 PM
Bootstrap에 이미지를 삽입하는 방법에는 여러 가지가 있습니다. HTML IMG 태그를 사용하여 이미지를 직접 삽입하십시오. 부트 스트랩 이미지 구성 요소를 사용하면 반응 형 이미지와 더 많은 스타일을 제공 할 수 있습니다. 이미지 크기를 설정하고 IMG-Fluid 클래스를 사용하여 이미지를 적응할 수 있도록하십시오. IMG 통과 클래스를 사용하여 테두리를 설정하십시오. 둥근 모서리를 설정하고 IMG 라운드 클래스를 사용하십시오. 그림자를 설정하고 그림자 클래스를 사용하십시오. CSS 스타일을 사용하여 이미지를 조정하고 배치하십시오. 배경 이미지를 사용하여 배경 이미지 CSS 속성을 사용하십시오.

 부트 스트랩을위한 프레임 워크를 설정하는 방법
Apr 07, 2025 pm 03:27 PM
부트 스트랩을위한 프레임 워크를 설정하는 방법
Apr 07, 2025 pm 03:27 PM
부트 스트랩 프레임 워크를 설정하려면 다음 단계를 따라야합니다. 1. CDN을 통해 부트 스트랩 파일 참조; 2. 자신의 서버에서 파일을 다운로드하여 호스팅하십시오. 3. HTML에 부트 스트랩 파일을 포함; 4. 필요에 따라 Sass/Less를 컴파일하십시오. 5. 사용자 정의 파일을 가져옵니다 (선택 사항). 설정이 완료되면 Bootstrap의 그리드 시스템, 구성 요소 및 스타일을 사용하여 반응 형 웹 사이트 및 응용 프로그램을 만들 수 있습니다.
 Vue에서 부트 스트랩을 사용하는 방법
Apr 07, 2025 pm 11:33 PM
Vue에서 부트 스트랩을 사용하는 방법
Apr 07, 2025 pm 11:33 PM
vue.js에서 bootstrap 사용은 5 단계로 나뉩니다 : Bootstrap 설치. main.js.의 부트 스트랩 가져 오기 부트 스트랩 구성 요소를 템플릿에서 직접 사용하십시오. 선택 사항 : 사용자 정의 스타일. 선택 사항 : 플러그인을 사용하십시오.
 부트 스트랩 버튼을 사용하는 방법
Apr 07, 2025 pm 03:09 PM
부트 스트랩 버튼을 사용하는 방법
Apr 07, 2025 pm 03:09 PM
부트 스트랩 버튼을 사용하는 방법? 부트 스트랩 CSS를 소개하여 버튼 요소를 만들고 부트 스트랩 버튼 클래스를 추가하여 버튼 텍스트를 추가하십시오.
