React 첫 번째 렌더링 분석 2 (순수 DOM 요소)
이 기사에서 제공하는 내용은 React의 첫 번째 렌더링 분석 2(순수 DOM 요소)에 대한 것입니다. 필요한 친구들이 참고할 수 있기를 바랍니다.
이전 기사 에서 최상위 객체 ReactCompositeComponent[T]가 어떻게 구성되는지 소개했습니다. 다음으로, batedMountComponentIntoNode가 수행하는 작업을 살펴보겠습니다.
이 글에서 설명할 콜 스택은 다음과 같습니다:
|=ReactMount.render(nextElement, container, callback)     ___
|=ReactMount._renderSubtreeIntoContainer()                 |
  |-ReactMount._renderNewRootComponent()                   |
    |-instantiateReactComponent()                          |
    |~batchedMountComponentIntoNode()                  upper half
      |~mountComponentIntoNode()                       (平台无关)
        |-ReactReconciler.mountComponent()                 |
          |-ReactCompositeComponent.mountComponent()       |
          |-ReactCompositeComponent.performInitialMount()  |
            |-instantiateReactComponent()                 _|_
            |-ReactDOMComponent.mountComponent()       lower half
        |-_mountImageIntoNode()                      (HTML DOM 相关)
                                                          _|_
소스 코드를 살펴보면 트랜잭션 관련 코드가 많이 눈에 띕니다. 지금은 무시하세요. 이후 기사에서 설명하겠습니다. 당분간은 transaction.perform을 호출할 때 실제로는 첫 번째 매개변수에 대한 함수 호출인 것으로 이해할 수 있습니다. 일부 템플릿 코드를 건너뛴 후 실제로 작업을 수행하는 것은 mountComponentIntoNode 메서드입니다.
// 文件位置:src/renderers/dom/client/ReactMount.js

function mountComponentIntoNode(
    wrapperInstance,    // ReactCompositeComponent[T]
    container,          // document.getElementById("root")
    transaction,
    shouldReuseMarkup,
    context
) {
    ...

    var markup = ReactReconciler.mountComponent(
        wrapperInstance,
        transaction,
        null,
        ReactDOMContainerInfo(wrapperInstance, container),
        context,
        0 /* parentDebugID */
    );

    ...

    ReactMount._mountImageIntoNode(
        markup,
        container,
        wrapperInstance,
        shouldReuseMarkup,
        transaction
    );
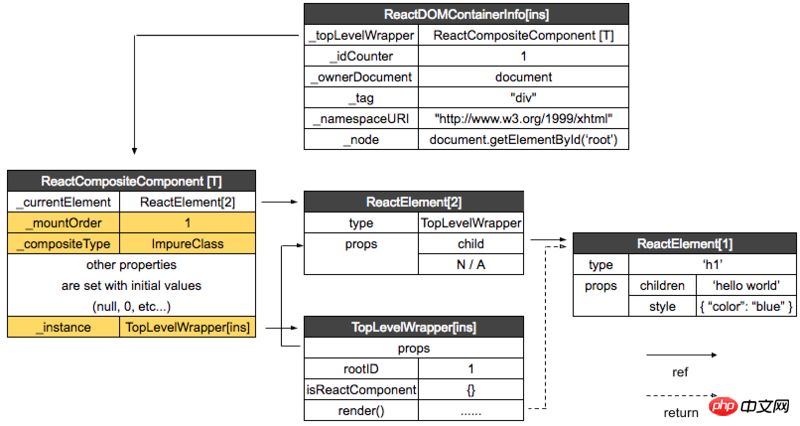
}ReactReconciler.mountComponent는 DOM 요소를 생성하는 데 사용됩니다. ReactMount._mountImageIntoNode는 새로 생성된 DOM입니다. 요소가 페이지에 첨부됩니다. ReactReconciler.mountComponent는 ReactCompositeComponent[T]의 mountComponent 메소드를 호출합니다. mountComponent 메소드를 보기 전에 ReactDOMContainerInfo에 의해 생성된 hostContainerInfo를 준비해야 합니다:
// 文件位置:src/renderers/shared/stack/reconciler/ReactContainerInfo.js

function ReactDOMContainerInfo(
    topLevelWrapper,     // ReactCompositeComponent[T]
    node                 // document.getElementById("root")
) {
    var info = {
        _topLevelWrapper: topLevelWrapper,
        _idCounter: 1,
        _ownerDocument: node ?
            node.nodeType === DOC_NODE_TYPE ? node : node.ownerDocument : null,
        _node: node,
        _tag: node ? node.nodeName.toLowerCase() : null,
        _namespaceURI: node ? node.namespaceURI : null,
    };

    ...

    return info;
}이제 인스턴스 간의 관계는 다음과 같습니다:
#🎜 🎜#
// 文件位置:src/renderers/shared/stack/reconciler/ReactCompositeComponent.js

mountComponent: function (
    transaction,
    hostParent,
    hostContainerInfo,
    context
) {
    ...

    // this._currentElement 为ReactElement[2](TopLevelWrapper)
    var publicProps = this._currentElement.props;
    var publicContext = this._processContext(context);

    // TopLevelWrapper
    var Component = this._currentElement.type;

    ...

    // Initialize the public class
    var doConstruct = shouldConstruct(Component);

    // 生成TopLevelWrapper 实例
    var inst = this._constructComponent(
        doConstruct,
        publicProps,
        publicContext,
        updateQueue
    );

    ...

    var markup;

    ...

    markup = this.performInitialMount(renderedElement,
            hostParent, hostContainerInfo, transaction, context

    ...

    return markup;
},

performInitialMount: function (renderedElement, hostParent,
    hostContainerInfo, transaction, context) {

    // TopLevelWrapper 实例
    var inst = this._instance;

    ...

    // If not a stateless component, we now render
    if (renderedElement === undefined) {
        // 返回值为 ReactElement[1]
        renderedElement = this._renderValidatedComponent();
    }

    // 返回 ReactNodeTypes.HOST
    var nodeType = ReactNodeTypes.getType(renderedElement);

    this._renderedNodeType = nodeType;

    // instantiateReactComponent.js
    var child = this._instantiateReactComponent(
        renderedElement,
        nodeType !== ReactNodeTypes.EMPTY /* shouldHaveDebugID */
    );
    this._renderedComponent = child;

    var markup = ReactReconciler.mountComponent(
        child,
        transaction,
        hostParent,
        hostContainerInfo,
        this._processChildContext(context),
        debugID
    );

    ...

    return markup;
},var child = this._instantiateReactComponent로 실행하는 경우, 이전 기사에서 언급한 instantiateReactComponent 파일이라고 합니다.
// 文件位置:src/renderers/shared/stack/reconciler/instantiateReactComponent.js

function instantiateReactComponent(node, shouldHaveDebugID) {
    var instance;

    ...

    } else if (typeof node === 'object') {
        ...

        // element.type 为 ‘h1’
        if (typeof element.type === 'string') {
            instance = ReactHostComponent.createInternalComponent(element);
        }

    return instance;
}var child = this._instantiateReactComponent时,就会调用上篇文章说到的instantiateReactComponent文件:// 文件位置:src/renderers/dom/shared/ReactDomComponent.js
function ReactDOMComponent(element) {
// h1
var tag = element.type;
validateDangerousTag(tag);
// ReactElement[1]
this._currentElement = element;
this._tag = tag.toLowerCase();
this._namespaceURI = null;
this._renderedChildren = null;
this._previousStyle = null;
this._previousStyleCopy = null;
this._hostNode = null;
this._hostParent = null;
this._rootNodeID = 0;
this._domID = 0;
this._hostContainerInfo = null;
this._wrapperState = null;
this._topLevelWrapper = null;
this._flags = 0;
}ReactDom 会在执行的时候,执行ReactDefaultInjection.inject()ReactDom은 실행 중에 ReactDefaultInjection.inject()를 실행하여 ReactDOMComponent를 주입합니다. ReactHostComponent, ReactHostComponent.createInternalComponent는 결국 ReactDOMComponent를 호출합니다:
|=ReactMount.render(nextElement, container, callback)     ___
|=ReactMount._renderSubtreeIntoContainer()                 |
  |-ReactMount._renderNewRootComponent()                   |
    |-instantiateReactComponent()                          |
    |~batchedMountComponentIntoNode()                  upper half
      |~mountComponentIntoNode()                       (平台无关)
        |-ReactReconciler.mountComponent()                 |
          |-ReactCompositeComponent.mountComponent()       |
          |-ReactCompositeComponent.performInitialMount()  |
            |-instantiateReactComponent()                 _|_
            |-ReactDOMComponent.mountComponent()       lower half
        |-_mountImageIntoNode()                 (HTML DOM 相关下一篇讲解)
                                                          _|_
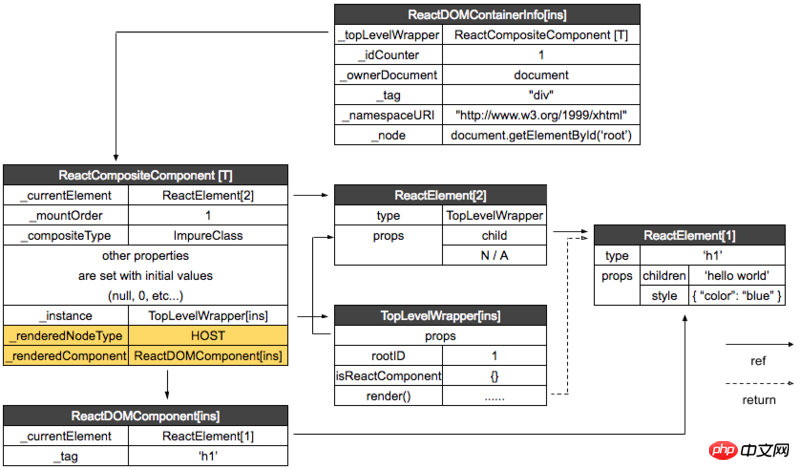
반환된 인스턴스의 이름을 ReactDOMComponent[ins]로 지정합니다.
ReactReconciler.mountComponent는 HTML DOM 관련 콘텐츠를 포함하는 ReactDomComponent의 mountComponent 메서드를 호출합니다. 이에 대해서는 다음 기사에서 설명하겠습니다.
이제 각 인스턴스 간의 관계를 살펴보겠습니다.

지금까지 호출 스택:
rrreee위 내용은 React 첫 번째 렌더링 분석 2 (순수 DOM 요소)의 상세 내용입니다. 자세한 내용은 PHP 중국어 웹사이트의 기타 관련 기사를 참조하세요!

핫 AI 도구

Undresser.AI Undress
사실적인 누드 사진을 만들기 위한 AI 기반 앱

AI Clothes Remover
사진에서 옷을 제거하는 온라인 AI 도구입니다.

Undress AI Tool
무료로 이미지를 벗다

Clothoff.io
AI 옷 제거제

AI Hentai Generator
AI Hentai를 무료로 생성하십시오.

인기 기사

뜨거운 도구

메모장++7.3.1
사용하기 쉬운 무료 코드 편집기

SublimeText3 중국어 버전
중국어 버전, 사용하기 매우 쉽습니다.

스튜디오 13.0.1 보내기
강력한 PHP 통합 개발 환경

드림위버 CS6
시각적 웹 개발 도구

SublimeText3 Mac 버전
신 수준의 코드 편집 소프트웨어(SublimeText3)

뜨거운 주제
 7510
7510
 15
15
 1378
1378
 52
52
 78
78
 11
11
 53
53
 19
19
 19
19
 64
64
 WebSocket과 JavaScript를 사용하여 온라인 음성 인식 시스템을 구현하는 방법
Dec 17, 2023 pm 02:54 PM
WebSocket 및 JavaScript를 사용하여 온라인 음성 인식 시스템을 구현하는 방법 소개: 지속적인 기술 개발로 음성 인식 기술은 인공 지능 분야의 중요한 부분이 되었습니다. WebSocket과 JavaScript를 기반으로 한 온라인 음성 인식 시스템은 낮은 대기 시간, 실시간, 크로스 플랫폼이라는 특징을 갖고 있으며 널리 사용되는 솔루션이 되었습니다. 이 기사에서는 WebSocket과 JavaScript를 사용하여 온라인 음성 인식 시스템을 구현하는 방법을 소개합니다.
 WebSocket 및 JavaScript: 실시간 모니터링 시스템 구현을 위한 핵심 기술
Dec 17, 2023 pm 05:30 PM
WebSocket과 JavaScript: 실시간 모니터링 시스템 구현을 위한 핵심 기술 서론: 인터넷 기술의 급속한 발전과 함께 실시간 모니터링 시스템이 다양한 분야에서 널리 활용되고 있다. 실시간 모니터링을 구현하는 핵심 기술 중 하나는 WebSocket과 JavaScript의 조합입니다. 이 기사에서는 실시간 모니터링 시스템에서 WebSocket 및 JavaScript의 적용을 소개하고 코드 예제를 제공하며 구현 원칙을 자세히 설명합니다. 1. 웹소켓 기술
 JavaScript 및 WebSocket을 사용하여 실시간 온라인 주문 시스템을 구현하는 방법
Dec 17, 2023 pm 12:09 PM
JavaScript 및 WebSocket을 사용하여 실시간 온라인 주문 시스템을 구현하는 방법 소개: 인터넷의 대중화와 기술의 발전으로 점점 더 많은 레스토랑에서 온라인 주문 서비스를 제공하기 시작했습니다. 실시간 온라인 주문 시스템을 구현하기 위해 JavaScript 및 WebSocket 기술을 사용할 수 있습니다. WebSocket은 TCP 프로토콜을 기반으로 하는 전이중 통신 프로토콜로 클라이언트와 서버 간의 실시간 양방향 통신을 실현할 수 있습니다. 실시간 온라인 주문 시스템에서는 사용자가 요리를 선택하고 주문을 하면
 WebSocket과 JavaScript를 사용하여 온라인 예약 시스템을 구현하는 방법
Dec 17, 2023 am 09:39 AM
WebSocket과 JavaScript를 사용하여 온라인 예약 시스템을 구현하는 방법 오늘날의 디지털 시대에는 점점 더 많은 기업과 서비스에서 온라인 예약 기능을 제공해야 합니다. 효율적인 실시간 온라인 예약 시스템을 구현하는 것이 중요합니다. 이 기사에서는 WebSocket과 JavaScript를 사용하여 온라인 예약 시스템을 구현하는 방법을 소개하고 구체적인 코드 예제를 제공합니다. 1. WebSocket이란 무엇입니까? WebSocket은 단일 TCP 연결의 전이중 방식입니다.
 JavaScript와 WebSocket: 효율적인 실시간 일기예보 시스템 구축
Dec 17, 2023 pm 05:13 PM
JavaScript 및 WebSocket: 효율적인 실시간 일기 예보 시스템 구축 소개: 오늘날 일기 예보의 정확성은 일상 생활과 의사 결정에 매우 중요합니다. 기술이 발전함에 따라 우리는 날씨 데이터를 실시간으로 획득함으로써 보다 정확하고 신뢰할 수 있는 일기예보를 제공할 수 있습니다. 이 기사에서는 JavaScript 및 WebSocket 기술을 사용하여 효율적인 실시간 일기 예보 시스템을 구축하는 방법을 알아봅니다. 이 문서에서는 특정 코드 예제를 통해 구현 프로세스를 보여줍니다. 우리
 간단한 JavaScript 튜토리얼: HTTP 상태 코드를 얻는 방법
Jan 05, 2024 pm 06:08 PM
JavaScript 튜토리얼: HTTP 상태 코드를 얻는 방법, 특정 코드 예제가 필요합니다. 서문: 웹 개발에서는 서버와의 데이터 상호 작용이 종종 포함됩니다. 서버와 통신할 때 반환된 HTTP 상태 코드를 가져와서 작업의 성공 여부를 확인하고 다양한 상태 코드에 따라 해당 처리를 수행해야 하는 경우가 많습니다. 이 기사에서는 JavaScript를 사용하여 HTTP 상태 코드를 얻는 방법과 몇 가지 실용적인 코드 예제를 제공합니다. XMLHttpRequest 사용
 자바스크립트에서 insertBefore를 사용하는 방법
Nov 24, 2023 am 11:56 AM
사용법: JavaScript에서 insertBefore() 메서드는 DOM 트리에 새 노드를 삽입하는 데 사용됩니다. 이 방법에는 삽입할 새 노드와 참조 노드(즉, 새 노드가 삽입될 노드)라는 두 가지 매개 변수가 필요합니다.
 JavaScript에서 HTTP 상태 코드를 쉽게 얻는 방법
Jan 05, 2024 pm 01:37 PM
JavaScript에서 HTTP 상태 코드를 얻는 방법 소개: 프런트 엔드 개발에서 우리는 종종 백엔드 인터페이스와의 상호 작용을 처리해야 하며 HTTP 상태 코드는 매우 중요한 부분입니다. HTTP 상태 코드를 이해하고 얻는 것은 인터페이스에서 반환된 데이터를 더 잘 처리하는 데 도움이 됩니다. 이 기사에서는 JavaScript를 사용하여 HTTP 상태 코드를 얻는 방법을 소개하고 구체적인 코드 예제를 제공합니다. 1. HTTP 상태 코드란 무엇입니까? HTTP 상태 코드는 브라우저가 서버에 요청을 시작할 때 서비스가


