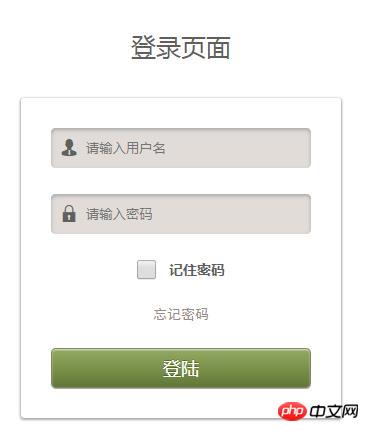
웹사이트를 탐색할 때 거의 모든 웹사이트에 등록하거나 로그인해야 한다는 사실을 알고 계셨나요? 프런트 엔드 개발자로서 HTML 로그인 페이지를 만드는 방법을 알고 계십니까? 이 기사에서는 HTML과 CSS로 구현된 멋진 로그인 페이지 코드를 공유합니다. 관심 있는 친구들은 이를 참조할 수 있습니다.
이 멋진 로그인 페이지를 만들려면 상자 그림자, 표시 속성, 테두리 반경 둥근 모서리, 호버 의사 클래스 등과 같은 CSS의 많은 속성을 사용해야 합니다. 확실하지 않은 경우 확인해 보세요. 내 이전 작업 기사를 보거나 CSS 비디오 튜토리얼을 방문하세요. 도움이 되길 바랍니다!
인스턴스 설명: 멋진 HTML 및 CSS 로그인 페이지를 만듭니다. 입력 상자에 정보를 입력하면 입력 상자의 색상이 더 밝아지고 비밀번호 기억, 비밀번호 잊어버리기, 로그인 기능도 있습니다.
HTML 부분:
<div class="wrapper">
<div class="header">登录页面</div>
<form action="" method="post">
<ul>
<li>
<div class="text">
<span class="yonghu"></span><input type="text" placeholder="请输入用户名">
</div>
</li>
<li>
<div class="password">
<span class="mima"></span><input type="password" placeholder="请输入密码">
</div>
</li>
<li class="remember">
<input type="checkbox">记住密码
</li>
<li>
<a href="">忘记密码</a>
</li>
<li>
<input type="button" value="登陆">
</li>
</ul>
</form>
</div>CSS 부분:
@font-face {
       font-family: 'iconfont';
       src: url('//at.alicdn.com/t/font_1463147324_946932.eot'); /* IE9*/
       src: url('//at.alicdn.com/t/font_1463147324_946932.eot?#iefix') format('embedded-opentype'), /* IE6-IE8 */
       url('http://at.alicdn.com/t/font_1463147324_946932.woff') format('woff'), /* chrome、firefox */
       url('http://at.alicdn.com/t/font_1463147324_946932.ttf') format('truetype'), /* chrome、firefox、opera、Safari, Android, iOS 4.2+*/
       url('//at.alicdn.com/t/font_1463147324_946932.svg#iconfont') format('svg'); /* iOS 4.1- */
   }
   *{margin: 0;padding: 0}
   li{list-style: none;}
   form a{text-decoration: none;}
   html,body {
       background: #fff;
       width: 100%;
       height: 100%;
       display: flex;
       flex-flow: column nowrap;
       justify-content: center;
   }
   .wrapper{text-align: center;}
   .header{
       font-size: 25px;
       font-family: 微软雅黑;
       color: rgb(98,94,91);
   }
   form{
       background: url(input-bg.png);
       width: 260px;
       height: 260px;
       margin: 35px auto;
       padding: 30px;
       box-shadow:0px 1px 2px 1px #aaaaaa,
       inset 0px 1px 1px rgba(255,255,255,0.7);
       border-radius: 3px;
   }
   form ul{
       width: 100%;
       height: 100%;
       text-align: left;
       display: flex;
       flex-flow: column nowrap;
       justify-content: space-between;
   }
   ul li div{
       width: 260px;
       height: 40px;
       background: #e1dcd8;
       color: rgb(98,94,91);
       box-shadow: inset 0px 2px 5px #aaaaaa;
       border-radius: 5px;
       position: relative;
   }
   ul li .yonghu{
       font-family: iconfont;
       position: absolute;
       top: 12px;
       left: 10px;
   }
   ul li .mima{
       font-family: iconfont;
       position: absolute;
       top: 12px;
       left: 10px;
   }
   ul li div input{
       height: 40px;
       width: 190px;
       padding: 0 35px;
       border: none;
       background: #e1dcd8;
       color: rgb(98,94,91);
       box-shadow:
               0px 1px 1px rgba(255,255,255,0.7),
               inset 0px 2px 5px #aaaaaa;
       border-radius: 5px;
   }
   ul li input:focus{
       outline: none;
       background: #f5f2ef;
   }
   ul .remember{
       font-size: 14px;
       font-family: 微软雅黑;
       font-weight: bold;
       color: rgb(98,94,91);
       position: relative;
       display: flex;
       justify-content: center;
   }
   ul .remember input[type*="checkbox"]{
       width: 20px;
       height: 20px;
       vertical-align: super;
       margin-right: 12px;
   }
   .remember label {
       cursor: pointer;
       position: absolute;
       width: 22px;
       height: 22px;
       top: 7px;
       left: 0;
       background: #eee;
       border:1px solid #cccccc;
       border-radius: 4px;

   }
   /*Display the tick inside the checkbox*/
   .remember label:after {
       opacity: 0.4;
       content: '';
       position: absolute;
       width: 12px;
       height: 5px;
       background: transparent;
       top: 6px;
       left: 4px;
       border: 3px solid #74884a;
       border-top: none;
       border-right: none;

       -webkit-transform: rotate(-45deg);
       -moz-transform: rotate(-45deg);
       -o-transform: rotate(-45deg);
       -ms-transform: rotate(-45deg);
       transform: rotate(-45deg);
   }
   /*Create the hover event of the tick*/
   .remember label:hover::after {
       opacity: 0.7;
   }
   /*Create the checkbox state for the tick*/
   .remember input[type=checkbox]:checked + label:after {
       opacity: 1;
       border-color: #74884a;
   }
   ul li a{
       font-size: 14px;
       font-family: 黑体;
       color: rgb(152,142,135);
       display: flex;
       justify-content: center;
   }
   ul li input[type*="button"]{
       width: 100%;
       height: 40px;
       font-family: Arial, Helvetica, sans-serif;
       font-size: 18px;
       color: #ffffff;
       background: -moz-linear-gradient(
               top,
               #94aa64 0%,
               #7a924a 50%,
               #607738);
       background: -webkit-gradient(
               linear, left top, left bottom,
               from(#94aa64),
               color-stop(0.50, #7a924a),
               to(#607738));
       -moz-border-radius: 5px;
       -webkit-border-radius: 5px;
       border-radius: 5px;
       border: 1px solid #7d8862;
       -moz-box-shadow:
               0px 1px 0px rgba(170,170,170,1),
               inset 0px 1px 1px rgba(255,255,255,0.7);
       -webkit-box-shadow:
               0px 1px 0px rgba(170,170,170,1),
               inset 0px 1px 1px rgba(255,255,255,0.7);
       box-shadow:
               0px 1px 0px rgba(170,170,170,1),
               inset 0px 1px 1px rgba(255,255,255,0.7);
       text-shadow:
               0px -1px 0px rgba(000,000,000,0.3),
               0px 0px 0px rgba(255,255,255,0);
   }
   ul li input[type*="button"]:hover{
       opacity: 0.8;
   }
   ul li input[type*="button"]:active{
       width: 100%;
       height: 40px;
       font-family: Arial, Helvetica, sans-serif;
       font-size: 18px;
       color: #ffffff;
       background: -moz-linear-gradient(
               top,
               #607738 0%,
               #7a924a 50%,
               #94aa64 );
       background: -webkit-gradient(
               linear, left top, left bottom,
               from(#607738),
               color-stop(0.50, #7a924a),
               to(#94aa64));
       -moz-border-radius: 5px;
       -webkit-border-radius: 5px;
       border-radius: 5px;
       border: 1px solid #7d8862;
       -moz-box-shadow:
               0px -1px 0px rgba(170,170,170,1),
               inset 0px -1px 1px rgba(255,255,255,0.7);
       -webkit-box-shadow:
               0px -1px 0px rgba(170,170,170,1),
               inset 0px -1px 1px rgba(255,255,255,0.7);
       box-shadow:
               0px -1px 0px rgba(170,170,170,1),
               inset 0px -1px 1px rgba(255,255,255,0.7);
       text-shadow:
               0px 1px 0px rgba(000,000,000,0.3),
               0px 0px 0px rgba(255,255,255,0);
}효과는 그림과 같습니다.

위에서는 HTML과 CSS로 구현된 멋진 로그인 페이지 코드를 공유했습니다. 초보자에게는 어려울 수 있지만, 이 예제는 HTML 및 CSS 지식을 포괄적으로 적용한 것이므로 탄탄한 기초를 다지는 것이 좋습니다. 이 튜토리얼이 도움이 되기를 바랍니다.
【관련 추천 튜토리얼】
위 내용은 HTML과 CSS로 구현된 멋진 로그인 페이지 코드를 공유하세요의 상세 내용입니다. 자세한 내용은 PHP 중국어 웹사이트의 기타 관련 기사를 참조하세요!


