본 글은 Spring Boot 캐시 소스코드에 대한 이해에 관한 내용으로, 참고가 필요한 친구들이 참고하시면 좋을 것 같습니다.
프로젝트에 애플리케이션 캐시를 추가하고 싶습니다. 처음에는 ehcache와 springboot를 통합하는 방법을 생각했고, 결국 이 구성과 저 구성을 구성할 준비가 되었습니다.
pom. dependency
ehcache 구성 파일을 작성하세요.
부팅 애플리케이션에 @EnableCaching 주석을 추가하세요.
마법같지 않나요?
pom은
<dependency>
            <groupid>net.sf.ehcache</groupid>
            <artifactid>ehcache</artifactid>
            <version>2.10.5</version>
</dependency>
구성 파일
<?xml  version="1.0" encoding="UTF-8"?>
<ehcache>
    <!-- 设定缓存的默认数据过期策略 -->
    <defaultcache></defaultcache>
</ehcache>
EnableCaching 주석
@SpringBootApplication
@EnableCaching
public class EhCacheApplication {

    public static void main(String[] args) {
        SpringApplication.run(EhCacheApplication.class, args);
    }
}을 애플리케이션에 추가하면 다음과 같이 코드에서 캐시 주석을 사용할 수 있습니다.
@CachePut(value = "fish-ehcache", key = "#person.id")
    public Person save(Person person) {
        System.out.println("为id、key为:" + person.getId() + "数据做了缓存");
        return person;
    }

    @CacheEvict(value = "fish-ehcache")
    public void remove(Long id) {
        System.out.println("删除了id、key为" + id + "的数据缓存");
    }


    @Cacheable(value = "fish-ehcache", key = "#person.id")
    public Person findOne(Person person) {
        findCount.incrementAndGet();
        System.out.println("为id、key为:" + person.getId() + "数据做了缓存");
        return person;
}정말 편리하죠? 다음으로 좀 더 깊이 파고들어 Spring이 어떻게 작동하는지 살펴보겠습니다. 주로 두 부분으로 나뉘는데, 하나는 시작할 때 수행되는 작업, 두 번째는 실행 시 수행되는 작업, 세 번째는 타사 캐시 구성 요소를 사용한 적응입니다.
시작할 때 수행되는 작업,
이것은 @에 따라 다름 EnableCaching 태그부터 캐싱 기능을 사용할 때 @EnableCaching 주석을 Springboot 애플리케이션 시작 클래스에 추가해야 합니다. 이 태그는
@Target({ElementType.TYPE})
@Retention(RetentionPolicy.RUNTIME)
@Documented
@Import({CachingConfigurationSelector.class})
public @interface EnableCaching {
    boolean proxyTargetClass() default false;
    AdviceMode mode() default AdviceMode.PROXY;
    int order() default 2147483647;
}를 소개하고 캐싱 구성을 활성화하는 CachingConfigurationSelector 클래스를 소개합니다. 기능. 이 클래스는 AutoProxyRegistrar.java 및 ProxyCachingConfiguration.java라는 두 가지 클래스를 추가합니다.
AutoProxyRegistrar: ImportBeanDefinitionRegistrar 인터페이스를 구현합니다. 이해가 안 돼요. 계속 배워야 해요.
ProxyCachingConfiguration: BeanFactoryCacheOperationSourceAdvisor, CacheOperationSource 및 CacheInterceptor의 세 가지 Bean을 생성하는 구성 클래스입니다.
CacheOperationSource는 캐시 메서드 서명 주석의 구문 분석 작업을 캡슐화하고 CacheOperations 컬렉션을 형성합니다. CacheInterceptor는 이 컬렉션 필터를 사용하여 캐시 처리를 수행합니다. 캐시 주석을 파싱하는 클래스는 SpringCacheAnnotationParser이며, 주요 메소드는 다음과 같습니다
/**
由CacheOperationSourcePointcut作为注解切面,会解析
SpringCacheAnnotationParser.java
扫描方法签名,解析被缓存注解修饰的方法,将生成一个CacheOperation的子类并将其保存到一个数组中去
**/
protected Collection<cacheoperation> parseCacheAnnotations(SpringCacheAnnotationParser.DefaultCacheConfig cachingConfig, AnnotatedElement ae) {
        Collection<cacheoperation> ops = null;
        //找@cacheable注解方法
        Collection<cacheable> cacheables = AnnotatedElementUtils.getAllMergedAnnotations(ae, Cacheable.class);
        if (!cacheables.isEmpty()) {
            ops = this.lazyInit(ops);
            Iterator var5 = cacheables.iterator();

            while(var5.hasNext()) {
                Cacheable cacheable = (Cacheable)var5.next();
                ops.add(this.parseCacheableAnnotation(ae, cachingConfig, cacheable));
            }
        }
        //找@cacheEvict注解的方法
        Collection<cacheevict> evicts = AnnotatedElementUtils.getAllMergedAnnotations(ae, CacheEvict.class);
        if (!evicts.isEmpty()) {
            ops = this.lazyInit(ops);
            Iterator var12 = evicts.iterator();

            while(var12.hasNext()) {
                CacheEvict evict = (CacheEvict)var12.next();
                ops.add(this.parseEvictAnnotation(ae, cachingConfig, evict));
            }
        }
        //找@cachePut注解的方法
        Collection<cacheput> puts = AnnotatedElementUtils.getAllMergedAnnotations(ae, CachePut.class);
        if (!puts.isEmpty()) {
            ops = this.lazyInit(ops);
            Iterator var14 = puts.iterator();

            while(var14.hasNext()) {
                CachePut put = (CachePut)var14.next();
                ops.add(this.parsePutAnnotation(ae, cachingConfig, put));
            }
        }
        Collection<caching> cachings = AnnotatedElementUtils.getAllMergedAnnotations(ae, Caching.class);
        if (!cachings.isEmpty()) {
            ops = this.lazyInit(ops);
            Iterator var16 = cachings.iterator();

            while(var16.hasNext()) {
                Caching caching = (Caching)var16.next();
                Collection<cacheoperation> cachingOps = this.parseCachingAnnotation(ae, cachingConfig, caching);
                if (cachingOps != null) {
                    ops.addAll(cachingOps);
                }
            }
        }
        return ops;
}</cacheoperation></caching></cacheput></cacheevict></cacheable></cacheoperation></cacheoperation>Parsing하면 Cachable, Caching, CachePut, CachEevict 4가지 주석 메소드가 모두 Collection
메서드 실행 시 수행되는 작업
실행 시 CacheInterceptor 클래스가 주로 사용됩니다.
public class CacheInterceptor extends CacheAspectSupport implements MethodInterceptor, Serializable {
    public CacheInterceptor() {
    }

    public Object invoke(final MethodInvocation invocation) throws Throwable {
        Method method = invocation.getMethod();
        CacheOperationInvoker aopAllianceInvoker = new CacheOperationInvoker() {
            public Object invoke() {
                try {
                    return invocation.proceed();
                } catch (Throwable var2) {
                    throw new ThrowableWrapper(var2);
                }
            }
        };

        try {
            return this.execute(aopAllianceInvoker, invocation.getThis(), method, invocation.getArguments());
        } catch (ThrowableWrapper var5) {
            throw var5.getOriginal();
        }
    }
}이 인터셉터는 CacheAspectSupport 클래스와 MethodInterceptor 인터페이스를 상속합니다. 그 중 CacheAspectSupport는 주요 로직을 캡슐화합니다. 예를 들어, 다음 단락입니다.
/**
CacheAspectSupport.java
执行@CachaEvict @CachePut @Cacheable的主要逻辑代码
**/

private Object execute(final CacheOperationInvoker invoker, Method method, CacheAspectSupport.CacheOperationContexts contexts) {
        if (contexts.isSynchronized()) {
            CacheAspectSupport.CacheOperationContext context = (CacheAspectSupport.CacheOperationContext)contexts.get(CacheableOperation.class).iterator().next();
            if (this.isConditionPassing(context, CacheOperationExpressionEvaluator.NO_RESULT)) {
                Object key = this.generateKey(context, CacheOperationExpressionEvaluator.NO_RESULT);
                Cache cache = (Cache)context.getCaches().iterator().next();

                try {
                    return this.wrapCacheValue(method, cache.get(key, new Callable<object>() {
                        public Object call() throws Exception {
                            return CacheAspectSupport.this.unwrapReturnValue(CacheAspectSupport.this.invokeOperation(invoker));
                        }
                    }));
                } catch (ValueRetrievalException var10) {
                    throw (ThrowableWrapper)var10.getCause();
                }
            } else {
                return this.invokeOperation(invoker);
            }
        } else {
            /**
            执行@CacheEvict的逻辑,这里是当beforeInvocation为true时清缓存
            **/
            this.processCacheEvicts(contexts.get(CacheEvictOperation.class), true, CacheOperationExpressionEvaluator.NO_RESULT);
            //获取命中的缓存对象
            ValueWrapper cacheHit = this.findCachedItem(contexts.get(CacheableOperation.class));
            List<cacheaspectsupport.cacheputrequest> cachePutRequests = new LinkedList();
            if (cacheHit == null) {
                //如果没有命中,则生成一个put的请求
                this.collectPutRequests(contexts.get(CacheableOperation.class), CacheOperationExpressionEvaluator.NO_RESULT, cachePutRequests);
            }


            Object cacheValue;
            Object returnValue;
            /**
                如果没有获得缓存对象,则调用业务方法获得返回对象,hasCachePut会检查exclude的情况
            **/
            if (cacheHit != null && cachePutRequests.isEmpty() && !this.hasCachePut(contexts)) {
                cacheValue = cacheHit.get();
                returnValue = this.wrapCacheValue(method, cacheValue);
            } else {

                returnValue = this.invokeOperation(invoker);
                cacheValue = this.unwrapReturnValue(returnValue);
            }

            this.collectPutRequests(contexts.get(CachePutOperation.class), cacheValue, cachePutRequests);
            Iterator var8 = cachePutRequests.iterator();

            while(var8.hasNext()) {
                CacheAspectSupport.CachePutRequest cachePutRequest = (CacheAspectSupport.CachePutRequest)var8.next();
                /**
                执行cachePut请求,将返回对象放到缓存中
                **/
                cachePutRequest.apply(cacheValue);
            }
            /**
            执行@CacheEvict的逻辑,这里是当beforeInvocation为false时清缓存
            **/
            this.processCacheEvicts(contexts.get(CacheEvictOperation.class), false, cacheValue);
            return returnValue;
        }
}</cacheaspectsupport.cacheputrequest></object>위의 코드 조각은 비교적 핵심이며 모두 캐시 내용입니다. aop의 소스 코드에 대해서는 여기서 자세히 다루지 않습니다. 기본 클래스와 인터페이스는 org.springframework.cache 패키지의 스프링 컨텍스트에 있습니다.
타사 캐시 구성 요소에 대한 적응
위의 분석을 통해 우리는 스프링 캐시 기능의 모든 것을 알고 있습니다. 아래에서 분석해야 할 것은 왜 우리가 Maven과 Spring Boot에 대한 종속성을 선언하면 되는지입니다. .
위 실행 방법에서 CachePutRequest가 CacheAspectSupport의 내부 클래스인 cachePutRequest.apply(cacheValue)를 보았습니다.
private class CachePutRequest {
        private final CacheAspectSupport.CacheOperationContext context;
        private final Object key;
        public CachePutRequest(CacheAspectSupport.CacheOperationContext context, Object key) {
            this.context = context;
            this.key = key;
        }
        public void apply(Object result) {
            if (this.context.canPutToCache(result)) {
                //从context中获取cache实例,然后执行放入缓存的操作
                Iterator var2 = this.context.getCaches().iterator();
                while(var2.hasNext()) {
                    Cache cache = (Cache)var2.next();
                    CacheAspectSupport.this.doPut(cache, this.key, result);
                }
            }
        }
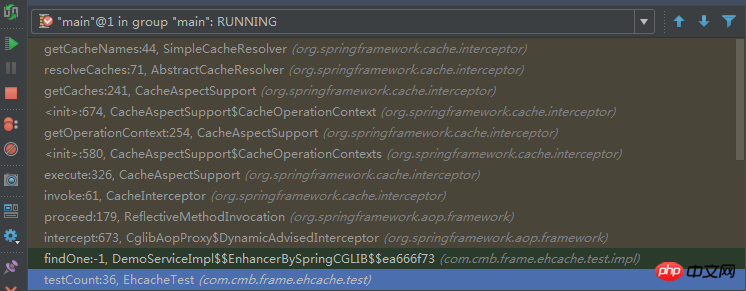
}Cache는 표준 인터페이스이며, 그 중 EhCacheCache는 EhCache의 구현 클래스입니다. 이것이 SpringBoot와 Ehcache 간의 연결인데, 컨텍스트의 캐시 목록은 언제 생성되나요? 그 답은 CacheAspectSupport
protected Collection extends Cache> getCaches(CacheOperationInvocationContext<cacheoperation> context, CacheResolver cacheResolver) {
        Collection extends Cache> caches = cacheResolver.resolveCaches(context);
        if (caches.isEmpty()) {
            throw new IllegalStateException("No cache could be resolved for '" + context.getOperation() + "' using resolver '" + cacheResolver + "'. At least one cache should be provided per cache operation.");
        } else {
            return caches;
        }
}</cacheoperation>의 getCaches 메소드이며, 캐시 작업이 수행될 때마다 캐시 획득이 실행됩니다. 콜스택을 보시면 됩니다

주제에서 조금 벗어난 것 같으니 다시 가져오세요... spring-boot-autoconfigure 패키지에는 자동 어셈블리 관련 클래스가 모두 있습니다. 여기에는 아래와 같이 EhcacheCacheConfiguration 클래스가 있습니다.
@Configuration
@ConditionalOnClass({Cache.class, EhCacheCacheManager.class})
@ConditionalOnMissingBean({CacheManager.class})
@Conditional({CacheCondition.class, EhCacheCacheConfiguration.ConfigAvailableCondition.class})
class EhCacheCacheConfiguration {
 ......
 static class ConfigAvailableCondition extends ResourceCondition {
        ConfigAvailableCondition() {
            super("EhCache", "spring.cache.ehcache", "config", new String[]{"classpath:/ehcache.xml"});
        }
    }
}이것은 클래스 경로에 ehcache.xml 파일이 있는지 직접 확인합니다
위 내용은 Spring Boot 캐시 소스 코드 이해의 상세 내용입니다. 자세한 내용은 PHP 중국어 웹사이트의 기타 관련 기사를 참조하세요!