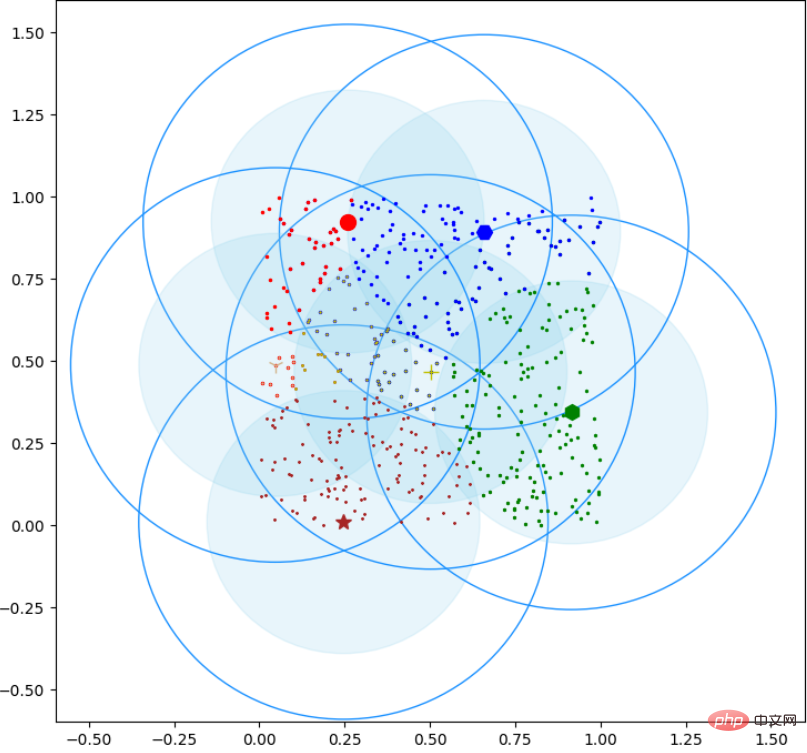
캐노피 알고리즘은 Andrew McCallum, Kamal Nigam 및 Lyle Ungar가 2000년에 제안했습니다. k-평균 클러스터링 알고리즘과 계층적 클러스터링 알고리즘의 전처리입니다. 우리 모두 알고 있듯이 kmeans의 단점 중 하나는 k 값을 수동으로 조정해야 한다는 점입니다. k 값은 나중에 Elbow Method와 Silhouette Coefficient를 통해 최종적으로 결정할 수 있지만 이러한 방법은 "사후"로 판단됩니다. , Canopy 알고리즘의 역할은 사전에 대략적인 군집화를 통해 k-평균 알고리즘에 대한 초기 군집 중심 수와 군집 중심점을 결정하는 것입니다.

사용된 패키지:
import math
import random
import numpy as np
from datetime import datetime
from pprint import pprint as p
import matplotlib.pyplot as plt
1. 먼저 알고리즘에 2차원 데이터 세트(나중에 2차원 평면에 그리기 및 표현을 용이하게 하기 위해)를 미리 설정합니다.
물론 고차원 데이터도 사용할 수 있고, 나중에 캐노피 코어 알고리즘을 클래스에 썼는데, 직접 호출을 통해 모든 차원의 데이터를 처리할 수 있습니다. 물론 소규모 배치에만 해당됩니다. 대량의 데이터를 Mahout 및 Hadoop으로 이동할 수 있습니다.
# 随机生成500个二维[0,1)平面点
dataset = np.random.rand(500, 2)
관련 권장 사항: "Python Video Tutorial"
2. 그런 다음 두 개의 범주를 생성합니다. 클래스의 속성은 다음과 같습니다.
class Canopy:
    def __init__(self, dataset):
        self.dataset = dataset
        self.t1 = 0
self.t2 = 0t1 및 의 초기 값 설정을 추가합니다. t2와 크기 판단 기능
   # 设置初始阈值
def setThreshold(self, t1, t2):
    if t1 > t2:
        self.t1 = t1
        self.t2 = t2
    else:
print('t1 needs to be larger than t2!')3 .거리 계산, 각 중심점 사이의 거리 계산 방법은 유클리드 거리입니다.
#使用欧式距离进行距离的计算
def euclideanDistance(self, vec1, vec2):
return math.sqrt(((vec1 - vec2)**2).sum())4. 그런 다음 데이터세트의 길이에 따라 데이터세트에서 첨자를 무작위로 선택하는 함수를 작성하세요.
# 根据当前dataset的长度随机选择一个下标
def getRandIndex(self):
return random.randint(0, len(self.dataset) - 1)5. 핵심 알고리즘
def clustering(self):
        if self.t1 == 0:
            print('Please set the threshold.')
        else:
            canopies = []  # 用于存放最终归类结果
            while len(self.dataset) != 0:
                rand_index = self.getRandIndex()
                current_center = self.dataset[rand_index]  # 随机获取一个中心点,定为P点
                current_center_list = []  # 初始化P点的canopy类容器
                delete_list = []  # 初始化P点的删除容器
                self.dataset = np.delete(
                     self.dataset, rand_index, 0)  # 删除随机选择的中心点P
                for datum_j in range(len(self.dataset)):
                    datum = self.dataset[datum_j]
                    distance = self.euclideanDistance(
                        current_center, datum)  # 计算选取的中心点P到每个点之间的距离
                    if distance < self.t1:
                        # 若距离小于t1,则将点归入P点的canopy类
                        current_center_list.append(datum)
                    if distance < self.t2:
                        delete_list.append(datum_j)  # 若小于t2则归入删除容器
                # 根据删除容器的下标,将元素从数据集中删除
                self.dataset = np.delete(self.dataset, delete_list, 0)
                canopies.append((current_center, current_center_list))
return canopies후속 데이터 시각화를 용이하게 하기 위해 내가 정의하는 캐노피 여기에 배열이 있습니다. 물론 dict를 사용할 수도 있습니다.
6.main() 함수
def main():
    t1 = 0.6
    t2 = 0.4
    gc = Canopy(dataset)
    gc.setThreshold(t1, t2)
    canopies = gc.clustering()
    print('Get %s initial centers.' % len(canopies))
#showCanopy(canopies, dataset, t1, t2)Canopy 클러스터링 시각화 코드
def showCanopy(canopies, dataset, t1, t2):
fig = plt.figure()
sc = fig.add_subplot(111)
colors = ['brown', 'green', 'blue', 'y', 'r', 'tan', 'dodgerblue', 'deeppink', 'orangered', 'peru', 'blue', 'y', 'r', 'gold', 'dimgray', 'darkorange', 'peru', 'blue', 'y', 'r', 'cyan', 'tan', 'orchid', 'peru', 'blue', 'y', 'r', 'sienna']
markers = ['*', 'h', 'H', '+', 'o', '1', '2', '3', ',', 'v', 'H', '+', '1', '2', '^', '<', '>', '.', '4', 'H', '+', '1', '2', 's', 'p', 'x', 'D', 'd', '|', '_'] for i in range(len(canopies)):
canopy = canopies[i]
center = canopy[0]
components = canopy[1]
sc.plot(center[0], center[1], marker=markers[i],
color=colors[i], markersize=10)
t1_circle = plt.Circle(
xy=(center[0], center[1]), radius=t1, color='dodgerblue', fill=False)
t2_circle = plt.Circle(
xy=(center[0], center[1]), radius=t2, color='skyblue', alpha=0.2)
sc.add_artist(t1_circle)
sc.add_artist(t2_circle) for component in components:
sc.plot(component[0], component[1],
marker=markers[i], color=colors[i], markersize=1.5)
maxvalue = np.amax(dataset)
minvalue = np.amin(dataset)
plt.xlim(minvalue - t1, maxvalue + t1)
plt.ylim(minvalue - t1, maxvalue + t1)
plt.show()렌더링은 다음과 같습니다.

위 내용은 Python에서 캐노피 클러스터링을 구현하는 방법의 상세 내용입니다. 자세한 내용은 PHP 중국어 웹사이트의 기타 관련 기사를 참조하세요!