리눅스 데스크탑에 원격으로 연결하는 방법

Linux 데스크톱에 원격으로 연결하는 방법:
1 Linux가 데스크톱 인터페이스가 있는 버전인지 확인하세요
#. 🎜🎜#2, xrdp를 설치하면 EPEL 웨어하우스에서 xrdp를 사용할 수 있으므로 EPEL 웨어하우스를 구성하십시오. sudo rpm -Uvh https://dl.fedoraproject.org/pub/epel/epel-release-latest-7.noarch .rpm# 🎜🎜#3. 플러그인을 설치합니다: sudo -y yum install xrdp, 결과는 다음과 같습니다:
[hadoop@master ~]$ sudo yum -y install xrdp Loaded plugins: fastestmirror, langpacks Loading mirror speeds from cached hostfile epel/x86_64/metalink | 8.5 kB 00:00:00 * base: mirrors.163.com * epel: ftp.cuhk.edu.hk * extras: mirrors.163.com * updates: ftp.sjtu.edu.cn epel | 4.7 kB 00:00:00 http://ftp.cuhk.edu.hk/pub/linux/fedora-epel/7/x86_64/repodata/repomd.xml: [Errno -1] repomd.xml does not match metalink for epel Trying other mirror. epel | 3.2 kB 00:00:00 (1/3): epel/x86_64/group_gz | 88 kB 00:00:00 (2/3): epel/x86_64/updateinfo | 943 kB 00:00:15 (3/3): epel/x86_64/primary | 3.6 MB 00:01:37 epel 12687/12687 Resolving Dependencies --> Running transaction check ---> Package xrdp.x86_64 1:0.9.7-1.el7 will be installed --> Processing Dependency: xorgxrdp for package: 1:xrdp-0.9.7-1.el7.x86_64 --> Running transaction check ---> Package xorgxrdp.x86_64 0:0.2.7-1.el7 will be installed --> Finished Dependency Resolution Dependencies Resolved ============================================================================================================================================================================================== Package Arch Version Repository Size ============================================================================================================================================================================================== Installing: xrdp x86_64 1:0.9.7-1.el7 epel 416 k Installing for dependencies: xorgxrdp x86_64 0.2.7-1.el7 epel 62 k Transaction Summary ============================================================================================================================================================================================== Install 1 Package (+1 Dependent package) Total download size: 478 k Installed size: 2.2 M Downloading packages: warning: /var/cache/yum/x86_64/7/epel/packages/xorgxrdp-0.2.7-1.el7.x86_64.rpm: Header V3 RSA/SHA256 Signature, key ID 352c64e5: NOKEY ] 0.0 B/s | 0 B --:--:-- ETA Public key for xorgxrdp-0.2.7-1.el7.x86_64.rpm is not installed (1/2): xorgxrdp-0.2.7-1.el7.x86_64.rpm | 62 kB 00:00:01 (2/2): xrdp-0.9.7-1.el7.x86_64.rpm | 416 kB 00:00:07 ---------------------------------------------------------------------------------------------------------------------------------------------------------------------------------------------- Total 62 kB/s | 478 kB 00:00:07 Retrieving key from file:///etc/pki/rpm-gpg/RPM-GPG-KEY-EPEL-7 Importing GPG key 0x352C64E5: Userid : "Fedora EPEL (7) <epel@fedoraproject.org>" Fingerprint: 91e9 7d7c 4a5e 96f1 7f3e 888f 6a2f aea2 352c 64e5 Package : epel-release-7-11.noarch (installed) From : /etc/pki/rpm-gpg/RPM-GPG-KEY-EPEL-7 Running transaction check Running transaction test Transaction test succeeded Running transaction Warning: RPMDB altered outside of yum. ** Found 11 pre-existing rpmdb problem(s), 'yum check' output follows: icedtea-web-1.7.1-1.el7.x86_64 has missing requires of java-1.8.0-openjdk icedtea-web-1.7.1-1.el7.x86_64 has missing requires of jpackage-utils icedtea-web-1.7.1-1.el7.x86_64 has missing requires of jpackage-utils jline-1.0-8.el7.noarch has missing requires of java >= ('0', '1.5', None) jline-1.0-8.el7.noarch has missing requires of jpackage-utils 1:libreoffice-core-5.3.6.1-10.el7.x86_64 has missing requires of java-headless >= ('1', '1.6', None) 1:libreoffice-ure-5.3.6.1-10.el7.x86_64 has missing requires of libjvm.so()(64bit) rhino-1.7R5-1.el7.noarch has missing requires of jpackage-utils rhino-1.7R5-1.el7.noarch has missing requires of jpackage-utils tagsoup-1.2.1-8.el7.noarch has missing requires of jpackage-utils tagsoup-1.2.1-8.el7.noarch has missing requires of jpackage-utils >= ('0', '1.6', None) Installing : xorgxrdp-0.2.7-1.el7.x86_64 1/2 Installing : 1:xrdp-0.9.7-1.el7.x86_64 2/2 Verifying : xorgxrdp-0.2.7-1.el7.x86_64 1/2 Verifying : 1:xrdp-0.9.7-1.el7.x86_64 2/2 Installed: xrdp.x86_64 1:0.9.7-1.el7 Dependency Installed: xorgxrdp.x86_64 0:0.2.7-1.el7 Complete!
4. -y install Tigervnc-server
5. 서비스 시작: /bin/systemctl start xrdp.service
[hadoop@master ~]$ /bin/systemctl start xrdp.service
==== AUTHENTICATING FOR org.freedesktop.systemd1.manage-units ===
Authentication is required to manage system services or units.
Authenticating as: root
Password:
==== AUTHENTICATION COMPLETE ===
[hadoop@master ~]$
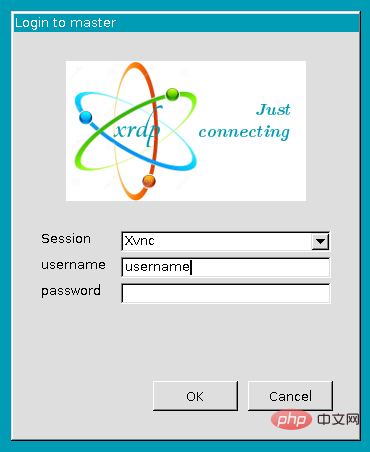
Linux 그래픽 데스크탑에 대한 Windows 원격 연결:
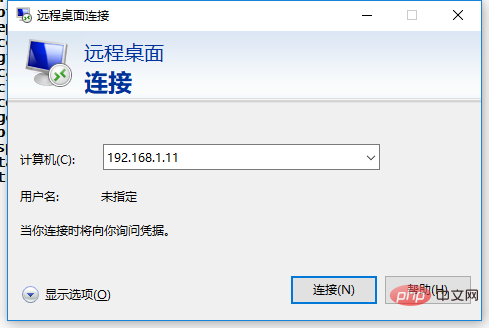
1. 원격 데스크톱 도구를 엽니다.
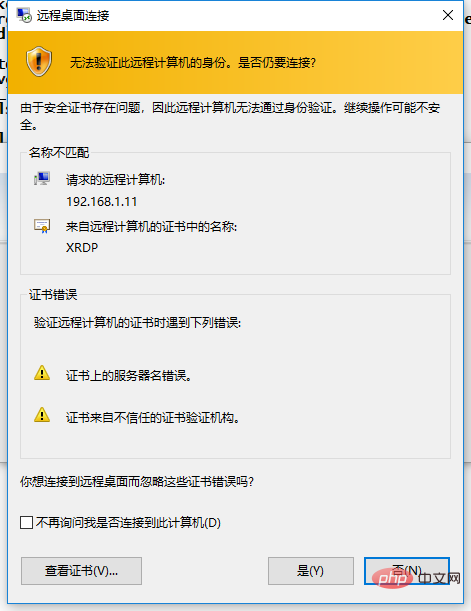
#🎜🎜 #2. 경고 메시지를 읽은 후 "예"를 클릭합니다. 🎜#

리눅스 튜토리얼
위 내용은 리눅스 데스크탑에 원격으로 연결하는 방법의 상세 내용입니다. 자세한 내용은 PHP 중국어 웹사이트의 기타 관련 기사를 참조하세요!

핫 AI 도구

Undresser.AI Undress
사실적인 누드 사진을 만들기 위한 AI 기반 앱

AI Clothes Remover
사진에서 옷을 제거하는 온라인 AI 도구입니다.

Undress AI Tool
무료로 이미지를 벗다

Clothoff.io
AI 옷 제거제

AI Hentai Generator
AI Hentai를 무료로 생성하십시오.

인기 기사

뜨거운 도구

메모장++7.3.1
사용하기 쉬운 무료 코드 편집기

SublimeText3 중국어 버전
중국어 버전, 사용하기 매우 쉽습니다.

스튜디오 13.0.1 보내기
강력한 PHP 통합 개발 환경

드림위버 CS6
시각적 웹 개발 도구

SublimeText3 Mac 버전
신 수준의 코드 편집 소프트웨어(SublimeText3)

뜨거운 주제
 7546
7546
 15
15
 1381
1381
 52
52
 83
83
 11
11
 57
57
 19
19
 21
21
 89
89
 Centos와 Ubuntu의 차이
Apr 14, 2025 pm 09:09 PM
Centos와 Ubuntu의 주요 차이점은 다음과 같습니다. Origin (Centos는 Red Hat, Enterprise의 경우, Ubuntu는 Debian에서 시작하여 개인의 경우), 패키지 관리 (Centos는 안정성에 중점을 둡니다. Ubuntu는 APT를 사용하여 APT를 사용합니다), 지원주기 (Ubuntu는 5 년 동안 LTS 지원을 제공합니다), 커뮤니티에 중점을 둔다 (Centos Conciors on ubuntu). 튜토리얼 및 문서), 사용 (Centos는 서버에 편향되어 있으며 Ubuntu는 서버 및 데스크탑에 적합), 다른 차이점에는 설치 단순성 (Centos는 얇음)이 포함됩니다.
 Centos를 설치하는 방법
Apr 14, 2025 pm 09:03 PM
CentOS 설치 단계 : ISO 이미지를 다운로드하고 부팅 가능한 미디어를 실행하십시오. 부팅하고 설치 소스를 선택하십시오. 언어 및 키보드 레이아웃을 선택하십시오. 네트워크 구성; 하드 디스크를 분할; 시스템 시계를 설정하십시오. 루트 사용자를 만듭니다. 소프트웨어 패키지를 선택하십시오. 설치를 시작하십시오. 설치가 완료된 후 하드 디스크에서 다시 시작하고 부팅하십시오.
 Centos는 유지 보수를 중지합니다. 2024
Apr 14, 2025 pm 08:39 PM
Centos는 2024 년에 상류 분포 인 RHEL 8이 종료 되었기 때문에 폐쇄 될 것입니다. 이 종료는 CentOS 8 시스템에 영향을 미쳐 업데이트를 계속받지 못하게합니다. 사용자는 마이그레이션을 계획해야하며 시스템을 안전하고 안정적으로 유지하기 위해 Centos Stream, Almalinux 및 Rocky Linux가 포함됩니다.
 유지 보수를 중단 한 후 Centos의 선택
Apr 14, 2025 pm 08:51 PM
Centos는 중단되었으며 대안은 다음과 같습니다. 1. Rocky Linux (Best Compatibility); 2. Almalinux (Centos와 호환); 3. Ubuntu 서버 (구성 필수); 4. Red Hat Enterprise Linux (상업용 버전, 유료 라이센스); 5. Oracle Linux (Centos 및 Rhel과 호환). 마이그레이션시 고려 사항은 호환성, 가용성, 지원, 비용 및 커뮤니티 지원입니다.
 Docker 원리에 대한 자세한 설명
Apr 14, 2025 pm 11:57 PM
Docker는 Linux 커널 기능을 사용하여 효율적이고 고립 된 응용 프로그램 실행 환경을 제공합니다. 작동 원리는 다음과 같습니다. 1. 거울은 읽기 전용 템플릿으로 사용되며, 여기에는 응용 프로그램을 실행하는 데 필요한 모든 것을 포함합니다. 2. Union 파일 시스템 (Unionfs)은 여러 파일 시스템을 스택하고 차이점 만 저장하고 공간을 절약하고 속도를 높입니다. 3. 데몬은 거울과 컨테이너를 관리하고 클라이언트는 상호 작용을 위해 사용합니다. 4. 네임 스페이스 및 CGroup은 컨테이너 격리 및 자원 제한을 구현합니다. 5. 다중 네트워크 모드는 컨테이너 상호 연결을 지원합니다. 이러한 핵심 개념을 이해 함으로써만 Docker를 더 잘 활용할 수 있습니다.
 Docker Desktop을 사용하는 방법
Apr 15, 2025 am 11:45 AM
Docker Desktop을 사용하는 방법? Docker Desktop은 로컬 머신에서 Docker 컨테이너를 실행하는 도구입니다. 사용 단계는 다음과 같습니다. 1. Docker Desktop 설치; 2. Docker Desktop을 시작하십시오. 3. Docker 이미지를 만듭니다 (Dockerfile 사용); 4. Docker Image 빌드 (Docker 빌드 사용); 5. 도커 컨테이너를 실행하십시오 (Docker Run 사용).
 Centos 후해야 할 일은 유지 보수를 중단합니다
Apr 14, 2025 pm 08:48 PM
Centos가 중단 된 후 사용자는 다음과 같은 조치를 취할 수 있습니다. Almalinux, Rocky Linux 및 Centos 스트림과 같은 호환되는 분포를 선택하십시오. Red Hat Enterprise Linux, Oracle Linux와 같은 상업 분포로 마이그레이션합니다. Centos 9 Stream : 롤링 분포로 업그레이드하여 최신 기술을 제공합니다. Ubuntu, Debian과 같은 다른 Linux 배포판을 선택하십시오. 컨테이너, 가상 머신 또는 클라우드 플랫폼과 같은 다른 옵션을 평가하십시오.
 VSCODE에 필요한 컴퓨터 구성
Apr 15, 2025 pm 09:48 PM
대 코드 시스템 요구 사항 : 운영 체제 : Windows 10 이상, MacOS 10.12 이상, Linux 배포 프로세서 : 최소 1.6GHz, 권장 2.0GHz 이상의 메모리 : 최소 512MB, 권장 4GB 이상의 저장 공간 : 최소 250MB, 권장 1GB 및 기타 요구 사항 : 안정 네트워크 연결, Xorg/Wayland (LINUX)


