
WeChat 애플릿 뷰 컨테이너 뷰에서 Flex 레이아웃을 통해 테이블 스타일을 구현할 수 있습니다.
Flex는 이름에서 알 수 있듯이 "유연한 레이아웃"이며 박스형 모델에 최대의 유연성을 제공하는 데 사용됩니다.
모든 컨테이너를 Flex 레이아웃으로 지정할 수 있습니다.
table.wxml
<view class="table">
  <view class="tr bg-w">
    <view class="th">head1</view>
    <view class="th">head2</view>
    <view class="th ">head3</view>
  </view>
  <block wx:for="{{listData}}" wx:key="{{code}}">
    <view class="tr bg-g" wx:if="{{index % 2 == 0}}">
      <view class="td">{{item.code}}</view>
      <view class="td">{{item.text}}</view>
      <view class="td">{{item.type}}</view>
    </view>
    <view class="tr" wx:else>
      <view class="td">{{item.code}}</view>
      <view class="td">{{item.text}}</view>
      <view class="td">{{item.type}}</view>
    </view>
  </block>
</view>table.wxss
.table {
  border: 0px solid darkgray;
}
.tr {
  display: flex;
  width: 100%;
  justify-content: center;
  height: 3rem;
  align-items: center;
}
.td {
    width:40%;
    justify-content: center;
    text-align: center;
}
.bg-w{
  background: snow;
}
.bg-g{
  background: #E6F3F9;
}
.th {
  width: 40%;
  justify-content: center;
  background: #3366FF;
  color: #fff;
  display: flex;
  height: 3rem;
  align-items: center;
}table.js
Page({
  data: {
    listData:[
      {"code":"01","text":"text1","type":"type1"},
      {"code":"02","text":"text2","type":"type2"},
      {"code":"03","text":"text3","type":"type3"},
      {"code":"04","text":"text4","type":"type4"},
      {"code":"05","text":"text5","type":"type5"},
      {"code":"06","text":"text6","type":"type6"},
      {"code":"07","text":"text7","type":"type7"}
    ]
  },
  onLoad: function () {
    console.log('onLoad')
  }

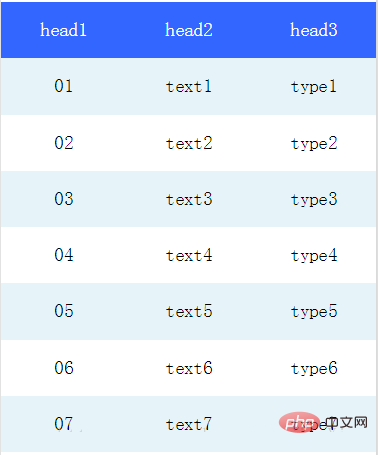
})렌더링은 다음과 같습니다
권장: "Mini 프로그램 개발 튜토리얼"
위 내용은 미니 프로그램에 테이블을 삽입하는 방법의 상세 내용입니다. 자세한 내용은 PHP 중국어 웹사이트의 기타 관련 기사를 참조하세요!
