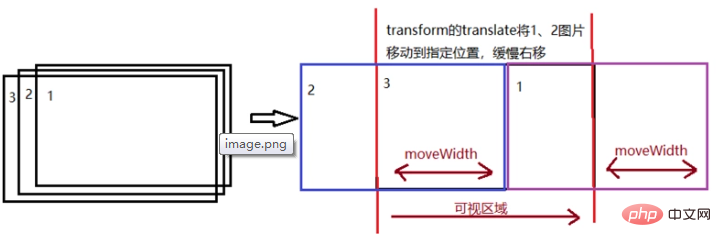
먼저 원리에 대해 이야기해보겠습니다.
이 방법을 사용하면 모든 img 노드를 만들지 않고도 전체 페이지에 항상 2개의 img 태그만 있도록 할 수 있습니다. 핵심은 매번 보이지 않는 img의 src를 바꾸는 것입니다. 
애니메이션 구현
이렇게 하면 움직이는 애니메이션이 완성됩니다.
<header>
    <p>
        <img  src="/static/imghw/default1.png" data-src="imgs/banner1.jpg" class="lazy" alt="네이티브 JS는 변환을 사용하여 배너의 무한 스크롤 효과를 얻습니다." >
        <img  src="/static/imghw/default1.png" data-src="imgs/banner2.jpg" class="lazy" alt="네이티브 JS는 변환을 사용하여 배너의 무한 스크롤 효과를 얻습니다." >
        <img  src="/static/imghw/default1.png" data-src="imgs/banner3.jpg" class="lazy" alt="네이티브 JS는 변환을 사용하여 배너의 무한 스크롤 효과를 얻습니다." >
        <img  src="/static/imghw/default1.png" data-src="imgs/banner4.jpg" class="lazy" alt="네이티브 JS는 변환을 사용하여 배너의 무한 스크롤 효과를 얻습니다." >
    </p>
    <p>
        </p>
<p>1</p>
        <p>2</p>
        <p>3</p>
        <p>4</p>

    <p>
        </p>
<p></p>

    <p>
        </p>
<p></p>

</header>
var timeout = null;
window.onload = function () {
    var oLeft = document.querySelector('.left');
    var oRight = document.querySelector('.right');
    var oButton = document.querySelector('.buttons');
    var oButtons = document.querySelectorAll('.buttons p');
    var oImgs = document.querySelectorAll('.box img');
    var imgWidth = oImgs[0].width;
    var gIndex = 0;
    begainAnimate();

    // 绑定左右点击事件
    oLeft.onclick = function () {
        clearTimeout(timeout);
        leftMove();
        begainAnimate();
    };
    oRight.onclick = function () {
        clearTimeout(timeout);
        rightMove();
        begainAnimate();
    };
    // 绑定数字序号事件
    oButton.onclick = function (event) {
        clearTimeout(timeout);
        var targetEl = event.target;
        var nextIndex = (+targetEl.innerText) - 1;
        console.log(nextIndex);
        rightMove(nextIndex);
        begainAnimate();
    }
    // 默认初始动画朝右边
    function begainAnimate() {
        clearTimeout(timeout);
        timeout = setTimeout(function () {
            rightMove();
            begainAnimate();
        }, 3000);
    }
    // 向左移动动画
    function leftMove() {
        var nextIndex = (gIndex - 1 = oImgs.length) ? 0 : gIndex + 1;
        }
        animateSteps(nextIndex, 50);
    }
    // 一次动画
    function animateSteps(nextIndex, timestamp) {
        var currentImg = oImgs[gIndex];
        var nextImg = oImgs[nextIndex];
        nextImg.style.zIndex = 10;
        var step = 0;
        requestAnimationFrame(goStep);
        // 走一帧的动画,移动timestamp
        function goStep() {
            var moveWidth = timestamp * step++;
            if (Math.abs(moveWidth)  0 ? (moveWidth - imgWidth) : (imgWidth + moveWidth)}px)`;
                requestAnimationFrame(goStep);
            } else {
                currentImg.style.zIndex = 1;
                currentImg.style.transform = `translate(0px)`;
                nextImg.style.transform = `translate(0px)`;
                oButtons[gIndex].setAttribute('class', '');
                oButtons[nextIndex].setAttribute('class', 'active');
                gIndex = nextIndex;
            }
        }
    }
}
window.onclose = function () {
    clearTimeout(timeout);
}<style>
/* 首先设置图片box的区域,将图片重叠在一起 */
header {
width: 100%;
position: relative;
overflow: hidden;
}
.box {
width: 100%;
height: 300px;
}
.box img {
width: 100%;
height: 100%;
position: absolute;
transform: translateX(0);
z-index: 1;
}
.box img:first-child {
z-index: 10;
}
/* 数字序列按钮 */
.buttons {
position: absolute;
right: 10%;
bottom: 5%;
display: flex;
z-index: 100;
}
.buttons p {
width: 30px;
height: 30px;
background-color: #aaa;
border: 1px solid #aaa;
text-align: center;
margin: 10px;
cursor: pointer;
opacity: .7;
border-radius: 15px;
line-height: 30px;
}
.buttons p.active {
background-color: white;
}
/* 左右切换按钮 */
.left,
.right {
position: absolute;
width: 80px;
height: 80px;
background-color: #ccc;
z-index: 100;
top: 110px;
border-radius: 40px;
opacity: .5;
cursor: pointer;
}
.left {
left: 2%;
}
.right {
right: 2%;
}
.left .arrow {
width: 30px;
height: 30px;
border-left: solid 5px #666;
border-top: solid 5px #666;
transform: translate(-5px, 25px) rotate(-45deg) translate(25px, 25px);
}
.right .arrow {
width: 30px;
height: 30px;
border-left: solid 5px #666;
border-top: solid 5px #666;
transform: translate(50px, 25px) rotate(135deg) translate(25px, 25px);
}
</style>추천 튜토리얼: "js tutorial"
위 내용은 네이티브 JS는 변환을 사용하여 배너의 무한 스크롤 효과를 얻습니다.의 상세 내용입니다. 자세한 내용은 PHP 중국어 웹사이트의 기타 관련 기사를 참조하세요!