중단점 디버깅을 배우는 데 도움이 되는 문서
❝개발 과정에서 알 수 없는 오류가 발생할 수 있습니다. 조금씩 디버깅하지 않도록 지정하세요. 이 글은 Atom을 사용하여 프로그램을 디버깅하는 데 도움이 될 것입니다. 궁금한 점이 있으면 답장을 보내주세요.
❞
1. 아톰에 php-debug를 설치하세요
파일->설정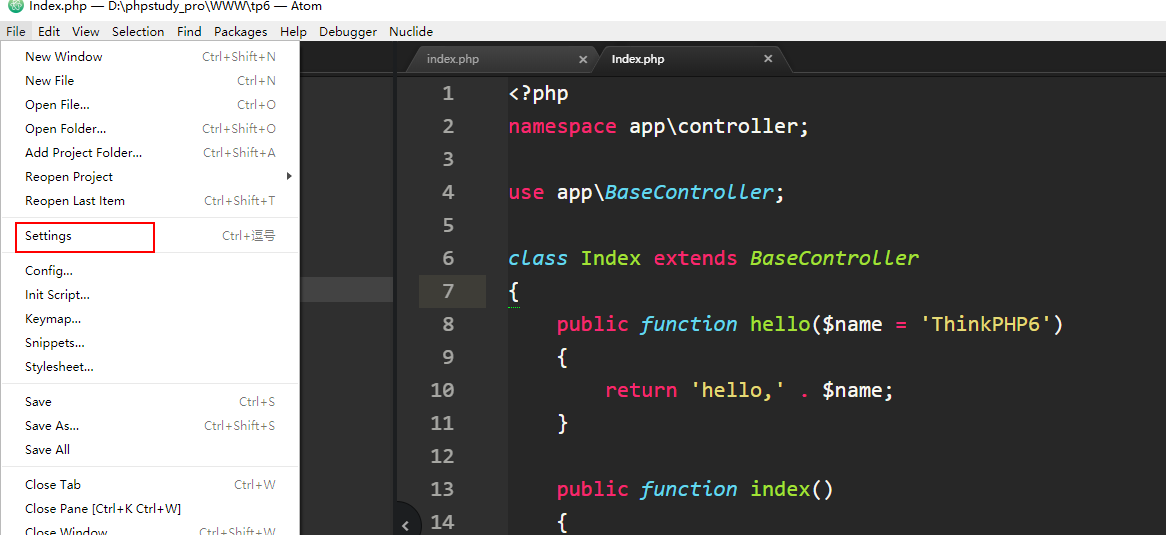 을 클릭하세요. 그런 다음 설치를 클릭하고 여기에 검색되지 않으면 php-debug를 검색하세요. 일어나, 방법을 찾아야 해! 우리는 과학적으로 인터넷 서핑을 배워야 합니다!
 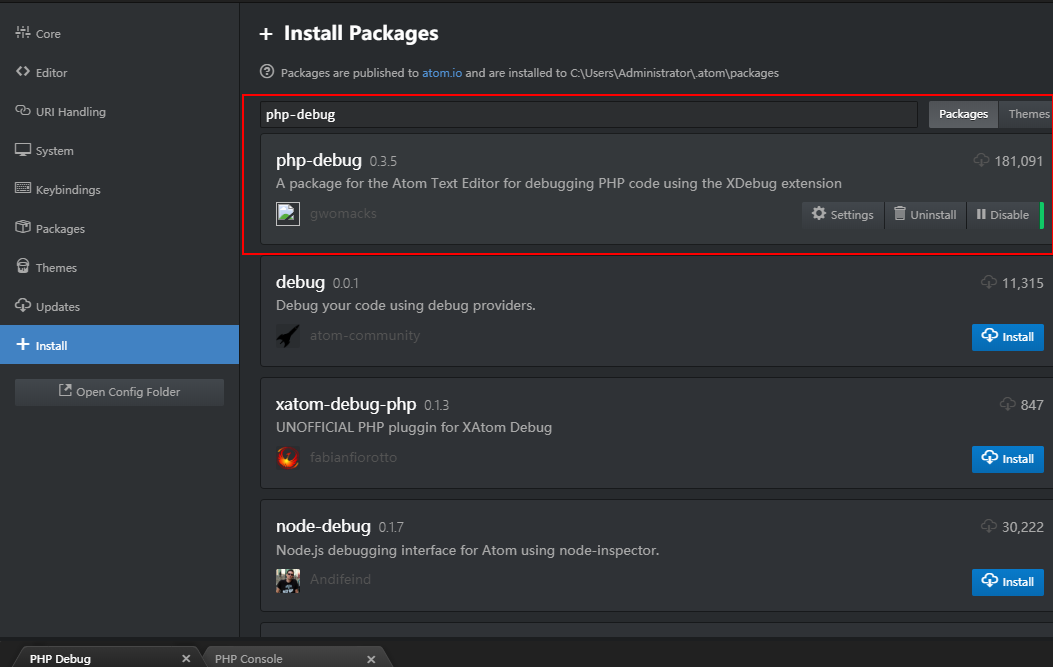 성공적인 설치는 이렇습니다
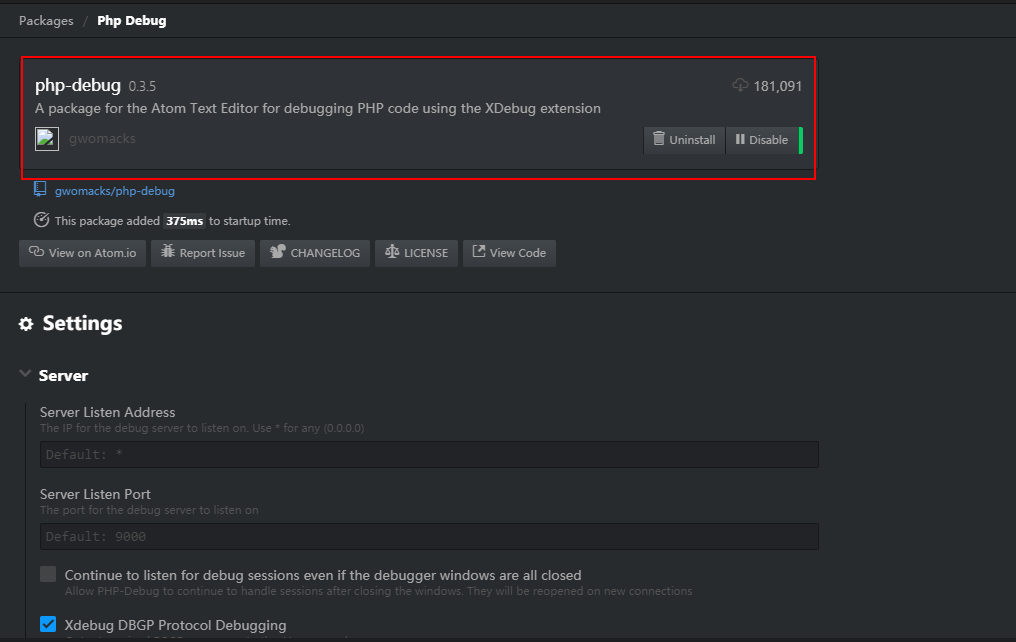
2. Xdebug 다운로드
다운로드 주소: https://xdebug.org/download, 주소를 열면 확장 프로그램을 볼 수 있습니다. 여기에 설치된 Kaka는 php7.3 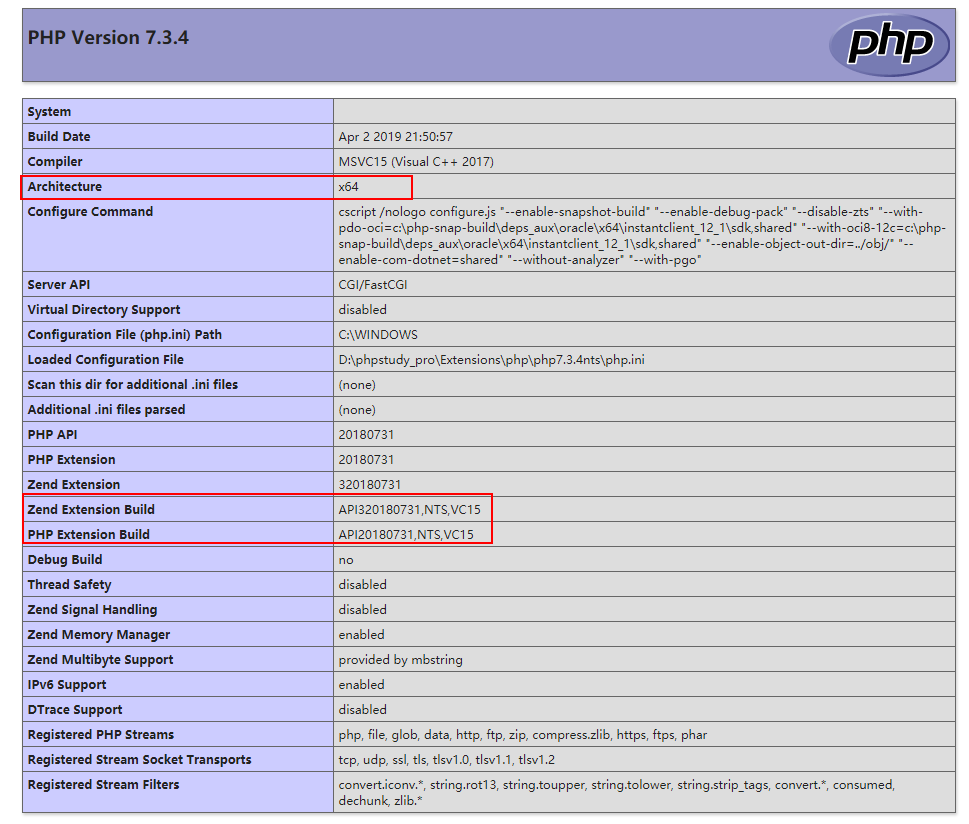 하지만 선택할 수 있는 php7.3이 두 개 있습니다! PHP 환경을 열면 상자에서 vc15를 볼 수 있습니다
 그런 다음 다운로드한 파일을
 D:phpstudy_proExtensionsphpphp7.3.4ntsext 카카 주소입니다. 자신의 PHP 환경에 넣기만 하면 됩니다. 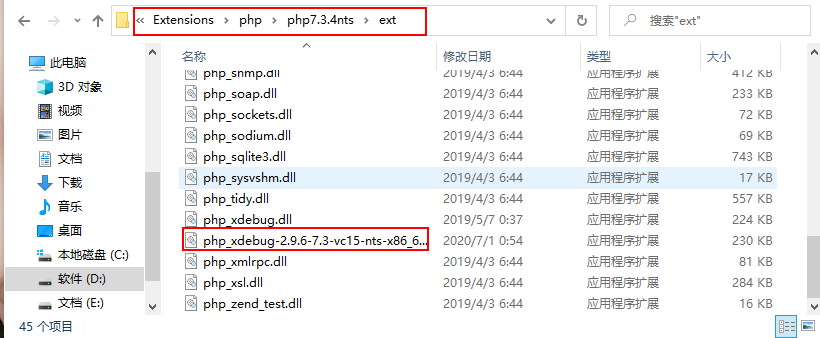
https://xdebug.org/download,打开地址后可以看到扩展,咔咔这里安装的是php7.3的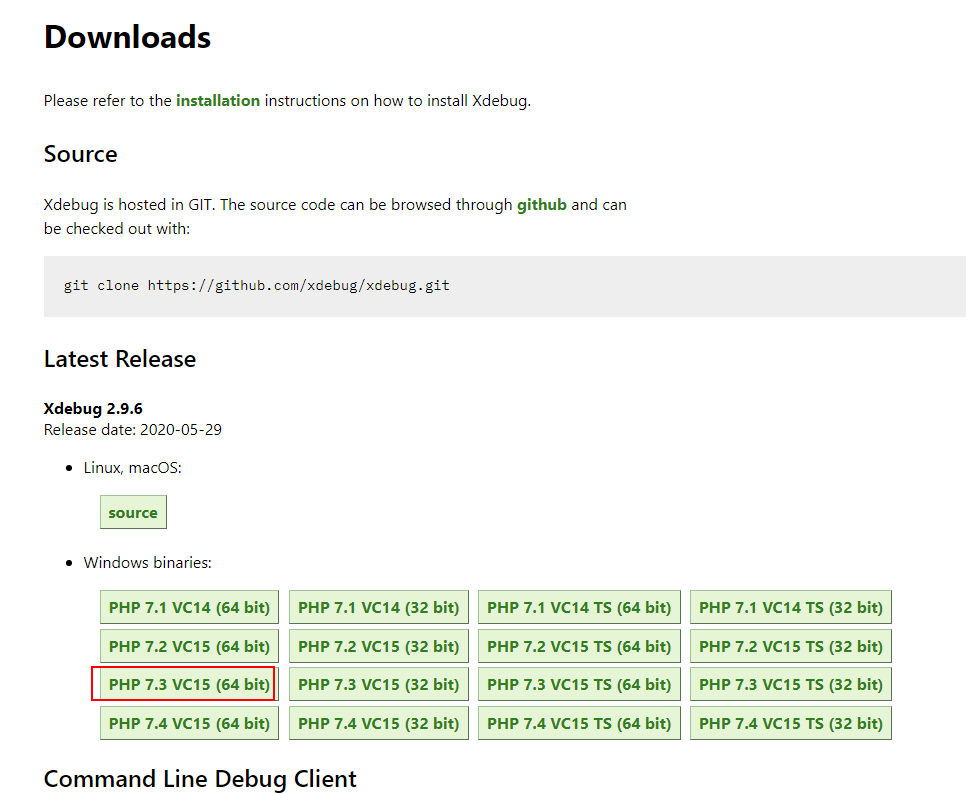 但是有俩个php7.3选择那个呢!打开你的PHP环境可以看到框里的vc15
 然后把下载的文件放到
D:phpstudy_proExtensionsphpphp7.3.4ntsext,这里是咔咔的地址。就是放到你们自己的PHP环境里边即可。
三、配置
然后找到你的php.ini文件,将下面的配置复制进去。记得需要修改zend_extension
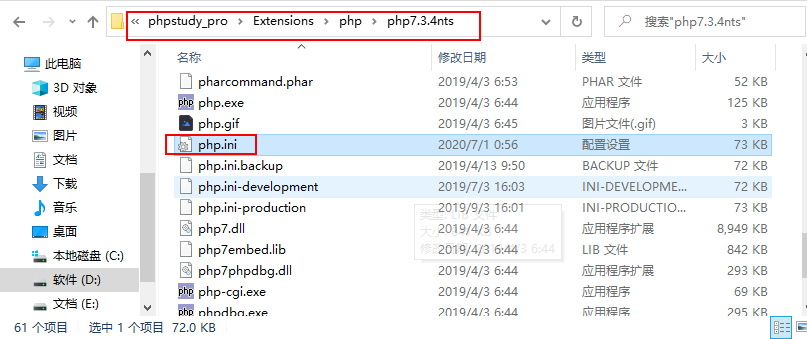
위치. 🎜🎜이 위치는 PHP 위치와 관련되어 있습니다. 🎜🎜<div class="code" style="position:relative; padding:0px; margin:0px;"><pre class='brush:php;toolbar:false;'><span style="display: block; background: url(https://imgkr.cn-bj.ufileos.com/97e4eed2-a992-4976-acf0-ccb6fb34d308.png); height: 30px; width: 100%; background-size: 40px; background-repeat: no-repeat; background-color: #282c34; margin-bottom: -7px; border-radius: 5px; background-position: 10px 10px;"></span><code class="hljs" style="overflow-x: auto; padding: 16px; color: #abb2bf; display: -webkit-box; font-family: Operator Mono, Consolas, Monaco, Menlo, monospace; font-size: 12px; -webkit-overflow-scrolling: touch; letter-spacing: 0px; padding-top: 15px; background: #282c34; border-radius: 5px;">[Xdebug]<br/>zend_extension = D:\phpstudy_pro\Extensions\php\php7<span class="hljs-number" style="color: #d19a66; line-height: 26px;">.3</span><span class="hljs-number" style="color: #d19a66; line-height: 26px;">.4</span>nts\ext\php_xdebug<span class="hljs-number" style="color: #d19a66; line-height: 26px;">-2.9</span><span class="hljs-number" style="color: #d19a66; line-height: 26px;">.6</span><span class="hljs-number" style="color: #d19a66; line-height: 26px;">-7.3</span>-vc15-nts-x86_64.dll<br/>xdebug.remote_enable = On<br/>xdebug.remote_host = localhost<br/>xdebug.remote_port = <span class="hljs-number" style="color: #d19a66; line-height: 26px;">9000</span><br/>xdebug.remote_handler = dbgp<br/>xdebug.idekey=xdebug-atom<br/></code></pre><div class="contentsignin">로그인 후 복사</div></div><p data-tool="mdnice编辑器" style="padding-top: 8px; padding-bottom: 8px; line-height: 26px; margin-top: 10px; margin-bottom: 10px; font-size: 14px; word-spacing: 2px;">이 위치를 결정하는 방법! 새 버전을 사용하는 경우<code style="overflow-wrap: break-word; margin: 0px 2px;font-family: " operator mono consolas monaco menlo monospace word-break: break-all rgb rgba>phpstudy, D:phpstudy_proExtensionsphpphp7.3.4ntsext그 위치입니다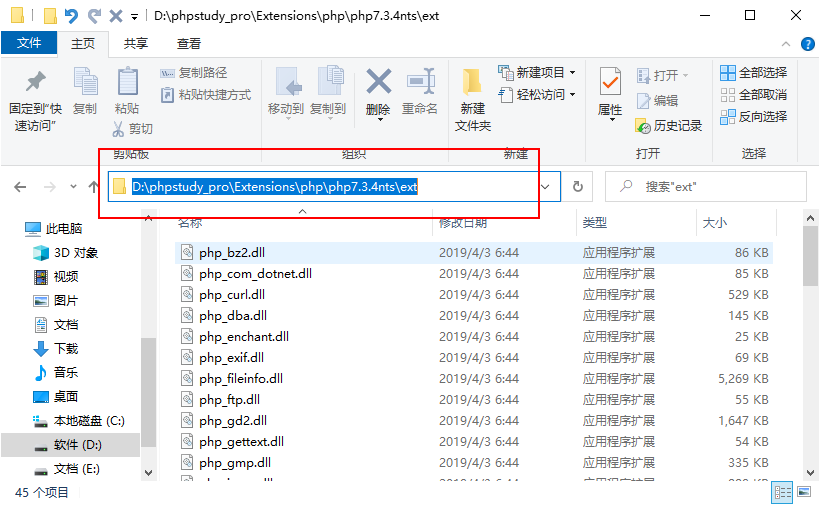 phpstudy의 이전 버전을 사용하는 경우
 <img src="/static/imghw/default1.png" data-src="https://img-blog.csdnimg.cn/20200701022653739.png" class="lazy" alt="여기에 이미지 설명 삽입" style="max-width:90%"><code style="overflow-wrap: break-word; margin: 0px 2px; font-family: " operator mono consolas monaco menlo monospace word-break: break-all color: rgb background: rgba display: inline-block padding: border-radius: height: line-height:>phpstudy,D:phpstudy_proExtensionsphpphp7.3.4ntsext那就是这个位置 如果你是旧版本的phpstudy位置在
C:phpStudyPHPTutorialphpphp-7.1.13-ntsext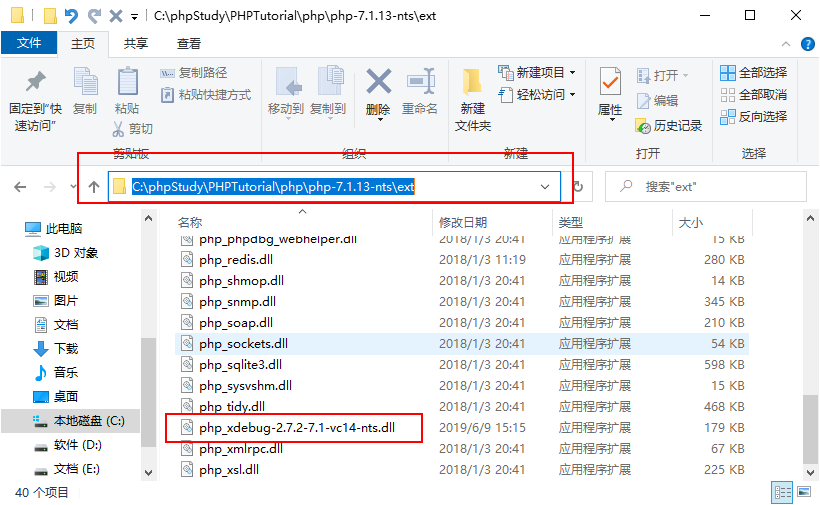
四、测试
以上工作完成之后切记需要重启一下环境。
这个时候需要做俩件事。
第一打开atom的debug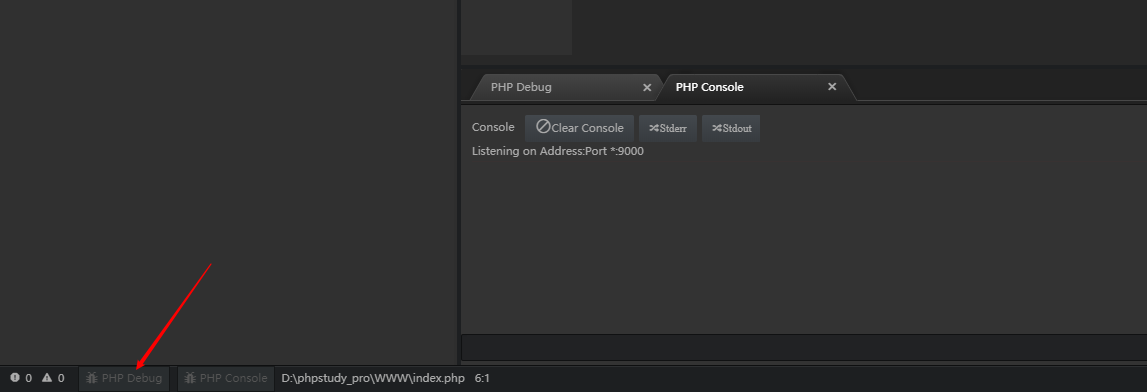
第二在地址栏输上地址http://localhost/index.php?XDEBUG_SESSION_START=1
4. 테스트
위 작업을 완료한 후 환경을 다시 시작하는 것을 잊지 마세요.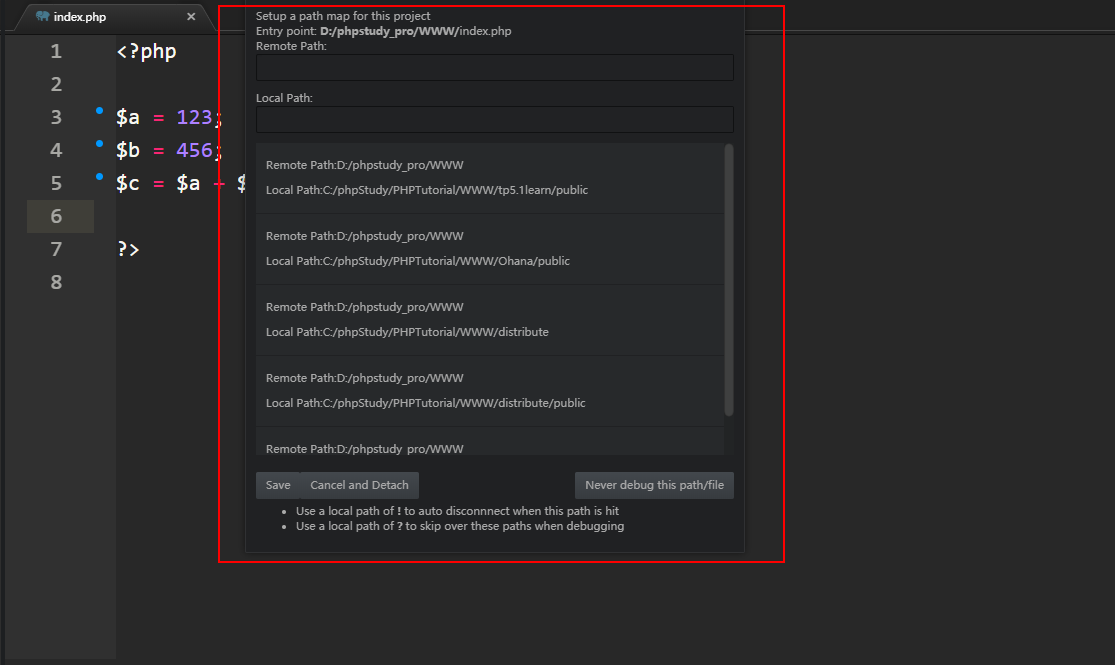 이번에는 두 가지 작업을 완료해야 합니다.
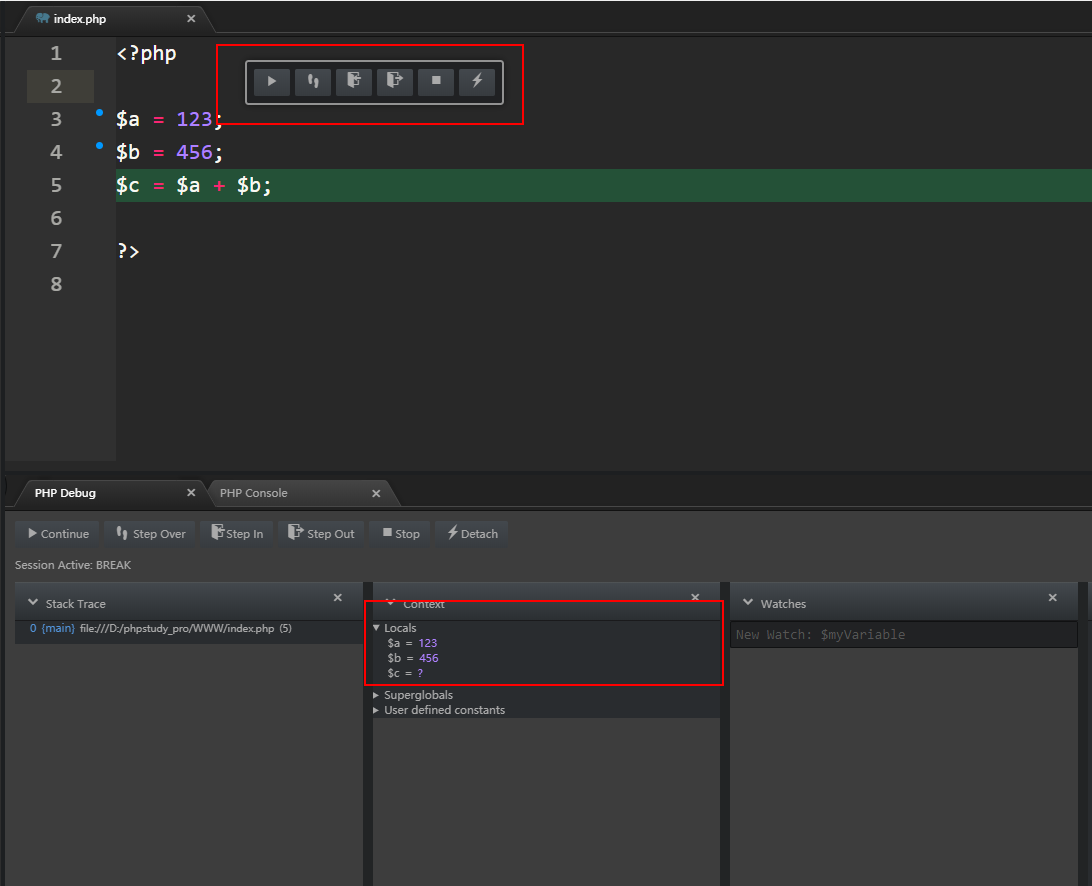
 🎜🎜둘째, 주소 표시줄에 주소를 입력하세요.
http://localhost/index.php?XDEBUG_SESSION_START= 1 /code>여기서 다음 매개변수에 주의하세요. 🎜🎜이때 팝업창이 뜨는데, 프로젝트 경로에 해당 주소를 입력하시면 됩니다🎜이때 디버깅 패널이 나오며, 우리의 변수값이 출력된 것을 보실 수 있습니다. 🎜지금까지 중단점 디버깅이 완료되었습니다. 🎜<h1 data-tool="mdnice编辑器" style="margin-top: 30px; margin-bottom: 15px; padding: 0px; color: black; font-size: 25px;">
<span class="prefix" style="color: rgb(64, 184, 250); display: none;"></span><span class="content" style="display: inline-block; color: rgb(64, 184, 250);"> 5. 요약 </span><span class="suffix" style="display: inline-block; color: rgb(64, 184, 250);"></span>
</h1>
<p data-tool="mdnice编辑器" style="padding-top: 8px; padding-bottom: 8px; line-height: 26px; margin-top: 10px; margin-bottom: 10px; font-size: 14px; word-spacing: 2px;">중단점을 구성하는 중요한 단계에 대한 요약입니다. </p>
<ul data-tool="mdnice编辑器" style="margin-top: 8px; margin-bottom: 8px; padding-left: 25px; font-size: 15px; color: #595959; list-style-type: circle;">
<li><section style="margin-top: 5px; margin-bottom: 5px; line-height: 26px; font-size: 14px;">atom php-debug 다운로드</section></li>
<li><section style="margin-top: 5px; margin-bottom: 5px; line-height: 26px; font-size: 14px;">xdebug를 다운로드하여 해당 PHP 확장 프로그램에 넣어주세요</section></li>
<li><section style="margin-top: 5px; margin-bottom: 5px; line-height: 26px; font-size: 14px;">주소 표시줄에 접근할 때 가져와야 합니다<code style="overflow-wrap: break-word; margin: 0px 2px; font-family: " operator mono consolas monaco menlo monospace word-break: break-all color: rgb background: rgba display: inline-block padding: border-radius: height: line-height:>?XDEBUG_SESSION_START=1
위 내용은 중단점 디버깅을 배우는 데 도움이 되는 문서의 상세 내용입니다. 자세한 내용은 PHP 중국어 웹사이트의 기타 관련 기사를 참조하세요!

핫 AI 도구

Undresser.AI Undress
사실적인 누드 사진을 만들기 위한 AI 기반 앱

AI Clothes Remover
사진에서 옷을 제거하는 온라인 AI 도구입니다.

Undress AI Tool
무료로 이미지를 벗다

Clothoff.io
AI 옷 제거제

AI Hentai Generator
AI Hentai를 무료로 생성하십시오.

인기 기사

뜨거운 도구

메모장++7.3.1
사용하기 쉬운 무료 코드 편집기

SublimeText3 중국어 버전
중국어 버전, 사용하기 매우 쉽습니다.

스튜디오 13.0.1 보내기
강력한 PHP 통합 개발 환경

드림위버 CS6
시각적 웹 개발 도구

SublimeText3 Mac 버전
신 수준의 코드 편집 소프트웨어(SublimeText3)

뜨거운 주제
 7478
7478
 15
15
 1377
1377
 52
52
 77
77
 11
11
 50
50
 19
19
 19
19
 33
33
 Atom에서 일반적으로 사용되는 40개 이상의 플러그인 공유 권장(플러그인 설치 방법 포함)
Dec 20, 2021 pm 04:14 PM
이 기사에서는 일반적으로 사용되는 40개 이상의 Atom용 플러그인과 Atom에 플러그인을 설치하는 방법을 공유합니다. 이 글이 도움이 되기를 바랍니다.
 Intel, 엣지 및 네트워킹 시장을 위한 Atom 프로세서 Amston Lake 시리즈 출시
Apr 09, 2024 pm 09:22 PM
4월 9일 이 사이트의 뉴스에 따르면, Intel은 오늘 Embedded World 2024에서 Amston Lake 시리즈 Atom 프로세서를 출시했습니다. Amston Lake 프로세서는 Intel7 프로세스를 기반으로 하며 단일 채널 메모리를 지원합니다. 엣지 지향적인 Atom x7000RE 시리즈와 네트워크 지향적인 x7000C 시리즈를 포함하는 Alder Lake-N 프로세서의 분기 변형이라고 볼 수 있습니다. 2023년에 이 사이트는 최대 4코어 ADL-N 아키텍처 Atom x7000E 프로세서에 대해 보고했으며 오늘날의 x7000RE 시리즈는 사양을 더욱 확장했습니다. 이 프로세서와 4코어 x7433RE 모두 최대 8코어 Atom x7835RE를 선택할 수 있습니다. 32E 장착
 프로덕션 서버에서 XDebug를 활성화하면 PHP 속도가 느려지나요?
Sep 22, 2023 pm 10:41 PM
예, XDebug와 같은 디버거는 PHP 서버 성능을 저하시킬 수 있습니다. 이것이 디버거가 서버 환경에 배치되지 않는 이유입니다. 불필요한 오버헤드를 피하기 위해 다양한 환경에 배포됩니다. 이미 프로덕션 중인 애플리케이션에는 디버그 메시지를 표시할 수 없습니다. 디버깅 동작이 서버에 추가되면 디버깅 엔진이 PHP 프로세스에 연결됩니다. 중단점에서 중지하라는 메시지 수신을 시작하지만 이는 다른 프로세스에 성능 저하를 주어 PHP 파서를 중지하므로 필수 동작은 아닙니다. 반면에 디버거를 설치하면 프로덕션 환경에서 사용하기 위한 것이 아니기 때문에 서버에서 포트를 여는 경향이 있습니다. 서버에서 포트를 여는 것은 해커가 엿볼 수 있도록 문을 여는 것만큼 나쁩니다.
 PHP 함수에 대한 Atom 함수
May 19, 2023 am 09:10 AM
PHP 함수의 Atom 함수 Atom 함수는 PHP 언어에서 일반적으로 사용되는 함수로, 변수의 원자 값을 얻을 수 있습니다. PHP에서 변수는 매우 중요한 개념이자 매우 널리 사용되는 요소입니다. PHP 변수는 숫자 및 문자열과 같은 기본 유형을 나타내는 것 외에도 배열 및 객체와 같은 복합 유형을 나타낼 수도 있다는 점은 주목할 가치가 있습니다. 따라서 변수 연산을 수행할 때 Atom 함수를 사용하여 변수의 원자값을 구해야 합니다. 다음은 Atom 함수의 구체적인 사용 방법을 소개합니다.
 ATOM은 어떤 코인인가요?
Feb 22, 2024 am 09:30 AM
ATOM은 어떤 코인인가요? ATOM은 서로 다른 블록체인 간의 연결성과 상호 운용성을 촉진하도록 설계된 분산형 블록체인 플랫폼인 Cosmos 네트워크의 기본 토큰입니다. 코스모스 프로젝트의 임무는 "상호 연결된 블록체인"이라는 네트워크를 구축하는 것이며, ATOM 토큰은 이 네트워크에서 중요한 역할을 합니다. ATOM 토큰은 2017년 ICO(Initial Coin Offering)를 통해 처음 발행되었습니다. Cosmos 블록체인의 Tendermint 합의 알고리즘을 기반으로 하는 토큰인 ATOM 토큰은 Cosmos 네트워크에서 노드 참가자에게 인센티브를 제공하고 네트워크 보안을 유지하기 위한 보상으로 사용됩니다. 코스모스 네트워크 코스모스 네트워크는 서로 연결된 독립적인 블록체인의 네트워크입니다.
 Atom 기본 플러그인 권장 사항: 동기화 및 특수 효과 타이핑 구현
Sep 22, 2022 pm 02:16 PM
Atom에서 동기화 설정 및 특수 효과 입력을 수행하는 방법은 무엇입니까? 이 글에서는 몇 가지 실용적인 플러그인을 추천하고 어떤 효과가 있는지 살펴보겠습니다.
 PHP에서 중단점 디버깅을 설정하는 방법
Mar 28, 2023 pm 04:18 PM
PHP는 일반적으로 사용되는 서버측 프로그래밍 언어입니다. 인터넷 기술의 급속한 발전으로 인해 PHP는 점점 더 널리 사용됩니다. 그러나 PHP를 개발하다 보면 필연적으로 다양한 문제와 오류에 직면하게 됩니다. 이때 어떻게 디버깅을 하느냐가 우리가 해결해야 할 문제 중 하나가 될 것입니다. 이 문서에서는 문제를 빠르게 찾고 해결하는 데 도움이 되도록 PHP 코드를 디버그하기 위해 중단점을 설정하는 방법을 소개합니다.
 PHP8.0의 디버깅 라이브러리: Xdebug
May 14, 2023 am 08:09 AM
디버깅은 PHP 개발에서 피할 수 없는 부분입니다. 개발자가 자신의 코드를 보다 쉽게 디버그할 수 있도록 돕기 위해 PHP8.0은 디버깅 라이브러리에 Xdebug라는 매우 유용한 도구를 도입했습니다. 이 기사에서는 Xdebug의 주요 기능 중 일부와 이를 사용하여 PHP 디버깅 프로세스를 단순화하는 방법을 소개합니다. Xdebug는 PHP 애플리케이션의 오류를 캡처하고 자세한 오류 스택 추적 정보와 사용 중인 변수를 제공할 수 있는 오픈 소스 디버깅 도구입니다. 개발자가 코드를 감지하고 문제를 해결하는 데 도움이 됩니다.


