

PHP에서 자신만의 프레임워크를 개발하려면 다음 지식 포인트를 알아야 합니다!

一、PHP常用的四种数据结构
简介:spl是php的一个标准库。
官方文档:http://php.net/manual/zh/book.spl.php
<?php //spl(php标准库)数据结构 /** * 栈(先进后出) */ $stack = new SplStack(); $stack->push('data1');//入栈(先进后出) $stack->push('data2');//入栈 $stack->push('data3');//入栈 echo $stack->pop();//出栈 echo $stack->pop();//出栈 echo $stack->pop();//出栈 /** *队列(先进先出) */ $queue = new SplQueue(); $queue->enqueue('data4');//入队列 $queue->enqueue('data5');//入队列 $queue->enqueue('data6');//入队列 echo $queue->dequeue();//出队列 echo $queue->dequeue();//出队列 echo $queue->dequeue();//出队列 echo $queue->dequeue();//出队列 /** * 堆 */ $heap = new SplMinHeap(); $heap->insert('data8');//入堆 $heap->insert('data9');//入堆 $heap->insert('data10');//入堆 echo $heap->extract();//从堆中提取数据 echo $heap->extract();//从堆中提取数据 echo $heap->extract();//从堆中提取数据 /** * 固定数组(不论使不使用,都会分配相应的内存空间) */ $array = new SplFixedArray(15); $array['0'] = 54; $array['6'] = 69; $array['10'] = 32; var_dump($array);
二、PHP链式操作的实现(原理)
1、入口文件 index.php
<?php /** * 框架入口文件 */ define('BASEDIR',__DIR__);//项目根目录 include BASEDIR.'/Extend/Loader.php';//引入项目自动加载类文件 spl_autoload_register('\\Extend\\Loader::autoload');//执行自动加载函数,完成类的自动加载 $db = new \Extend\Database(); $db->where('uid < 100000')->->order('uid desc')->limit(100);
2、自动加载类 Loader.php
<?php
namespace Extend;
/**
* 实现框架的自动加载
*/
class Loader
{
/**
* 实现文件的自动载入
*/
static function autoload($class)
{
require BASEDIR.'/'.str_replace('\\','/',$class).'.php';
}
}3、数据库类Database.php
注:只是原理,并没有对方法进行具体的封装,具体的封装还是看个人喜好去定链式查询的风格。
<?php
namespace Extend;

class Database
{
    /**
     * 指定查询条件
     * @param $where
     */
    function where($where)
    {
        return $this;
    }

    /**
     * 指定排序条件
     */
    function order($order)
    {
        return $this;
    }

    /**
     * 指定查询的限制条数
     * @param $limit
     */
    function limit($limit)
    {
        return $this;
    }


}其实就是对传过来的条件进行重新的底层封装,然后再把当前对象返回,使得可以不断的链式查询。
三、PHP魔术方法的使用
在php设计模式中,会涉及到很多魔术方法的使用,这里也对经常会用到的魔术方法进行简单总结。
1、框架入口文件 index.php
<?php /** * 框架入口文件 */ define('BASEDIR',__DIR__);//项目根目录 include BASEDIR.'/Extend/Loader.php';//引入项目自动加载类文件 spl_autoload_register('\\Extend\\Loader::autoload');//执行自动加载函数,完成类的自动加载 /** * 魔术方法的使用 */ # 实例化Object类 $obj = new \Extend\Object();//当前文件不存在这个类,就会自动执行自动加载函数去包含相应的类文件(即 Extend/Object.php) # __set 和 __get 对不存在的属性进行接管 $obj->title = 'xiaobudiu'; //当对一个不存在的类属性赋值时,会自动调用类中定义的__set() echo $obj->title; //当调用一个不存在的类属性时,会自动调用类中定义的__get() # __call 和 __callStatic 对不存在或者权限不够的类方法进行接管 $obj->getUserInfo('1000068'); //当调用一个不存在的类方法时,会调用__call(),并自动将当前方法名和参数传到__call方法中 \Extend\Object::getOpenId('1000068'); //当调用一个不存在的类静态方法时,会调用__callStatic(),并自动将当前方法名和参数传递到__callStatic方法中 # echo或print对象时,由__toString 接管 echo $obj; //当echo或print一个对象时,会自动调用类中定义的__toString方法 # 在php中,如果我们把一个对象当成函数用,则由__invoke()接管 $obj('xiaobudiu');//当我们将一个对象当成函数用的时候,会自动调用当前类中定义的__invoke()方法
2、 Extend/Object.php
<?php
namespace Extend;
/**
 * 要求类名必须和文件名保持一致,即类名是Object,则所在文件名为Object.php
 * Class Object
 * @package Extend
 */
class Object
{
    protected $array = array();

    /**
     * 在代码要给未定义的属性赋值时调用,或在类外部修改被private修饰的类属性时被调用
     */
    function __set($name, $value)
    {
        echo "this is __set func";
    }

    /**
     * 当在类外部访问被private或proteced修饰的属性或访问一个类中原本不存在的属性时被调用
     * @param $name
     */
    function __get($name)
    {
        echo "this is __get func";
    }

    /**
     * 当试图调用不存在的方法或权限不足时会触发__call()
     * @param $name 调用不存在的类方法时那个不存在的类方法的方法名
     * @param $arguments 调用不存在的类方法时传递的参数
     */
    function __call($name, $arguments)
    {
        var_dump($name,$arguments);
    }


    /**
     * 当试图调用不存在的静态方法或权限不足时会触发__callStatic()
     * @param $name 调用不存在的静态方法时那个不存在的方法的方法名
     * @param $arguments 调用不存在的静态方法时传递的参数
     */
    function __callStatic($name,$arguments)
    {
       var_dump($name,$arguments);
    }

    /**
     * 当使用echo或print打印对象时会调用__toString()方法将对象转化为字符串
     */
    function __toString()
    {
        echo "this is __toString func";
    }


    /**
     * 对象本身不能直接当函数用,如果被当做函数用,会直接回调__invoke方法
     * @param $param
     */
    function __invoke($param)
    {
        echo $param."<br>this is __invoke func";
    }


}四、三种基础设计模式
1、工厂模式
通过传入参数的不同,来实例化不同的类。
index.php
<?php
/**
* 框架入口文件
*/
define('BASEDIR',__DIR__);//项目根目录
include BASEDIR.'/Extend/Loader.php';//引入项目自动加载类文件
spl_autoload_register('\\Extend\\Loader::autoload');//执行自动加载函数,完成类的自动加载
//构造实例化缓存类时传入的参数
$config = array(
'host' => '127.0.0.1',
'pass' => 'myRedis&&&'
);
//工厂模式创建cache对象
$cache = Extend\CacheFactory::getCacheObj('redis',$config);
var_dump($cache);Extend/CacheFactory.php
<?php
namespace Extend;
class CacheFactory
{
const FILE = 1;
const MEMCACHE = 2;
const REDIS = 3;
static $instance;//定义静态属性,用于存储对象
/**
* 工厂类创建缓存对象
* @param $type 指定缓存类型
* @param array $options 传入缓存参数
* @return FileCache|Memcache|RedisCache
*/
static function getCacheObj($type, array $options)
{
switch ($type) {
case 'file':
case self::FILE:
self::$instance = new FileCache($options);
break;
case 'memcache':
case self::MEMCACHE:
self::$instance = new Memcache($options);
break;
case 'redis':
case self::REDIS:
self::$instance = new RedisCache($options);
break;
default:
self::$instance = new FileCache($options);
break;
}
return self::$instance;
}
}2、单例模式
保证一个类只实例化一个类对象,进而减少系统开销和资源的浪费
index.php
<?php /** * 框架入口文件 */ define('BASEDIR',__DIR__);//项目根目录 include BASEDIR.'/Extend/Loader.php';//引入项目自动加载类文件 spl_autoload_register('\\Extend\\Loader::autoload');//执行自动加载函数,完成类的自动加载 //单例模式创建对象 $obj = Extend\SingleObject::getInstance(); $obj2 = Extend\SingleObject::getInstance(); var_dump($obj,$obj2);//从结果可以看出,两个实例化的对象其实是一个对象
Extend/SingleObject.php
<?php
namespace Extend;

/**
 * 单例模式创建唯一类对象
 * Class SingleObject
 * @package Extend
 */
class SingleObject
{
    //私有的静态属性,用于存储类对象
    private static $instance = null;

    //私有的构造方法,保证不允许在类外 new
    private function __construct(){}

    //私有的克隆方法, 确保不允许通过在类外 clone 来创建新对象
    private function __clone(){}

    //公有的静态方法,用来实例化唯一当前类对象
    public static function getInstance()
    {
        if(is_null(self::$instance)){
            self::$instance = new self;
        }
        return self::$instance;
    }

}3、注册树模式
将我们用到的对象注册到注册树上,然后在之后要用到这个对象的时候,直接从注册树上取下来就好。(就和我们用全局变量一样方便)
Extend/RegisterTree,php
<?php
namespace Extend;

/**
 * 注册树模式
 * Class RegisterTree
 * @package Extend
 */
class RegisterTree
{

    static protected $objects;//静态类属性,用于储存注册到注册树上的对象

    /**
     * 将对象注册到注册树上
     * @param $alias 对象的别名
     * @param $object 对象
     */
    static function setObject($alias,$object)
    {
        self::$objects[$alias] = $object;
    }


    /**
     * 从注册树上取出给定别名相应的对象
     * @param $alias 将对象插入到注册树上时写的别名
     * @return mixed 对象
     */
    static protected function getObject($alias)
    {
        return self::$objects[$alias];
    }

    /**
     * 将对象从注册树上删除
     * @param $alias 将对象插入到注册树上时写的别名
     */
    public function unsetObject($alias)
    {
        unset(self::$objects[$alias]);
    }

}五、其他常见的8种PHP设计模式
1、适配器模式
将一个类的接口转换成客户希望的另一个接口,适配器模式使得原本的由于接口不兼容而不能一起工作的那些类可以一起工作。
应用场景:老代码接口不适应新的接口需求,或者代码很多很乱不便于继续修改,或者使用第三方类库。
常见的有两种适配器,分别是类适配器和对象适配器,这里拿更看好的对象适配器举例:
<?php
namespace Extend;
/**
* 对象适配器模式具体流程
* 1、根据需求定义接口,进而满足新需求功能
* 2、定义新类,继承并实现定义的接口
* 3、在实现接口时,原有的功能,只通过原有类对象调用原有类功能(委托)
* 4、再根据需求,在新类中实现新需求功能
* 【适用性】
* (1)你想使用一个已经存在的类,而它的接口不符合你的需求
* (2)你想创建一个可以复用的类,该类可以与其他不相关的类或不可预见的类协同工作
* (3)你想使用一个已经存在的子类,但是不可能对每一个都进行子类化以匹配它们的接口。对象适配器可以适配它的父类接口(仅限于对
*/
/**
* 目标角色(根据需求定义含有旧功能加上新功能的接口)
* Interface Target 我们期望得到的功能类
* @package Extend
*/
interface Target
{
public function simpleMethod1();
public function simpleMethod2();
}
/**
* 源角色(在新功能提出之前的旧功能类和方法)
* Class Adaptee
* @package Extend
*/
class Adaptee
{
public function simpleMethod1()
{
echo 'Adapter simpleMethod1'."<br>";
}
}
/**
* 类适配器角色(新定义接口的具体实现)
* Class Adapter
* @package Extend
*/
class Adapter implements Target
{
private $adaptee;
function __construct()
{
//适配器初始化直接new 原功能类,以方便之后委派
$adaptee = new Adaptee();
$this->adaptee = $adaptee;
}
//委派调用Adaptee的sampleMethod1方法
public function simpleMethod1()
{
echo $this->adaptee->simpleMethod1();
}
public function simpleMethod2()
{
echo 'Adapter simpleMethod2'."<br>";
}
}
/**
* 客户端调用
*/
$adapter = new Adapter();
$adapter->simpleMethod1();
$adapter->simpleMethod2();2、策略模式
将一组特定的行为和算法封装成类,以适应某些特定的上下文环境,这种模式就是策略模式,策略模式可以实现依赖倒置以及控制反转。
实例举例:假如一个电商网站系统,针对男性女性用户要各自跳转到不同的商品类目,并且所有的广告位展示展示不同的广告。
index.php
<?php
/**
* 框架入口文件
*/
define('BASEDIR',__DIR__);//项目根目录
include BASEDIR.'/Extend/Loader.php';//引入项目自动加载类文件
spl_autoload_register('\\Extend\\Loader::autoload');//执行自动加载函数,完成类的自动加载
/**
* 首页数据控制器
* Class Index
*/
class Home
{
/**
* 最好写上这个注释,告诉phpstorm是对应的哪个接口类,否则虽然程序执行正确,但phpstorm识别不了
* @var \Extend\UserType
*/
protected $userType;
/**
* 首页展示数据
* 使用策略模式
* Index constructor.
*/
function index()
{
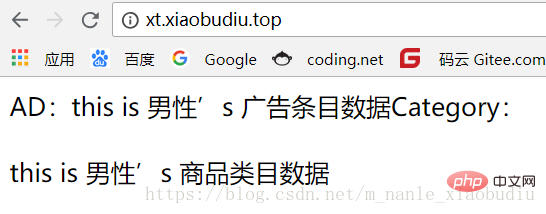
echo "AD:";
$this->userType->showAd();
echo "Category:";
$this->userType->showCategory();
}
/**
* 策略模式
* 根据传递的用户性别展示不同类别数据
* @param \Extend\UserType $userType
*/
function setUserType(\Extend\UserType $userType)
{
$this->userType = $userType;
}
}
$obj = new Home();
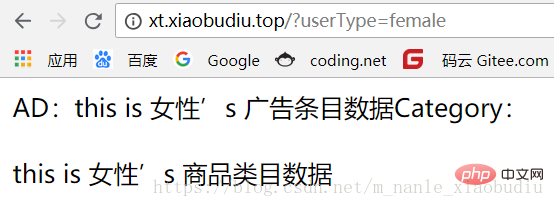
if ($_GET['userType'] == 'female'){
$userType = new \Extend\FemaleUserType();
} else {
$userType = new \Extend\MaleUserType();
}
$obj->setUserType($userType);
$obj->index();Extend/userType.php(定义的接口)
<?php

namespace Extend;

/**
 * 策略模式
 * 定义根据性别不同展示不同商品类目和广告接口
 * Interface UserType
 * @package Extend
 */
interface UserType
{
    //显示广告
    function showAd();
    //展示类目
    function showCategory();

}MaleUserType.php、FemaleUserType.php(具体实现的类 )
<?php

namespace Extend;

/**
 * 定义男性商品类目和广告位数据接口
 * Class MaleUserType
 * @package Extend
 */
class MaleUserType implements UserType
{
    /**
     * 广告栏数据展示
     */
    function showAd()
    {
        echo "this is 男性’s 广告条目数据";
    }

    /**
     * 商品类目数据展示
     */
    function showCategory()
    {
        echo "this is 男性’s 商品类目数据";
    }

}<?php
namespace Extend;
/**
* 定义女性商品类目和广告位数据接口
* Class FemaleUserType
* @package Extend
*/
class FemaleUserType implements UserType
{
/**
* 广告栏数据展示
*/
function showAd()
{
echo "this is 女性’s 广告条目数据";
}
/**
* 商品类目数据展示
*/
function showCategory()
{
echo "this is 女性’s 商品类目数据";
}
}显示效果:
3、数据对象映射模式
将对象和数据存储映射起来,对一个对象的操作会映射为对数据存储的操作。
下面在代码中实现数据对象映射模式,我们将实现一个ORM类,将复杂的sql语句映射成对象属性的操作。并结合使用数据对象映射模式、工厂模式、注册模式。
-----(1)数据库映射模式简单实例实现
index.php
<?php /** * 框架入口文件 */ define('BASEDIR',__DIR__);//项目根目录 include BASEDIR.'/Extend/Loader.php';//引入项目自动加载类文件 spl_autoload_register('\\Extend\\Loader::autoload');//执行自动加载函数,完成类的自动加载 //使用数据对象映射模式代替写sql $user = new Extend\User(25); $user->name = '小卜丢饭团子'; $user->salary = '20000'; $user->city = '浙江省';
Extend/User.php
<?php
namespace Extend;
class User
{
//对应数据库中的4个字段
public $id;
public $name;
public $salary;
public $city;
//存储数据库连接对象属性
protected $pdo;
public $data;
function __construct($id)
{
$this->id = $id;
$this->pdo = new \PDO('mysql:host=127.0.0.1;dbname=test','root','123456');
}
function __destruct()
{
$this->pdo->query("update user set name = '{$this->name}',salary = '{$this->salary}',city = '{$this->city}' where id='{$this->id}'");
}
}这样,执行index.php文件,数据库就会发生相应的操作,也就实现了基本的数据对象映射。
-------(2)数据库映射模式复杂案例实现
index.php
<?php
/**
* 框架入口文件
*/
define('BASEDIR',__DIR__);//项目根目录
include BASEDIR.'/Extend/Loader.php';//引入项目自动加载类文件
spl_autoload_register('\\Extend\\Loader::autoload');//执行自动加载函数,完成类的自动加载
class EX
{
function index()
{
//使用数据对象映射模式代替写sql
$user = Extend\Factory::getUserObj(25);
$user->name = '小卜丢饭团子';
$user->salary = '20000';
$user->city = '浙江省';
}
function test()
{
$user = Extend\Factory::getUserObj(25);
$user->city = '广东省';
}
}
$ex = new EX();
$ex->index();Extend/Factory.php
<?php
namespace Extend;
class Factory
{
/**
* 工厂模式创建数据库对象,单例模式保证创建唯一db对象
* @return mixed
*/
static function CreateDatabaseObj()
{
$db = Database::getInstance();
return $db;
}
/**
* 工厂模式创建user对象,注册树模式保证创建唯一对象,避免资源浪费
* @param $id
* @return User|mixed
*/
static function getUserObj($id)
{
$key = 'user'.$id;
$user = RegisterTree::getObject($key);
if (!$user) {
$user = new User($id);
RegisterTree::setObject($key,$user);
}
return $user;
}
}Extend/Register.php
<?php

namespace Extend;

/**
 * 注册树模式
 * Class RegisterTree
 * @package Extend
 */
class RegisterTree
{
    static protected $objects;//静态类属性,用于储存注册到注册树上的对象

    /**
     * 将对象注册到注册树上
     * @param $alias 对象的别名
     * @param $object 对象
     */
    static function setObject($alias,$object)
    {
        self::$objects[$alias] = $object;
    }


    /**
     * 从注册树上取出给定别名相应的对象
     * @param $alias 将对象插入到注册树上时写的别名
     * @return mixed 对象
     */
    static function getObject($alias)
    {
        return self::$objects[$alias];
    }

    /**
     * 将对象从注册树上删除
     * @param $alias 将对象插入到注册树上时写的别名
     */
    public function unsetObject($alias)
    {
        unset(self::$objects[$alias]);
    }

}Extend/User.php
<?php
namespace Extend;
class User
{
//对应数据库中的4个字段
public $id;
public $name;
public $salary;
public $city;
//存储数据库连接对象属性
protected $pdo;
public $data;
function __construct($id)
{
$this->id = $id;
$this->pdo = new \PDO('mysql:host=127.0.0.1;dbname=test','root','123456');
}
function __destruct()
{
$this->pdo->query("update user set name = '{$this->name}',salary = '{$this->salary}',city = '{$this->city}' where id='{$this->id}'");
}
}这样,就实现了稍复杂的数据对象映射模式和工厂模式、注册树模式相结合的案例。
4、观察者模式
当一个对象状态发生改变时,依赖它的对象会全部收到通知,并自动更新。
场景:一个事件发生后,要执行一连串更新操作。传统的编程方式就是在事件的代码之后直接加入处理逻辑,当更新的逻辑增多之后,代码会变的难以维护。这种方式是耦合的,侵入式的,增加新的逻辑需要修改事件主体的代码。观察者模式实现了低耦合,非侵入式的通知与更新机制。
4.1、传统模式举例:
<?php
/**
* 框架入口文件
*/
define('BASEDIR',__DIR__);//项目根目录
include BASEDIR.'/Extend/Loader.php';//引入项目自动加载类文件
spl_autoload_register('\\Extend\\Loader::autoload');//执行自动加载函数,完成类的自动加载
/**
* 一个事件的逻辑控制器
* Class Event
*/
class Event
{
/**
* 用户确认订单
*/
function firmOrder()
{
//这里假设一个事件发生了,比如用户已经完成下单
echo "用户已下单<br>";
//传统方式是在发生一个事件之后直接进行一系列的相关处理,耦合度比较高,比如写入日志,给用户发邮件等等
echo "在用户下单之后进行的一系列操作<br>";
}
}
$event = new Event();
$event->firmOrder();4.2、观察者模式典型实现方式:
(1)定义2个接口:观察者(通知)接口、被观察者(主题)接口
(2)定义2个类,观察者类实现观察者接口、被观察者类实现被观察者接口
(3)被观察者注册自己需要通知的观察者
(4)被观察者类某个业务逻辑发生时,通知观察者对象,进而每个观察者执行自己的业务逻辑。
代码示例:
test.php
<?php
/**
* 观察者模式场景描述:
* 1、购票后记录文本日志
* 2、购票后记录数据库日志
* 3、购票后发送短信
* 4、购票送抵扣卷、兑换卷、积分
* 5、其他各类活动等
*/
/**
* 观察者接口
*/
interface TicketObserver
{
function buyTicketOver($sender, $args); //得到通知后调用的方法
}
/**
* 被观察者接口(购票主题接口)
*/
interface TicketObserved
{
function addObserver($observer); //提供注册观察者方法
}
/**
* 主体逻辑,继承被观察者接口
* Class BuyTicket
*/
class BuyTicket implements TicketObserved
{
/**
* 定义观察者数组属性,用于储存观察者
* @var array
*/
private $observers = array();
/**
* 实现被观察者接口定义的方法(添加观察者)
* @param $observer 实例化后的观察者对象
*/
public function addObserver($observer)
{
$this->observers[] = $observer;
}
/**
* 购票主体方法
* BuyTicket constructor.
* @param $ticket 购票排号
*/
public function buyTicket($ticket)
{
//1、根据需求写购票逻辑
//..............
//2、购票成功之后,循环通知观察者,并调用其buyTicketOver实现不同业务逻辑
foreach ($this->observers as $observe) {
$observe->buyTicketOver($this, $ticket); //$this 可用来获取主题类句柄,在通知中使用
}
}
}
/**
* 购票成功后,发送短信通知
* Class buyTicketMSN
*/
class buyTicketMSN implements TicketObserver
{
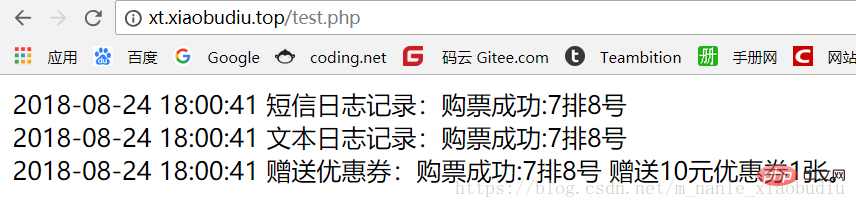
public function buyTicketOver($sender, $ticket)
{
echo (date ( 'Y-m-d H:i:s' ) . " 短信日志记录:购票成功:$ticket<br>");
}
}
/**
* 购票成功后,记录日志
* Class buyTicketLog
*/
class buyTicketLog implements TicketObserver
{
public function buyTicketOver($sender, $ticket)
{
echo (date ( 'Y-m-d H:i:s' ) . " 文本日志记录:购票成功:$ticket<br>");
}
}
/**
* 购票成功后,赠送优惠券
* Class buyTicketCoupon
*/
class buyTicketCoupon implements TicketObserver
{
public function buyTicketOver($sender, $ticket)
{
echo (date ( 'Y-m-d H:i:s' ) . " 赠送优惠券:购票成功:$ticket 赠送10元优惠券1张。<br>");
}
}
//实例化购票类
$buy = new BuyTicket();
//添加多个观察者
$buy->addObserver(new buyTicketMSN());
$buy->addObserver(new buyTicketLog());
$buy->addObserver(new buyTicketCoupon());
//开始购票
$buy->buyTicket ("7排8号");浏览器显示结果:
5、原型模式
原型模式与工厂模式的作用类似,都是用来创建对象的。但是实现方式是不同的。原型模式是先创建好一个原型对象,然后通过clone原型对象来创建新的对象。这样,就免去了类创建时重复的初始化操作。
原型模式适用于大对象的创建,创建一个大对象需要很大的开销,如果每次new就会消耗很大,原型模式仅需内存拷贝即可。
代码实例:
<?php
/**
* 抽象原型角色
*/
interface Prototype
{
public function copy();
}
/**
* 具体原型角色
*/
class ConcretePrototype implements Prototype
{
private $_name;
public function __construct($name)
{
$this->_name = $name;
}
public function setName($name)
{
$this->_name = $name;
}
public function getName()
{
return $this->_name;
}
public function copy()
{
//深拷贝实现
//$serialize_obj = serialize($this); // 序列化
//$clone_obj = unserialize($serialize_obj); // 反序列化
//return $clone_obj;
// 浅拷贝实现
return clone $this;
}
}
/**
* 测试深拷贝用的引用类
*/
class Demo
{
public $array;
}
//测试
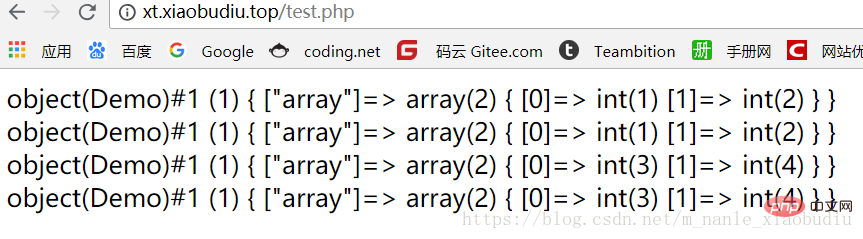
$demo = new Demo();
$demo->array = array(1, 2);
$object1 = new ConcretePrototype($demo);
$object2 = $object1->copy();
var_dump($object1->getName());
echo '<br />';
var_dump($object2->getName());
echo '<br />';
$demo->array = array(3, 4);
var_dump($object1->getName());
echo '<br />';
var_dump($object2->getName());
echo '<br />';浏览器显示结果:
6、装饰器模式
可以动态的添加或修改类的功能
一个类实现一个功能,如果要再修改或添加额外的功能,传统的编程模式需要写一个子类继承它,并重新实现类的方法。
使用装饰器模式,仅需在运行时添加一个装饰器对象即可实现,可以实现最大的灵活性。
<?php
/**
* 装饰器流程
* 1、声明装饰器接口(装饰器接口)
* 2、具体类继承并实现装饰器接口(颜色装饰器实现,字体大小装饰器实现)
* 3、在被装饰者类中定义"添加装饰器"方法(EchoText类中的addDecorator方法)
* 4、在被装饰者类中定义调用装饰器的方法(EchoText类中的beforeEcho和afterEcho方法)
* 5、使用时,实例化被装饰者类,并传入装饰器对象(比如new ColorDecorator('yellow'))
*/
/**
* 装饰器接口
* Class Decorator
*/
interface Decorator
{
public function beforeEcho();
public function afterEcho();
}
/**
* 颜色装饰器实现
* Class ColorDecorator
*/
class ColorDecorator implements Decorator
{
protected $color;
public function __construct($color)
{
$this->color = $color;
}
public function beforeEcho()
{
echo "<dis style='color: {$this->color}'>";
}
public function afterEcho()
{
echo "</p>";
}
}
/**
* 字体大小装饰器实现
* Class SizeDecorator
*/
class SizeDecorator implements Decorator
{
protected $size;
public function __construct($size)
{
$this->size = $size;
}
public function beforeEcho()
{
echo "<dis style='font-size: {$this->size}px'>";
}
public function afterEcho()
{
echo "</p>";
}
}
/**
* 被装饰者
* 输出一个字符串
* 装饰器动态添加功能
* Class EchoText
*/
class EchoText
{
protected $decorators = array();//存放装饰器
//装饰方法
public function Index()
{
//调用装饰器前置操作
$this->beforeEcho();
echo "你好,我是装饰器。";
//调用装饰器后置操作
$this->afterEcho();
}
//添加装饰器
public function addDecorator(Decorator $decorator)
{
$this->decorators[] = $decorator;
}
//执行装饰器前置操作 先进先出原则
protected function beforeEcho()
{
foreach ($this->decorators as $decorator)
$decorator->beforeEcho();
}
//执行装饰器后置操作 先进后出原则
protected function afterEcho()
{
$tmp = array_reverse($this->decorators);
foreach ($tmp as $decorator)
$decorator->afterEcho();
}
}
//实例化输出类
$echo = new EchoText();
//增加装饰器
$echo->addDecorator(new ColorDecorator('yellow'));
//增加装饰器
$echo->addDecorator(new SizeDecorator('22'));
//输出
$echo->Index();7、迭代器模式
在不需要了解内部实现的前提下,遍历一个聚合对象的内部元素而又不暴露该对象的内部表示,这就是PHP迭代器模式的定义。
相对于传统编程模式,迭代器模式可以隐藏遍历元素的所需的操作。
index.php
<?php
/**
* 框架入口文件
*/
define('BASEDIR',__DIR__);//项目根目录
include BASEDIR.'/Extend/Loader.php';//引入项目自动加载类文件
spl_autoload_register('\\Extend\\Loader::autoload');//执行自动加载函数,完成类的自动加载
$users = new Extend\AllUser();
//循环遍历出所有用户数据
foreach ($users as $user) {
var_dump($user);
}Extend/AllUser.php
<?php
namespace Extend;
/**
* 迭代器模式,继承php内部自带的迭代器接口(\Iterator)
* Class AllUser
* @package Extend
*/
class AllUser implements \Iterator
{
protected $index = 0;//表示索引
protected $ids = array();//用于储存所有user的id(实际应用中,可以采用注册树模式进行存储)
protected $pdo;//用于存储数据库对象
function __construct()
{
//获取pdo数据库对象
$this->pdo = new \PDO('mysql:host=127.0.0.1;dbname=test','root','123456');
//获取所有用户的id
$this->ids = $this->pdo->query("select id from user")->fetchAll(2);
}
/**
* 实现接口方法,重置迭代器,回到集合开头
*/
public function rewind()
{
$this->index = 0;
}
/**
* 实现接口方法,获取当前元素
* @return mixed|void
*/
public function current()
{
$id = $this->ids[$this->index]['id'];
//获取当前用户的数据
$user_data = $this->pdo->query("select * from user where id='{$id}'")->fetch(2);
return $user_data;
}
/**
* 实现接口方法,获取当前元素键值
* @return mixed|void
*/
public function key()
{
return $this->index;
}
/**
* 实现接口方法,获取下一个元素
*/
public function next()
{
$this->index++;
}
/**
* 实现接口方法,验证是否还有下一个元素
* @return bool|void
*/
public function valid()
{
return $this->index < count($this->ids);
}
}8、代理模式
在客户端与实体之间建立一个代理对象(proxy),客户端对实体进行操作全部委派给代理对象,隐藏实体的具体实现细节。
典型的应用就是mysql的主从结构,读写分离。在mysql中,对所有读的操作请求从库,所有写的操作请求主库。
声明一个代理类,前台使用时只需创建一个代理类,调用对应方法即可。代码实例:
index.php
<?php
/**
* 框架入口文件
*/
define('BASEDIR',__DIR__);//项目根目录
include BASEDIR.'/Extend/Loader.php';//引入项目自动加载类文件
spl_autoload_register('\\Extend\\Loader::autoload');//执行自动加载函数,完成类的自动加载
// 1、传统编程模式是手动选择
#查询操作使用从库
//$db_slave = Extend\Factory::getDatabase('slave');
//$info = $db_slave->query("select * from user where id = 1 limit 1");
#增删改操作使用主库
//$db_master = Extend\Factory::getDatabase('master');
//$db_master->query("update user name = 'xiaobudiu' where id = 29 limit 1");
// 2、使用代理模式
$db_proxy = new Extend\Proxy();
$db_proxy->getUserName(1);
$db_proxy->setUserName(29,'xiaobudiu');Extend/Proxy.php
<?php
namespace Extend;
class Proxy implements IUserProxy
{
function getUserName($id)
{
$db = Factory::getDatabase('slave');
$db->query("select name from user where id =$id limit 1");
}
function setUserName($id, $name)
{
$db = Factory::getDatabase('master');
$db->query("update user set name = $name where id =$id limit 1");
}
}Extend/Factory.php
<?php
namespace Extend;
class Factory
{
static function getDatabase($id)
{
$key = 'database_'.$id;
if ($id == 'slave')
{
$slaves = Application::getInstance()->config['database']['slave'];
$db_conf = $slaves[array_rand($slaves)];
} else {
$db_conf = Application::getInstance()->config['database'][$id];
}
//注册树模式存储及获取对象
$db = Register::get($key);
if (!$db) {
$db = new Database\MySQLi();
$db->connect($db_conf['host'], $db_conf['user'], $db_conf['password'], $db_conf['dbname']);
Register::set($key, $db);
}
return $db;
}
}Extend/Application.php
<?php
namespace Extend;
class Application
{
public $base_dir;
protected static $instance;
public $config;
protected function __construct($base_dir)
{
$this->base_dir = $base_dir;
$this->config = new Config($base_dir.'/configs');
}
static function getInstance($base_dir = '')
{
if (empty(self::$instance))
{
self::$instance = new self($base_dir);
}
return self::$instance;
}
}Extend/Config.php
<?php
namespace Extend;
/**
* 配置类,继承于php自带的ArrayAccess接口
* 允许一个对象以数组的方式访问
* Class Config
* @package Extend
*/
class Config implements \ArrayAccess
{
protected $path;
protected $configs = array();
function __construct($path)
{
$this->path = $path;
}
function offsetGet($key)
{
if (empty($this->configs[$key]))
{
$file_path = $this->path.'/'.$key.'.php';
$config = require $file_path;
$this->configs[$key] = $config;
}
return $this->configs[$key];
}
function offsetSet($key, $value)
{
throw new \Exception("cannot write config file.");
}
function offsetExists($key)
{
return isset($this->configs[$key]);
}
function offsetUnset($key)
{
unset($this->configs[$key]);
}
}configs/database.php
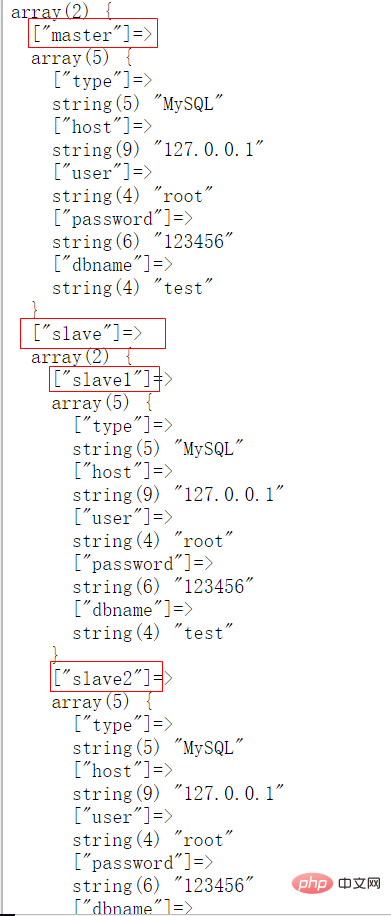
<?php
$config = array(
'master' => array(
'type' => 'MySQL',
'host' => '127.0.0.1',
'user' => 'root',
'password' => '123456',
'dbname' => 'test',
),
'slave' => array(
'slave1' => array(
'type' => 'MySQL',
'host' => '127.0.0.1',
'user' => 'root',
'password' => '123456',
'dbname' => 'test',
),
'slave2' => array(
'type' => 'MySQL',
'host' => '127.0.0.1',
'user' => 'root',
'password' => '123456',
'dbname' => 'test',
),
),
);
return $config;五、其余设计模式以及总结
六、面向对象编程的基本原则
1、单一职责原则:一个类只需要做好一件事情。不要使用一个类完成很多功能,而应该拆分成更多更小的类。
2、开放封闭原则:一个类写好之后,应该是可扩展而不可修改的。
3、依赖倒置原则:一个类不应该强依赖另外一个类,每个类对于另外一个类都是可替换的。
4、配置化原则:尽量使用配置,而不是硬编码。
5、面向接口编程原则:只需要关心某个类提供了哪些接口,而不需要关心他的实现。
七、自动加载配置类文件
1、php中使用ArrayAccess实现配置文件的加载(使得程序可以以数组的方式进行读取配置)
(1)定义Config.php,继承php自带的ArrayAccess接口,并实现相应的方法,用于读取和设置配置
Extend/Config.php
<?php
namespace Extend;
/**
* 配置类,继承于php自带的ArrayAccess接口
* 允许一个对象以数组的方式访问
* Class Config
* @package Extend
*/
class Config implements \ArrayAccess
{
protected $path;
protected $configs = array();
function __construct($path)
{
$this->path = $path;
}
function offsetGet($key)
{
if (empty($this->configs[$key]))
{
$file_path = $this->path.'/'.$key.'.php';
$config = require $file_path;
$this->configs[$key] = $config;
}
return $this->configs[$key];
}
function offsetSet($key, $value)
{
throw new \Exception("cannot write config file.");
}
function offsetExists($key)
{
return isset($this->configs[$key]);
}
function offsetUnset($key)
{
unset($this->configs[$key]);
}
}(2)configs/database.php
<?php
$config = array(
'master' => array(
'type' => 'MySQL',
'host' => '127.0.0.1',
'user' => 'root',
'password' => '123456',
'dbname' => 'test',
),
'slave' => array(
'slave1' => array(
'type' => 'MySQL',
'host' => '127.0.0.1',
'user' => 'root',
'password' => '123456',
'dbname' => 'test',
),
'slave2' => array(
'type' => 'MySQL',
'host' => '127.0.0.1',
'user' => 'root',
'password' => '123456',
'dbname' => 'test',
),
),
);
return $config;(3)读取配置
index.php
<?php /** * 框架入口文件 */ define('BASEDIR',__DIR__);//项目根目录 include BASEDIR.'/Extend/Loader.php';//引入项目自动加载类文件 spl_autoload_register('\\Extend\\Loader::autoload');//执行自动加载函数,完成类的自动加载 $config = new Extend\Config(__DIR__.'/configs'); var_dump($config['database']);
(4)浏览器显示:
到此,就可以在程序中随心所欲的加载配置文件了。
2、在工厂方法中读取配置,生成可配置化的对象
Extend/Factory.php
<?php
namespace Extend;
class Factory
{
static function getDatabase($id)
{
$key = 'database_'.$id;
if ($id == 'slave')
{
$slaves = Application::getInstance()->config['database']['slave'];
$db_conf = $slaves[array_rand($slaves)];
} else {
$db_conf = Application::getInstance()->config['database'][$id];
}
//注册树模式存储及获取对象
$db = Register::get($key);
if (!$db) {
$db = new Database\MySQLi();
$db->connect($db_conf['host'], $db_conf['user'], $db_conf['password'], $db_conf['dbname']);
Register::set($key, $db);
}
return $db;
}
}Extend/Application.php
<?php
namespace Extend;
class Application
{
public $base_dir;
protected static $instance;
public $config;
protected function __construct($base_dir)
{
$this->base_dir = $base_dir;
$this->config = new Config($base_dir.'/configs');
}
static function getInstance($base_dir = '')
{
if (empty(self::$instance))
{
self::$instance = new self($base_dir);
}
return self::$instance;
}
}Extend/Config.php
<?php
namespace Extend;
/**
* 配置类,继承于php自带的ArrayAccess接口
* 允许一个对象以数组的方式访问
* Class Config
* @package Extend
*/
class Config implements \ArrayAccess
{
protected $path;
protected $configs = array();
function __construct($path)
{
$this->path = $path;
}
function offsetGet($key)
{
if (empty($this->configs[$key]))
{
$file_path = $this->path.'/'.$key.'.php';
$config = require $file_path;
$this->configs[$key] = $config;
}
return $this->configs[$key];
}
function offsetSet($key, $value)
{
throw new \Exception("cannot write config file.");
}
function offsetExists($key)
{
return isset($this->configs[$key]);
}
function offsetUnset($key)
{
unset($this->configs[$key]);
}
}
위 내용은 PHP에서 자신만의 프레임워크를 개발하려면 다음 지식 포인트를 알아야 합니다!의 상세 내용입니다. 자세한 내용은 PHP 중국어 웹사이트의 기타 관련 기사를 참조하세요!

핫 AI 도구

Undresser.AI Undress
사실적인 누드 사진을 만들기 위한 AI 기반 앱

AI Clothes Remover
사진에서 옷을 제거하는 온라인 AI 도구입니다.

Undress AI Tool
무료로 이미지를 벗다

Clothoff.io
AI 옷 제거제

AI Hentai Generator
AI Hentai를 무료로 생성하십시오.

인기 기사
뜨거운 도구

메모장++7.3.1
사용하기 쉬운 무료 코드 편집기

SublimeText3 중국어 버전
중국어 버전, 사용하기 매우 쉽습니다.

스튜디오 13.0.1 보내기
강력한 PHP 통합 개발 환경

드림위버 CS6
시각적 웹 개발 도구

SublimeText3 Mac 버전
신 수준의 코드 편집 소프트웨어(SublimeText3)
뜨거운 주제
 7322
7322
 9
1625
14
1350
46
1262
25
1209
29
9
1625
14
1350
46
1262
25
1209
29

 CakePHP 프로젝트 구성
Sep 10, 2024 pm 05:25 PM
CakePHP 프로젝트 구성
Sep 10, 2024 pm 05:25 PM
이번 장에서는 CakePHP의 환경 변수, 일반 구성, 데이터베이스 구성, 이메일 구성에 대해 알아봅니다.
 Ubuntu 및 Debian용 PHP 8.4 설치 및 업그레이드 가이드
Dec 24, 2024 pm 04:42 PM
Ubuntu 및 Debian용 PHP 8.4 설치 및 업그레이드 가이드
Dec 24, 2024 pm 04:42 PM
PHP 8.4는 상당한 양의 기능 중단 및 제거를 통해 몇 가지 새로운 기능, 보안 개선 및 성능 개선을 제공합니다. 이 가이드에서는 Ubuntu, Debian 또는 해당 파생 제품에서 PHP 8.4를 설치하거나 PHP 8.4로 업그레이드하는 방법을 설명합니다.


 CakePHP 토론
Sep 10, 2024 pm 05:28 PM
CakePHP 토론
Sep 10, 2024 pm 05:28 PM
CakePHP는 PHP용 오픈 소스 프레임워크입니다. 이는 애플리케이션을 훨씬 쉽게 개발, 배포 및 유지 관리할 수 있도록 하기 위한 것입니다. CakePHP는 강력하고 이해하기 쉬운 MVC와 유사한 아키텍처를 기반으로 합니다. 모델, 뷰 및 컨트롤러 gu
 PHP 개발을 위해 Visual Studio Code(VS Code)를 설정하는 방법
Dec 20, 2024 am 11:31 AM
PHP 개발을 위해 Visual Studio Code(VS Code)를 설정하는 방법
Dec 20, 2024 am 11:31 AM
VS Code라고도 알려진 Visual Studio Code는 모든 주요 운영 체제에서 사용할 수 있는 무료 소스 코드 편집기 또는 통합 개발 환경(IDE)입니다. 다양한 프로그래밍 언어에 대한 대규모 확장 모음을 통해 VS Code는

