컴퓨터 과학에서 가장 일반적으로 사용되고 논의되는 데이터 구조 중 하나는 이진 검색 트리입니다. 이는 일반적으로 비선형 삽입 알고리즘으로 도입된 첫 번째 데이터 구조입니다. 이진 검색 트리는 이중 연결 목록과 유사하며 각 노드에는 일부 데이터와 다른 노드에 대한 두 개의 포인터가 포함되어 있으며 해당 노드가 서로 관련되는 방식이 다릅니다. 이진 검색 트리 노드에 대한 포인터는 종종 "왼쪽" 및 "오른쪽"이라고 불리며 현재 값과 관련된 하위 트리를 나타내는 데 사용됩니다. 이러한 노드의 간단한 JavaScript 구현은 다음과 같습니다.
var node = {
    value: 125,
    left: null,
    right: null
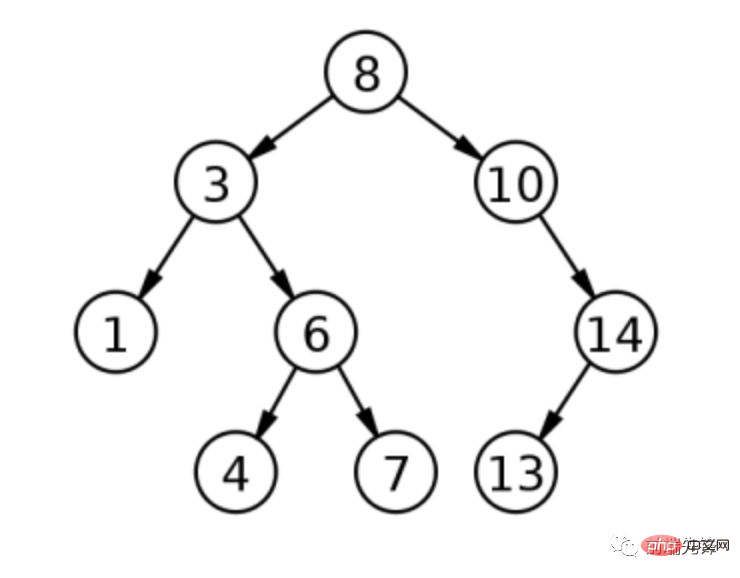
};이름에서 알 수 있듯이 이진 검색 트리는 계층적 트리와 같은 구조로 구성됩니다. 첫 번째 항목은 루트 노드가 되고 각 추가 값은 해당 루트의 조상으로 트리에 추가됩니다. 그러나 이진 검색 트리의 노드에 있는 값은 고유하며 포함된 값에 따라 정렬됩니다. 노드의 왼쪽 하위 트리에 있는 값은 항상 노드의 값보다 작기 때문에 오른쪽 하위 트리는 항상 노드 값보다 큽니다. 이러한 방식으로 이진 검색 트리에서 값을 찾는 것은 매우 간단해집니다. 찾고 있는 값이 작업 중인 노드보다 작으면 왼쪽으로 이동하고, 값이 더 크면 오른쪽으로 이동합니다. 중복은 관계를 깨뜨리기 때문에 이진 검색 트리에는 중복이 있을 수 없습니다. 아래 그림은 간단한 이진 검색 트리를 나타냅니다.

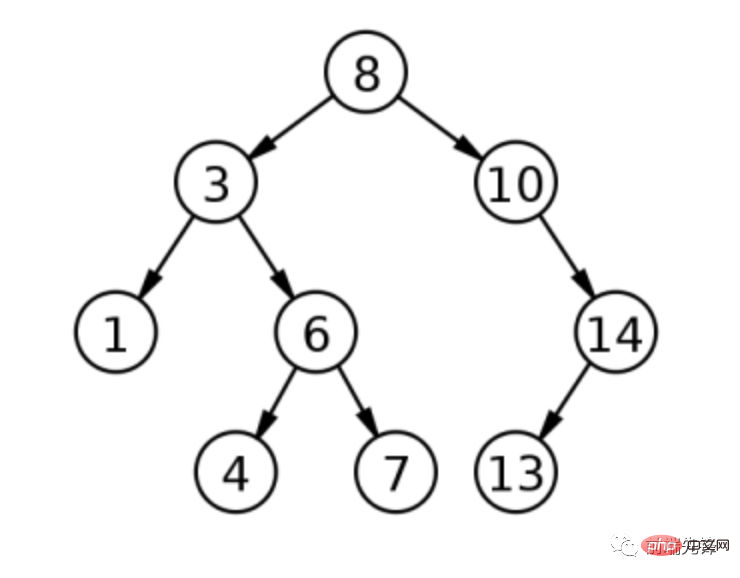
위 그림은 루트 값이 8인 이진 검색 트리를 나타냅니다. 값 3을 추가하면 3이 8보다 작기 때문에 루트의 왼쪽 자식이 됩니다. 값 1이 추가되면 1은 8보다 작고(왼쪽) 1은 3보다 작기 때문에(다시 왼쪽) 3의 왼쪽 자식이 됩니다. 값 10을 더하면 10이 8보다 크기 때문에 follow의 오른쪽 자식이 됩니다. 값 6, 4, 7, 14 및 13을 사용하여 이 프로세스를 계속합니다. 이 이진 검색 트리의 깊이는 3입니다. 이는 루트에서 가장 먼 노드가 3개의 노드임을 의미합니다.
이진 검색 트리는 자연스럽게 정렬된 순서로 끝나므로 각 단계의 가능성을 즉시 제거할 수 있으므로 데이터를 빠르게 찾는 데 사용할 수 있습니다. 찾아야 하는 노드 수를 제한하면 검색 속도가 빨라집니다. 위의 트리에서 값 6을 찾고 싶다고 가정해 보겠습니다. 루트에서 시작하여 6이 8보다 작다는 것을 확인하고 루트의 왼쪽 자식으로 이동합니다. 6은 3보다 크므로 올바른 노드로 이동합니다. 정확한 값을 찾을 수 있습니다. 따라서 이 값을 찾으려면 9개가 아닌 3개의 노드만 방문하면 됩니다.
JavaScript에서 이진 검색 트리를 구현하려면 첫 번째 단계는 기본 인터페이스를 정의하는 것입니다.
function BinarySearchTree() {
    this._root = null;
}

BinarySearchTree.prototype = {

    //restore constructor
    constructor: BinarySearchTree,

    add: function (value){
    },

    contains: function(value){
    },

    remove: function(value){
    },

    size: function(){
    },

    toArray: function(){
    },

    toString: function(){
    }

};기본 인터페이스는 값을 추가하고 삭제하는 방법을 포함하는 다른 데이터 구조와 유사합니다. 또한 JavaScript에 유용한 몇 가지 편의 메서드인 size(), toArray() 및 toString()을 추가했습니다. size(),toArray()和toString(),它们对 JavaScript 很有用。
要掌握使用二叉搜索树的方法,最好从 contains() 方法开始。 contains() 方法接受一个值作为参数,如果值存在于树中则返回 true,否则返回 false。此方法遵循基本的二叉搜索算法来确定该值是否存在:
BinarySearchTree.prototype = {
//more code
contains: function(value){
var found = false,
current = this._root
//make sure there's a node to search
while(!found && current){
//if the value is less than the current node's, go left
if (value < current.value){
current = current.left;
//if the value is greater than the current node's, go right
} else if (value > current.value){
current = current.right;
//values are equal, found it!
} else {
found = true;
}
}
//only proceed if the node was found
return found;
},
//more code
};搜索从树的根开始。如果没有添加数据,则可能没有根,所以必须要进行检查。遍历树遵循前面讨论的简单算法:如果要查找的值小于当前节点则向左移动,如果值更大则向右移动。每次都会覆盖 current 指针,直到找到要找的值(在这种情况下 found 设置为 true)或者在那个方向上没有更多的节点了(在这种情况下,值不在树上)。
在 contains() 中使用的方法也可用于在树中插入新值。主要区别在于你要寻找放置新值的位置,而不是在树中查找值:
BinarySearchTree.prototype = {
//more code
add: function(value){
//create a new item object, place data in
var node = {
value: value,
left: null,
right: null
},
//used to traverse the structure
current;
//special case: no items in the tree yet
if (this._root === null){
this._root = node;
} else {
current = this._root;
while(true){
//if the new value is less than this node's value, go left
if (value < current.value){
//if there's no left, then the new node belongs there
if (current.left === null){
current.left = node;
break;
} else {
current = current.left;
}
//if the new value is greater than this node's value, go right
} else if (value > current.value){
//if there's no right, then the new node belongs there
if (current.right === null){
current.right = node;
break;
} else {
current = current.right;
}
//if the new value is equal to the current one, just ignore
} else {
break;
}
}
}
},
//more code
};在二叉搜索树中添加值时,特殊情况是在没有根的情况。在这种情况下,只需将根设置为新值即可轻松完成工作。对于其他情况,基本算法与 contains()
contains() 메서드부터 시작하는 것이 가장 좋습니다. contains() 메서드는 값을 매개변수로 받아들이고 해당 값이 트리에 있으면 true를 반환하고, 그렇지 않으면 false를 반환합니다. 이 방법은 기본 이진 검색 알고리즘을 따라 값이 존재하는지 확인합니다. 🎜BinarySearchTree.prototype = {
//more code
traverse: function(process){
//helper function
function inOrder(node){
if (node){
//traverse the left subtree
if (node.left !== null){
inOrder(node.left);
}
//call the process method on this node
process.call(this, node);
//traverse the right subtree
if (node.right !== null){
inOrder(node.right);
}
}
}
//start with the root
inOrder(this._root);
},
//more code
};현재 포인터는 찾는 값이 발견될 때까지(이 경우 found가 true로 설정됨) 또는 해당 방향으로 매번 덮어쓰기됩니다. 더 이상 노드가 없습니다(이 경우 값은 트리에 없습니다). 🎜🎜contains()에 사용된 메서드를 사용하여 트리에 새 값을 삽입할 수도 있습니다. 주요 차이점은 트리에서 값을 찾는 것이 아니라 새 값을 넣을 위치를 찾는다는 것입니다. 🎜BinarySearchTree.prototype = {
//more code
size: function(){
var length = 0;
this.traverse(function(node){
length++;
});
return length;
},
toArray: function(){
var result = [];
this.traverse(function(node){
result.push(node.value);
});
return result;
},
toString: function(){
return this.toArray().toString();
},
//more code
};contains()에 사용된 것과 정확히 동일합니다. 새 값이 현재 노드보다 작으면 왼쪽으로 가고 값이 더 크면 오른쪽으로 이동합니다. 가장 큰 차이점은 더 이상 나아갈 수 없을 때 새로운 가치가 있는 곳이라는 것입니다. 따라서 왼쪽으로 이동해야 하는데 왼쪽 노드가 없으면 새 값은 왼쪽 노드가 됩니다(오른쪽 노드와 동일). 중복된 항목이 없으므로 동일한 값을 가진 노드가 발견되면 작업이 중지됩니다. 🎜在继续讨论 size() 方法之前,我想深入讨论树遍历。为了计算二叉搜索树的大小,必须要访问树中的每个节点。二叉搜索树通常会有不同类型的遍历方法,最常用的是有序遍历。通过处理左子树,然后是节点本身,然后是右子树,在每个节点上执行有序遍历。由于二叉搜索树以这种方式排序,从左到右,结果是节点以正确的排序顺序处理。对于 size() 方法,节点遍历的顺序实际上并不重要,但它对 toArray() 方法很重要。由于两种方法都需要执行遍历,我决定添加一个可以通用的 traverse() 方法:
BinarySearchTree.prototype = {

    //more code

    traverse: function(process){

        //helper function
        function inOrder(node){
            if (node){

                //traverse the left subtree
                if (node.left !== null){
                    inOrder(node.left);
                }

                //call the process method on this node
                process.call(this, node);

                //traverse the right subtree
                if (node.right !== null){
                    inOrder(node.right);
                }
            }
        }

        //start with the root
        inOrder(this._root);
    },

    //more code

};此方法接受一个参数 process,这是一个应该在树中的每个节点上运行的函数。该方法定义了一个名为 inOrder() 的辅助函数用于递归遍历树。注意,如果当前节点存在,则递归仅左右移动(以避免多次处理 null )。然后 traverse() 方法从根节点开始按顺序遍历,process() 函数处理每个节点。然后可以使用此方法实现size()、toArray()、toString():
BinarySearchTree.prototype = {

    //more code

    size: function(){
        var length = 0;

        this.traverse(function(node){
            length++;
        });

        return length;
    },

    toArray: function(){
        var result = [];

        this.traverse(function(node){
            result.push(node.value);
        });

        return result;
    },

    toString: function(){
        return this.toArray().toString();
    },

    //more code

};size() 和 toArray() 都调用 traverse() 方法并传入一个函数来在每个节点上运行。在使用 size()的情况下,函数只是递增长度变量,而 toArray() 使用函数将节点的值添加到数组中。 toString()方法在调用 toArray() 之前把返回的数组转换为字符串,并返回 。
删除节点时,你需要确定它是否为根节点。根节点的处理方式与其他节点类似,但明显的例外是根节点需要在结尾处设置为不同的值。为简单起见,这将被视为 JavaScript 代码中的一个特例。
删除节点的第一步是确定节点是否存在:
BinarySearchTree.prototype = {
//more code here
remove: function(value){
var found = false,
parent = null,
current = this._root,
childCount,
replacement,
replacementParent;
//make sure there's a node to search
while(!found && current){
//if the value is less than the current node's, go left
if (value < current.value){
parent = current;
current = current.left;
//if the value is greater than the current node's, go right
} else if (value > current.value){
parent = current;
current = current.right;
//values are equal, found it!
} else {
found = true;
}
}
//only proceed if the node was found
if (found){
//continue
}
},
//more code here
};remove()方法的第一部分是用二叉搜索定位要被删除的节点,如果值小于当前节点的话则向左移动,如果值大于当前节点则向右移动。当遍历时还会跟踪 parent 节点,因为你最终需要从其父节点中删除该节点。当 found 等于 true 时,current 的值是要删除的节点。
删除节点时需要注意三个条件:
1、叶子节点
2、只有一个孩子的节点
3、有两个孩子的节点
从二叉搜索树中删除除了叶节点之外的内容意味着必须移动值来对树正确的排序。前两个实现起来相对简单,只删除了一个叶子节点,删除了一个带有一个子节点的节点并用其子节点替换。最后一种情况有点复杂,以便稍后访问。
在了解如何删除节点之前,你需要知道节点上究竟存在多少个子节点。一旦知道了,你必须确定节点是否为根节点,留下一个相当简单的决策树:
BinarySearchTree.prototype = {
//more code here
remove: function(value){
var found = false,
parent = null,
current = this._root,
childCount,
replacement,
replacementParent;
//find the node (removed for space)
//only proceed if the node was found
if (found){
//figure out how many children
childCount = (current.left !== null ? 1 : 0) +
(current.right !== null ? 1 : 0);
//special case: the value is at the root
if (current === this._root){
switch(childCount){
//no children, just erase the root
case 0:
this._root = null;
break;
//one child, use one as the root
case 1:
this._root = (current.right === null ?
current.left : current.right);
break;
//two children, little work to do
case 2:
//TODO
//no default
}
//non-root values
} else {
switch (childCount){
//no children, just remove it from the parent
case 0:
//if the current value is less than its
//parent's, null out the left pointer
if (current.value < parent.value){
parent.left = null;
//if the current value is greater than its
//parent's, null out the right pointer
} else {
parent.right = null;
}
break;
//one child, just reassign to parent
case 1:
//if the current value is less than its
//parent's, reset the left pointer
if (current.value < parent.value){
parent.left = (current.left === null ?
current.right : current.left);
//if the current value is greater than its
//parent's, reset the right pointer
} else {
parent.right = (current.left === null ?
current.right : current.left);
}
break;
//two children, a bit more complicated
case 2:
//TODO
//no default
}
}
}
},
//more code here
};处理根节点时,这是一个覆盖它的简单过程。对于非根节点,必须根据要删除的节点的值设置 parent 上的相应指针:如果删除的值小于父节点,则 left 指针必须重置为 null (对于没有子节点的节点)或删除节点的 left 指针;如果删除的值大于父级,则必须将 right 指针重置为 null 或删除的节点的 right指针。
如前所述,删除具有两个子节点的节点是最复杂的操作。考虑二元搜索树的以下表示。

根为 8,左子为 3,如果 3 被删除会发生什么?有两种可能性:1(3 左边的孩子,称为有序前身)或4(右子树的最左边的孩子,称为有序继承者)都可以取代 3。
这两个选项中的任何一个都是合适的。要查找有序前驱,即删除值之前的值,请检查要删除的节点的左子树,并选择最右侧的子节点;找到有序后继,在删除值后立即出现的值,反转进程并检查最左侧的右子树。其中每个都需要另一次遍历树来完成操作:
BinarySearchTree.prototype = {

    //more code here

    remove: function(value){

        var found       = false,
            parent      = null,
            current     = this._root,
            childCount,
            replacement,
            replacementParent;

        //find the node (removed for space)

        //only proceed if the node was found
        if (found){

            //figure out how many children
            childCount = (current.left !== null ? 1 : 0) +
                         (current.right !== null ? 1 : 0);

            //special case: the value is at the root
            if (current === this._root){
                switch(childCount){

                    //other cases removed to save space

                    //two children, little work to do
                    case 2:

                        //new root will be the old root's left child
                        //...maybe
                        replacement = this._root.left;

                        //find the right-most leaf node to be
                        //the real new root
                        while (replacement.right !== null){
                            replacementParent = replacement;
                            replacement = replacement.right;
                        }

                        //it's not the first node on the left
                        if (replacementParent !== null){

                            //remove the new root from it's
                            //previous position
                            replacementParent.right = replacement.left;

                            //give the new root all of the old
                            //root's children
                            replacement.right = this._root.right;
                            replacement.left = this._root.left;
                        } else {

                            //just assign the children
                            replacement.right = this._root.right;
                        }

                        //officially assign new root
                        this._root = replacement;

                    //no default

                }

            //non-root values
            } else {

                switch (childCount){

                    //other cases removed to save space

                    //two children, a bit more complicated
                    case 2:

                        //reset pointers for new traversal
                        replacement = current.left;
                        replacementParent = current;

                        //find the right-most node
                        while(replacement.right !== null){
                            replacementParent = replacement;
                            replacement = replacement.right;
                        }

                        replacementParent.right = replacement.left;

                        //assign children to the replacement
                        replacement.right = current.right;
                        replacement.left = current.left;

                        //place the replacement in the right spot
                        if (current.value < parent.value){
                            parent.left = replacement;
                        } else {
                            parent.right = replacement;
                        }

                    //no default

                }

            }

        }

    },

    //more code here

};具有两个子节点的根节点和非根节点的代码几乎相同。此实现始终通过查看左子树并查找最右侧子节点来查找有序前驱。遍历是使用 while 循环中的 replacement 和 replacementParent 变量完成的。
replacement中的节点最终成为替换 current 的节点,因此通过将其父级的 right 指针设置为替换的 left 指针,将其从当前位置移除。
루트 노드의 경우 replacement가 루트 노드의 직계 하위 노드인 경우 replacementParent는 null이므로 replacement의 <code>right 포인터는 단순히 루트의 right 포인터로 설정됩니다. replacement 是根节点的直接子节点时,replacementParent 将为 null,因此 replacement 的 right 指针只是设置为 root 的 right 指针。
最后一步是将替换节点分配到正确的位置。对于根节点,替换设置为新根;对于非根节点,替换被分配到原始 parent
상위 항목의 적절한 위치에 할당됩니다. 이 구현에 대한 참고 사항: 항상 노드를 순서가 지정된 선행 노드로 바꾸면 대부분의 값이 트리의 한쪽에 있는 불균형 트리가 발생할 수 있습니다. 불균형 트리는 검색 효율성이 낮다는 것을 의미하므로 실제 시나리오에서는 주의해야 합니다. 이진 검색 트리 구현에서는 트리의 적절한 균형을 유지하기 위해 순서가 지정된 선행 항목을 사용할지 아니면 순서가 지정된 후속 항목을 사용할지 결정하는 것이 중요합니다(종종 자체 균형 이진 검색 트리라고 함). 이 이진 검색 트리 구현의 전체 소스 코드는 내 GitHub에서 찾을 수 있습니다. 대안적인 구현을 위해 Isaac Schlueter의 GitHub 포크
를 확인해 보세요.이 기사는 다음에서 복제되었습니다: https://segmentfault.com/a/1190000020044659영어 원본 주소: https://humanwhocodes.com/blog/2009/06/09/computer-science-in-javascript- bin-search-tree-part-1/저자: Nicholas C. Zakas
추천 튜토리얼: "JavaScript Video Tutorial
"🎜위 내용은 JS에서 이진 검색 트리를 구현하는 방법을 이해하는 한 기사의 상세 내용입니다. 자세한 내용은 PHP 중국어 웹사이트의 기타 관련 기사를 참조하세요!