분산 세션 도메인 간 공유 문제를 해결하기 위해 Spring 세션 및 Redis 알아보기

Spring Session과 Redis를 사용하여 분산 세션 도메인 간 공유 문제 해결
현상 설명:
서비스 실행 시 프런트엔드 코드와 백엔드 코드가 분리되지 않습니다. 일반적으로 두 개의 인스턴스가 있으면 유사한 요청이 가끔 팝업됩니다. 다시 로그인하라는 메시지, 백그라운드 오류 메시지

이것은 프로세서 예외입니다. 이유는 명확하지 않습니다
머신 인스턴스를 추가한 후 프런트엔드에 액세스할 때. 페이지에서 로그인 페이지에 반복적으로 액세스하여 302페이지가 발생했습니다. 다양한 표시가 로그인 구성 문제로 인해 발생했음을 나타냅니다.
관련 주제 추천: php 세션 (사진, 텍스트, 동영상, 사례 포함)
문제 소개: 세션을 공유할 수 없어 로그인이 필요한 서로 다른 시스템 간에 폴링이 발생하여 최종 서비스 예외가 발생함
솔루션: Spring Session 및 Redis를 사용하여 분산 세션 도메인 간 공유 문제를 해결합니다.
구성 해결:
1 )종속성 추가
<dependency>
  <groupId>org.springframework.session</groupId>
  <artifactId>spring-session-data-redis</artifactId>
  <version>1.2.0.RELEASE</version>
</dependency>
<dependency>
  <groupId>org.apache.velocity</groupId>
  <artifactId>velocity</artifactId>
  <version>1.7</version>
</dependency>
2 ) web.xml 구성 파일 추가:
<!-- 分布式Session共享Filter -->
<filter>
  <filter-name>springSessionRepositoryFilter</filter-name>
  <filter-class>org.springframework.web.filter.DelegatingFilterProxy</filter-class>
</filter>
<filter-mapping>
  <filter-name>springSessionRepositoryFilter</filter-name>
  <url-pattern>/*</url-pattern>
</filter-mapping>
3 ) Spring.xml 구성
<!-- 将session放入redis -->
<context:annotation-config/>
<bean id="redisHttpSessionConfiguration"   class="org.springframework.session.data.redis.config.annotation.web.http.RedisHttpSessionConfiguration">
   <property name="maxInactiveIntervalInSeconds" value="120" />
</bean>
<bean class="org.springframework.data.redis.connection.jedis.JedisConnectionFactory">
   <!-- redis 配置 -->
   <property name="hostName" value="192.168.0.48" />
   <property name="port" value="6379" />
</bean>
분석:
1. 웹의 DelegatingFilterProxy 클래스: 이는 봄에 Tomcat이 로드되기 시작할 때 필터 관리를 Bean에 넘겨줍니다. 또한 세 번째 단계의 구성에서는 RedisHttpSessionConfiguration
2을 소개합니다. RedisHttpSessionConfiguration은 SpringHttpSessionConfiguration 클래스를 상속합니다. SpringHttpSessionConfiguration은 @Bean을 통해 springSessionRepositoryFilter를 주입합니다.
3 、SessionRepositoryFilter 이 필터는 DelegatingFilterProxy가 이전에 검색한 필터입니다. SessionRepositoryFilter가 핵심입니다. 
springSessionRepositoryFilter 필터를 살펴보겠습니다.  4,
4, SessionRepositoryFilter의 기능은 컨테이너의 기본 javax.servlet.http.HttpSession 지원을 org.springframework.session.Session으로 대체하는 것입니다.
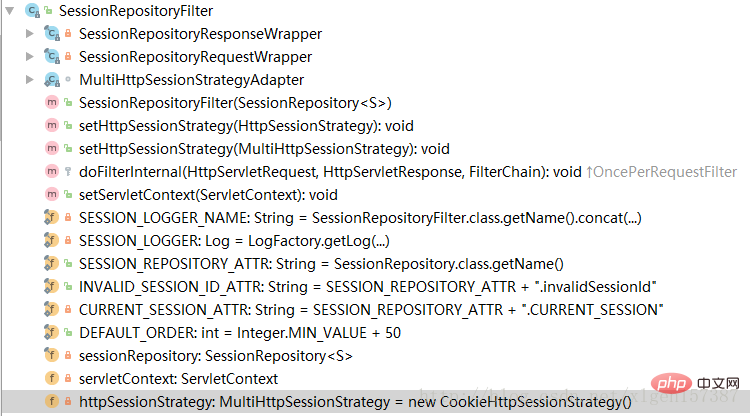
SessionRepositoryFilter의 주요 메소드와 속성은 다음과 같습니다: SessionRepositoryFilter这个过滤器就是前边DelegatingFilterProxy查找的过滤器SessionRepositoryFilter是关键,具体怎么关联起来的呢?
如果未指定init-param参数的话,DelegatingFilterProxy就会把filter-name作为要查找的Bean对象,这也是DelegatingFilterProxy类的作用。可以看出每一个请求都会经过该filter,经过该filter的请求也会相应的经过springSessionRepositoryFilter这个过滤器,那么我们就接着看一下springSessionRepositoryFilter这个过滤器
4、SessionRepositoryFilter的作用就是替换容器默认的javax.servlet.http.HttpSession支持为org.springframework.session.Session。
SessionRepositoryFilter的主要方法和属性如下:

5、其中SessionRepositoryResponseWrapper、SessionRepositoryRequestWrapper、HttpSessionWrapper

 5. 그 중
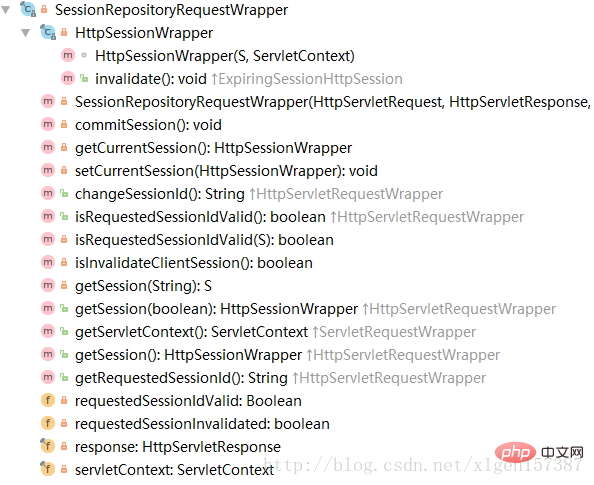
 SessionRepositoryResponseWrapper, SessionRepositoryRequestWrapper, HttpSessionWrapper는 내부 클래스이며, 이는 또한 매우 중요합니다. 예를 들어, SessionRepositoryRequestWrapper Class는 SessionRepositoryRequestWrapper가 javax.servlet.http.httpservletrequestWrapper 클래스를 상속한다는 것을 알 수 있습니다. SessionRepositoryRequestWrapper는 HttpServletRequestWrapper를 상속하고, HttpServletRequestWrapper는 HttpServletRequest 인터페이스를 구현하며, SessionRepositoryRequestWrapper는 HttpServletRequest 인터페이스의 일부 메소드를 다시 작성하므로 getSession 및changeSessionId와 같은 메소드가 있습니다. 이 시점에서 우리는 원래 요청과 응답이 다시 패키징되었다는 것을 대략적으로 이해해야 합니다. 우리는 또한 원래 HttpSesion이 어떻게 Spring Session으로 대체되었는지 이해합니다.

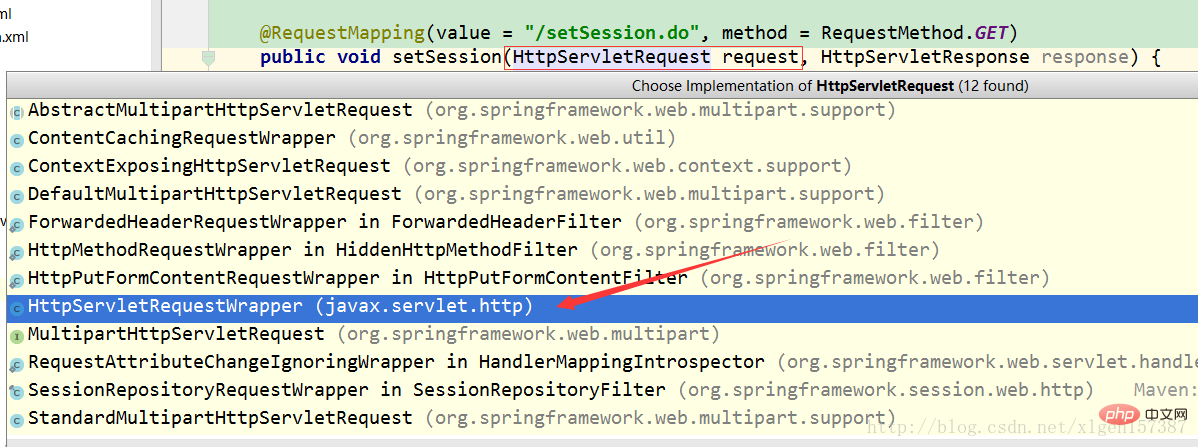
단축키를 사용하여 request.getSession()의 특정 구현을 확인하면 SessionRepositoryRequestWrapper에 의해 재정의된 메서드가 이미 있음을 알 수 있습니다. 위에는 두 가지 기본 구현이 있는데, 하나는 원본이고 다른 하나는 Spring Session에 의해 구현됩니다. 어느 것을 구현으로 선택해야 합니까? 이것은 위에서 언급한 DelegatingFilterProxy 프록시의 역할입니다. 각 요청은 DelegatingFilterProxy를 통해 필터링됩니다. 또한 springSessionRepositoryFilter 필터를 통해 springSessionRepositoryFilter 필터는 원래 요청을 SessionRepositoryRequestWrapper로 변환하는 것을 실현합니다.
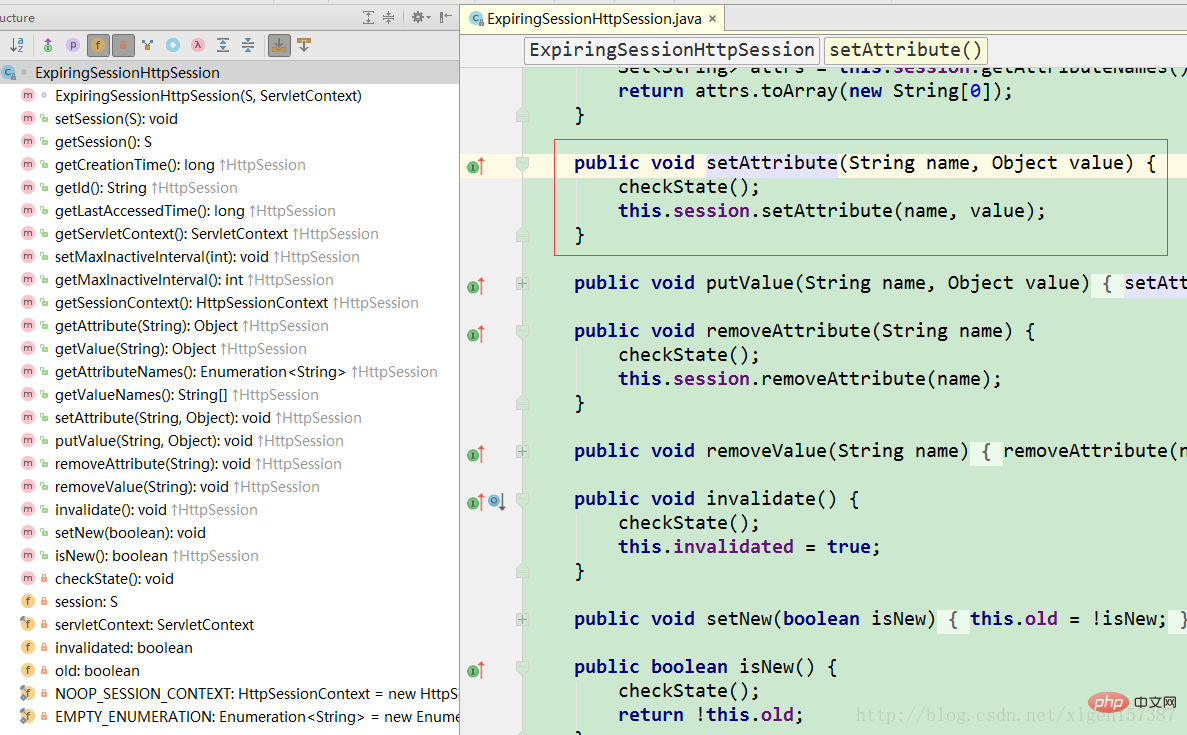
request.getSession().setAttribute(name, value)구현: 코드를 추적하면 아래 콘텐츠에 도달할 수 있습니다.
 Redis 관련 작업을 볼 수 있습니다! 이 시점에서 우리는 Spring Session이 어떻게 작동하는지 알아야 합니다! 아래 과정은 다시 소개하지는 않지만 이미 명확하게 이해되어 있습니다.
관련 학습 권장 사항: redis 비디오 튜토리얼
위 내용은 분산 세션 도메인 간 공유 문제를 해결하기 위해 Spring 세션 및 Redis 알아보기의 상세 내용입니다. 자세한 내용은 PHP 중국어 웹사이트의 기타 관련 기사를 참조하세요!

핫 AI 도구

Undresser.AI Undress
사실적인 누드 사진을 만들기 위한 AI 기반 앱

AI Clothes Remover
사진에서 옷을 제거하는 온라인 AI 도구입니다.

Undress AI Tool
무료로 이미지를 벗다

Clothoff.io
AI 옷 제거제

AI Hentai Generator
AI Hentai를 무료로 생성하십시오.

인기 기사

뜨거운 도구

메모장++7.3.1
사용하기 쉬운 무료 코드 편집기

SublimeText3 중국어 버전
중국어 버전, 사용하기 매우 쉽습니다.

스튜디오 13.0.1 보내기
강력한 PHP 통합 개발 환경

드림위버 CS6
시각적 웹 개발 도구

SublimeText3 Mac 버전
신 수준의 코드 편집 소프트웨어(SublimeText3)

뜨거운 주제
 7467
7467
 15
15
 1376
1376
 52
52
 77
77
 11
11
 48
48
 19
19
 19
19
 22
22
 Redis 클러스터 모드를 구축하는 방법
Apr 10, 2025 pm 10:15 PM
Redis Cluster Mode는 Sharding을 통해 Redis 인스턴스를 여러 서버에 배포하여 확장 성 및 가용성을 향상시킵니다. 시공 단계는 다음과 같습니다. 포트가 다른 홀수 redis 인스턴스를 만듭니다. 3 개의 센티넬 인스턴스를 만들고, Redis 인스턴스 및 장애 조치를 모니터링합니다. Sentinel 구성 파일 구성, Redis 인스턴스 정보 및 장애 조치 설정 모니터링 추가; Redis 인스턴스 구성 파일 구성, 클러스터 모드 활성화 및 클러스터 정보 파일 경로를 지정합니다. 각 redis 인스턴스의 정보를 포함하는 Nodes.conf 파일을 작성합니다. 클러스터를 시작하고 Create 명령을 실행하여 클러스터를 작성하고 복제본 수를 지정하십시오. 클러스터에 로그인하여 클러스터 정보 명령을 실행하여 클러스터 상태를 확인하십시오. 만들다
 기본 Redis를 구현하는 방법
Apr 10, 2025 pm 07:21 PM
Redis는 해시 테이블을 사용하여 데이터를 저장하고 문자열, 목록, 해시 테이블, 컬렉션 및 주문한 컬렉션과 같은 데이터 구조를 지원합니다. Redis는 Snapshots (RDB)를 통해 데이터를 유지하고 WRITE 전용 (AOF) 메커니즘을 추가합니다. Redis는 마스터 슬레이브 복제를 사용하여 데이터 가용성을 향상시킵니다. Redis는 단일 스레드 이벤트 루프를 사용하여 연결 및 명령을 처리하여 데이터 원자력과 일관성을 보장합니다. Redis는 키의 만료 시간을 설정하고 게으른 삭제 메커니즘을 사용하여 만료 키를 삭제합니다.
 Redis에서 모든 키를 보는 방법
Apr 10, 2025 pm 07:15 PM
Redis에서 모든 키를 보려면 세 가지 방법이 있습니다. 키 명령을 사용하여 지정된 패턴과 일치하는 모든 키를 반환하십시오. 스캔 명령을 사용하여 키를 반복하고 키 세트를 반환하십시오. 정보 명령을 사용하여 총 키 수를 얻으십시오.
 Redis의 버전 번호를 보는 방법
Apr 10, 2025 pm 05:57 PM
Redis 버전 번호를 보려면 다음 세 가지 방법을 사용할 수 있습니다. (1) info 명령을 입력하고 (2) -version 옵션으로 서버를 시작하고 (3) 구성 파일을 봅니다.
 Redis-Server를 찾을 수없는 경우해야 할 일
Apr 10, 2025 pm 06:54 PM
Redis-Server가 찾을 수없는 문제를 해결하기위한 단계 : Redis가 올바르게 설치되어 있는지 확인하십시오. 환경 변수를 설정 redis_host 및 redis_port; Redis Server Redis-Server를 시작하십시오. 서버가 Redis-Cli Ping을 실행 중인지 확인하십시오.
 Redis Zset을 사용하는 방법
Apr 10, 2025 pm 07:27 PM
Redis 순서 세트 (ZSETS)는 순서가있는 요소를 저장하고 관련 점수별로 정렬하는 데 사용됩니다. ZSET을 사용하는 단계에는 다음이 포함됩니다. 1. ZSET을 만듭니다. 2. 회원 추가; 3. 회원 점수를 얻으십시오. 4. 순위를 얻으십시오. 5. 순위 범위에서 멤버를 받으십시오. 6. 회원 삭제; 7. 요소 수를 얻으십시오. 8. 점수 범위에서 멤버 수를 얻으십시오.
 Redis 명령을 사용하는 방법
Apr 10, 2025 pm 08:45 PM
Redis 지시 사항을 사용하려면 다음 단계가 필요합니다. Redis 클라이언트를 엽니 다. 명령 (동사 키 값)을 입력하십시오. 필요한 매개 변수를 제공합니다 (명령어마다 다름). 명령을 실행하려면 Enter를 누르십시오. Redis는 작업 결과를 나타내는 응답을 반환합니다 (일반적으로 OK 또는 -err).
 Redis의 소스 코드를 읽는 방법
Apr 10, 2025 pm 08:27 PM
Redis 소스 코드를 이해하는 가장 좋은 방법은 단계별로 이동하는 것입니다. Redis의 기본 사항에 익숙해집니다. 특정 모듈을 선택하거나 시작점으로 기능합니다. 모듈 또는 함수의 진입 점으로 시작하여 코드를 한 줄씩 봅니다. 함수 호출 체인을 통해 코드를 봅니다. Redis가 사용하는 기본 데이터 구조에 익숙해 지십시오. Redis가 사용하는 알고리즘을 식별하십시오.


