맞춤형 DingTalk 로봇의 샘플 코드를 사용하기 위해 Python을 배우십시오.

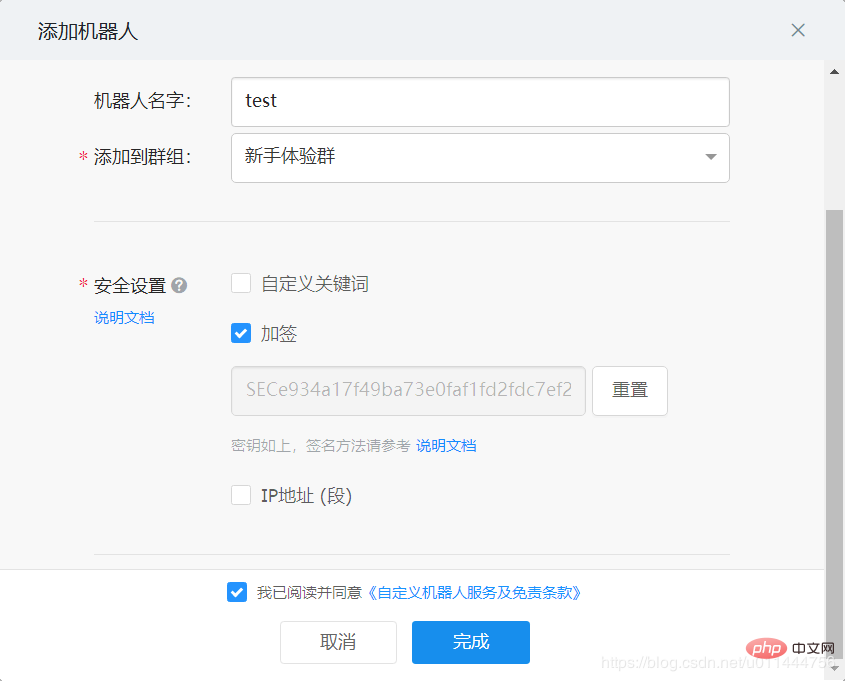
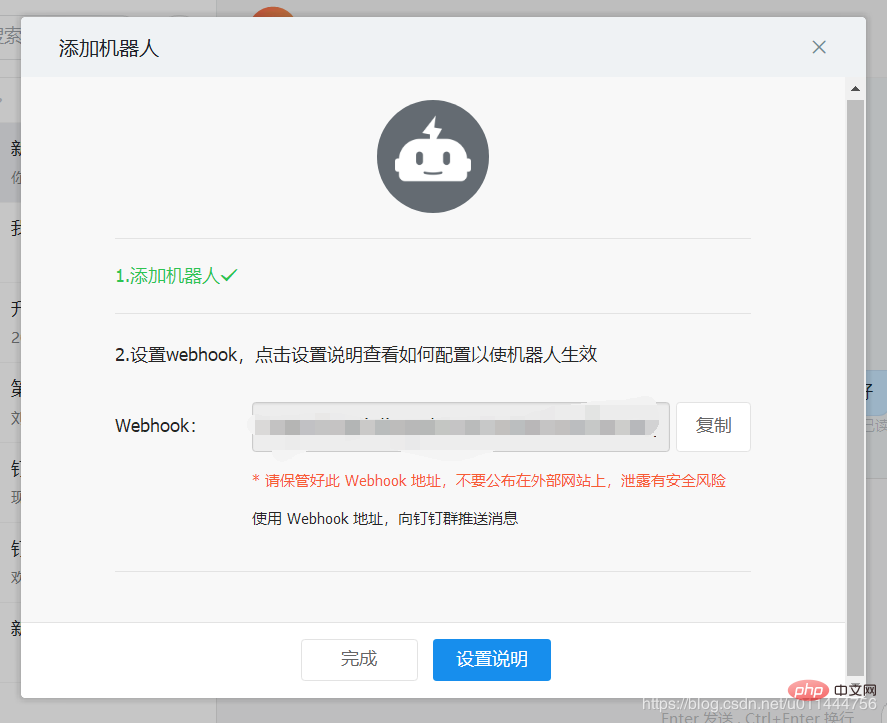
1. 맞춤형 로봇 추가


관련 학습 권장 사항: python 비디오 튜토리얼
2. DingTalk 로봇을 요청하는 Python 코드 작성 주어진 웹훅
DingTalk 맞춤형 로봇 공식 문서
보안 방법은 서명 방법을 사용합니다.
첫 번째 단계는 타임스탬프+"n"+키를 서명 문자열로 사용하고 HmacSHA256 알고리즘을 사용하여 계산하는 것입니다. , Base64 인코딩, 마지막으로 서명 매개변수를 urlEncode하여 최종 서명을 얻습니다(UTF-8 문자 집합을 사용해야 함).
Parameters |
설명 |
timestamp |
현재 타임스탬프(밀리초)는 요청 호출 시간으로부터 1시간을 초과할 수 없습니다 |
비밀 | Key, 로봇 보안 설정 페이지, 서명 열 아래에 SEC로 시작하는 문자열이 표시됩니다 |
import requests


#python 3.8
import time
import hmac
import hashlib
import base64
import urllib.parse

timestamp = str(round(time.time() * 1000))
secret = '加签时生成的密钥'
secret_enc = secret.encode('utf-8')
string_to_sign = '{}\n{}'.format(timestamp, secret)
string_to_sign_enc = string_to_sign.encode('utf-8')
hmac_code = hmac.new(secret_enc, string_to_sign_enc, digestmod=hashlib.sha256).digest()
sign = urllib.parse.quote_plus(base64.b64encode(hmac_code))
print(timestamp)
print(sign)두 번째 단계는 첫 번째 단계에서 얻은 타임스탬프와 서명 값을 URL에 연결하는 것입니다.
Parameters | 설명 |
timestamp | 첫 번째 단계에서 사용된 타임스탬프 |
sign | 첫 번째 단계에서 얻은 시그니처 값 |
세 번째 단계, 요청 보내기
url='生成的Webhook×tamp={}&sign={}'.format(timestamp, sign)
print (url)
headers={
'Content-Type':'application/json'
}
json={"msgtype": "text",
"text": {
"content": "888"
} }
resp=requests.post(url=url,headers=headers,json=json)
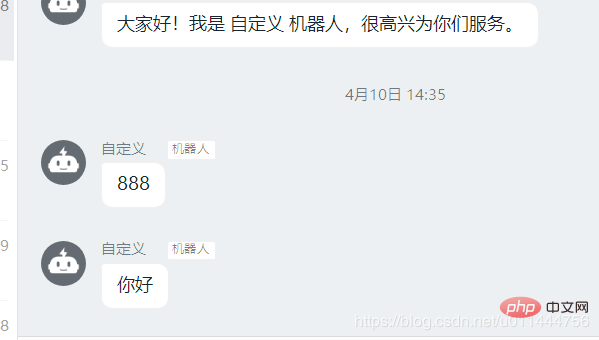
print (resp.text)결과:

전체 코드:
import requests


#python 3.8
import time
import hmac
import hashlib
import base64
import urllib.parse

timestamp = str(round(time.time() * 1000))
secret = '加签时生成的密钥'
secret_enc = secret.encode('utf-8')
string_to_sign = '{}\n{}'.format(timestamp, secret)
string_to_sign_enc = string_to_sign.encode('utf-8')
hmac_code = hmac.new(secret_enc, string_to_sign_enc, digestmod=hashlib.sha256).digest()
sign = urllib.parse.quote_plus(base64.b64encode(hmac_code))
print(timestamp)
print(sign)


url='生成的Webhook×tamp={}&sign={}'.format(timestamp, sign)


print (url)
headers={
 'Content-Type':'application/json'
}
json={"msgtype": "text",
 "text": {
  "content": "测试"
 } }
resp=requests.post(url=url,headers=headers,json=json)
print (resp.text)관련 학습 권장 사항: 프로그래밍 비디오
위 내용은 맞춤형 DingTalk 로봇의 샘플 코드를 사용하기 위해 Python을 배우십시오.의 상세 내용입니다. 자세한 내용은 PHP 중국어 웹사이트의 기타 관련 기사를 참조하세요!

핫 AI 도구

Undresser.AI Undress
사실적인 누드 사진을 만들기 위한 AI 기반 앱

AI Clothes Remover
사진에서 옷을 제거하는 온라인 AI 도구입니다.

Undress AI Tool
무료로 이미지를 벗다

Clothoff.io
AI 옷 제거제

AI Hentai Generator
AI Hentai를 무료로 생성하십시오.

인기 기사

뜨거운 도구

메모장++7.3.1
사용하기 쉬운 무료 코드 편집기

SublimeText3 중국어 버전
중국어 버전, 사용하기 매우 쉽습니다.

스튜디오 13.0.1 보내기
강력한 PHP 통합 개발 환경

드림위버 CS6
시각적 웹 개발 도구

SublimeText3 Mac 버전
신 수준의 코드 편집 소프트웨어(SublimeText3)

뜨거운 주제
 7489
7489
 15
15
 1377
1377
 52
52
 77
77
 11
11
 52
52
 19
19
 19
19
 41
41
 MySQL은 지불해야합니다
Apr 08, 2025 pm 05:36 PM
MySQL에는 무료 커뮤니티 버전과 유료 엔터프라이즈 버전이 있습니다. 커뮤니티 버전은 무료로 사용 및 수정할 수 있지만 지원은 제한되어 있으며 안정성이 낮은 응용 프로그램에 적합하며 기술 기능이 강합니다. Enterprise Edition은 안정적이고 신뢰할 수있는 고성능 데이터베이스가 필요하고 지원 비용을 기꺼이 지불하는 응용 프로그램에 대한 포괄적 인 상업적 지원을 제공합니다. 버전을 선택할 때 고려 된 요소에는 응용 프로그램 중요도, 예산 책정 및 기술 기술이 포함됩니다. 완벽한 옵션은없고 가장 적합한 옵션 만 있으므로 특정 상황에 따라 신중하게 선택해야합니다.
 hadidb : 파이썬의 가볍고 수평 확장 가능한 데이터베이스
Apr 08, 2025 pm 06:12 PM
HADIDB : 가볍고 높은 수준의 확장 가능한 Python 데이터베이스 HadIDB (HADIDB)는 파이썬으로 작성된 경량 데이터베이스이며 확장 수준이 높습니다. PIP 설치를 사용하여 HADIDB 설치 : PIPINSTALLHADIDB 사용자 관리 사용자 만들기 사용자 : createUser () 메소드를 작성하여 새 사용자를 만듭니다. Authentication () 메소드는 사용자의 신원을 인증합니다. Fromhadidb.operationimportuseruser_obj = user ( "admin", "admin") user_obj.
 MongoDB 데이터베이스 비밀번호를 보는 Navicat의 방법
Apr 08, 2025 pm 09:39 PM
해시 값으로 저장되기 때문에 MongoDB 비밀번호를 Navicat을 통해 직접 보는 것은 불가능합니다. 분실 된 비밀번호 검색 방법 : 1. 비밀번호 재설정; 2. 구성 파일 확인 (해시 값이 포함될 수 있음); 3. 코드를 점검하십시오 (암호 하드 코드 메일).
 MySQL은 인터넷이 필요합니까?
Apr 08, 2025 pm 02:18 PM
MySQL은 기본 데이터 저장 및 관리를위한 네트워크 연결없이 실행할 수 있습니다. 그러나 다른 시스템과의 상호 작용, 원격 액세스 또는 복제 및 클러스터링과 같은 고급 기능을 사용하려면 네트워크 연결이 필요합니다. 또한 보안 측정 (예 : 방화벽), 성능 최적화 (올바른 네트워크 연결 선택) 및 데이터 백업은 인터넷에 연결하는 데 중요합니다.
 MySQL Workbench가 Mariadb에 연결할 수 있습니다
Apr 08, 2025 pm 02:33 PM
MySQL Workbench는 구성이 올바른 경우 MariadB에 연결할 수 있습니다. 먼저 커넥터 유형으로 "mariadb"를 선택하십시오. 연결 구성에서 호스트, 포트, 사용자, 비밀번호 및 데이터베이스를 올바르게 설정하십시오. 연결을 테스트 할 때는 마리아드 브 서비스가 시작되었는지, 사용자 이름과 비밀번호가 올바른지, 포트 번호가 올바른지, 방화벽이 연결을 허용하는지 및 데이터베이스가 존재하는지 여부를 확인하십시오. 고급 사용에서 연결 풀링 기술을 사용하여 성능을 최적화하십시오. 일반적인 오류에는 불충분 한 권한, 네트워크 연결 문제 등이 포함됩니다. 오류를 디버깅 할 때 오류 정보를 신중하게 분석하고 디버깅 도구를 사용하십시오. 네트워크 구성을 최적화하면 성능이 향상 될 수 있습니다
 고로드 애플리케이션의 MySQL 성능을 최적화하는 방법은 무엇입니까?
Apr 08, 2025 pm 06:03 PM
MySQL 데이터베이스 성능 최적화 안내서 리소스 집약적 응용 프로그램에서 MySQL 데이터베이스는 중요한 역할을 수행하며 대규모 트랜잭션 관리를 담당합니다. 그러나 응용 프로그램 규모가 확장됨에 따라 데이터베이스 성능 병목 현상은 종종 제약이됩니다. 이 기사는 일련의 효과적인 MySQL 성능 최적화 전략을 탐색하여 응용 프로그램이 고 부하에서 효율적이고 반응이 유지되도록합니다. 실제 사례를 결합하여 인덱싱, 쿼리 최적화, 데이터베이스 설계 및 캐싱과 같은 심층적 인 주요 기술을 설명합니다. 1. 데이터베이스 아키텍처 설계 및 최적화 된 데이터베이스 아키텍처는 MySQL 성능 최적화의 초석입니다. 몇 가지 핵심 원칙은 다음과 같습니다. 올바른 데이터 유형을 선택하고 요구 사항을 충족하는 가장 작은 데이터 유형을 선택하면 저장 공간을 절약 할 수있을뿐만 아니라 데이터 처리 속도를 향상시킬 수 있습니다.
 MySQL을 해결하는 방법은 로컬 호스트에 연결할 수 없습니다
Apr 08, 2025 pm 02:24 PM
MySQL 연결은 다음과 같은 이유로 인한 것일 수 있습니다. MySQL 서비스가 시작되지 않았고 방화벽이 연결을 가로 채고 포트 번호가 올바르지 않으며 사용자 이름 또는 비밀번호가 올바르지 않으며 My.cnf의 청취 주소가 부적절하게 구성되어 있습니다. 1. MySQL 서비스가 실행 중인지 확인합니다. 2. MySQL이 포트 3306을들을 수 있도록 방화벽 설정을 조정하십시오. 3. 포트 번호가 실제 포트 번호와 일치하는지 확인하십시오. 4. 사용자 이름과 암호가 올바른지 확인하십시오. 5. my.cnf의 바인드 아드 드레스 설정이 올바른지 확인하십시오.
 Amazon Athena와 함께 AWS Glue Crawler를 사용하는 방법
Apr 09, 2025 pm 03:09 PM
데이터 전문가는 다양한 소스에서 많은 양의 데이터를 처리해야합니다. 이것은 데이터 관리 및 분석에 어려움을 겪을 수 있습니다. 다행히도 AWS Glue와 Amazon Athena의 두 가지 AWS 서비스가 도움이 될 수 있습니다.


