vc를 mysql 데이터베이스에 연결하는 방법
mysql 데이터베이스를 vc와 연결하는 방법: 먼저 VC6을 열고 중간 목록 상자에 로컬로 설치된 MySQL의 포함 디렉터리 경로를 추가한 다음 "라이브러리 파일"을 선택하고 MySQL의 Lib 디렉터리 경로를 추가하고 마지막으로 프로그래밍을 수행합니다. 테스트.

추천: "mysql 비디오 튜토리얼"
1. MySQL 설치
Mysql 설치는 공식 웹사이트에서 다운로드할 수 있습니다. . . 최신 버전은 5.7입니다. .
2. VC6.0 설정
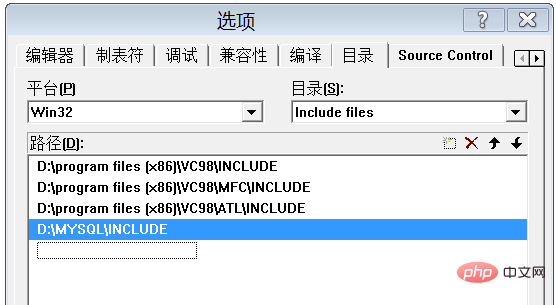
(1) 도구 모음의 도구 메뉴에서 0 옵션 옵션을 선택하고 오른쪽에 있는 "디렉터리 표시:" 드롭다운 목록을 선택합니다. 디렉터리 탭 "Includefiles"에서 중간 목록 상자에 로컬 MySQL 설치의 포함 디렉터리 경로를 추가합니다. 그림에 표시된 대로:

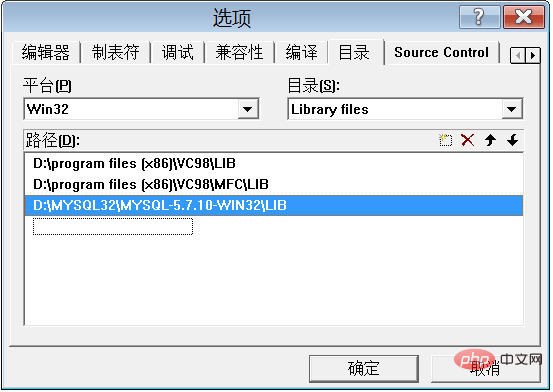
(2) 위에서 언급한 "다음에 대한 디렉터리 표시:" 드롭다운 목록에서 "라이브러리 파일"을 선택한 다음 로컬 MySQL의 Lib 디렉터리 경로를 추가합니다. 설치. 그림에 표시된 대로:

** 여기에 설명하고 싶습니다. 주의 깊은 사람들은 내 디렉터리가 이전 그림의 디렉터리와 다르다는 것을 알게 될 것입니다. 이는 libmysql.lib 오류 때문입니다. : 치명적인 오류 LNK1113: 잘못된 머신 잘못된 서버
이것은 vc가 32비트 프로그램을 개발하는데, mysql 데이터베이스가 64비트 프로그램을 사용하여 64비트 데이터베이스를 운영하기 때문입니다. 당신은 분명히 오류를 범할 것입니다. 아래에서 설명하겠습니다. 블로그 게시물에서 해결 방법을 자세히 설명할 것입니다.
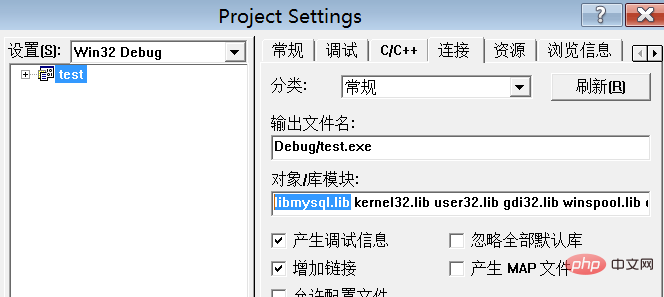
(3) "프로젝트 설정->링크:객체/라이브러리 모듈"에 "libmysql.lib"를 추가합니다.议 建 (5) "libmysql.lib, libmysql.dll"을 빌드한 디렉터리에 복사하는 것이 좋습니다.
이 두 파일은 D:Mysqllib 디렉터리에 있습니다. 
3. 프로그래밍 구현
#include <stdio.h>
#include <windows.h>
#include <mysql.h>

int main()
{

       MYSQL mysql;
       mysql_init(&mysql); //初始化mysql结构

       if(!mysql_real_connect(&mysql,"localhost","myuser","123456","student_db",3306,NULL,0))
              printf("\n连接数据库时发生错误!\n");
       else
              printf("\n连接数据库成功!\n");

       mysql_close(&mysql); //释放数据库

       return 0;
}mysql_real_connect(&mysql,"localhost","myuser","123456","student_db",3306,NULL,0)//myuser는 내 사용자 이름, "123456"은 비밀번호, "student_db"는 데이터베이스 , 3306은 포트 번호입니다.
2. 쿼리 애플릿을 구현합니다.
// test.cpp : Defines the entry point for the console application.
//
#include <stdio.h>
#include <windows.h>
#include "StdAfx.h"

#include <winsock.h>
#include <iostream>
#include <string>
#include <mysql.h>
using namespace std;
//不需要单步调试的就注释掉
//#define STEPBYSTEP

void pause(){

    #ifdef STEPBYSTEP
        system("pause");
    #endif
}
void writeToFile(const char *s)
{

     FILE *fp=fopen("info.txt","rw");
     fprintf(fp,s);
     fclose(fp);

}
 /* int main()

{

       MYSQL mysql;
       mysql_init(&mysql); //初始化mysql结构

       if(!mysql_real_connect(&mysql,"localhost","myuser","123456","student_db",3306,NULL,0))
              printf("\n连接数据库时发生错误!\n");
       else
              printf("\n连接数据库成功!\n");

       mysql_close(&mysql); //释放数据库

       return 0;
}*/
int main(int argc, char* argv[]){

    cout<<"start...."<<endl;
    pause();
    MYSQL mysql;
    if(0==mysql_library_init(0,NULL,NULL))
    {
        cout<<"mysql_library_init succeed"<<endl;

    }else{
        cout<<"mysql_library_init failed"<<endl;
        return -1;
    }
    pause();
    if(NULL!=mysql_init(&mysql))
    {

        cout<<"mysql_init succeed"<<endl;
    }else{
        cout<<"mysql_init failed"<<endl;
        return -1;
    }
    pause();
    if(0==mysql_options(&mysql,MYSQL_SET_CHARSET_NAME,"gb2312"))
    {

        cout<<"mysql_option succeed"<<endl;
    }else{
        cout<<"mysql_option failed"<<endl;
        return -1;
    }
    pause();

    if(NULL!=mysql_real_connect(&mysql,"localhost","myuser","123456","student_db",3306,NULL,0))
    {

        cout<<"mysql_real_connect succeed"<<endl;
    }else{
        cout<<"mysql_real_connect failed"<<endl;
        return -1;
    }
    pause();
    string sql;

    sql="select * from sgroup";
    MYSQL_RES *result=NULL;
    if(0==mysql_query(&mysql,sql.c_str()))
    {

            cout<<"mysql_query select succeed"<<endl;
            result=mysql_store_result(&mysql);
            int rowcount=mysql_num_rows(result);
            cout<<"row count:"<<rowcount<<endl;
            unsigned int fieldcount=mysql_num_fields(result);
            MYSQL_FIELD *field=NULL;
            for(unsigned int i=0;i<fieldcount;i++)
            {

                field=mysql_fetch_field_direct(result,i);
                cout<<field->name<<"\t\t";
            }
            cout<<endl;
            MYSQL_ROW row=NULL;
            row=mysql_fetch_row(result);
            while(NULL!=row)
            {

                for(int i=0;i<fieldcount;i++){

                    cout<<row[i]<<"\t\t";

                }
                cout<<endl;
                row=mysql_fetch_row(result);

            }
    }else{

            cout<<"mysql_query select data failed"<<endl;
            mysql_close(&mysql);
            return -1;
    }
    pause();
    /*sql="drop table user_info";
    if(0==mysql_query(&mysql,sql.c_str()))
    {

            cout<<"mysql_query drop table succeed"<<endl;
    }else{
            cout<<"mysql_query drop table failed"<<endl;
            mysql_close(&mysql);
            return -1;

    }  */
    mysql_free_result(result);
    mysql_close(&mysql);
    mysql_server_end();


    system("pause");
    return 0;
}
연결에 성공했습니다. . 하하. .
위 내용은 vc를 mysql 데이터베이스에 연결하는 방법의 상세 내용입니다. 자세한 내용은 PHP 중국어 웹사이트의 기타 관련 기사를 참조하세요!

핫 AI 도구

Undresser.AI Undress
사실적인 누드 사진을 만들기 위한 AI 기반 앱

AI Clothes Remover
사진에서 옷을 제거하는 온라인 AI 도구입니다.

Undress AI Tool
무료로 이미지를 벗다

Clothoff.io
AI 옷 제거제

Video Face Swap
완전히 무료인 AI 얼굴 교환 도구를 사용하여 모든 비디오의 얼굴을 쉽게 바꾸세요!

인기 기사

뜨거운 도구

메모장++7.3.1
사용하기 쉬운 무료 코드 편집기

SublimeText3 중국어 버전
중국어 버전, 사용하기 매우 쉽습니다.

스튜디오 13.0.1 보내기
강력한 PHP 통합 개발 환경

드림위버 CS6
시각적 웹 개발 도구

SublimeText3 Mac 버전
신 수준의 코드 편집 소프트웨어(SublimeText3)

뜨거운 주제
 7678
7678
 15
15
 1393
1393
 52
52
 1209
1209
 24
24
 91
91
 11
11
 73
73
 19
19
 phpmyadmin을 여는 방법
Apr 10, 2025 pm 10:51 PM
다음 단계를 통해 phpmyadmin을 열 수 있습니다. 1. 웹 사이트 제어판에 로그인; 2. phpmyadmin 아이콘을 찾고 클릭하십시오. 3. MySQL 자격 증명을 입력하십시오. 4. "로그인"을 클릭하십시오.
 MySQL : 세계에서 가장 인기있는 데이터베이스 소개
Apr 12, 2025 am 12:18 AM
MySQL은 오픈 소스 관계형 데이터베이스 관리 시스템으로, 주로 데이터를 신속하고 안정적으로 저장하고 검색하는 데 사용됩니다. 작업 원칙에는 클라이언트 요청, 쿼리 해상도, 쿼리 실행 및 반환 결과가 포함됩니다. 사용의 예로는 테이블 작성, 데이터 삽입 및 쿼리 및 조인 작업과 같은 고급 기능이 포함됩니다. 일반적인 오류에는 SQL 구문, 데이터 유형 및 권한이 포함되며 최적화 제안에는 인덱스 사용, 최적화 된 쿼리 및 테이블 분할이 포함됩니다.
 MySQL의 장소 : 데이터베이스 및 프로그래밍
Apr 13, 2025 am 12:18 AM
데이터베이스 및 프로그래밍에서 MySQL의 위치는 매우 중요합니다. 다양한 응용 프로그램 시나리오에서 널리 사용되는 오픈 소스 관계형 데이터베이스 관리 시스템입니다. 1) MySQL은 웹, 모바일 및 엔터프라이즈 레벨 시스템을 지원하는 효율적인 데이터 저장, 조직 및 검색 기능을 제공합니다. 2) 클라이언트 서버 아키텍처를 사용하고 여러 스토리지 엔진 및 인덱스 최적화를 지원합니다. 3) 기본 사용에는 테이블 작성 및 데이터 삽입이 포함되며 고급 사용에는 다중 테이블 조인 및 복잡한 쿼리가 포함됩니다. 4) SQL 구문 오류 및 성능 문제와 같은 자주 묻는 질문은 설명 명령 및 느린 쿼리 로그를 통해 디버깅 할 수 있습니다. 5) 성능 최적화 방법에는 인덱스의 합리적인 사용, 최적화 된 쿼리 및 캐시 사용이 포함됩니다. 모범 사례에는 거래 사용 및 준비된 체계가 포함됩니다
 MySQL을 사용하는 이유는 무엇입니까? 혜택과 장점
Apr 12, 2025 am 12:17 AM
MySQL은 성능, 신뢰성, 사용 편의성 및 커뮤니티 지원을 위해 선택됩니다. 1.MYSQL은 효율적인 데이터 저장 및 검색 기능을 제공하여 여러 데이터 유형 및 고급 쿼리 작업을 지원합니다. 2. 고객-서버 아키텍처 및 다중 스토리지 엔진을 채택하여 트랜잭션 및 쿼리 최적화를 지원합니다. 3. 사용하기 쉽고 다양한 운영 체제 및 프로그래밍 언어를 지원합니다. 4. 강력한 지역 사회 지원을 받고 풍부한 자원과 솔루션을 제공합니다.
 Apache의 데이터베이스에 연결하는 방법
Apr 13, 2025 pm 01:03 PM
Apache는 데이터베이스에 연결하여 다음 단계가 필요합니다. 데이터베이스 드라이버 설치. 연결 풀을 만들려면 Web.xml 파일을 구성하십시오. JDBC 데이터 소스를 작성하고 연결 설정을 지정하십시오. JDBC API를 사용하여 Connections, 명세서 작성, 매개 변수 바인딩, 쿼리 또는 업데이트 실행 및 처리를 포함하여 Java 코드의 데이터베이스에 액세스하십시오.
 Docker의 MySQL을 시작하는 방법
Apr 15, 2025 pm 12:09 PM
Docker에서 MySQL을 시작하는 프로세스는 다음 단계로 구성됩니다. MySQL 이미지를 가져와 컨테이너를 작성하고 시작하고 루트 사용자 암호를 설정하고 포트 확인 연결을 매핑하고 데이터베이스를 작성하고 사용자는 데이터베이스에 모든 권한을 부여합니다.
 Centos 설치 MySQL
Apr 14, 2025 pm 08:09 PM
Centos에 MySQL을 설치하려면 다음 단계가 필요합니다. 적절한 MySQL Yum 소스 추가. mysql 서버를 설치하려면 yum install mysql-server 명령을 실행하십시오. mysql_secure_installation 명령을 사용하여 루트 사용자 비밀번호 설정과 같은 보안 설정을 작성하십시오. 필요에 따라 MySQL 구성 파일을 사용자 정의하십시오. MySQL 매개 변수를 조정하고 성능을 위해 데이터베이스를 최적화하십시오.
 MySQL의 역할 : 웹 응용 프로그램의 데이터베이스
Apr 17, 2025 am 12:23 AM
웹 응용 프로그램에서 MySQL의 주요 역할은 데이터를 저장하고 관리하는 것입니다. 1. MySQL은 사용자 정보, 제품 카탈로그, 트랜잭션 레코드 및 기타 데이터를 효율적으로 처리합니다. 2. SQL 쿼리를 통해 개발자는 데이터베이스에서 정보를 추출하여 동적 컨텐츠를 생성 할 수 있습니다. 3.mysql은 클라이언트-서버 모델을 기반으로 작동하여 허용 가능한 쿼리 속도를 보장합니다.


