

을 방문하세요.많은 무료 학습 권장 사항이 있으므로 python tutorial(동영상)
소개
어제 기사에서는 PyTorch에서 자신의 이미지를 사용하여 이미지 분류기를 훈련한 다음 이를 이미지 인식에 사용하는 방법을 다뤘습니다. 이 기사에서는 사전 훈련된 분류기를 사용하여 이미지에서 여러 객체를 감지하고 비디오에서 추적하는 방법을 보여줍니다.
이미지의 표적 탐지
표적 탐지를 위한 알고리즘은 다양하며 현재 가장 인기 있는 알고리즘은 YOLO와 SSD입니다. 이 기사에서는 YOLOv3를 사용합니다. 여기서는 YOLO에 대해 자세히 논의하지 않겠습니다. 더 자세히 알고 싶으시면 아래 링크를 참조하세요~ (https://pjreddie.com/darknet/yolo/)
시작해 보겠습니다. 아직 The에서 가져오는 중입니다. 모듈 시작:
from models import *
from utils import *
import os, sys, time, datetime, random
import torch
from torch.utils.data import DataLoader
from torchvision import datasets, transforms
from torch.autograd import Variable
import matplotlib.pyplot as plt
import matplotlib.patches as patches
from PIL import Image
그런 다음 사전 훈련된 구성과 가중치는 물론 이미지 크기, 신뢰도 임계값 및 최대 비최대 억제 임계값을 포함하여 사전 정의된 일부 값을 로드합니다.
config_path='config/yolov3.cfg'
weights_path='config/yolov3.weights'
class_path='config/coco.names'
img_size=416
conf_thres=0.8
nms_thres=0.4
# Load model and weights
model = Darknet(config_path, img_size=img_size)
model.load_weights(weights_path)
model.cuda()
model.eval()
classes = utils.load_classes(class_path)
Tensor = torch.cuda.FloatTensor
다음 함수는 지정된 이미지에 대한 감지 결과를 반환합니다.
def detect_image(img):
    # scale and pad image
    ratio = min(img_size/img.size[0], img_size/img.size[1])
    imw = round(img.size[0] * ratio)
    imh = round(img.size[1] * ratio)
    img_transforms=transforms.Compose([transforms.Resize((imh,imw)),
         transforms.Pad((max(int((imh-imw)/2),0),
              max(int((imw-imh)/2),0), max(int((imh-imw)/2),0),
              max(int((imw-imh)/2),0)), (128,128,128)),
         transforms.ToTensor(),
         ])
    # convert image to Tensor
    image_tensor = img_transforms(img).float()
    image_tensor = image_tensor.unsqueeze_(0)
    input_img = Variable(image_tensor.type(Tensor))
    # run inference on the model and get detections
    with torch.no_grad():
        detections = model(input_img)
        detections = utils.non_max_suppression(detections, 80,
                        conf_thres, nms_thres)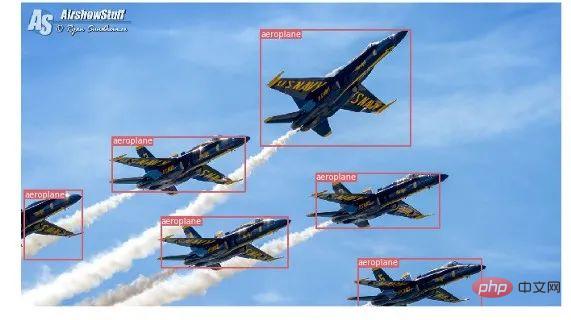
return detections[0]마지막으로 이미지를 로딩하여 감지 결과를 얻은 후, 감지된 객체 주위에 경계 상자를 표시해 보겠습니다. 그리고 클래스별로 서로 다른 색상을 사용하여 구분합니다.
# load image and get detections
img_path = "images/blueangels.jpg"
prev_time = time.time()
img = Image.open(img_path)
detections = detect_image(img)
inference_time = datetime.timedelta(seconds=time.time() - prev_time)
print ('Inference Time: %s' % (inference_time))
# Get bounding-box colors
cmap = plt.get_cmap('tab20b')
colors = [cmap(i) for i in np.linspace(0, 1, 20)]
img = np.array(img)
plt.figure()
fig, ax = plt.subplots(1, figsize=(12,9))
ax.imshow(img)
pad_x = max(img.shape[0] - img.shape[1], 0) * (img_size / max(img.shape))
pad_y = max(img.shape[1] - img.shape[0], 0) * (img_size / max(img.shape))
unpad_h = img_size - pad_y
unpad_w = img_size - pad_x
if detections is not None:
    unique_labels = detections[:, -1].cpu().unique()
    n_cls_preds = len(unique_labels)
    bbox_colors = random.sample(colors, n_cls_preds)
    # browse detections and draw bounding boxes
    for x1, y1, x2, y2, conf, cls_conf, cls_pred in detections:
        box_h = ((y2 - y1) / unpad_h) * img.shape[0]
        box_w = ((x2 - x1) / unpad_w) * img.shape[1]
        y1 = ((y1 - pad_y // 2) / unpad_h) * img.shape[0]
        x1 = ((x1 - pad_x // 2) / unpad_w) * img.shape[1]
        color = bbox_colors[int(np.where(
             unique_labels == int(cls_pred))[0])]
        bbox = patches.Rectangle((x1, y1), box_w, box_h,
             linewidth=2, edgecolor=color, facecolor='none')
        ax.add_patch(bbox)
        plt.text(x1, y1, s=classes[int(cls_pred)],
                color='white', verticalalignment='top',
                bbox={'color': color, 'pad': 0})
plt.axis('off')
# save image
plt.savefig(img_path.replace(".jpg", "-det.jpg"),
                  bbox_inches='tight', pad_inches=0.0)
plt.show()감지 결과 중 일부는 다음과 같습니다.

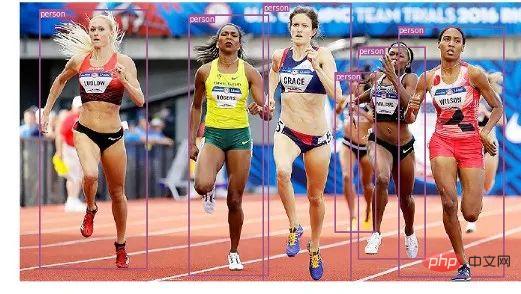
비디오의 객체 추적
이제 이미지에서 다양한 객체를 감지하는 방법을 알게 되었습니다. 비디오에서 프레임별로 보면 추적 상자가 움직이는 것을 볼 수 있습니다. 하지만 이러한 비디오 프레임에 여러 개체가 있는 경우 한 프레임의 개체가 이전 프레임의 개체와 동일한지 어떻게 알 수 있습니까? 이를 객체 추적이라고 하며 여러 탐지를 사용하여 특정 객체를 식별합니다.
이 작업을 수행하는 데는 여러 알고리즘이 있습니다. 이 기사에서는 Kalman 필터를 사용하여 이전에 식별된 대상의 궤적을 예측하고 이를 새로운 탐지 결과와 일치시키는 SORT(Simple Online and Realtime Tracking)를 사용하기로 결정했습니다. 매우 편리합니다. 그리고 빠르다.
이제 코드 작성을 시작하겠습니다. 처음 3개의 코드 조각은 단일 프레임에서 YOLO 감지를 처리하므로 단일 이미지 감지의 코드 조각과 동일합니다. 차이점은 마지막 부분에 있습니다. 각 감지에 대해 Sort 객체의 Update 함수를 호출하여 이미지의 객체에 대한 참조를 얻습니다. 따라서 이전 예의 일반 감지(경계 상자 좌표 및 클래스 예측 포함)와 달리 위의 매개변수 외에 객체 ID를 포함하여 추적된 객체를 가져옵니다. 그리고 비디오를 읽고 비디오 프레임을 표시하려면 OpenCV를 사용해야 합니다.
videopath = 'video/interp.mp4'
%pylab inline
import cv2
from IPython.display import clear_output
cmap = plt.get_cmap('tab20b')
colors = [cmap(i)[:3] for i in np.linspace(0, 1, 20)]
# initialize Sort object and video capture
from sort import *
vid = cv2.VideoCapture(videopath)
mot_tracker = Sort()
#while(True):
for ii in range(40):
    ret, frame = vid.read()
    frame = cv2.cvtColor(frame, cv2.COLOR_BGR2RGB)
    pilimg = Image.fromarray(frame)
    detections = detect_image(pilimg)
    img = np.array(pilimg)
    pad_x = max(img.shape[0] - img.shape[1], 0) *
            (img_size / max(img.shape))
    pad_y = max(img.shape[1] - img.shape[0], 0) *
            (img_size / max(img.shape))
    unpad_h = img_size - pad_y
    unpad_w = img_size - pad_x
    if detections is not None:
        tracked_objects = mot_tracker.update(detections.cpu())
        unique_labels = detections[:, -1].cpu().unique()
        n_cls_preds = len(unique_labels)
        for x1, y1, x2, y2, obj_id, cls_pred in tracked_objects:
            box_h = int(((y2 - y1) / unpad_h) * img.shape[0])
            box_w = int(((x2 - x1) / unpad_w) * img.shape[1])
            y1 = int(((y1 - pad_y // 2) / unpad_h) * img.shape[0])
            x1 = int(((x1 - pad_x // 2) / unpad_w) * img.shape[1])
            color = colors[int(obj_id) % len(colors)]
            color = [i * 255 for i in color]
            cls = classes[int(cls_pred)]
            cv2.rectangle(frame, (x1, y1), (x1+box_w, y1+box_h),
                         color, 4)
            cv2.rectangle(frame, (x1, y1-35), (x1+len(cls)*19+60,
                         y1), color, -1)
            cv2.putText(frame, cls + "-" + str(int(obj_id)),
                        (x1, y1 - 10), cv2.FONT_HERSHEY_SIMPLEX,
                        1, (255,255,255), 3)
    fig=figure(figsize=(12, 8))
    title("Video Stream")
    imshow(frame)
    show()
clear_output(wait=True)관련 무료 학습 권장사항: php 프로그래밍(동영상)
위 내용은 PyTorch를 사용하여 표적 탐지 및 추적을 구현하는 방법에 대한 자세한 설명의 상세 내용입니다. 자세한 내용은 PHP 중국어 웹사이트의 기타 관련 기사를 참조하세요!


![[웹 프런트엔드] Node.js 빠른 시작](https://img.php.cn/upload/course/000/000/067/662b5d34ba7c0227.png)


