vue.js를 사용하여 비동기 요청을 만드는 방법
vue.js를 사용하여 비동기 요청을 수행하는 방법: 먼저 프로젝트에 axiox를 설치한 다음 전역 사용을 위해 main.js에 axios를 도입하고 마지막으로 axios 게시 요청을 구현합니다.

이 튜토리얼의 운영 환경: windows7 시스템, vue2.0 버전, thinkpad t480 컴퓨터.
추천: "vue tutorial"
vue.js를 사용하여 비동기 요청 만들기
1. axios를 사용하여 비동기 요청을 구현하세요
1. 프로젝트에 axiox를 설치하세요
npm install --save axios
2. 전역 사용을 위한 js
import axios from 'axios'
//可以给axios的ajax请求设置统一的主机和端口号
axios.defaults.baseURL = "http://157.122.54.189:8080/";
//将axios这个对象添加到Vue的原型对象中,在使用的时候就只需要使用this.对象名就可以了
Vue.prototype.$http = axios
3.axios' get request
vue 프론트 엔드:
<template>
<div>
</div>
</template>
<script>
export default {
methods:{
getData(){
//axios-get请求
this.$http.get('/getData1')
.then(r => console.log(r))//接口调用成功返回的数据
.catch(err => console.log(err)),//接口调用失败返回的数据
}
}
mounted(){//模板或el对应的html渲染完成后再调用里面的方法
this.getData()
}
}
</script>
<style scoped>
</style>
node后端:
server.get('/getData1',function(req,res){
res.send({
'msg':'aaa'
})
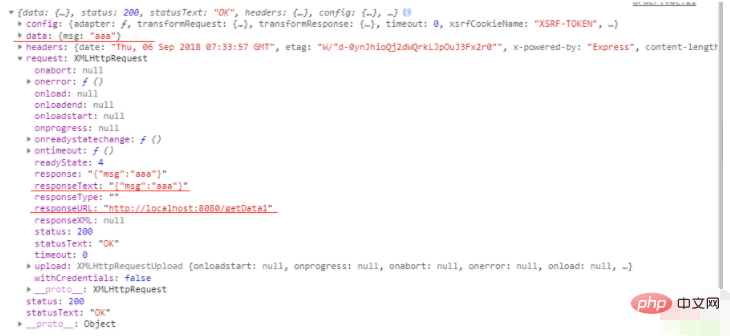
})요청 결과:

4.axios' post request
Vue 프론트 엔드:
두 가지 형태의 제출 매개변수:
// 1.可以直接传入字符串 name=张三&age=19
// 2.可以以对象的形式传入{name:“三”,age:19}
<template>
<div>
</div>
</template>
<script>
export default {
methods:{
getData(){
//axios-post请求传值
this.$http({
method:"post",
url:"/getData2",
headers:{
'Content-type': 'application/x-www-form-urlencoded'
},
data:{
name:'xxx'
},
transformRequest: [function (data) {//更改传值格式
let ret = ''
for (let it in data) {
ret += encodeURIComponent(it) + '=' +
encodeURIComponent(data[it]) + '&'
}
return ret.slice(0,ret.length-1)
}],
})
.then(r => console.log(r))
.catch(err => console.log(err))
}
}
mounted(){//模板或el对应的html渲染完成后再调用里面的方法
this.getData()
}
}
</script>
<style scoped>
</style>노드 백엔드:
server.post('/getData2',function(req,res){
  req.on("data",function(data){
      console.log(querystring.parse(decodeURIComponent(data)));
  });
  res.send({
    'msg':'bbb'
  })
})2. vue-resource는 비동기 요청을 구현합니다(기본적으로 axios와 동일한 단계)
1 프로젝트
npm install --save vue-resource
에 vue-resource를 설치합니다. 전역 사용
import vueResource from 'vue-resource'
Vue.use(vueResource)//这儿有所不同
3.vue-resource의 get 요청
this.$http.get('/getData1')
    .then(r => console.log(r))//接口调用成功返回的数据
.catch(err => console.log(err)),//接口调用失败返回的数据4.vue-resource의 게시물 요청
this.$http.post('/getData2',{name:"bbb"})
    .then(r => console.log(r))//接口调用成功返回的数据
.catch(err => console.log(err)),//接口调用失败返回的数据위 내용은 vue.js를 사용하여 비동기 요청을 만드는 방법의 상세 내용입니다. 자세한 내용은 PHP 중국어 웹사이트의 기타 관련 기사를 참조하세요!

핫 AI 도구

Undresser.AI Undress
사실적인 누드 사진을 만들기 위한 AI 기반 앱

AI Clothes Remover
사진에서 옷을 제거하는 온라인 AI 도구입니다.

Undress AI Tool
무료로 이미지를 벗다

Clothoff.io
AI 옷 제거제

AI Hentai Generator
AI Hentai를 무료로 생성하십시오.

인기 기사

뜨거운 도구

메모장++7.3.1
사용하기 쉬운 무료 코드 편집기

SublimeText3 중국어 버전
중국어 버전, 사용하기 매우 쉽습니다.

스튜디오 13.0.1 보내기
강력한 PHP 통합 개발 환경

드림위버 CS6
시각적 웹 개발 도구

SublimeText3 Mac 버전
신 수준의 코드 편집 소프트웨어(SublimeText3)

뜨거운 주제
 7529
7529
 15
15
 1378
1378
 52
52
 81
81
 11
11
 54
54
 19
19
 21
21
 75
75
 Vue 용 버튼에 기능을 추가하는 방법
Apr 08, 2025 am 08:51 AM
HTML 템플릿의 버튼을 메소드에 바인딩하여 VUE 버튼에 함수를 추가 할 수 있습니다. 메소드를 정의하고 VUE 인스턴스에서 기능 로직을 작성하십시오.
 Vue에서 부트 스트랩을 사용하는 방법
Apr 07, 2025 pm 11:33 PM
vue.js에서 bootstrap 사용은 5 단계로 나뉩니다 : Bootstrap 설치. main.js.의 부트 스트랩 가져 오기 부트 스트랩 구성 요소를 템플릿에서 직접 사용하십시오. 선택 사항 : 사용자 정의 스타일. 선택 사항 : 플러그인을 사용하십시오.
 vue.js로 JS 파일을 참조하는 방법
Apr 07, 2025 pm 11:27 PM
vue.js에서 JS 파일을 참조하는 세 가지 방법이 있습니다. & lt; script & gt; 꼬리표;; mounted () 라이프 사이클 후크를 사용한 동적 가져 오기; Vuex State Management Library를 통해 수입.
 Vue에서 시계를 사용하는 방법
Apr 07, 2025 pm 11:36 PM
vue.js의 시계 옵션을 사용하면 개발자가 특정 데이터의 변경 사항을들을 수 있습니다. 데이터가 변경되면 콜백 기능을 트리거하여 업데이트보기 또는 기타 작업을 수행합니다. 구성 옵션에는 즉시 콜백을 실행할지 여부와 DEEP를 지정하는 즉시 포함되며, 이는 객체 또는 어레이에 대한 변경 사항을 재귀 적으로 듣는 지 여부를 지정합니다.
 Vue가 이전 페이지로 돌아 오는 방법
Apr 07, 2025 pm 11:30 PM
vue.js는 이전 페이지로 돌아갈 수있는 네 가지 방법이 있습니다. $ router.go (-1) $ router.back () 사용 & lt; router-link to = & quot;/quot; Component Window.history.back () 및 메소드 선택은 장면에 따라 다릅니다.
 Vue 다중 페이지 개발은 무엇을 의미합니까?
Apr 07, 2025 pm 11:57 PM
VUE 멀티 페이지 개발은 vue.js 프레임 워크를 사용하여 응용 프로그램을 구축하는 방법입니다. 여기서 응용 프로그램은 별도의 페이지로 나뉩니다. 코드 유지 보수 : 응용 프로그램을 여러 페이지로 분할하면 코드를보다 쉽게 관리하고 유지 관리 할 수 있습니다. 모듈 식 : 각 페이지는 쉬운 재사용 및 교체를 위해 별도의 모듈로 사용할 수 있습니다. 간단한 라우팅 : 페이지 간의 탐색은 간단한 라우팅 구성을 통해 관리 할 수 있습니다. SEO 최적화 : 각 페이지에는 자체 URL이있어 SEO가 도움이됩니다.
 Vue의 div로 점프하는 방법
Apr 08, 2025 am 09:18 AM
VUE에서 DIV 요소를 점프하는 두 가지 방법이 있습니다. VUE 라우터를 사용하고 라우터 링크 구성 요소를 추가하십시오. @Click 이벤트 리스너를 추가하고 이것을 호출하십시오. $ router.push () 메소드를 점프하십시오.
 Vue에서 Foreach Loop을 사용하는 방법
Apr 08, 2025 am 06:33 AM
vue.js의 Foreach 루프는 V-For 지시문을 사용하여 개발자가 각 요소를 배열 또는 객체에서 반복하고 각 요소에서 특정 작업을 수행 할 수 있습니다. 구문은 다음과 같습니다. & lt; template & gt; & lt; ul & gt; & lt; li v-for = & quot; 항목의 항목 & gt; {{item}} & lt;/li & gt; & lt;/ul & gt; & lt;/template & gt; & am


