uniapp에서 홈페이지 슬라이드쇼를 만드는 방법
uniapp에서 홈페이지 슬라이드쇼를 만드는 방법: 먼저 구성 파일을 수정한 다음 홈페이지 코드를 작성하고 코드는 [
]이며 마지막으로 CSS 코드를 완성합니다. 그것을 실행하십시오.

이 튜토리얼의 운영 환경: windows7 시스템, uni-app2.5.1 버전 이 방법은 모든 브랜드의 컴퓨터에 적합합니다.
추천(무료): uni-app 개발 튜토리얼
uniapp으로 홈페이지 슬라이드쇼 만드는 방법:
1. 구성 파일을 수정하세요
먼저 생성된 프로젝트 루트 디렉토리 아래에 페이지가 필요합니다. 이전 구성 파일(pages.json)에서 네비게이션 바 배경을 검은색으로, 헤더 글꼴 색상을 흰색으로 설정합니다.
구성이 완료되면 코드는 다음과 같습니다.
{
"pages": [ //pages数组中第一项表示应用启动页,
{
"path": "pages/index/index",//首页文件路径
"style": {
"navigationBarTitleText": "首页"//首页头部标题
}
}
],
"globalStyle": {
"navigationBarTextStyle": "white",//导航栏标题颜色(仅支持 black/white)
"navigationBarTitleText": "WPApp",//导航栏默认标题
"navigationBarBackgroundColor": "#000000;",//导航栏背景颜色,此处为黑色
"backgroundColor": "#F8F8F8"//页面背景颜色
}
}2. 홈페이지 코드를 작성합니다
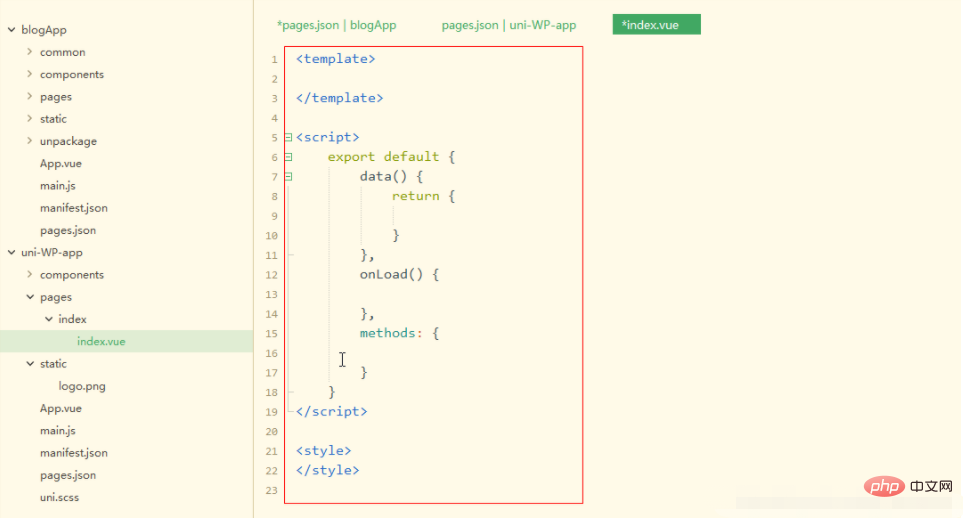
여기에서 공식 uni-app 구성 요소를 사용해야 합니다. 링크를 클릭하면 특정 사용 방법을 볼 수 있습니다. 그런 다음 페이지>index>index.vue 디렉토리를 차례로 열면 index.vue에 프로젝트를 생성할 때 이미 코드의 일부가 있습니다. 쓸모가 없으므로 먼저 원본 코드를 삭제한 다음 아래와 같이

기존 코드를 삭제한 후 원하는 코드를 작성하기 시작합니다. 홈페이지이므로 여기에 슬라이드쇼 코드 작성을 시작합니다.
uni-app의 페이지는 템플릿 코드(뷰), js 코드(데이터, 상호 작용), CSS 코드(뷰 스타일)의 세 부분으로 구성됩니다. 여기서는 먼저 템플릿 코드를 다음과 같이 작성합니다.
<template>
    <view>
        <view class="uni-padding-wrap">
            <view class="page-section swiper">
                <view class="page-section-spacing">
    <!-- 一组幻灯片代码开始,用到组件swiper -->
<!-- indicator-dots autoplay interval……:组件相关属性,具体可以查看官网说明 -->
                    <swiper class="swiper" indicator-dots="indicatorDots" autoplay="autoplay" interval="interval" duration="duration">
                        <!-- 每组幻灯片中的子项目 1 -->
<swiper-item>
<!-- 此处放内容,可以是图片,也可是图片加文字 -->
                        </swiper-item>
<!-- 每组幻灯片中的子项目 2 -->
                        <swiper-item>
<!-- 此处放内容,可以是图片,也可是图片加文字 -->
                        </swiper-item>
<!-- 每组幻灯片中的子项目 3 -->
                        <swiper-item>
<!-- 此处放内容,可以是图片,也可是图片加文字 -->
                        </swiper-item>
                    </swiper>
                </view>
            </view>
        </view>
    </view>
</template>두 번째 여기에서는 데이터와 사용자 상호 작용이 아직 사용되지 않으므로 여기에서는 js 코드가 변경되지 않으므로 다음과 같이 유지하세요.
<script>
export default {
data() {
return {
}
},
onLoad() {

},
methods: {

}
}
</script>마지막은 다음과 같은 CSS 코드입니다.
<style>
/* 将这组幻灯片中的子项目改成我们设计图中的灰色 */
swiper-item{
background-color: #f8f8f8;
}
</style>3.
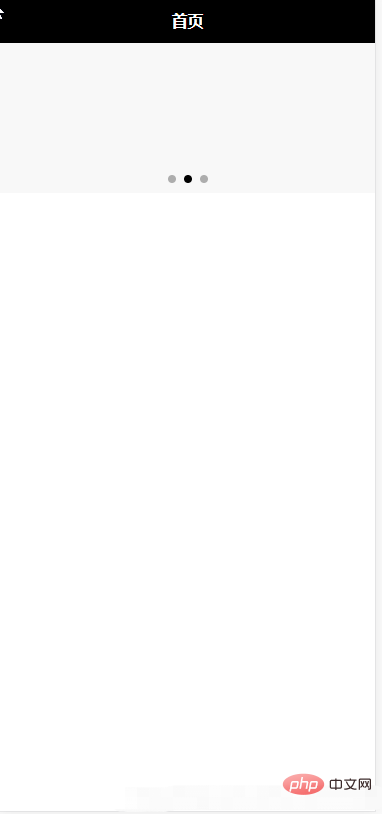
run to Google Browse 도구를 사용하면 다음과 같은 효과를 볼 수 있습니다.

마지막으로 전체 페이지의 코드를 첨부합니다.
<template>
    <view>
        <view class="uni-padding-wrap">
            <view class="page-section swiper">
                <view class="page-section-spacing">
    <!-- 一组幻灯片代码开始,用到组件swiper -->
<!-- indicator-dots autoplay interval……:组件相关属性,具体可以查看官网说明 -->
                    <swiper class="swiper" indicator-dots="indicatorDots" autoplay="autoplay" interval="interval" duration="duration">
                        <!-- 每组幻灯片中的子项目 1 -->
<swiper-item>
<!-- 此处放内容,可以是图片,也可是图片加文字 -->
                        </swiper-item>
<!-- 每组幻灯片中的子项目 2 -->
                        <swiper-item>
<!-- 此处放内容,可以是图片,也可是图片加文字 -->
                        </swiper-item>
<!-- 每组幻灯片中的子项目 3 -->
                        <swiper-item>
<!-- 此处放内容,可以是图片,也可是图片加文字 -->
                        </swiper-item>
                    </swiper>
                </view>
            </view>
        </view>
    </view>
</template>

<script>
export default {
data() {
return {
}
},
onLoad() {

},
methods: {

}
}
</script>

<style>
/* 将这组幻灯片中的子项目改成我们设计图中的灰色 */
swiper-item{
background-color: #f8f8f8;
}
</style>관련 무료 학습 권장 사항: php 프로그래밍(동영상)
위 내용은 uniapp에서 홈페이지 슬라이드쇼를 만드는 방법의 상세 내용입니다. 자세한 내용은 PHP 중국어 웹사이트의 기타 관련 기사를 참조하세요!

핫 AI 도구

Undresser.AI Undress
사실적인 누드 사진을 만들기 위한 AI 기반 앱

AI Clothes Remover
사진에서 옷을 제거하는 온라인 AI 도구입니다.

Undress AI Tool
무료로 이미지를 벗다

Clothoff.io
AI 옷 제거제

Video Face Swap
완전히 무료인 AI 얼굴 교환 도구를 사용하여 모든 비디오의 얼굴을 쉽게 바꾸세요!

인기 기사

뜨거운 도구

메모장++7.3.1
사용하기 쉬운 무료 코드 편집기

SublimeText3 중국어 버전
중국어 버전, 사용하기 매우 쉽습니다.

스튜디오 13.0.1 보내기
강력한 PHP 통합 개발 환경

드림위버 CS6
시각적 웹 개발 도구

SublimeText3 Mac 버전
신 수준의 코드 편집 소프트웨어(SublimeText3)
 Webstorm에서 개발한 uniapp 프로젝트 미리보기를 시작하는 방법
Apr 08, 2024 pm 06:42 PM
WebStorm에서 UniApp 프로젝트 미리보기를 실행하는 단계: UniApp 개발 도구 플러그인 설치 장치 설정에 연결 WebSocket 실행 미리보기
 유니앱의 단점은 무엇인가요?
Apr 06, 2024 am 04:06 AM
UniApp은 크로스 플랫폼 개발 프레임워크로서 많은 편리함을 가지고 있지만 단점도 분명합니다. 하이브리드 개발 모드로 인해 성능이 제한되어 열기 속도, 페이지 렌더링 및 대화형 응답이 좋지 않습니다. 생태계가 불완전하고 특정 분야의 컴포넌트와 라이브러리가 적어 창의성과 복잡한 기능 구현이 제한됩니다. 다양한 플랫폼에서의 호환성 문제로 인해 스타일 차이와 일관되지 않은 API 지원이 발생하기 쉽습니다. WebView의 보안 메커니즘은 기본 애플리케이션과 다르므로 애플리케이션 보안이 저하될 수 있습니다. 동시에 여러 플랫폼을 지원하는 애플리케이션 릴리스 및 업데이트에는 여러 컴파일과 패키지가 필요하므로 개발 및 유지 관리 비용이 증가합니다.
 uniapp과 mui 중 어느 것이 더 좋나요?
Apr 06, 2024 am 05:18 AM
일반적으로 복잡한 기본 기능이 필요할 때는 uni-app이 더 좋고, 단순하거나 고도로 맞춤화된 인터페이스가 필요할 때는 MUI가 더 좋습니다. 또한 uni-app에는 1. Vue.js/JavaScript 지원 2. 풍부한 기본 구성 요소/API 3. 좋은 생태계가 있습니다. 단점은 다음과 같습니다. 1. 성능 문제 2. 인터페이스 사용자 정의가 어렵습니다. MUI에는 다음이 포함됩니다. 1. 머티리얼 디자인 지원 2. 높은 유연성 3. 광범위한 구성 요소/테마 라이브러리. 단점은 다음과 같습니다. 1. CSS 종속성 2. 기본 구성 요소를 제공하지 않습니다. 3. 소규모 생태계.
 uniapp과 flutter의 차이점은 무엇입니까
Apr 06, 2024 am 04:30 AM
UniApp은 Vue.js를 기반으로 하고 Flutter는 Dart를 기반으로 하며 둘 다 크로스 플랫폼 개발을 지원합니다. UniApp은 풍부한 구성 요소와 쉬운 개발을 제공하지만 WebView로 인해 성능이 제한됩니다. Flutter는 뛰어난 성능을 갖춘 기본 렌더링 엔진을 사용하지만 개발이 더 어렵습니다. UniApp에는 활발한 중국 커뮤니티가 있고 Flutter에는 대규모 글로벌 커뮤니티가 있습니다. UniApp은 빠른 개발과 낮은 성능 요구 사항이 있는 시나리오에 적합합니다. Flutter는 높은 사용자 정의 및 고성능을 갖춘 복잡한 애플리케이션에 적합합니다.
 유니앱을 배우려면 어떤 기본이 필요한가요?
Apr 06, 2024 am 04:45 AM
uniapp 개발에는 다음과 같은 기초가 필요합니다: 프론트엔드 기술(HTML, CSS, JavaScript) 모바일 개발 지식(iOS 및 Android 플랫폼) Node.js 기타 기초(버전 제어 도구, IDE, 모바일 개발 시뮬레이터 또는 실제 머신 디버깅 경험)
 UniApp 오류 문제 해결: 'xxx' 애니메이션 효과를 찾을 수 없습니다.
Nov 25, 2023 am 11:43 AM
UniApp 오류 문제 해결: 'xxx' 애니메이션 효과를 찾을 수 없습니다. UniApp은 Vue.js 프레임워크를 기반으로 하는 크로스 플랫폼 애플리케이션 개발 프레임워크로 WeChat 애플릿, H5 및 기타 플랫폼과 같은 여러 플랫폼용 애플리케이션을 개발하는 데 사용할 수 있습니다. 앱. 개발 과정에서 우리는 사용자 경험을 향상시키기 위해 애니메이션 효과를 자주 사용합니다. 그러나 때로는 오류가 발생할 수 있습니다: 'xxx' 애니메이션 효과를 찾을 수 없습니다. 이 오류로 인해 애니메이션이 정상적으로 실행되지 않아 개발에 불편을 끼칠 수 있습니다. 이 기사에서는 이 문제를 해결하는 여러 가지 방법을 소개합니다.
 유니앱 개발과 네이티브 개발 중 어느 것이 더 낫나요?
Apr 06, 2024 am 05:06 AM
UniApp과 네이티브 개발 중에서 선택할 때는 개발 비용, 성능, 사용자 경험 및 유연성을 고려해야 합니다. UniApp의 장점은 크로스 플랫폼 개발, 빠른 반복, 쉬운 학습 및 내장 플러그인이며, 네이티브 개발은 성능, 안정성, 네이티브 경험 및 확장성이 뛰어납니다. 구체적인 프로젝트 요구사항에 따라 장단점을 따져보세요. UniApp은 초보자에게 적합하고, 네이티브 개발은 고성능과 원활한 경험을 추구하는 복잡한 애플리케이션에 적합합니다.


