작은 프로그램 캔버스를 사용하여 간단한 그림 응용 프로그램 작성
미니 프로그램 개발 튜토리얼캔버스를 사용하여 그림을 쓰는 방법을 소개하는 칼럼

권장(무료): 미니 프로그램 개발 튜토리얼
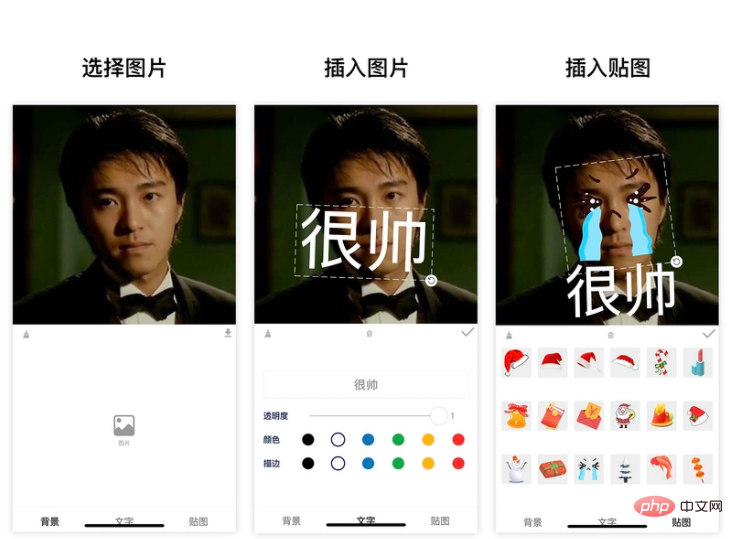
애플리케이션 디스플레이
스크린샷

Requirements
작은 응용 프로그램이므로 최종 제품에 적용 가능한 시나리오가 있고 가치 있는
요구 사항 소스
이 응용 프로그램 요구 사항
에 대한 영감은 다음과 같습니다. 이전 직장과 생활에서 우리는 우연히 동료들의 아름다운 사진
을 자주 얻었습니다. 이때 우리는 이 사진을 이모티콘 팩으로 만들고 싶습니다.
보통 사진에 몇 가지 캡션을 추가합니다
흥미로운 의사소통 도구입니다. (이모티콘 팩) 완료
요구 사항 분석
위 요구 사항을 바탕으로 해체
응용 기능 정리
- 사용자가 사진을 업로드해야
- 텍스트 추가 가능
- 텍스트 스타일 조정 가능 그리고 회전 및 확대/축소
- 또한 일부 스티커를 삽입할 수 있기를 바랍니다
- 텍스처도 가능합니다 회전 및 확대/축소
- 사용자는 사진을 앨범으로 내보내기
구현
github 저장소 https: //github.com/luosijie /f...
제 프로젝트가 마음에 드셨다면 별표를 주시고 격려해주세요
이 애플리케이션은 미니 프로그램으로 개발되었습니다
- 프레임워크 사용: mpx
- 기술 사용: mini 프로그램 캔버스
상태 관리
import { createStore } from '@mpxjs/core'

const store = createStore({
  state: {
    cavas: null,         // cnavas实例
    ctx: null,           // canvas上下文实例
    elements: [],        // canvas元素
    activeIndex: null,   // 当前编辑中的元素索引
    mode: 'background',  // 当前编辑模式:background, text, sticker
    fontStyle: {         // 文字默认样式
      opacity: 1,
      fillStyle: '#000000',
      strokeStyle: '#000000'
    }
  },
  mutations: {
    setCanvas (state, data) {
      state.canvas = data
    },
    setCtx (state, data) {
      state.ctx = data
    },
    setElements (state, data) {
      state.elements = data
    },
    setMode (state, data) {
      state.mode = data
    },
    setActiveIndex (state, data) {
      state.activeIndex = data
    },
    setFontStyle (state, { key, data }) {
      state.fontStyle[key] = data
    },
    // 添加文字
    addText (state) {
      const size = 50
      const string = '请输入文字'
      const text = {
        type: 'text',
        data: string,
        scale: 1,
        size,
        left: 100,
        top: 100,
        rotate: 0,
        opacity: state.fontStyle.opacity,
        fillStyle: state.fontStyle.fillStyle,
        strokeStyle: state.fontStyle.strokeStyle
      }
      state.elements.push(text)
      state.activeIndex = state.elements.length - 1
    },
    // 添加贴图
    addSticker (state, data) {
      state.elements.push(data)
      state.activeIndex = state.elements.length - 1
    },
    // 删除当前选中
    deleteActiveELement (state) {
      state.elements.splice(state.activeIndex, 1)
      state.activeIndex = null
    },
    // 清空画布
    clear (state) {
      state.elements = []
      state.activeIndex = null
    }
  }
})

export default store캔버스 초기화
// 初始化画布
async initCanvas() {
  const query = this.createSelectorQuery()
  query
    .select('#canvas')
    .fields({ node: true, size: true })
    .exec(async res => {
      const canvas = res[0].node
      const ctx = canvas.getContext('2d')
      store.commit('setCanvas', canvas)
      store.commit('setCtx', ctx)

      await this.loadImage('/images/icon-rotate.png').then(res => {
        this.image.rotate = res
      })

      canvas.width = res[0].width * this.dpr
      canvas.height = res[0].height * this.dpr
      ctx.scale(this.dpr, this.dpr)
      this.drawGrid()
    })
}그림 그리기
/**
 * 绘制图片
 * @param { Object } ele canvas元素
 */
drawImage(ele) {
  this.ctx.save()
  const width = ele.width
  const height = ele.height
  const centerX = ele.left + ele.width / 2
  const centerY = ele.top + ele.height / 2
  this.ctx.translate(centerX, centerY)
  this.ctx.rotate(ele.rotate)
  this.ctx.drawImage(ele.data, ele.left - centerX, ele.top - centerY, width, height)
  this.ctx.restore()
}텍스트 그리기
/**
 * 绘制文字
 * @param { Object } ele canvas元素
 */
drawText(ele) {
  this.ctx.save()
  const width = ele.size * ele.data.length
  const height = ele.size
  const centerX = ele.left + width / 2
  const centerY = ele.top + height / 2
  this.ctx.translate(centerX, centerY)
  this.ctx.rotate(ele.rotate)
  this.ctx.font = `${ele.size}px bold sans-serif`
  this.ctx.globalAlpha = ele.opacity
  this.ctx.fillStyle = ele.fillStyle
  this.ctx.strokeStyle = ele.strokeStyle
  // this.ctx.lineWidth = 2
  this.ctx.textBaseline = 'top'
  console.log('draw-text', ele)
  this.ctx.fillText(ele.data, ele.left - centerX, ele.top - centerY)
  this.ctx.strokeText(ele.data, ele.left - centerX, ele.top - centerY)
  this.ctx.restore()
}컨트롤 요소 그리기
initController(ele) {
  const cs = this.convert2ControllerSize(ele)
  this.ctx.save()
  this.ctx.strokeStyle = '#eee'
  this.ctx.translate(cs.centerX, cs.centerY)
  this.ctx.rotate(cs.rotate)
  // 绘制虚线边框
  this.ctx.setLineDash([10, 5], 5)
  this.ctx.strokeRect(cs.left - cs.centerX, cs.top - cs.centerY, cs.width, cs.height)
  // 绘制控制点-旋转
  this.ctx.drawImage(this.image.rotate, cs.left + cs.width - 10 - cs.centerX, cs.top + cs.height - 10 - cs.centerY, 20, 20)
  this.ctx.restore()
}캔버스 렌더링 기능
// 画布渲染函数
renderCanvas() {
  this.ctx.clearRect(0, 0, this.ctx.canvas.width, this.ctx.canvas.height)
  this.drawGrid()
  console.log('draw-background', this.background)
  if (this.background) this.drawImage(this.background)
  for (let i = 0; i  <p><strong> 이벤트 듣기</strong></p><p><strong>Mobile</strong> </p><pre class="brush:php;toolbar:false">// 移动事件绑定函数
handleMove(e) {
  console.log('mouse-move', e)
  if (e.touches.length > 1) return
  const x = e.touches[0].x
  const y = e.touches[0].y
  const dx = this.startTouches[0].x - x
  const dy = this.startTouches[0].y - y
  const elements = this.elements.slice()
  elements[this.activeIndex || 0].left = this.startSelected.left - dx
  elements[this.activeIndex || 0].top = this.startSelected.top - dy
  store.commit('setElements', elements)
}Rotate
// 旋转绑定函数
handleRotate(e) {
  console.log('handleRotate')
  const start = this.startTouches[0]
  const end = e.touches[0]
  const center = {
    x: this.startSelected.centerX,
    y: this.startSelected.centerY
  }
  const startLength = Math.sqrt((center.x - start.x) ** 2 + (center.y - start.y) ** 2)
  const endLength = Math.sqrt((center.x - end.x) ** 2 + (center.y - end.y) ** 2)
  const radian = this.convert2Radian(start, end, center)
  const scale = endLength / startLength
  const elements = this.elements.slice()
  const selected = elements[this.activeIndex]
  // 旋转
  selected.rotate = this.startSelected.rotate - radian
  // 缩放
  if (selected.type === 'text') {
    selected.left = this.startSelected.centerX - this.startSelected.size * this.startSelected.data.length * scale / 2
    selected.top = this.startSelected.centerY - this.startSelected.size * scale / 2
    selected.size = this.startSelected.size * scale
  }
  if (selected.type === 'sticker') {
    selected.left = this.startSelected.centerX - this.startSelected.width * scale / 2
    selected.top = this.startSelected.centerY - this.startSelected.height * scale / 2
    selected.width = this.startSelected.width * scale
    selected.height = this.startSelected.height * scale
  }
  store.commit('setElements', elements)
}Scale
// 缩放事件绑定函数
handleScale(e) {
  if (e.touches.length !== 2 || this.mode !== 'background') return
  const startLength = Math.sqrt(
    (this.startTouches[0].x - this.startTouches[1].x) ** 2 +
      (this.startTouches[0].y - this.startTouches[1].y) ** 2
  )
  const endLength = Math.sqrt(
    (e.touches[0].x - e.touches[1].x) ** 2 + (e.touches[0].y - e.touches[1].y) ** 2
  )
  const scale = endLength / startLength
  const elements = this.elements.slice()
  const selected = elements[this.activeIndex || 0]
  selected.left = this.startSelected.centerX - this.startSelected.width * scale / 2
  selected.top = this.startSelected.centerY - this.startSelected.height * scale / 2
  selected.width = this.startSelected.width * scale
  selected.height = this.startSelected.height * scale
  // elements[this.activeIndex || 0].scale = this.startSelected.scale * scale
  store.commit('setElements', elements)
}사진 내보내기
export() {
  if (!store.state.elements.length) {
    wx.showToast({
      title: '加点东西再导出吧',
      icon: 'none'
    })
    return
  }
  wx.showModal({
    title: '提示',
    content: '图片将保存到手机相册',
    success(res) {
      if (res.confirm) {
        console.log('export-canvas', store.state.ctx)
        const canvas = store.state.canvas
        wx.canvasToTempFilePath({
          x: 0,
          y: 0,
          width: canvas.width,
          height: canvas.height,
          canvas,
          complete(res) {
            if (res.errMsg === 'canvasToTempFilePath:ok') {
              wx.saveImageToPhotosAlbum({
                filePath: res.tempFilePath,
                success(res) {
                  wx.showToast({
                    title: '图片保存成功',
                    icon: 'none'
                  })
                }
              })
            }
          }
        })
      }
    }
  })
}위 내용은 작은 프로그램 캔버스를 사용하여 간단한 그림 응용 프로그램 작성의 상세 내용입니다. 자세한 내용은 PHP 중국어 웹사이트의 기타 관련 기사를 참조하세요!

핫 AI 도구

Undresser.AI Undress
사실적인 누드 사진을 만들기 위한 AI 기반 앱

AI Clothes Remover
사진에서 옷을 제거하는 온라인 AI 도구입니다.

Undress AI Tool
무료로 이미지를 벗다

Clothoff.io
AI 옷 제거제

AI Hentai Generator
AI Hentai를 무료로 생성하십시오.

인기 기사

뜨거운 도구

메모장++7.3.1
사용하기 쉬운 무료 코드 편집기

SublimeText3 중국어 버전
중국어 버전, 사용하기 매우 쉽습니다.

스튜디오 13.0.1 보내기
강력한 PHP 통합 개발 환경

드림위버 CS6
시각적 웹 개발 도구

SublimeText3 Mac 버전
신 수준의 코드 편집 소프트웨어(SublimeText3)

뜨거운 주제
 7514
7514
 15
15
 1378
1378
 52
52
 79
79
 11
11
 53
53
 19
19
 19
19
 64
64
 PHP와 Vue: 프런트엔드 개발 도구의 완벽한 조합
Mar 16, 2024 pm 12:09 PM
PHP와 Vue: 프론트엔드 개발 도구의 완벽한 조합 오늘날 인터넷이 빠르게 발전하는 시대에 프론트엔드 개발은 점점 더 중요해지고 있습니다. 사용자가 웹 사이트 및 애플리케이션 경험에 대한 요구 사항이 점점 더 높아짐에 따라 프런트 엔드 개발자는 보다 효율적이고 유연한 도구를 사용하여 반응형 및 대화형 인터페이스를 만들어야 합니다. 프론트엔드 개발 분야의 두 가지 중요한 기술인 PHP와 Vue.js는 함께 사용하면 완벽한 도구라고 볼 수 있습니다. 이 기사에서는 독자가 이 두 가지를 더 잘 이해하고 적용할 수 있도록 PHP와 Vue의 조합과 자세한 코드 예제를 살펴보겠습니다.
 프론트엔드 면접관이 자주 묻는 질문
Mar 19, 2024 pm 02:24 PM
프론트엔드 개발 인터뷰에서 일반적인 질문은 HTML/CSS 기초, JavaScript 기초, 프레임워크 및 라이브러리, 프로젝트 경험, 알고리즘 및 데이터 구조, 성능 최적화, 크로스 도메인 요청, 프론트엔드 엔지니어링, 디자인 패턴, 새로운 기술 및 트렌드. 면접관 질문은 후보자의 기술적 능력, 프로젝트 경험, 업계 동향에 대한 이해를 평가하기 위해 고안되었습니다. 따라서 지원자는 자신의 능력과 전문성을 입증할 수 있도록 해당 분야에 대한 충분한 준비를 갖추어야 합니다.
 Django는 프론트엔드인가요, 백엔드인가요? 확인 해봐!
Jan 19, 2024 am 08:37 AM
Django는 빠른 개발과 깔끔한 방법을 강조하는 Python으로 작성된 웹 애플리케이션 프레임워크입니다. Django는 웹 프레임워크이지만 Django가 프런트엔드인지 백엔드인지에 대한 질문에 답하려면 프런트엔드와 백엔드의 개념에 대한 깊은 이해가 필요합니다. 프론트엔드는 사용자가 직접 상호작용하는 인터페이스를 의미하고, 백엔드는 HTTP 프로토콜을 통해 데이터와 상호작용하는 서버측 프로그램을 의미합니다. 프론트엔드와 백엔드가 분리되면 프론트엔드와 백엔드 프로그램을 독립적으로 개발하여 각각 비즈니스 로직과 인터랙티브 효과, 데이터 교환을 구현할 수 있습니다.
 캔버스 프레임워크를 배우고 일반적으로 사용되는 캔버스 프레임워크에 대해 자세히 설명합니다.
Jan 17, 2024 am 11:03 AM
Canvas 프레임워크 탐색: 일반적으로 사용되는 Canvas 프레임워크가 무엇인지 이해하려면 특정 코드 예제가 필요합니다. 소개: Canvas는 풍부한 그래픽 및 애니메이션 효과를 얻을 수 있는 HTML5에서 제공되는 그리기 API입니다. 그리기의 효율성과 편의성을 향상시키기 위해 많은 개발자들이 다양한 Canvas 프레임워크를 개발했습니다. 이 기사에서는 일반적으로 사용되는 몇 가지 캔버스 프레임워크를 소개하고 독자가 이러한 프레임워크를 사용하는 방법을 더 깊이 이해하는 데 도움이 되는 특정 코드 예제를 제공합니다. 1. EaselJS 프레임워크 Ea
 Go 언어 프런트엔드 기술 탐색: 프런트엔드 개발을 위한 새로운 비전
Mar 28, 2024 pm 01:06 PM
빠르고 효율적인 프로그래밍 언어인 Go 언어는 백엔드 개발 분야에서 널리 사용됩니다. 그러나 Go 언어를 프런트엔드 개발과 연관시키는 사람은 거의 없습니다. 실제로 프런트엔드 개발에 Go 언어를 사용하면 효율성이 향상될 뿐만 아니라 개발자에게 새로운 지평을 열어줄 수도 있습니다. 이 기사에서는 프런트엔드 개발에 Go 언어를 사용할 수 있는 가능성을 살펴보고 독자가 이 영역을 더 잘 이해할 수 있도록 구체적인 코드 예제를 제공합니다. 전통적인 프런트엔드 개발에서는 사용자 인터페이스를 구축하기 위해 JavaScript, HTML, CSS를 사용하는 경우가 많습니다.
 위챗 미니 프로그램 회원가입 방법
May 07, 2024 am 10:24 AM
1. WeChat 미니 프로그램을 열고 해당 미니 프로그램 페이지로 들어갑니다. 2. 미니 프로그램 페이지에서 회원 관련 입구를 찾으세요. 일반적으로 회원 입구는 하단 네비게이션 바 또는 개인 센터에 있습니다. 3. 멤버십 포털을 클릭하여 멤버십 신청 페이지로 이동합니다. 4. 회원가입신청 페이지에서 휴대폰번호, 이름 등 관련 정보를 입력하신 후, 가입신청을 해주세요. 5. 미니 프로그램은 회원 가입 신청서를 검토한 후, 사용자는 위챗 미니 프로그램의 회원이 될 수 있습니다. 6. 이용자는 회원이 되면 포인트, 쿠폰, 회원전용 이벤트 등 더 많은 회원권을 누릴 수 있습니다.
 Golang과 프런트엔드 기술의 결합: Golang이 프런트엔드 분야에서 어떤 역할을 하는지 살펴보세요.
Mar 19, 2024 pm 06:15 PM
Golang과 프런트엔드 기술의 결합: Golang이 프런트엔드 분야에서 어떤 역할을 하는지 살펴보려면 구체적인 코드 예제가 필요합니다. 인터넷과 모바일 애플리케이션의 급속한 발전으로 인해 프런트엔드 기술이 점점 더 중요해지고 있습니다. 이 분야에서는 강력한 백엔드 프로그래밍 언어인 Golang도 중요한 역할을 할 수 있습니다. 이 기사에서는 Golang이 프런트엔드 기술과 어떻게 결합되는지 살펴보고 특정 코드 예제를 통해 프런트엔드 분야에서의 잠재력을 보여줍니다. 프론트엔드 분야에서 Golang의 역할은 효율적이고 간결하며 배우기 쉬운 것입니다.
 Django: 프론트엔드와 백엔드 개발을 모두 처리할 수 있는 마법의 프레임워크!
Jan 19, 2024 am 08:52 AM
Django: 프론트엔드와 백엔드 개발을 모두 처리할 수 있는 마법의 프레임워크! Django는 효율적이고 확장 가능한 웹 애플리케이션 프레임워크입니다. MVC, MTV를 포함한 다양한 웹 개발 모델을 지원할 수 있으며 고품질 웹 애플리케이션을 쉽게 개발할 수 있습니다. Django는 백엔드 개발을 지원할 뿐만 아니라 프런트엔드 인터페이스를 빠르게 구축하고 템플릿 언어를 통해 유연한 뷰 표시를 구현할 수 있습니다. Django는 프론트엔드 개발과 백엔드 개발을 완벽한 통합으로 결합하므로 개발자가 전문적으로 학습할 필요가 없습니다.


