

Angle4에서 탭 전환을 구현하는 방법 소개

angular탭바 전환을 어떻게 구현하나요? 이 기사에서는 각도 4에서 탭 표시줄 전환을 구현하는 방법을 소개합니다. 도움이 필요한 친구들이 모두 참고할 수 있기를 바랍니다.

추천 관련 튜토리얼: "angular Tutorial"
관리 시스템 탭 전환 페이지는 일반적으로 다음과 같이 필요합니다.
왼쪽 메뉴를 클릭하면 해당 탭이 그런 다음 다른 탭을 동시에 편집할 수 있으며 전환 시 정보가 손실되지 않습니다!
PHP 또는 .net, Java 개발 기술을 사용하고 아마도 디스플레이를 전환한 다음 iram을 추가하거나 ajax를 통해 정보를 로드하여 해당 레이어를 표시합니다.
그러나 각도를 사용하는 경우 어떻게 구현합니까? 첫 번째 아이디어는 동일한 ifarm을 사용하여 구현할 수 있습니까?
두 번째로 떠오르는 것은 라우터 콘센트가 다음과 같다는 것입니다
근데 그걸 못 이루니까 간단한 탭 페이지를 만드는 게 그렇게 어려운 걸까?
아니면 정말 간단한 방법이 없을까요?
오랜동안 신경쓰지 않았어요
Angular에 대한 이해와 학습이 부족하다는 걸 알기에 오랫동안 내려놓고 지후에 올라온 글을 보기까지
Angular 경로 재사용 전략
그래서 아이디어가 떠올랐고 마침내 anguar 4 탭 전환 페이지를 구현하는 데 반나절이 걸렸습니다. 일반적인 아이디어는 다음과 같습니다.
1. RouteReuseStrategy 인터페이스를 구현합니다. 경로 활용 전략
SimpleReuseStrategy. ts 코드는 다음과 같습니다:
import { RouteReuseStrategy, DefaultUrlSerializer, ActivatedRouteSnapshot, DetachedRouteHandle } from '@angular/router';

export class SimpleReuseStrategy implements RouteReuseStrategy {

    public static handlers: { [key: string]: DetachedRouteHandle } = {}

    /** 表示对所有路由允许复用 如果你有路由不想利用可以在这加一些业务逻辑判断 */
    public shouldDetach(route: ActivatedRouteSnapshot): boolean {
        return true;
    }

    /** 当路由离开时会触发。按path作为key存储路由快照&组件当前实例对象 */
    public store(route: ActivatedRouteSnapshot, handle: DetachedRouteHandle): void {
        SimpleReuseStrategy.handlers[route.routeConfig.path] = handle
    }

    /** 若 path 在缓存中有的都认为允许还原路由 */
    public shouldAttach(route: ActivatedRouteSnapshot): boolean {
        return !!route.routeConfig && !!SimpleReuseStrategy.handlers[route.routeConfig.path]
    }

    /** 从缓存中获取快照,若无则返回nul */
    public retrieve(route: ActivatedRouteSnapshot): DetachedRouteHandle {
        if (!route.routeConfig) {
            return null
        }

        return SimpleReuseStrategy.handlers[route.routeConfig.path]
    }

    /** 进入路由触发,判断是否同一路由 */
    public shouldReuseRoute(future: ActivatedRouteSnapshot, curr: ActivatedRouteSnapshot): boolean {
        return future.routeConfig === curr.routeConfig
    }
}2. 모듈에 전략을 등록합니다:
import { BrowserModule } from '@angular/platform-browser';
import { NgModule } from '@angular/core';
import { FormsModule } from '@angular/forms';
import { CommonModule as SystemCommonModule } from '@angular/common';
import { AppComponent } from './app.component';
import { AppRoutingModule,ComponentList } from './app.routing'
import { SimpleReuseStrategy } from './SimpleReuseStrategy';
import { RouteReuseStrategy } from '@angular/router';

@NgModule({
  declarations: [
    AppComponent,
    ComponentList
  ],
  imports: [
    BrowserModule,
    AppRoutingModule,
    FormsModule,
    SystemCommonModule
  ],
  providers: [
    { provide: RouteReuseStrategy, useClass: SimpleReuseStrategy }
  ],
  bootstrap: [AppComponent]
})
export class AppModule { }위의 두 단계는 기본적으로 재사용 전략을 구현하지만 첫 번째 렌더링을 달성하려면 여전히 필요합니다. 다른 작업 수행
3. 경로 추가 정의 일부 데이터 데이터 라우팅 코드는 다음과 같습니다.
import { NgModule } from '@angular/core';
import { Routes, RouterModule } from '@angular/router';
import { AboutComponent } from './home/about.component'
import { HomeComponent } from './home/home.component'
import { NewsComponent } from './home/news.component'
import { ContactComponent } from './home/contact.component'


export const routes: Routes = [
  { path: '', redirectTo: 'home', pathMatch: 'full', },
  { path: 'home', component: HomeComponent,data: { title: '首页', module: 'home', power: "SHOW" } },
  { path: 'news',component: NewsComponent ,data: { title: '新闻管理', module: 'news', power: "SHOW" }},
  { path: 'contact',component: ContactComponent ,data: { title: '联系我们', module: 'contact', power: "SHOW" }},
  { path: 'about', component: AboutComponent,data: { title: '关于我们', module: 'about', power: "SHOW" } },
];

@NgModule({
  imports: [RouterModule.forRoot(routes)],
  exports: [RouterModule]
})

export class AppRoutingModule { }

export const ComponentList=[
    HomeComponent,
    NewsComponent,
    AboutComponent,
    ContactComponent
] 4. app.comComponent 코드에서
import { Component } from '@angular/core';
import { SimpleReuseStrategy } from './SimpleReuseStrategy';
import { ActivatedRoute, Router, NavigationEnd } from '@angular/router';
import { Title } from '@angular/platform-browser';
import 'rxjs/add/operator/filter';
import 'rxjs/add/operator/map';
import 'rxjs/add/operator/mergeMap';
@Component({
selector: 'app-root',
styleUrls:['app.css'],
templateUrl: 'app.html',
providers: [SimpleReuseStrategy]
})
export class AppComponent {
//路由列表
menuList: Array<{ title: string, module: string, power: string,isSelect:boolean }>=[];
constructor(private router: Router,
private activatedRoute: ActivatedRoute,
private titleService: Title) {
//路由事件
this.router.events.filter(event => event instanceof NavigationEnd)
.map(() => this.activatedRoute)
.map(route => {
while (route.firstChild) route = route.firstChild;
return route;
})
.filter(route => route.outlet === 'primary')
.mergeMap(route => route.data)
.subscribe((event) => {
//路由data的标题
let title = event['title'];
this.menuList.forEach(p => p.isSelect=false);
var menu = { title: title, module: event["module"], power: event["power"], isSelect:true};
this.titleService.setTitle(title);
let exitMenu=this.menuList.find(info=>info.title==title);
if(exitMenu){//如果存在不添加,当前表示选中
this.menuList.forEach(p => p.isSelect=p.title==title);
return ;
}
this.menuList.push(menu);
});
}
//关闭选项标签
closeUrl(module:string,isSelect:boolean){
//当前关闭的是第几个路由
let index=this.menuList.findIndex(p=>p.module==module);
//如果只有一个不可以关闭
if(this.menuList.length==1) return ;
this.menuList=this.menuList.filter(p=>p.module!=module);
//删除复用
delete SimpleReuseStrategy.handlers[module];
if(!isSelect) return;
//显示上一个选中
let menu=this.menuList[index-1];
if(!menu) {//如果上一个没有下一个选中
menu=this.menuList[index+1];
}
// console.log(menu);
// console.log(this.menuList);
this.menuList.forEach(p => p.isSelect=p.module==menu.module );
//显示当前路由信息
this.router.navigate(['/'+menu.module]);
}
}app.html 코드는 다음과 같습니다.
<div class="row">
  <div class="col-md-4">
    <ul>
      <li><a routerLinkActive="active" routerLink="/home">首页</a></li>
      <li><a routerLinkActive="active" routerLink="/about">关于我们</a></li>
      <li><a routerLinkActive="active" routerLink="/news">新闻中心</a></li>
      <li><a routerLinkActive="active" routerLink="/contact">联系我们</a></li>
    </ul>
  </div>
  <div class="col-md-8">
    <div class="crumbs clearfix">
      <ul>
          <ng-container  *ngFor="let menu of menuList">
              <ng-container *ngIf="menu.isSelect">
                  <li class="isSelect">
                      <a routerLink="/{{ menu.module }}">{{ menu.title }}</a>
                      <span (click)="closeUrl(menu.module,menu.isSelect)">X</span>
                  </li>
              </ng-container>
              <ng-container *ngIf="!menu.isSelect">
                  <li>
                      <a routerLink="/{{ menu.module }}">{{ menu.title }}</a>
                      <span  (click)="closeUrl(menu.module,menu.isSelect)">X</span>
                  </li>
              </ng-container>
          </ng-container>
      </ul>
    </div>
    <router-outlet></router-outlet>
  </div>
</div>전체 효과는 다음과 같습니다.
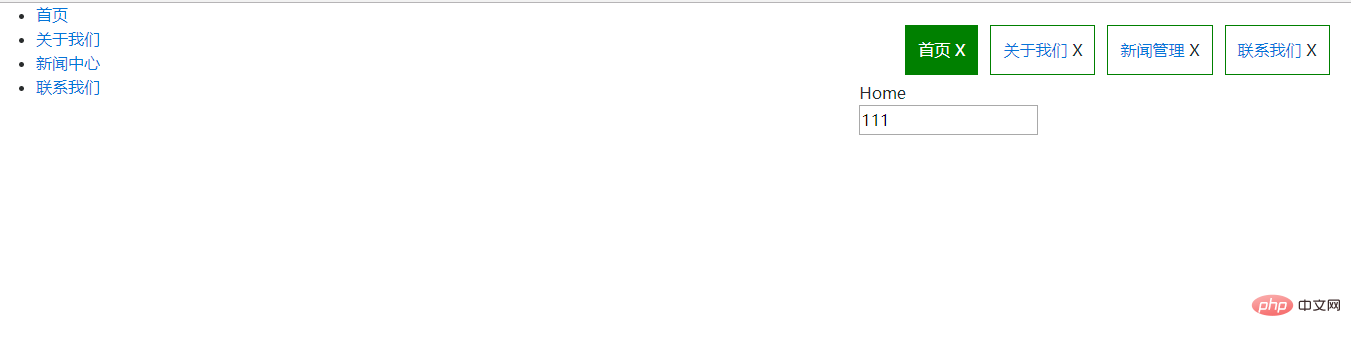
마지막으로 메뉴를 클릭하면 해당 라벨 선택이 표시되고, 닫을 때 편집 내용을 전환할 수 있습니다. 라벨을 삭제하려면 메뉴를 다시 클릭하여 콘텐츠를 다시 로드하세요.
더 많은 프로그래밍 관련 지식을 보려면 프로그래밍 교육을 방문하세요! !
위 내용은 Angle4에서 탭 전환을 구현하는 방법 소개의 상세 내용입니다. 자세한 내용은 PHP 중국어 웹사이트의 기타 관련 기사를 참조하세요!

핫 AI 도구

Undresser.AI Undress
사실적인 누드 사진을 만들기 위한 AI 기반 앱

AI Clothes Remover
사진에서 옷을 제거하는 온라인 AI 도구입니다.

Undress AI Tool
무료로 이미지를 벗다

Clothoff.io
AI 옷 제거제

Video Face Swap
완전히 무료인 AI 얼굴 교환 도구를 사용하여 모든 비디오의 얼굴을 쉽게 바꾸세요!

인기 기사
뜨거운 도구

메모장++7.3.1
사용하기 쉬운 무료 코드 편집기

SublimeText3 중국어 버전
중국어 버전, 사용하기 매우 쉽습니다.

스튜디오 13.0.1 보내기
강력한 PHP 통합 개발 환경

드림위버 CS6
시각적 웹 개발 도구

SublimeText3 Mac 버전
신 수준의 코드 편집 소프트웨어(SublimeText3)
뜨거운 주제
 7677
7677
 15
1393
52
1207
24
91
11
73
19
15
1393
52
1207
24
91
11
73
19

 Angular의 메타데이터와 데코레이터에 대해 이야기해 보겠습니다.
Feb 28, 2022 am 11:10 AM
Angular의 메타데이터와 데코레이터에 대해 이야기해 보겠습니다.
Feb 28, 2022 am 11:10 AM
이 글은 Angular에 대한 학습을 계속하고, Angular의 메타데이터와 데코레이터를 이해하고, 그 사용법을 간략하게 이해하는 데 도움이 되기를 바랍니다.
 Ubuntu 24.04에 Angular를 설치하는 방법
Mar 23, 2024 pm 12:20 PM
Ubuntu 24.04에 Angular를 설치하는 방법
Mar 23, 2024 pm 12:20 PM
Angular.js는 동적 애플리케이션을 만들기 위해 자유롭게 액세스할 수 있는 JavaScript 플랫폼입니다. HTML 구문을 템플릿 언어로 확장하여 애플리케이션의 다양한 측면을 빠르고 명확하게 표현할 수 있습니다. Angular.js는 코드를 작성, 업데이트 및 테스트하는 데 도움이 되는 다양한 도구를 제공합니다. 또한 라우팅 및 양식 관리와 같은 많은 기능을 제공합니다. 이 가이드에서는 Ubuntu24에 Angular를 설치하는 방법에 대해 설명합니다. 먼저 Node.js를 설치해야 합니다. Node.js는 서버 측에서 JavaScript 코드를 실행할 수 있게 해주는 ChromeV8 엔진 기반의 JavaScript 실행 환경입니다. Ub에 있으려면
 각도 학습 상태 관리자 NgRx에 대한 자세한 설명
May 25, 2022 am 11:01 AM
각도 학습 상태 관리자 NgRx에 대한 자세한 설명
May 25, 2022 am 11:01 AM
이 글은 Angular의 상태 관리자 NgRx에 대한 심층적인 이해를 제공하고 NgRx 사용 방법을 소개하는 글이 될 것입니다.
 Angular의 서버 측 렌더링(SSR)을 탐색하는 기사
Dec 27, 2022 pm 07:24 PM
Angular의 서버 측 렌더링(SSR)을 탐색하는 기사
Dec 27, 2022 pm 07:24 PM
앵귤러 유니버셜(Angular Universal)을 아시나요? 웹사이트가 더 나은 SEO 지원을 제공하는 데 도움이 될 수 있습니다!
 프론트엔드 개발에 PHP와 Angular를 사용하는 방법
May 11, 2023 pm 04:04 PM
프론트엔드 개발에 PHP와 Angular를 사용하는 방법
May 11, 2023 pm 04:04 PM
인터넷의 급속한 발전과 함께 프론트엔드 개발 기술도 지속적으로 개선되고 반복되고 있습니다. PHP와 Angular는 프런트엔드 개발에 널리 사용되는 두 가지 기술입니다. PHP는 양식 처리, 동적 페이지 생성, 액세스 권한 관리와 같은 작업을 처리할 수 있는 서버측 스크립팅 언어입니다. Angular는 단일 페이지 애플리케이션을 개발하고 구성 요소화된 웹 애플리케이션을 구축하는 데 사용할 수 있는 JavaScript 프레임워크입니다. 이 기사에서는 프론트엔드 개발에 PHP와 Angular를 사용하는 방법과 이들을 결합하는 방법을 소개합니다.
 Angular + NG-ZORRO로 백엔드 시스템을 빠르게 개발
Apr 21, 2022 am 10:45 AM
Angular + NG-ZORRO로 백엔드 시스템을 빠르게 개발
Apr 21, 2022 am 10:45 AM
이 기사는 Angular의 실제 경험을 공유하고 ng-zorro와 결합된 angualr을 사용하여 백엔드 시스템을 빠르게 개발하는 방법을 배우게 될 것입니다. 모든 사람에게 도움이 되기를 바랍니다.
 각도에서 monaco-editor를 사용하는 방법에 대한 간략한 분석
Oct 17, 2022 pm 08:04 PM
각도에서 monaco-editor를 사용하는 방법에 대한 간략한 분석
Oct 17, 2022 pm 08:04 PM
각도에서 모나코 편집기를 사용하는 방법은 무엇입니까? 다음 글은 최근 비즈니스에서 사용되는 Monaco-Editor의 활용 사례를 기록한 글입니다.
 Angular의 독립 구성요소에 대한 간략한 분석 및 사용 방법 알아보기
Jun 23, 2022 pm 03:49 PM
Angular의 독립 구성요소에 대한 간략한 분석 및 사용 방법 알아보기
Jun 23, 2022 pm 03:49 PM
이 기사에서는 Angular의 독립 구성 요소, Angular에서 독립 구성 요소를 만드는 방법, 기존 모듈을 독립 구성 요소로 가져오는 방법을 안내합니다.
