yii2를 사용하여 qq 사서함을 사용하여 파일을 보내는 방법

구체적인 방법은 다음과 같습니다.
(동영상 공유 학습: 프로그래밍 입문)
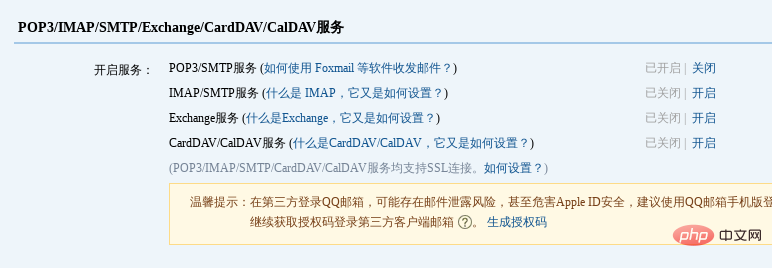
1 먼저 qq 메일함 설정에서 POP3/SMTP 서비스를 활성화합니다

인증 코드를 저장합니다.
Yii2 구성 파일(common/config/main.php의 구성 요소)에 메일함 구성 요소
'mailer' => [
            'class' => 'yii\swiftmailer\Mailer',
            'viewPath' => '@common/mail',
            // send all mails to a file by default. You have to set
            // 'useFileTransport' to false and configure a transport
            // for the mailer to send real emails.
            'useFileTransport' => false,
            'transport' => [
                //这里如果你是qq的邮箱,可以参考qq客户端设置后再进行配置 http://service.mail.qq.com/cgi-bin/help?subtype=1&&id=28&&no=1001256
                'class' => 'Swift_SmtpTransport',
                'host' => 'smtp.qq.com',
                // qq邮箱
                'username' => '114***6@qq.com',
                //授权码, 什么是授权码, http://service.mail.qq.com/cgi-bin/help?subtype=1&&id=28&&no=1001256
                'password' => '***',
                'port' => '465',
                'encryption' => 'ssl',
             ],
            'messageConfig'=>[
                'charset'=>'UTF-8',
                'from'=>['114***@qq.com'=>'developer']
            ],
],를 추가하고 메일함 인터페이스를 호출하여 이메일을 보냅니다.
public function actionSendmail()
    {
        $mail = \YII::$app->mailer->compose();
        $mail->setTo("***@qq.com");
        $mail->setSubject("邮件测试");
        $mail->setTextBody("textbody 25 ok?");//发布纯文字文本
        //$mail->setHtmlBody("htmlbody");//发布可以带html标签的文本
        if($mail->send()){
            echo "success";
        }else{
            echo "failure";
        }
}관련 권장 사항: yii 프레임워크
위 내용은 yii2를 사용하여 qq 사서함을 사용하여 파일을 보내는 방법의 상세 내용입니다. 자세한 내용은 PHP 중국어 웹사이트의 기타 관련 기사를 참조하세요!

핫 AI 도구

Undresser.AI Undress
사실적인 누드 사진을 만들기 위한 AI 기반 앱

AI Clothes Remover
사진에서 옷을 제거하는 온라인 AI 도구입니다.

Undress AI Tool
무료로 이미지를 벗다

Clothoff.io
AI 옷 제거제

AI Hentai Generator
AI Hentai를 무료로 생성하십시오.

인기 기사

뜨거운 도구

메모장++7.3.1
사용하기 쉬운 무료 코드 편집기

SublimeText3 중국어 버전
중국어 버전, 사용하기 매우 쉽습니다.

스튜디오 13.0.1 보내기
강력한 PHP 통합 개발 환경

드림위버 CS6
시각적 웹 개발 도구

SublimeText3 Mac 버전
신 수준의 코드 편집 소프트웨어(SublimeText3)

뜨거운 주제
 7569
7569
 15
15
 1386
1386
 52
52
 87
87
 11
11
 61
61
 19
19
 28
28
 107
107
 Gate.io 등록 자습서
Mar 31, 2025 pm 11:09 PM
이 기사는 공식 웹 사이트에 액세스하는 것부터 등록 정보 작성, 등록 정보 작성, 확인, 사용자 계약 읽기 등의 모든 단계를 다루는 자세한 Gate.io 등록 자습서를 제공합니다.이 기사는 또한 2 차 검증을 설정하고 실제 인증을 설정하고 초보자의 디지털 자산 거래를 시작하는 등의 성공적인 등록을 성공적으로 등록한 후 보안 조치를 강조합니다.
 초보자를위한 Gate.io 최신 등록 자습서
Mar 31, 2025 pm 11:12 PM
이 기사는 초보자에게 자세한 GATE.IO 등록 자습서를 제공하여 공식 웹 사이트 액세스, 정보 작성, 신원 확인 등을 포함하여 등록 프로세스를 점차적으로 완료하도록 안내하고 등록 후 보안 설정을 강조합니다. 또한이 기사는 Binance, Ouyi 및 참깨 오픈 도어와 같은 다른 교환을 언급했습니다. 초보자는 자신의 요구에 따라 올바른 플랫폼을 선택하고 독자들에게 디지털 자산 투자가 위험하고 합리적으로 투자해야한다는 것을 상기시키는 것이 좋습니다.
 Laravel에서 이메일 전송이 실패 할 때 반환 코드를 얻는 방법은 무엇입니까?
Apr 01, 2025 pm 02:45 PM
Laravel 이메일 전송이 실패 할 때 반환 코드를 얻는 방법. Laravel을 사용하여 응용 프로그램을 개발할 때 종종 확인 코드를 보내야하는 상황이 발생합니다. 그리고 실제로 ...
 Laravel에서는 이메일로 확인 코드를 보내지 못하는 상황을 처리하는 방법은 무엇입니까?
Mar 31, 2025 pm 11:48 PM
Laravel의 이메일을 처리하지 않는 방법은 LaRavel을 사용하는 것입니다.
 Gate.io 웹 버전의 최신 등록 자습서
Mar 31, 2025 pm 11:15 PM
이 기사는 사용자가 디지털 자산 거래를 쉽게 시작할 수 있도록 자세한 Gate.io 웹 버전 최신 등록 자습서를 제공합니다. 이 자습서는 공식 웹 사이트에 액세스하는 것부터 등록 완료에 이르기까지 모든 단계를 다루고 등록 후 보안 설정을 강조합니다. 이 기사는 또한 Binance, Ouyi 및 참깨 오픈 도어와 같은 다른 거래 플랫폼을 간략하게 소개합니다. 사용자는 자신의 요구에 따라 올바른 플랫폼을 선택하고 투자 위험에주의를 기울이는 것이 좋습니다.
 Binance Binance 컴퓨터 버전 입구 Binance Binance 컴퓨터 버전 PC 공식 웹 사이트 로그인 입구
Mar 31, 2025 pm 04:36 PM
이 기사는 Binance PC 버전에 로그인 및 등록에 대한 완전한 안내서를 제공합니다. 먼저 Binance PC 버전으로 로그하는 단계에 대해 자세히 설명했습니다. 브라우저에서 "Binance 공식 웹 사이트"를 검색하고 로그인 버튼을 클릭하고 이메일 및 비밀번호를 입력하십시오 (2FA 활성화 검증 코드를 입력 할 수 있음) 로그인 할 수 있습니다. 두 번째로 기사는 "등록"버튼을 클릭하고 이메일 주소를 클릭하고 강한 비밀번호를 설정하고 이메일 주소를 확인하십시오. 마지막으로,이 기사는 또한 계정 보안을 강조하여 사용자에게 공식 도메인 이름, 네트워크 환경에주의를 기울이고 비밀번호를 정기적으로 업데이트하여 계정 보안 및 시장 조건보기, 거래 수행 및 자산 관리와 같은 Binance PC 버전에서 제공하는 다양한 기능을 더 잘 활용하도록 상기시킵니다.
 산성 특성 이해 : 신뢰할 수있는 데이터베이스의 기둥
Apr 08, 2025 pm 06:33 PM
데이터베이스 산 속성에 대한 자세한 설명 산 속성은 데이터베이스 트랜잭션의 신뢰성과 일관성을 보장하기위한 일련의 규칙입니다. 데이터베이스 시스템이 트랜잭션을 처리하는 방법을 정의하고 시스템 충돌, 전원 중단 또는 여러 사용자의 동시 액세스가 발생할 경우에도 데이터 무결성 및 정확성을 보장합니다. 산 속성 개요 원자력 : 트랜잭션은 불가분의 단위로 간주됩니다. 모든 부분이 실패하고 전체 트랜잭션이 롤백되며 데이터베이스는 변경 사항을 유지하지 않습니다. 예를 들어, 은행 송금이 한 계정에서 공제되지만 다른 계정으로 인상되지 않은 경우 전체 작업이 취소됩니다. BeginTransaction; updateAccountssetBalance = Balance-100WH
 OUYI 공식 웹 사이트의 최신 등록 포털
Mar 21, 2025 pm 05:54 PM
세계 최고의 디지털 자산 거래 플랫폼 인 Ouyi Okx는 풍부한 거래 제품, 강력한 보안 보증 및 편리한 사용자 경험으로 많은 투자자를 유치합니다. 그러나 네트워크 보안의 위험이 점점 심해지고 있으며 공식 OUYI OKX 계정을 안전하게 등록하는 방법이 중요합니다. 이 기사는 OUYI OKX 공식 웹 사이트의 최신 등록 포털을 제공하고 공식 웹 사이트를 식별하고 강력한 암호를 설정하고 2 인용 암호 검증을 활성화하는 방법을 포함하여 안전한 등록 단계와 예방 조치를 자세히 설명하여 디지털 자산 투자 여행을 안전하고 편리하게 시작하는 데 도움이됩니다. 디지털 자산 투자에는 위험이 있습니다. 신중한 결정을 내리십시오.


