Angular의 라우팅 가드에 대한 자세한 설명
이 글에서는 Angular 라우팅의 라우팅 가드를 소개합니다. 도움이 필요한 친구들이 모두 참고할 수 있기를 바랍니다.

관련 추천: "angular Tutorial"
1. 경로 가드
사용자가 특정 조건을 충족하면 경로에 들어가거나 탈퇴할 수 있습니다.
경로 보호 시나리오:
사용자가 로그인하고 특정 권한이 있는 경우에만 특정 경로에 들어갈 수 있습니다.
등록 과정 등 여러 양식으로 구성된 마법사입니다. 사용자는 현재 경로의 구성 요소에 필수 정보를 입력해야만 다음 경로로 이동할 수 있습니다.
사용자가 저장 작업을 수행하지 않고 현재 탐색에서 나가려고 하면 사용자에게 경고합니다.
Angular는 경로 진입 또는 이탈을 제어하는 데 도움이 되는 몇 가지 후크를 제공합니다. 이러한 후크는 라우팅 가드이며 위의 시나리오는 이러한 후크를 통해 실현될 수 있습니다.
- CanActivate: 경로 탐색을 처리합니다.
- CanDeactivate: 현재 경로에서 출발을 처리합니다.
- 해결: 라우팅 활성화 전에 라우팅 데이터를 가져옵니다.
일부 속성은 라우팅, 경로, 구성 요소, 콘센트, 하위를 구성할 때 사용되며 라우팅 가드도 라우팅 속성입니다.
2. CanActivate
예: 로그인한 사용자만 제품 정보 라우팅을 입력하도록 허용합니다.
새 가드 디렉터리를 만듭니다. 디렉토리에 새로운 login.guard.ts를 생성하십시오.
LoginGuard 클래스는 CanActivate 인터페이스를 구현하고 true 또는 false를 반환합니다. Angular는 반환 값에 따라 요청의 성공 여부를 결정합니다.
import { CanActivate } from "@angular/router";

export class LoginGuard implements CanActivate{
    canActivate(){
        let loggedIn :boolean= Math.random()<0.5;
        if(!loggedIn){
            console.log("用户未登录");
        }
        return loggedIn;
    }
}제품 라우팅을 구성하세요. 먼저 공급자에 LoginGuard를 추가한 다음 라우팅 가드를 지정합니다.
canActivate는 여러 가드를 지정할 수 있으며 값은 배열입니다.
const routes: Routes = [
  { path: '', redirectTo : 'home',pathMatch:'full' },
  { path: 'chat', component: ChatComponent, outlet: "aux"},//辅助路由
  { path: 'home', component: HomeComponent },
  { path: 'product/:id', component: ProductComponent, children:[
    { path: '', component : ProductDescComponent },
    { path: 'seller/:id', component : SellerInfoComponent }
  ] ,canActivate: [LoginGuard]},
  { path: '**', component: Code404Component }
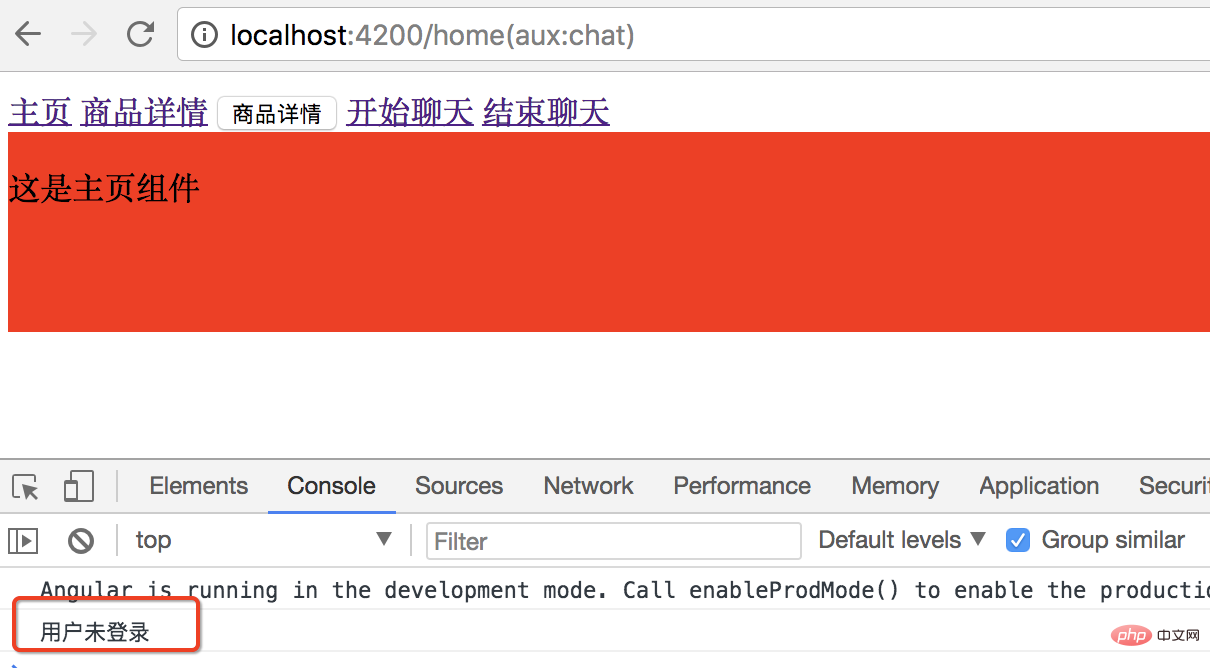
];효과: 제품 세부 정보 링크를 클릭하면 콘솔은 사용자에게 로그인되어 있지 않아 제품 세부 정보 경로에 들어갈 수 없다는 것을 알려줍니다.

3. CanDeactivate
출발 시 경로 보호. 떠나기 전에 저장하도록 사용자에게 상기시킵니다.
guard 디렉터리에 새 unsave.guard.ts 파일을 만듭니다.
CanDeactivate 인터페이스에는 현재 구성 요소의 유형을 지정하는 일반 유형이 있습니다.
CanDeactivate 메서드의 첫 번째 매개 변수는 보호할 구성 요소의 상태에 따라 인터페이스에서 지정하는 일반 유형의 구성 요소이거나 사용자가 나갈 수 있는지 여부를 결정하는 메서드를 호출합니다.
import { CanDeactivate } from "@angular/router";
import { ProductComponent } from "../product/product.component";
export class UnsaveGuard implements CanDeactivate<ProductComponent>{
//第一个参数 范型类型的组件
//根据当前要保护组件 的状态 判断当前用户是否能够离开
canDeactivate(component: ProductComponent){
return window.confirm('你还没有保存,确定要离开吗?');
}
}경로를 먼저 공급자에 추가한 다음 경로를 구성하세요.
import { NgModule } from '@angular/core';
import { Routes, RouterModule } from '@angular/router';
import { HomeComponent } from './home/home.component';
import { ProductComponent } from './product/product.component';
import { Code404Component } from './code404/code404.component';
import { ProductDescComponent } from './product-desc/product-desc.component';
import { SellerInfoComponent } from './seller-info/seller-info.component';
import { ChatComponent } from './chat/chat.component';
import { LoginGuard } from './guard/login.guard';
import { UnsaveGuard } from './guard/unsave.guard';

const routes: Routes = [
  { path: '', redirectTo : 'home',pathMatch:'full' },
  { path: 'chat', component: ChatComponent, outlet: "aux"},//辅助路由
  { path: 'home', component: HomeComponent },
  { path: 'product/:id', component: ProductComponent, children:[
    { path: '', component : ProductDescComponent },
    { path: 'seller/:id', component : SellerInfoComponent }
  ] ,canActivate: [LoginGuard],
     canDeactivate: [UnsaveGuard]},
  { path: '**', component: Code404Component }
];

@NgModule({
  imports: [RouterModule.forRoot(routes)],
  exports: [RouterModule],
  providers: [LoginGuard,UnsaveGuard]
})
export class AppRoutingModule { }효과:
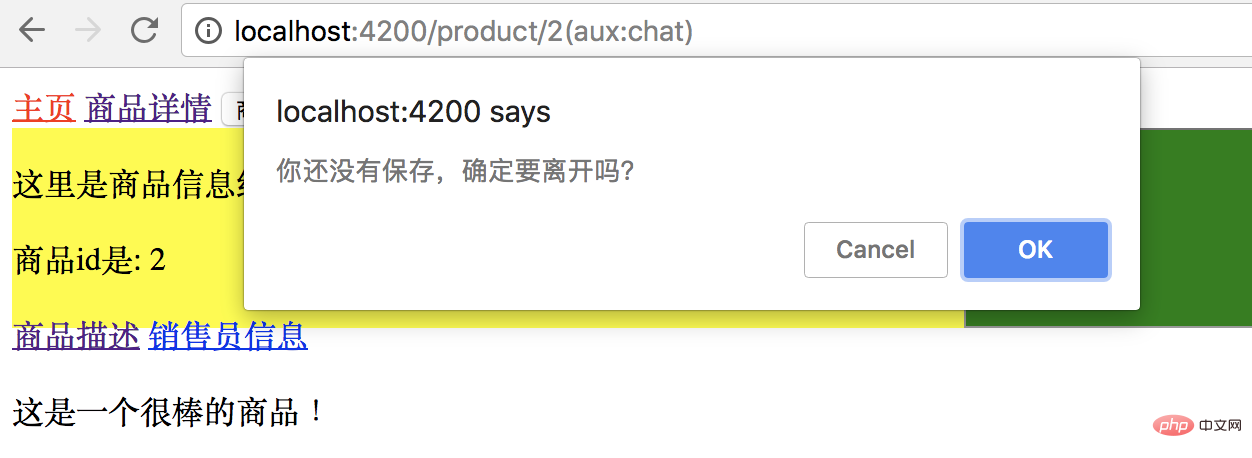
현재 페이지를 떠나려면 확인을 클릭하고, 현재 페이지에 머물려면 취소를 클릭하세요.

4. 가드 해결
http 요청 데이터 반환이 지연되어 템플릿이 즉시 표시되지 않습니다.
데이터가 반환되기 전에 컨트롤러 값을 표시하기 위해 보간 표현식을 사용해야 하는 템플릿의 모든 위치가 비어 있습니다. 사용자 경험이 좋지 않습니다.
해결 방법: 라우팅을 입력하기 전에 서버로 이동하여 데이터를 읽습니다. 필요한 데이터를 모두 읽은 후 데이터와 함께 라우팅을 입력하고 즉시 데이터를 표시합니다.
예:
상품정보 라우팅을 입력하기 전, 상품정보를 준비한 후 라우팅을 입력하세요. 정보를 얻을 수 없거나 정보를 얻는 데 문제가 있는 경우 오류 메시지 페이지로 바로 이동하거나 프롬프트가 팝업되고 더 이상 대상 경로에 진입할 수 없습니다.
먼저 product.comComponent.ts에서 제품 정보 유형을 선언하세요.
export class Product{
  constructor(public id:number, public name:string){
  }
}guard 디렉터리에 새 product.resolve.ts를 만듭니다. ProductResolve 클래스는 Resolve 인터페이스를 구현합니다.
Resolve는 또한 Resolve로 구문 분석할 데이터 유형인 패러다임을 선언해야 합니다.
import { Resolve, ActivatedRouteSnapshot, RouterStateSnapshot, Router } from "@angular/router";

import { Injectable } from "@angular/core";
import { Observable } from "rxjs/Observable";
import { Product } from "../product/product.component";

@Injectable()
export class ProductResolve implements Resolve<Product>{

    constructor(private router: Router) {
    }

    resolve(route: ActivatedRouteSnapshot, state: RouterStateSnapshot): Observable<any> | Promise<any> | any {
        let productId: number = route.params["id"];
        if (productId == 2) { //正确id
            return new Product(1, "iPhone7");
        } else { //id不是1导航回首页
            this.router.navigate(["/home"]);
            return undefined;
        }
    }
}경로 구성: 공급자에 선언되고 제품 경로에 구성됩니다.
resolve는 객체입니다. 객체에 있는 매개변수의 이름은 전달하려는 매개변수의 이름입니다. 제품은 이를 구문 분석하고 생성하는 데 사용됩니다.
import { NgModule } from '@angular/core';
import { Routes, RouterModule } from '@angular/router';
import { HomeComponent } from './home/home.component';
import { ProductComponent } from './product/product.component';
import { Code404Component } from './code404/code404.component';
import { ProductDescComponent } from './product-desc/product-desc.component';
import { SellerInfoComponent } from './seller-info/seller-info.component';
import { ChatComponent } from './chat/chat.component';
import { LoginGuard } from './guard/login.guard';
import { UnsaveGuard } from './guard/unsave.guard';
import { ProductResolve } from './guard/product.resolve';

const routes: Routes = [
  { path: '', redirectTo : 'home',pathMatch:'full' },
  { path: 'chat', component: ChatComponent, outlet: "aux"},//辅助路由
  { path: 'home', component: HomeComponent },
  { path: 'product/:id', component: ProductComponent, children:[
    { path: '', component : ProductDescComponent },
    { path: 'seller/:id', component : SellerInfoComponent }
  ] ,
    //  canActivate: [LoginGuard],
    //  canDeactivate: [UnsaveGuard],
    resolve:{ //resolve是一个对象
      product : ProductResolve   //想传入product,product由ProductResolve生成
    }},
  { path: '**', component: Code404Component }
];

@NgModule({
  imports: [RouterModule.forRoot(routes)],
  exports: [RouterModule],
  providers: [LoginGuard,UnsaveGuard,ProductResolve]
})
export class AppRoutingModule { }제품 ID와 이름을 표시하도록 product.comComponent.ts 및 템플릿을 수정하세요.
import { Component, OnInit } from '@angular/core';
import { ActivatedRoute, Params } from '@angular/router';

@Component({
  selector: 'app-product',
  templateUrl: './product.component.html',
  styleUrls: ['./product.component.css']
})
export class ProductComponent implements OnInit {

  private productId: number;
  private productName: string;
  constructor(private routeInfo: ActivatedRoute) { }

  ngOnInit() {
    // this.routeInfo.params.subscribe((params: Params)=> this.productId=params["id"]);
    this.routeInfo.data.subscribe(
      (data:{product:Product})=>{
        this.productId=data.product.id;
        this.productName=data.product.name;
      }
    );
  }

}

export class Product{
  constructor(public id:number, public name:string){
  }
}<div class="product">
<p>
这里是商品信息组件
</p>
<p>
商品id是: {{productId}}
</p>
<p>
商品名称是: {{productName}}
</p>
<a [routerLink]="['./']">商品描述</a>
<a [routerLink]="['./seller',99]">销售员信息</a>
<router-outlet></router-outlet>
</div>효과:
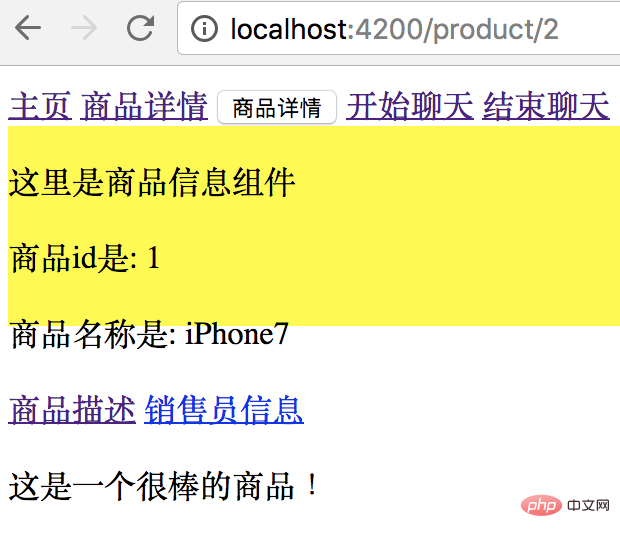
제품 세부정보 링크를 클릭하면 들어오는 제품 ID는 2이며 이는 리졸브 가드의 올바른 ID이며 제품 데이터 일부가 반환됩니다.
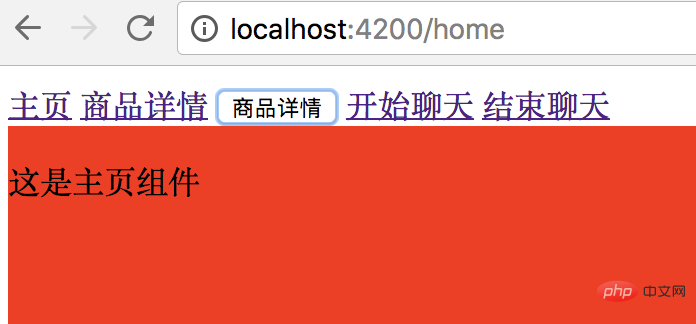
상품상세정보 버튼을 클릭하시면, 들어오는 상품ID가 3번인데, 잘못된 ID이며 홈페이지로 바로 이동됩니다.


이 기사는 다음에서 복제되었습니다: http://www.cnblogs.com/starof/p/9012193.html
프로그래밍 관련 지식을 더 보려면 프로그래밍 비디오를 방문하세요! !
위 내용은 Angular의 라우팅 가드에 대한 자세한 설명의 상세 내용입니다. 자세한 내용은 PHP 중국어 웹사이트의 기타 관련 기사를 참조하세요!

핫 AI 도구

Undresser.AI Undress
사실적인 누드 사진을 만들기 위한 AI 기반 앱

AI Clothes Remover
사진에서 옷을 제거하는 온라인 AI 도구입니다.

Undress AI Tool
무료로 이미지를 벗다

Clothoff.io
AI 옷 제거제

AI Hentai Generator
AI Hentai를 무료로 생성하십시오.

인기 기사

뜨거운 도구

메모장++7.3.1
사용하기 쉬운 무료 코드 편집기

SublimeText3 중국어 버전
중국어 버전, 사용하기 매우 쉽습니다.

스튜디오 13.0.1 보내기
강력한 PHP 통합 개발 환경

드림위버 CS6
시각적 웹 개발 도구

SublimeText3 Mac 버전
신 수준의 코드 편집 소프트웨어(SublimeText3)

뜨거운 주제
 7473
7473
 15
15
 1377
1377
 52
52
 77
77
 11
11
 48
48
 19
19
 19
19
 30
30
 Ubuntu 24.04에 Angular를 설치하는 방법
Mar 23, 2024 pm 12:20 PM
Angular.js는 동적 애플리케이션을 만들기 위해 자유롭게 액세스할 수 있는 JavaScript 플랫폼입니다. HTML 구문을 템플릿 언어로 확장하여 애플리케이션의 다양한 측면을 빠르고 명확하게 표현할 수 있습니다. Angular.js는 코드를 작성, 업데이트 및 테스트하는 데 도움이 되는 다양한 도구를 제공합니다. 또한 라우팅 및 양식 관리와 같은 많은 기능을 제공합니다. 이 가이드에서는 Ubuntu24에 Angular를 설치하는 방법에 대해 설명합니다. 먼저 Node.js를 설치해야 합니다. Node.js는 서버 측에서 JavaScript 코드를 실행할 수 있게 해주는 ChromeV8 엔진 기반의 JavaScript 실행 환경입니다. Ub에 있으려면
 Angular 구성 요소 및 해당 표시 속성: 비블록 기본값 이해
Mar 15, 2024 pm 04:51 PM
Angular 프레임워크의 구성 요소에 대한 기본 표시 동작은 블록 수준 요소에 대한 것이 아닙니다. 이 디자인 선택은 구성 요소 스타일의 캡슐화를 촉진하고 개발자가 각 구성 요소가 표시되는 방법을 의식적으로 정의하도록 장려합니다. CSS 속성 표시를 명시적으로 설정하면 Angular 구성 요소의 표시를 완전히 제어하여 원하는 레이아웃과 응답성을 얻을 수 있습니다.
 Slim 프레임워크에서 API 라우팅을 구현하는 방법
Aug 02, 2023 pm 05:13 PM
Slim 프레임워크에서 API 라우팅을 구현하는 방법 Slim은 웹 애플리케이션을 구축하는 간단하고 유연한 방법을 제공하는 경량 PHP 마이크로 프레임워크입니다. 주요 기능 중 하나는 API 라우팅 구현으로, 이를 통해 다양한 요청을 해당 핸들러에 매핑할 수 있습니다. 이 기사에서는 Slim 프레임워크에서 API 라우팅을 구현하는 방법을 소개하고 몇 가지 코드 예제를 제공합니다. 먼저 Slim 프레임워크를 설치해야 합니다. 최신 버전의 Slim은 Composer를 통해 설치할 수 있습니다. 터미널을 열고
 Java Apache Camel: 유연하고 효율적인 서비스 지향 아키텍처 구축
Feb 19, 2024 pm 04:12 PM
Apache Camel은 서로 다른 애플리케이션, 서비스 및 데이터 소스를 쉽게 통합하여 복잡한 비즈니스 프로세스를 자동화할 수 있는 ESB(Enterprise Service Bus) 기반 통합 프레임워크입니다. ApacheCamel은 경로 기반 구성을 사용하여 통합 프로세스를 쉽게 정의하고 관리합니다. ApacheCamel의 주요 기능은 다음과 같습니다. 유연성: ApacheCamel은 다양한 애플리케이션, 서비스 및 데이터 소스와 쉽게 통합될 수 있습니다. HTTP, JMS, SOAP, FTP 등을 포함한 여러 프로토콜을 지원합니다. 효율성: ApacheCamel은 매우 효율적이어서 많은 수의 메시지를 처리할 수 있습니다. 성능을 향상시키는 비동기 메시징 메커니즘을 사용합니다. 확장 가능
 Vue 프로젝트에서 라우팅을 사용하여 페이지 전환 애니메이션 효과를 사용자 정의하는 방법은 무엇입니까?
Jul 21, 2023 pm 02:37 PM
Vue 프로젝트에서 라우팅을 사용하여 페이지 전환 애니메이션 효과를 사용자 정의하는 방법은 무엇입니까? 소개: Vue 프로젝트에서 라우팅은 자주 사용하는 기능 중 하나입니다. 페이지 간 전환은 라우팅을 통해 이루어지며 좋은 사용자 경험을 제공합니다. 페이지 전환을 더욱 생생하게 만들기 위해 애니메이션 효과를 사용자 정의하여 구현할 수 있습니다. 이 기사에서는 라우팅을 사용하여 Vue 프로젝트에서 페이지 전환 애니메이션 효과를 사용자 정의하는 방법을 소개합니다. Vue 프로젝트 만들기 먼저 Vue 프로젝트를 만들어야 합니다. VueCLI를 사용하여 빠르게 빌드할 수 있습니다.
 Angular 및 Node를 사용한 토큰 기반 인증
Sep 01, 2023 pm 02:01 PM
인증은 모든 웹 애플리케이션에서 가장 중요한 부분 중 하나입니다. 이 튜토리얼에서는 토큰 기반 인증 시스템과 기존 로그인 시스템과의 차이점에 대해 설명합니다. 이 튜토리얼이 끝나면 Angular와 Node.js로 작성된 완벽하게 작동하는 데모를 볼 수 있습니다. 기존 인증 시스템 토큰 기반 인증 시스템으로 넘어가기 전에 기존 인증 시스템을 살펴보겠습니다. 사용자는 로그인 양식에 사용자 이름과 비밀번호를 입력하고 로그인을 클릭합니다. 요청한 후 데이터베이스를 쿼리하여 백엔드에서 사용자를 인증합니다. 요청이 유효하면 데이터베이스에서 얻은 사용자 정보를 이용하여 세션을 생성하고, 세션 정보를 응답 헤더에 반환하여 브라우저에 세션 ID를 저장한다. 다음과 같은 애플리케이션에 대한 액세스를 제공합니다.
 ThinkPHP6에서 라우팅을 사용하는 방법
Jun 20, 2023 pm 07:54 PM
ThinkPHP6은 URL 라우팅 구성을 동시에 쉽게 구현할 수 있는 편리한 라우팅 기능을 갖춘 강력한 PHP 프레임워크이며, GET, POST, PUT, DELETE 등과 같은 다양한 라우팅 모드도 지원합니다. 이 기사에서는 라우팅 구성을 위해 ThinkPHP6을 사용하는 방법을 소개합니다. 1. ThinkPHP6 라우팅 모드 GET 방법: GET 방법은 데이터를 얻는 데 사용되는 방법으로 페이지 표시에 자주 사용됩니다. ThinkPHP6에서는 다음을 사용할 수 있습니다.
 JavaScript 기능을 사용하여 웹 페이지 탐색 및 라우팅 구현
Nov 04, 2023 am 09:46 AM
최신 웹 애플리케이션에서 웹 페이지 탐색 및 라우팅을 구현하는 것은 매우 중요한 부분입니다. JavaScript 기능을 사용하여 이 기능을 구현하면 웹 애플리케이션을 더욱 유연하고 확장 가능하며 사용자 친화적으로 만들 수 있습니다. 이 기사에서는 JavaScript 기능을 사용하여 웹 페이지 탐색 및 라우팅을 구현하는 방법을 소개하고 구체적인 코드 예제를 제공합니다. 웹 페이지 탐색 구현 웹 애플리케이션에서 웹 페이지 탐색은 사용자가 가장 자주 조작하는 부분입니다. 사용자가 페이지를 클릭하면


