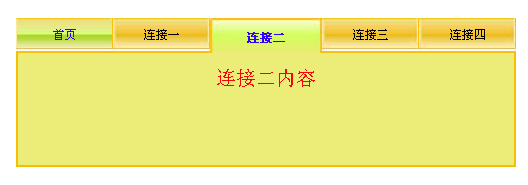
이 기사의 예에서는 아름다운 탭 효과를 얻기 위한 JS DIV CSS 레이아웃을 설명합니다. 참고할 수 있도록 모든 사람과 공유하세요. 세부 내용은 다음과 같습니다.
이 탭은 초보자가 Div CSS 레이아웃 기술을 연습하는 데 도움이 되는 간단한 탭 코드입니다. 탭은 많은 웹사이트에서 널리 사용됩니다. .
런닝 효과 스크린샷은 다음과 같습니다.

온라인 데모 주소는 다음과 같습니다.
http://demo.jb51.net/js/2015/js-div-css-pbbj-nav-demo/
구체적인 코드는 다음과 같습니다.
<!DOCTYPE html PUBLIC "-//W3C//DTD XHTML 1.0 Transitional//EN"
"http://www.w3.org/TR/xhtml1/DTD/xhtml1-transitional.dtd">
<html xmlns="http://www.w3.org/1999/xhtml">
<head>
<meta http-equiv="Content-Type" content="text/html; charset=gb2312" />
<title>DIV CSS排版</title>
<style type="text/css">
<!--
body,ul{margin:0; padding:0; list-style:none; font:12px "宋体";}
.test {
 width:500px;
 margin:20px auto;
 height:150px;
 background:url("images/9zrgo3.jpg") repeat-x 0 33px;
 }
.test ul li {
 float:left;
 padding:2px 1px 6px 1px;
 background: url("images/11abdrs.jpg") no-repeat 0 0;
 }
.test ul li a {
 color:#000;
 width:95px;
 text-decoration:none;
 display:block;
 height:27px;
 line-height:31px;
 text-align:center;
 overflow:hidden;
 }
.test ul li a:hover{
 color:#30F;
 background:#FFF url("images/2vi1df8.jpg") repeat-x 0 0px;
 }
.test ul li.yes {padding:0;border:none;}
.test ul li.yes a {
 color:#30F;
 width:112px;
 height:35px;
 line-height:40px;
 display:block;
 font-weight:bold;
 margin-bottom:-5px;
 background: url("images/27zgcqc.jpg") no-repeat 0px 0;
 overflow:hidden;
 }
.content {
 line-height:50px;
 text-align:center;
 font-size:20px;
 color:red;
 height:112px;
 border:#F8BE05 2px solid;
 border-top:none;
 clear:both;
 background:#ECED78;
 }
.no { display:none;}
-->
</style>
<script type="text/javascript" language="javascript">
 function test_item(n){
  var menu = document.getElementById("menu");
  var menuli = menu.getElementsByTagName("li");
  for(var i = 0; i< menuli.length;i++){
   menuli[i].className= "";
   menuli[n].className="yes";
   document.getElementById("test"+ i).className = "no";
   document.getElementById("test"+ n).className = "content";
  }
 }
</script>
</head>
<body>
<div class="test">
 <ul id="menu">
  <li class="yes" onclick="javascript:test_item(0);"><a href="#" onfocus="this.blur()">首页</a></li>
  <li onclick="javascript:test_item(1);"><a href="#" onfocus="this.blur()">连接一</a></li>
  <li onclick="javascript:test_item(2);"><a href="#" onfocus="this.blur()">连接二</a></li>
  <li onclick="javascript:test_item(3);"><a href="#" onfocus="this.blur()">连接三</a></li>
  <li onclick="javascript:test_item(4);"><a href="#" onfocus="this.blur()">连接四</a></li>
 </ul>
 <div class="content" id="test0">
  首页内容
 </div>
 <div id="test1" class="no">
  连接一内容
 </div>
 <div id="test2" class="no">
  连接二内容
 </div>
 <div id="test3" class="no">
  连接三内容
 </div>
 <div id="test4" class="no">
  连接四内容
 </div>
</div>
</body>
</html>이 기사가 모든 사람의 JavaScript 프로그래밍에 도움이 되기를 바랍니다.