Nginx1.19 php8.0 소스 코드 컴파일 및 설치에 대한 자세한 설명
추천 학습: "PHP8 Tutorial"
centos7 이상 버전 준비
1단계
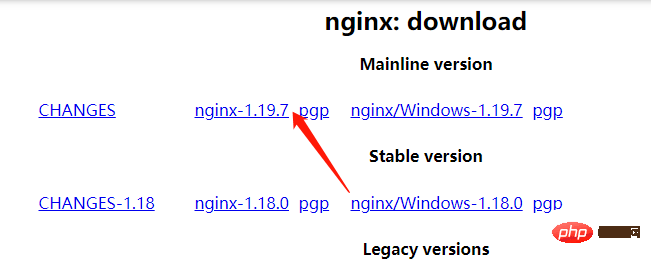
nginx 패키지를 다운로드하여 지정된 디렉터리에 넣습니다. mnt 디렉터리:
다운로드 주소: nginx.org/en/download.html

nginx 압축 패키지 압축 풀기
tar zxvf nginx-1.19.7.tar.gz
로그인 후 복사
종속성 패키지 준비:
yum -y install zlib-devel pcre-devel openssl-devel
로그인 후 복사
nginx 사용자 준비:
useradd -M -s /sbin/nologin nginx
로그인 후 복사
소스 코드 컴파일 및 설치:
./configure --prefix=/usr/local/nginx --with-http_stub_status_module --with-http_ssl_module --with-http_random_index_module --with-http_sub_module

make
make install
로그인 후 복사
구성 파일 설정:
user nginx;
로그인 후 복사
서비스 관리:
1. 구성 구문 감지
/usr/local/nginx/sbin/nginx -t
로그인 후 복사
2. 서비스를 다시 로드
/usr/local/nginx/sbin/nginx
로그인 후 복사
4. 부팅하고 시작합니다.
/usr/local/nginx/sbin/nginx -s reload
pkill -HUP nginx
로그인 후 복사
/usr/local/nginx/sbin/nginx -s stop
pkill nginx
로그인 후 복사
vi /etc/rc.local/usr/local/nginx/sbin/nginx
로그인 후 복사
pstree |grep nginx
ps -ef |grep nginx
ps aux |grep nginx
로그인 후 복사
netstat -tunpl |grep nginx
로그인 후 복사
php8.0 소스 코드 컴파일 및 설치
php8 종속성 단일 설치
http://192.168.2.1
로그인 후 복사
[root@wml sbin]# pkill -HUP nginx
로그인 후 복사
yum -y install autoconf freetype gd libpng libpng-devel libjpeg libxml2 libxml2-devel zlib curl curl-devel net-snmp-devel libjpeg-devel php-ldap openldap-devel openldap-clients freetype-devel gmp-devel libzip libzip-devel sqlite-devel
로그인 후 복사
tar -zxvf oniguruma-6.9.4.tar.gz
로그인 후 복사
1 .Unzip
cd oniguruma-6.9.4/
로그인 후 복사
2. 디렉토리 전환
./autogen.sh
로그인 후 복사
3. 컴파일 구성 파일 생성
./configure --prefix=/usr
로그인 후 복사
4. 컴파일 및 설치
make && make install
로그인 후 복사
error 컴파일 및 설치 중에 오류 발생
tar xzf php-8.0.0.tar.gz
로그인 후 복사
cd php-8.0.0/
로그인 후 복사
./configure --prefix=/usr/local/php --with-config-file-path=/usr/local/php/etc --enable-fpm --with-fpm-user=nginx --with-fpm-group=nginx --enable-mysqlnd --with-mysqli --with-pdo-mysql --enable-opcache --with-pcre-jit --enable-gd --with-jpeg --with-freetype --with-gettext --with-curl --with-openssl --enable-sockets --enable-mbstring --enable-xml --with-zip --with-zlib --with-snmp --with-mhash --enable-ftp --enable-bcmath --enable-soap --enable-shmop --enable-sysvsem --enable-pcntl --with-gmp
로그인 후 복사

위 내용은 Nginx1.19 php8.0 소스 코드 컴파일 및 설치에 대한 자세한 설명의 상세 내용입니다. 자세한 내용은 PHP 중국어 웹사이트의 기타 관련 기사를 참조하세요!
본 웹사이트의 성명
본 글의 내용은 네티즌들의 자발적인 기여로 작성되었으며, 저작권은 원저작자에게 있습니다. 본 사이트는 이에 상응하는 법적 책임을 지지 않습니다. 표절이나 침해가 의심되는 콘텐츠를 발견한 경우 admin@php.cn으로 문의하세요.

핫 AI 도구

Undresser.AI Undress
사실적인 누드 사진을 만들기 위한 AI 기반 앱

AI Clothes Remover
사진에서 옷을 제거하는 온라인 AI 도구입니다.

Undress AI Tool
무료로 이미지를 벗다

Clothoff.io
AI 옷 제거제

AI Hentai Generator
AI Hentai를 무료로 생성하십시오.

인기 기사
어 ass 신 크리드 그림자 : 조개 수수께끼 솔루션
3 몇 주 전
By DDD
Windows 11 KB5054979의 새로운 기능 및 업데이트 문제를 해결하는 방법
2 몇 주 전
By DDD
Atomfall에서 크레인 제어 키 카드를 찾을 수 있습니다
3 몇 주 전
By DDD
R.E.P.O. 저축 설명 (및 파일 저장)
1 몇 달 전
By 尊渡假赌尊渡假赌尊渡假赌
어 ass 신 크리드 섀도우 - 대장장이를 찾고 무기 및 갑옷 커스터마 화 잠금 해제 방법
4 몇 주 전
By DDD

뜨거운 도구

메모장++7.3.1
사용하기 쉬운 무료 코드 편집기

SublimeText3 중국어 버전
중국어 버전, 사용하기 매우 쉽습니다.

스튜디오 13.0.1 보내기
강력한 PHP 통합 개발 환경

드림위버 CS6
시각적 웹 개발 도구

SublimeText3 Mac 버전
신 수준의 코드 편집 소프트웨어(SublimeText3)

뜨거운 주제
Gmail 이메일의 로그인 입구는 어디에 있나요?
 7569
7569
 15
15
 7569
7569
 15
15
Cakephp 튜토리얼
 1386
1386
 52
52
 1386
1386
 52
52
Steam의 계정 이름 형식은 무엇입니까?
 87
87
 11
11
 87
87
 11
11
Win11 활성화 키 영구
 61
61
 19
19
 61
61
 19
19
NYT 연결 힌트와 답변
 28
28
 107
107
 28
28
 107
107


