PHP에서 GraphQL을 설치하고 사용하는 방법에 대한 자세한 설명
이 글에서는 GraphQL에 대해 소개하고, PHP에서 GraphQL을 설치하고 사용하는 방법을 자세히 소개합니다. 도움이 필요한 친구들이 모두 참고할 수 있기를 바랍니다.

GraphQL 소개
GraphQL은 최신 HTTP API 인터페이스 구성 방법이며, 클라이언트는 요청 시 필요한 데이터를 쿼리할 수 있습니다.
GraphQL은 API 호출의 유연성을 향상시켜 데이터베이스 쿼리문을 작성하는 것처럼 필요한 데이터를 얻기 위해 API를 요청할 수 있으며 이는 복잡한 API 쿼리를 작성하는 데 매우 유용합니다. 按需查询需要的数据。
GraphQL 可以提升 API 调用的灵活性,我们可以像写数据库查询语句一样来请求 API 来获取所需要的数据,这对构建复杂的 API 查询来说非常有用。
与REST对比
REST的核心思想就是资源,每个资源都能用一个URL来表示,你能通过一个GET请求访问该URL从而获取该资源。根据当今大多数API的定义,你很有可能会得到一份JSON格式的数据响应,整个过程大概是这样:
GET /user/1
{
    "username":"姓名",
    "age":20,
    "sex":"男"
}GET /book/1
{
"book":"书名",
"author":"作者",
"country":"中国"
}从上面的示例可以看出,如果前端需要user/1和book/1的时候需要调用2次接口,并且如果前端只需要user/1里面的username,而上面的接口获取了username以外的数据,那么对于前端而言,除 username 之外的数据无处可用,造成了资源的浪费。
如果我们使用GraphQL来进行查询的话,与REST方式相比,只需要调用一次并且可以查询我们指定的字段,避免了资源的浪费,并且更加高效。
query {
 user(id:1) {
     username
 }
 book(id:1){
     book,
     author,
     country
 }
}推荐学习:《PHP视频教程》
安装graphql-php包
composer require webonyx/graphql-php
开始
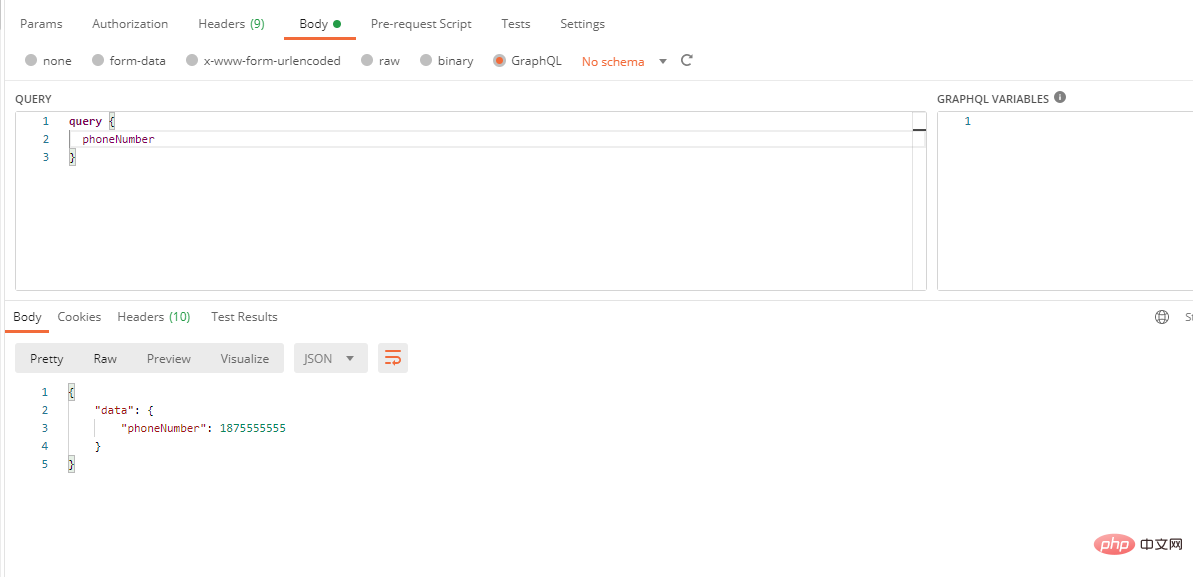
1、安装完成之后,我们先编写一个简单示例,来看看graphql-php怎么用,具体代码如下:这段代码中,我们定义了一个名为phoneNumber的字段,然后通过postman来调用我们编写的代码。
<?php
require_once __DIR__ . '/vendor/autoload.php';
use GraphQL\Type\Schema;
use GraphQL\Type\Definition\ObjectType;
use GraphQL\Type\Definition\Type;
use GraphQL\GraphQL;
$queryType = new ObjectType([
'name' => 'Query',
'fields' => [
'phoneNumber' => [
'type' => Type::int(),
'resolve' => function () {
return 1875555555;
}
]
],
]);
$schema = new Schema([
'query' => $queryType,
]);
$rawInput = file_get_contents('php://input');
$input = json_decode($rawInput, true);
$query = $input['query'];
$variableValues = isset($input['variables']) ? $input['variables'] : null;
try {
$rootValue = ['prefix' => 'prefix: '];
$result = GraphQL::executeQuery($schema, $query, $rootValue, null, $variableValues);
$output = $result->toArray();
} catch (\Exception $e) {
$output = [
'errors' => [
[
'message' => $e->getMessage()
]
]
];
}
header('Content-Type: application/json');
echo json_encode($output);2、使用postman来调用我们刚刚编写的代码,以下是我们查询结果的示例

介绍
从上面的示例中,我们可以看到示例主要引入了4个类
use GraphQL\Type\Schema; use GraphQL\Type\Definition\ObjectType; use GraphQL\Type\Definition\Type; use GraphQL\GraphQL;
Schema 类
Schema 是类型层次结构的容器,它接受构造函数中的根类型并向内部 GrahpQL 工具提供接收你的类型信息的方法。
配置选项
包含以下选项的数组:
| Option | Type | Notes |
|---|---|---|
| query | ObjectType | 必须。 读取 API 中包含根级字段的对象类型 (通常命名为 "Query"),用于读取数据 |
| mutation | ObjectType | 写入 API 中包含根级字段的对象类型 (通常命名为 "Mutation"),数据变更时会用到 |
| subscription | ObjectType | 保留用于将来的描述实现。目前表现为 graphql-js 自检查询的兼容,用于各种客户端 (如 Relay 或 GraphiQL) |
| directives | Directive[] | 默认包含内建指令 @skip 和 @include 。 如果你传递自定义指令并且依然想使用内建指令,请声明添加它们。例如: array_merge(GraphQL::getStandardDirectives(), [$myCustomDirective]); |
| types | ObjectType[] | 对象类型类表,它在静态 schema 解析期间是不能被 graphql-php 发现的。 大多数情况下,对象类型未曾在字段中被直接引用,但它依然是 schema 的一部分时会用到,因为它实现了一个在 resolveType 中调用解析为此对象类型的接口。 请注意,您在此处无需传递所有类型 ,它只是具体用例的解决方法。 |
| typeLoader | callable | REST와의 비교REST의 핵심 아이디어는 리소스입니다. 각 리소스는 URL로 표시되어 얻을 수 있습니다. 자원. 오늘날 대부분의 API 정의에 따르면 JSON 형식의 데이터 응답을 얻을 가능성이 높습니다. 전체 프로세스는 대략 다음과 같습니다. |
GraphQL을 사용하여 쿼리하면 REST 메서드에 비해 🎜한 번만🎜 호출하면 되며 🎜지정🎜한 필드를 쿼리할 수 있어 리소스 낭비를 피하고 더 효율적입니다. 🎜$queryType = new ObjectType([
'name' => 'Query',
'fields' => [
'phoneNumber' => [
'type' => Type::int(),
'resolve' => function () {
return 1875555555;
}
]
],
]);use GraphQL\GraphQL;
$result = GraphQL::executeQuery(
$schema,
$queryString,
$rootValue = null,
$context = null,
$variableValues = null,
$operationName = null,
$fieldResolver = null,
$validationRules = null
);🎜Start🎜🎜🎜1. 설치가 완료되면 먼저 다음을 작성합니다. 간단한 예로 graphql-php 사용법을 살펴보겠습니다. 구체적인 코드는 다음과 같습니다. 이 코드에서는 phoneNumber라는 필드를 정의한 후 postman을 통해 작성한 코드를 호출합니다. 🎜<?php
require_once __DIR__ . '/vendor/autoload.php';
use GraphQL\Type\Definition\ObjectType;
use GraphQL\Type\Definition\Type;
use GraphQL\GraphQL;
use GraphQL\Type\Schema;
$queryType = new ObjectType([
'name' => 'Query',
'fields' => [
'phoneNumber' => [
'type' => Type::int(),
'resolve' => function () {
return 1875555555;
}
],
'echo' => [
'type' => Type::string(),
'args' => [
'message' => Type::string(),
],
'resolve' => function ($root, $args) {
return 'echo msg result:' . ($args['message'] ?? 'nothing');
}
],
],
]);
$schema = new Schema([
'query' => $queryType
]);
$rawInput = file_get_contents('php://input');
$input = json_decode($rawInput, true);
$query = $input['query'];
$variableValues = isset($input['variables']) ? $input['variables'] : null;
try {
$rootValue = ['prefix' => 'prefix: '];
$result = GraphQL::executeQuery($schema, $query, $rootValue, null, $variableValues);
$output = $result->toArray();
} catch (\Exception $e) {
$output = [
'errors' => [
[
'message' => $e->getMessage()
]
]
];
}
header('Content-Type: application/json');
echo json_encode($output);로그인 후 복사로그인 후 복사🎜2. postman을 사용하여 방금 작성한 코드를 호출합니다. 다음은 쿼리 결과의 예입니다🎜🎜 🎜
🎜🎜Introduction🎜🎜🎜위의 예를 보면, 주로 4가지 클래스를 소개합니다. 🎜<?php
require_once __DIR__ . '/vendor/autoload.php';
use GraphQL\Type\Definition\ObjectType;
use GraphQL\Type\Definition\Type;
use GraphQL\GraphQL;
use GraphQL\Type\Schema;
$userType = new ObjectType([
'name' => 'userType',
'description' => '用户详情',
'fields' => [
'uid' => [
'type' => Type::int(),
'description' => '用户ID'
],
'name' => Type::string()
]
]);
$queryType = new ObjectType([
'name' => 'Query',
'fields' => [
'oneUser' => [
'type' => $userType, // 我们这里指定type为我们上面创建的$userType
'description' => '用户列表',
'args' => [
'uid' => [
'type' => Type::int(),
'defaultValue' => 222
]
],
'resolve' => function($root, $args) {
return [
"uid" => $args['user_id'] ?? 3,
"name" => "xzl",
];
}
],
]
]);
$schema = new Schema([
'query' => $queryType
]);
$rawInput = file_get_contents('php://input');
$input = json_decode($rawInput, true);
$query = $input['query'];
$variableValues = isset($input['variables']) ? $input['variables'] : null;
try {
$rootValue = ['prefix' => 'prefix: '];
$result = GraphQL::executeQuery($schema, $query, $rootValue, null, $variableValues);
$output = $result->toArray();
} catch (\Exception $e) {
$output = [
'errors' => [
[
'message' => $e->getMessage()
]
]
];
}
header('Content-Type: application/json');
echo json_encode($output);로그인 후 복사로그인 후 복사🎜스키마 클래스 🎜
🎜스키마는 유형 계층의 컨테이너이며 생성자에서 루트 유형을 받아들이고 내부 클래스에 수신을 제공합니다. 유형 정보에 대한 GrahpQL 도구 방법. 🎜🎜구성 옵션🎜
🎜다음 옵션을 포함하는 배열: 🎜
<?php
require_once __DIR__ . '/vendor/autoload.php';
use GraphQL\Type\Definition\ObjectType;
use GraphQL\Type\Definition\Type;
use GraphQL\GraphQL;
use GraphQL\Type\Schema;
$queryType = new ObjectType([
'name' => 'Query',
'fields' => [
'phoneNumber' => [
'type' => Type::int(),
'resolve' => function () {
return 1875555555;
}
],
'echo' => [
'type' => Type::string(),
'args' => [
'message' => Type::string(),
],
'resolve' => function ($root, $args) {
return 'echo msg result:' . ($args['message'] ?? 'nothing');
}
],
],
]);
$schema = new Schema([
'query' => $queryType
]);
$rawInput = file_get_contents('php://input');
$input = json_decode($rawInput, true);
$query = $input['query'];
$variableValues = isset($input['variables']) ? $input['variables'] : null;
try {
$rootValue = ['prefix' => 'prefix: '];
$result = GraphQL::executeQuery($schema, $query, $rootValue, null, $variableValues);
$output = $result->toArray();
} catch (\Exception $e) {
$output = [
'errors' => [
[
'message' => $e->getMessage()
]
]
];
}
header('Content-Type: application/json');
echo json_encode($output);<?php
require_once __DIR__ . '/vendor/autoload.php';
use GraphQL\Type\Definition\ObjectType;
use GraphQL\Type\Definition\Type;
use GraphQL\GraphQL;
use GraphQL\Type\Schema;
$userType = new ObjectType([
'name' => 'userType',
'description' => '用户详情',
'fields' => [
'uid' => [
'type' => Type::int(),
'description' => '用户ID'
],
'name' => Type::string()
]
]);
$queryType = new ObjectType([
'name' => 'Query',
'fields' => [
'oneUser' => [
'type' => $userType, // 我们这里指定type为我们上面创建的$userType
'description' => '用户列表',
'args' => [
'uid' => [
'type' => Type::int(),
'defaultValue' => 222
]
],
'resolve' => function($root, $args) {
return [
"uid" => $args['user_id'] ?? 3,
"name" => "xzl",
];
}
],
]
]);
$schema = new Schema([
'query' => $queryType
]);
$rawInput = file_get_contents('php://input');
$input = json_decode($rawInput, true);
$query = $input['query'];
$variableValues = isset($input['variables']) ? $input['variables'] : null;
try {
$rootValue = ['prefix' => 'prefix: '];
$result = GraphQL::executeQuery($schema, $query, $rootValue, null, $variableValues);
$output = $result->toArray();
} catch (\Exception $e) {
$output = [
'errors' => [
[
'message' => $e->getMessage()
]
]
];
}
header('Content-Type: application/json');
echo json_encode($output);🎜스키마 클래스 🎜
🎜스키마는 유형 계층의 컨테이너이며 생성자에서 루트 유형을 받아들이고 내부 클래스에 수신을 제공합니다. 유형 정보에 대한 GrahpQL 도구 방법. 🎜🎜구성 옵션🎜
🎜다음 옵션을 포함하는 배열: 🎜| 옵션 | 유형 | 메모 | 🎜||||||||||||||||||||||||||||||||||||||||||||||||||||||
|---|---|---|---|---|---|---|---|---|---|---|---|---|---|---|---|---|---|---|---|---|---|---|---|---|---|---|---|---|---|---|---|---|---|---|---|---|---|---|---|---|---|---|---|---|---|---|---|---|---|---|---|---|---|---|---|---|
| Option | Type | Notes |
|---|---|---|
| name | string | 必须。 Schema 中此对象的唯一名称 |
| fields | array or callable | 必须。 描述对象字段或可调用返回此类数组的数组。 |
| description | string | 呈现于客户端的参数文本说明(例如:用于 GraphiQL 自动生成文档 ) |
| interfaces | array or callable | 此类型实现的接口列表或返回此类列表的可调用接口。 |
内置标量类型
<?php
use GraphQL\Type\Definition\Type;
// 内置标量类型
Type::string();  // String 类型
Type::int();     // Int 类型
Type::float();   // Float 类型
Type::boolean(); // Boolean 类型
Type::id();      // ID 类型
字段参数
GraphQL 对象类型上的所有字段都有 0 个或多个参数,使用在 args 的字段定义上。每个参数数组参考以下说明:
| Option | Type | Notes |
|---|---|---|
| name | string | 必须。 参数名称。 为空时,使用 args 数组键值 |
| type | Type | 必须。 |
| description | string | 呈现于客户端的参数文本说明 |
| defaultValue | scalar | 当前参数默认值 |
示例
$queryType = new ObjectType([
    'name' => 'Query',
    'fields' => [
        'phoneNumber' => [
            'type' => Type::int(),
            'resolve' => function () {
                return 1875555555;
            }
        ]
    ],
]);GraphQL 类
GraphQL类主要在查询的时候用到,我们可以用 GraphQL::executeQuery 方法来执行查询
executeQuery 方法的参数说明
| 参数 | 类型 | 说明 |
|---|---|---|
| schema | GraphQL\Type\Schema | 必须。 Schema应用实例 |
| queryString | string or GraphQL\Language\AST\DocumentNode | 必须。 解析,验证并执行现有的 GraphQL 查询字符。 如果在执行之前解析其他查询,则在此处传递相应的 AST 文档节点来避免新的解析。 |
| rootValue | mixed | 表示数据图结构的基础值。作为Query type 字段解析传递的第一个参数。如果现有该值已被 Query type 解析过,则可忽略或设置为 null 值。 |
| context | mixed | 字段解析器的共享信息。 常用来传递已登录用户信息,位置详情等。 它将用在所有字段解析器的第 3 个参数。 |
| variableValues | array | 变量的映射,该值将随同查询字符串一起传递。请查阅 GraphQL官网查询变量的相关。 |
| operationName | string | 指定请求方可执行的操作, 防止条件查询字符包含多级操作。 |
| fieldResolver | callable | Schema 参数 schema 中未实现的解析器函数。 |
| validationRules | array | 查询验证规则组,默认所有规则。空数组将跳过查询验证 (对于持久化查询将会比较方便,查询会在持久化之前默认已验证,并在执行期间假设符合规则)。 |
use GraphQL\GraphQL;

$result = GraphQL::executeQuery(
    $schema,
    $queryString,
    $rootValue = null,
    $context = null,
    $variableValues = null,
    $operationName = null,
    $fieldResolver = null,
    $validationRules = null
);简单示例
我们介绍完GraphQL几个概念之后,用几个简单的示例带大家来体验一下。
普通示例
在这个示例中我们定义了2个字段,分别是phoneNumber和echo,其中phoneNumber为 Type::int()类型,echo 为Type::string()类型,同时echo字段带有一个参数为message
<?php
require_once __DIR__ . '/vendor/autoload.php';
use GraphQL\Type\Definition\ObjectType;
use GraphQL\Type\Definition\Type;
use GraphQL\GraphQL;
use GraphQL\Type\Schema;
$queryType = new ObjectType([
'name' => 'Query',
'fields' => [
'phoneNumber' => [
'type' => Type::int(),
'resolve' => function () {
return 1875555555;
}
],
'echo' => [
'type' => Type::string(),
'args' => [
'message' => Type::string(),
],
'resolve' => function ($root, $args) {
return 'echo msg result:' . ($args['message'] ?? 'nothing');
}
],
],
]);
$schema = new Schema([
'query' => $queryType
]);
$rawInput = file_get_contents('php://input');
$input = json_decode($rawInput, true);
$query = $input['query'];
$variableValues = isset($input['variables']) ? $input['variables'] : null;
try {
$rootValue = ['prefix' => 'prefix: '];
$result = GraphQL::executeQuery($schema, $query, $rootValue, null, $variableValues);
$output = $result->toArray();
} catch (\Exception $e) {
$output = [
'errors' => [
[
'message' => $e->getMessage()
]
]
];
}
header('Content-Type: application/json');
echo json_encode($output);执行示例代码结果

我们可以看到,在请求时我们传了phoneNumber和echo两个字段,并且message为test。
对象示例
我们在上面说过,对象类型是典型的 GraphQL 应用程序中使用最频繁的基元,一个对象类型里面可以包含宁外一个对象类型,我们可以新定义一个名为$userType的ObjectType,然后在oneUser指定它的类型为$userType,这样我们执行查询的时候,oneUser就会返回一个对象。
<?php
require_once __DIR__ . '/vendor/autoload.php';
use GraphQL\Type\Definition\ObjectType;
use GraphQL\Type\Definition\Type;
use GraphQL\GraphQL;
use GraphQL\Type\Schema;
$userType = new ObjectType([
'name' => 'userType',
'description' => '用户详情',
'fields' => [
'uid' => [
'type' => Type::int(),
'description' => '用户ID'
],
'name' => Type::string()
]
]);
$queryType = new ObjectType([
'name' => 'Query',
'fields' => [
'oneUser' => [
'type' => $userType, // 我们这里指定type为我们上面创建的$userType
'description' => '用户列表',
'args' => [
'uid' => [
'type' => Type::int(),
'defaultValue' => 222
]
],
'resolve' => function($root, $args) {
return [
"uid" => $args['user_id'] ?? 3,
"name" => "xzl",
];
}
],
]
]);
$schema = new Schema([
'query' => $queryType
]);
$rawInput = file_get_contents('php://input');
$input = json_decode($rawInput, true);
$query = $input['query'];
$variableValues = isset($input['variables']) ? $input['variables'] : null;
try {
$rootValue = ['prefix' => 'prefix: '];
$result = GraphQL::executeQuery($schema, $query, $rootValue, null, $variableValues);
$output = $result->toArray();
} catch (\Exception $e) {
$output = [
'errors' => [
[
'message' => $e->getMessage()
]
]
];
}
header('Content-Type: application/json');
echo json_encode($output);执行示例代码结果

列表示例
在平时的开发请求中,我们从后端接口获取数据的时候,大部分都是以列表的形式返回的,我们可以通过Type::listOf方法来指定我们返回的字段是一个列表。
<?php
require_once __DIR__ . '/vendor/autoload.php';
use GraphQL\Type\Definition\ObjectType;
use GraphQL\Type\Definition\Type;
use GraphQL\GraphQL;
use GraphQL\Type\Schema;
class User
{
// 模拟从数据库取数据
public static function getUserLimit($limit)
{
$user = [
[
"uid" => 1,
"name" => "name1"
],
[
"uid" => 2,
"name" => "name2"
],
[
"uid" => 3,
"name" => "name3"
],
[
"uid" => 4,
"name" => "name4"
]
];
return array_slice($user, 0, $limit);
}
}
$userType = new ObjectType([
'name' => 'userType',
'description' => '用户详情',
'fields' => [
'uid' => [
'type' => Type::int(),
'description' => '用户ID'
],
'name' => Type::string()
]
]);
$queryType = new ObjectType([
'name' => 'Query',
'fields' => [
'users' => [
'type' => Type::listOf($userType),
'description' => '用户列表',
'args' => [
'limit' => [
'type' => Type::int(),
'description' => '限制条数',
'defaultValue' => 10
]
],
'resolve' => function($root, $args) {
return User::getUserLimit($args['limit']);
}
]
]
]);
$schema = new Schema([
'query' => $queryType
]);
$rawInput = file_get_contents('php://input');
$input = json_decode($rawInput, true);
$query = $input['query'];
$variableValues = isset($input['variables']) ? $input['variables'] : null;
try {
$rootValue = ['prefix' => 'prefix: '];
$result = GraphQL::executeQuery($schema, $query, $rootValue, null, $variableValues);
$output = $result->toArray();
} catch (\Exception $e) {
$output = [
'errors' => [
[
'message' => $e->getMessage()
]
]
];
}
header('Content-Type: application/json');
echo json_encode($output);执行示例代码结果

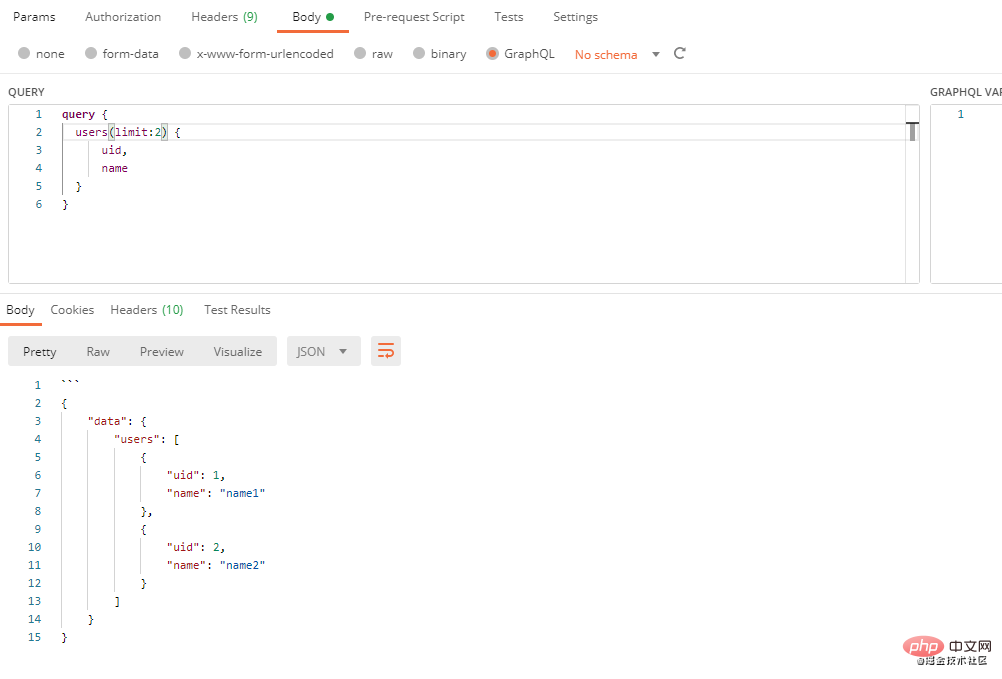
从上面结果可以看到,我们传了limit参数为2,最终从我们模拟的数据里面取出了2条数据
使用类型语言
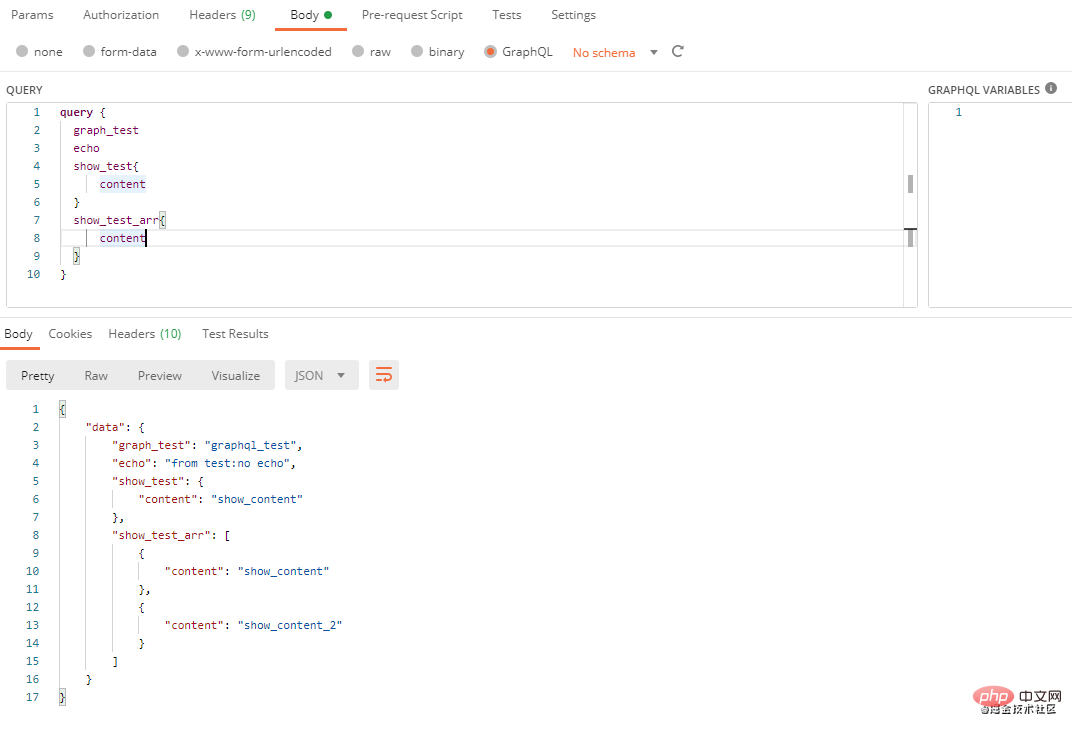
在上面的示例中,如果我们代码返回的数据比较复杂时,需要编写大量的代码,通过GraphQL类型语言,我们可以减少代码量,使代码看上去更加简洁,这是一个用 GraphQL 类型语言定义的简单 Schema示例。
<?php
require_once __DIR__ . '/vendor/autoload.php';
use GraphQL\GraphQL;
use GraphQL\Utils\BuildSchema;
// graph.graphql 文件内容
$graph =
<<<GRAPH
schema {
query: Query
}
type Query {
graph_test: String
echo(message: String): String
show_test: Show
show_test_arr: [Show]
}
type Show {
content: String!
text: String!
}
GRAPH;
$schema = BuildSchema::build($graph);
$rawInput = file_get_contents('php://input');
$input = json_decode($rawInput, true);
$query = $input['query'];
$variableValues = isset($input['variables']) ? $input['variables'] : null;
try {
$rootValue = [
'sum' => function($rootValue, $args, $context) {
return $args['x'] + $args['y'];
},
'echo' => function($rootValue, $args, $context) {
return $rootValue['prefix'] . ($args['message'] ?? 'no echo');
},
'show_test' => function($rootValue, $args, $context) {
return [
'content' => 'show_content',
'text' => 'xxxx xxx'
];
},
'show_test_arr' => function($rootValue, $args, $context) {
return [
[
'content' => 'show_content',
'text' => 'xxxx xxx'
],
[
'content' => 'show_content_2',
'text' => 'xxxx xxx_2'
]
];
},
'prefix' => 'from test:',
"graph_test" => "graphql_test"
];;
$result = GraphQL::executeQuery($schema, $query, $rootValue, null, $variableValues);
$output = $result->toArray();
} catch (\Exception $e) {
\GraphQL\Server\StandardServer::send500Error($e);
}
header('Content-Type: application/json');
echo json_encode($output);执行示例代码结果

参考
更多编程相关知识,请访问:编程视频!!
위 내용은 PHP에서 GraphQL을 설치하고 사용하는 방법에 대한 자세한 설명의 상세 내용입니다. 자세한 내용은 PHP 중국어 웹사이트의 기타 관련 기사를 참조하세요!

핫 AI 도구

Undresser.AI Undress
사실적인 누드 사진을 만들기 위한 AI 기반 앱

AI Clothes Remover
사진에서 옷을 제거하는 온라인 AI 도구입니다.

Undress AI Tool
무료로 이미지를 벗다

Clothoff.io
AI 옷 제거제

AI Hentai Generator
AI Hentai를 무료로 생성하십시오.

인기 기사

뜨거운 도구

메모장++7.3.1
사용하기 쉬운 무료 코드 편집기

SublimeText3 중국어 버전
중국어 버전, 사용하기 매우 쉽습니다.

스튜디오 13.0.1 보내기
강력한 PHP 통합 개발 환경

드림위버 CS6
시각적 웹 개발 도구

SublimeText3 Mac 버전
신 수준의 코드 편집 소프트웨어(SublimeText3)

뜨거운 주제
 7488
7488
 15
15
 1377
1377
 52
52
 77
77
 11
11
 52
52
 19
19
 19
19
 40
40
 Ubuntu 및 Debian용 PHP 8.4 설치 및 업그레이드 가이드
Dec 24, 2024 pm 04:42 PM
PHP 8.4는 상당한 양의 기능 중단 및 제거를 통해 몇 가지 새로운 기능, 보안 개선 및 성능 개선을 제공합니다. 이 가이드에서는 Ubuntu, Debian 또는 해당 파생 제품에서 PHP 8.4를 설치하거나 PHP 8.4로 업그레이드하는 방법을 설명합니다.
 CakePHP 토론
Sep 10, 2024 pm 05:28 PM
CakePHP는 PHP용 오픈 소스 프레임워크입니다. 이는 애플리케이션을 훨씬 쉽게 개발, 배포 및 유지 관리할 수 있도록 하기 위한 것입니다. CakePHP는 강력하고 이해하기 쉬운 MVC와 유사한 아키텍처를 기반으로 합니다. 모델, 뷰 및 컨트롤러 gu
 PHP 개발을 위해 Visual Studio Code(VS Code)를 설정하는 방법
Dec 20, 2024 am 11:31 AM
VS Code라고도 알려진 Visual Studio Code는 모든 주요 운영 체제에서 사용할 수 있는 무료 소스 코드 편집기 또는 통합 개발 환경(IDE)입니다. 다양한 프로그래밍 언어에 대한 대규모 확장 모음을 통해 VS Code는
 CakePHP 빠른 가이드
Sep 10, 2024 pm 05:27 PM
CakePHP는 오픈 소스 MVC 프레임워크입니다. 이를 통해 애플리케이션 개발, 배포 및 유지 관리가 훨씬 쉬워집니다. CakePHP에는 가장 일반적인 작업의 과부하를 줄이기 위한 여러 라이브러리가 있습니다.
 PHP에서 HTML/XML을 어떻게 구문 분석하고 처리합니까?
Feb 07, 2025 am 11:57 AM
이 튜토리얼은 PHP를 사용하여 XML 문서를 효율적으로 처리하는 방법을 보여줍니다. XML (Extensible Markup Language)은 인간의 가독성과 기계 구문 분석을 위해 설계된 다목적 텍스트 기반 마크 업 언어입니다. 일반적으로 데이터 저장 AN에 사용됩니다


