PHP7에서 xhprof 성능 분석 도구를 설치하고 사용하는 방법
이 글에서는 PHP7에서 xhprof 성능 분석 도구를 설치하고 사용하는 방법을 소개합니다. 도움이 필요한 친구들이 모두 참고할 수 있기를 바랍니다.

xhprof 버전은 https://github.com/longxinH/xhprof에서 구합니다.
git clone https://github.com/longxinH/xhprof
xhprof
cd xhprof/extension/
phpize
./configure
make
make install
를 설치한 다음 상황에 따라 /etc/php.ini에
extension=xhprof.so
execute
php -m | grep xhprof
를 추가합니다. .php 확장이 성공적으로 설치되었음을 나타내는 출력을 확인한 다음 Apache 또는 php-fpm을 다시 시작하세요
Run
github에서 복제된 파일의 예제 디렉터리에서 예제를 직접 실행할 수 있습니다
출력은 다음과 같습니다
Array
(
    [main()] => Array
        (
            [ct] => 1
            [wt] => 9
        )

)
---------------
Assuming you have set up the http based UI for
XHProf at some address, you can view run at
http://<xhprof-ui-address>/index.php?run=592567308784c&source=xhprof_foo
---------------xhprof_html/index.php?run=592567308784c&source=xhprof_foo
failed to execute cmd:" dot -Tpng". stderr:sh: dot:command not found。
당신은 중간에서 출력 avistrree reporting
//解决方案
yum install graphviz
변화에 적응
// start profiling
xhprof_enable();
로그인 후 복사
를 추가합니다.// start profiling xhprof_enable();
끝 부분에
// stop profiler
$xhprof_data = xhprof_disable();

// display raw xhprof data for the profiler run
print_r($xhprof_data);


include_once "xhprof_lib.php";
include_once "xhprof_runs.php";

// save raw data for this profiler run using default
// implementation of iXHProfRuns.
$xhprof_runs = new XHProfRuns_Default();

// save the run under a namespace "xhprof_foo"
$run_id = $xhprof_runs->save_run($xhprof_data, "xhprof_foo");

echo "---------------\n".
     "Assuming you have set up the http based UI for \n".
     "XHProf at some address, you can view run at \n".
     "http://<xhprof-ui-address>/index.php?run=$run_id&source=xhprof_foo\n".
"---------------\n";를 추가합니다. 위의 URL을 얻으려면
http://***/xhprof_html/index.php?run=*****&source=xhprof_foo
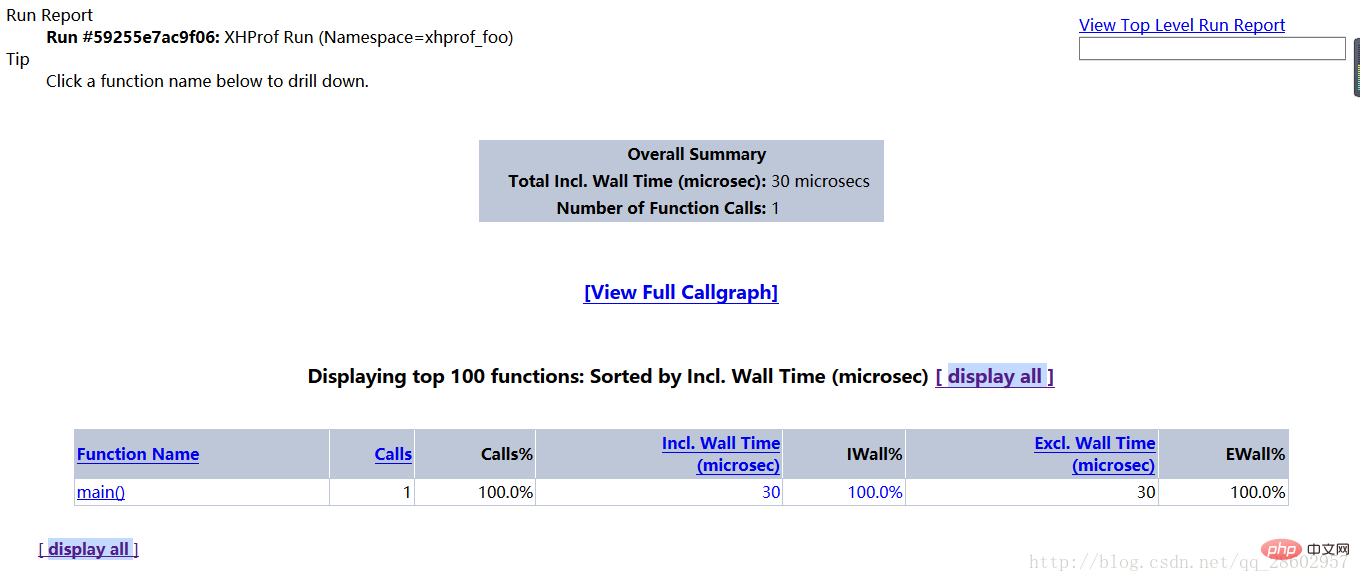
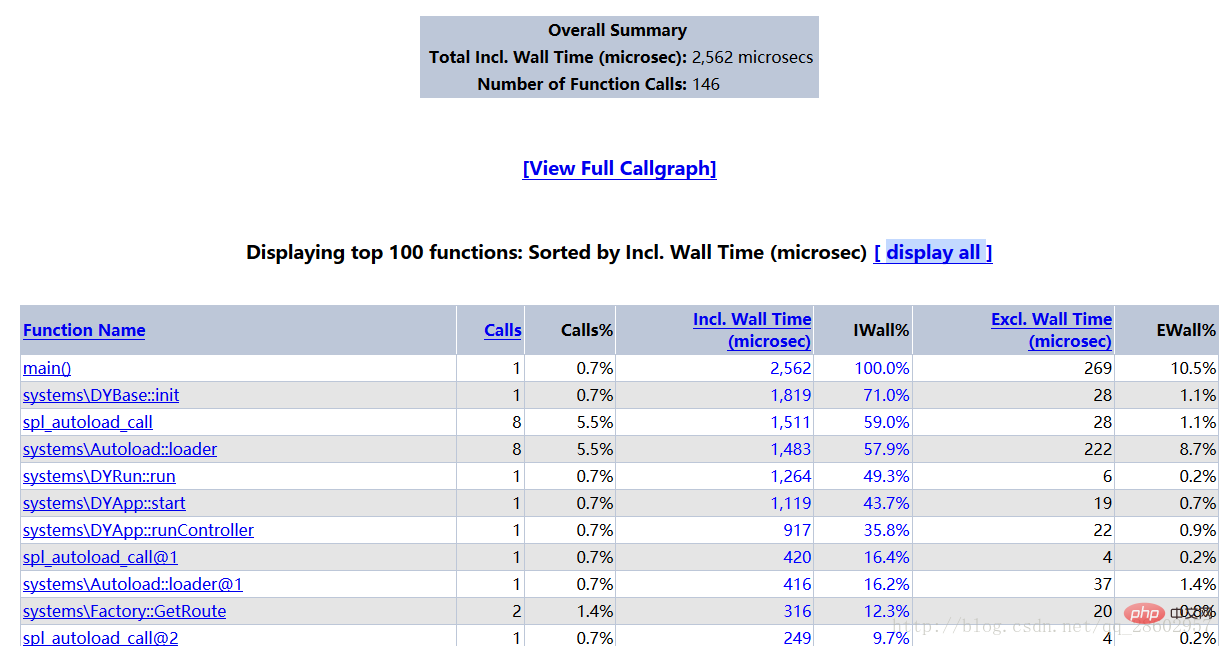
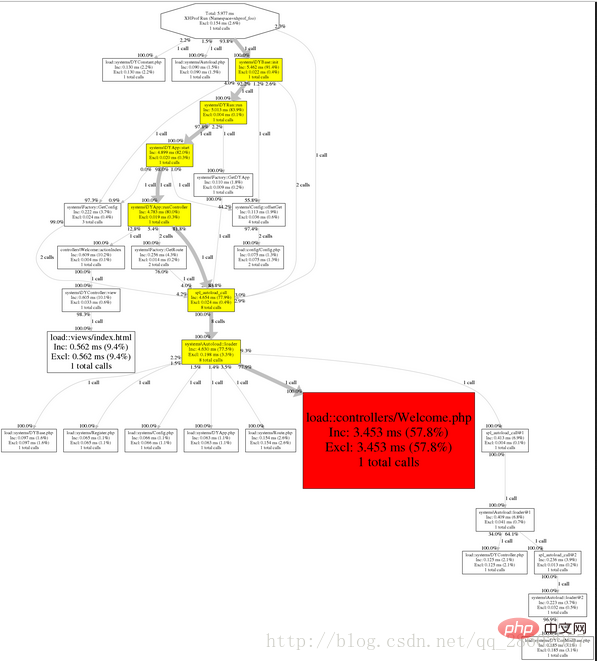
를 다시 방문하여 아래의 페이지를 얻으세요
사진 보기

함수 이름: 메서드 이름을 최적화할 수 있습니다.
- Calls: 메서드가 호출된 횟수입니다.
- Calls%: 동일한 수준의 총 메서드 호출 수에 대한 메서드 호출 수의 백분율입니다.
- Incl.Wall Time(마이크로초): 하위 메서드 실행 시간을 포함하여 메서드 실행에 걸리는 시간입니다. (단위: 마이크로초)
- IWall%: 메서드 실행에 소요된 시간의 비율입니다.
- Excl. Wall Time(마이크로초): 하위 메서드의 실행 시간을 제외하고 메서드 자체를 실행하는 데 걸리는 시간입니다. (단위: 마이크로초)
- EWall%: 메서드 자체를 실행하는 데 소요된 시간의 비율입니다.
- CPU 포함(마이크로초): 하위 메서드 실행 시간을 포함하여 메서드 실행에 소요된 CPU 시간입니다. (단위: 마이크로초)
- ICpu%: 메서드 실행에 소요된 CPU 시간의 비율입니다.
- CPU 제외(마이크로초): 하위 메서드 실행 시간을 제외하고 메서드 자체를 실행하는 데 소요된 CPU 시간입니다. (단위: 마이크로초)
- ECPU%: 메서드 자체를 실행하는 데 소요된 CPU 시간의 비율입니다.
- Incl.MemUse(bytes): 하위 메서드 실행이 차지하는 메모리를 포함하여 메서드 실행이 차지하는 메모리입니다. (단위: 바이트)
- IMemUse%: 메서드 실행에 사용되는 메모리 비율입니다.
- Excl.MemUse(bytes): 하위 메소드 실행으로 점유된 메모리를 제외하고 메소드 자체 실행으로 점유된 메모리입니다. (단위: 바이트)
- EMemUse%: 메서드 자체가 차지하는 메모리 비율입니다.
- Incl.PeakMemUse(바이트): Incl.MemUse 피크 값. (단위: 바이트)
- IPeakMemUse%: Incl.MemUse 최대 비율입니다.
- Excl.PeakMemUse(바이트): Excl.MemUse 피크 값. 단위: (바이트)
- EPeakMemUse%: Excl.MemUse 최고 비율입니다.
- 추천 학습:
- php 비디오 튜토리얼
위 내용은 PHP7에서 xhprof 성능 분석 도구를 설치하고 사용하는 방법의 상세 내용입니다. 자세한 내용은 PHP 중국어 웹사이트의 기타 관련 기사를 참조하세요!

핫 AI 도구

Undresser.AI Undress
사실적인 누드 사진을 만들기 위한 AI 기반 앱

AI Clothes Remover
사진에서 옷을 제거하는 온라인 AI 도구입니다.

Undress AI Tool
무료로 이미지를 벗다

Clothoff.io
AI 옷 제거제

AI Hentai Generator
AI Hentai를 무료로 생성하십시오.

인기 기사

뜨거운 도구

메모장++7.3.1
사용하기 쉬운 무료 코드 편집기

SublimeText3 중국어 버전
중국어 버전, 사용하기 매우 쉽습니다.

스튜디오 13.0.1 보내기
강력한 PHP 통합 개발 환경

드림위버 CS6
시각적 웹 개발 도구

SublimeText3 Mac 버전
신 수준의 코드 편집 소프트웨어(SublimeText3)

뜨거운 주제
 7537
7537
 15
15
 1380
1380
 52
52
 82
82
 11
11
 55
55
 19
19
 21
21
 86
86
 Ubuntu 및 Debian용 PHP 8.4 설치 및 업그레이드 가이드
Dec 24, 2024 pm 04:42 PM
PHP 8.4는 상당한 양의 기능 중단 및 제거를 통해 몇 가지 새로운 기능, 보안 개선 및 성능 개선을 제공합니다. 이 가이드에서는 Ubuntu, Debian 또는 해당 파생 제품에서 PHP 8.4를 설치하거나 PHP 8.4로 업그레이드하는 방법을 설명합니다.
 PHP 개발을 위해 Visual Studio Code(VS Code)를 설정하는 방법
Dec 20, 2024 am 11:31 AM
VS Code라고도 알려진 Visual Studio Code는 모든 주요 운영 체제에서 사용할 수 있는 무료 소스 코드 편집기 또는 통합 개발 환경(IDE)입니다. 다양한 프로그래밍 언어에 대한 대규모 확장 모음을 통해 VS Code는
 이전에 몰랐던 후회되는 PHP 함수 7가지
Nov 13, 2024 am 09:42 AM
숙련된 PHP 개발자라면 이미 그런 일을 해왔다는 느낌을 받을 것입니다. 귀하는 상당한 수의 애플리케이션을 개발하고, 수백만 줄의 코드를 디버깅하고, 여러 스크립트를 수정하여 작업을 수행했습니다.
 PHP에서 HTML/XML을 어떻게 구문 분석하고 처리합니까?
Feb 07, 2025 am 11:57 AM
이 튜토리얼은 PHP를 사용하여 XML 문서를 효율적으로 처리하는 방법을 보여줍니다. XML (Extensible Markup Language)은 인간의 가독성과 기계 구문 분석을 위해 설계된 다목적 텍스트 기반 마크 업 언어입니다. 일반적으로 데이터 저장 AN에 사용됩니다
 JWT (JSON Web Tokens) 및 PHP API의 사용 사례를 설명하십시오.
Apr 05, 2025 am 12:04 AM
JWT는 주로 신분증 인증 및 정보 교환을 위해 당사자간에 정보를 안전하게 전송하는 데 사용되는 JSON을 기반으로 한 개방형 표준입니다. 1. JWT는 헤더, 페이로드 및 서명의 세 부분으로 구성됩니다. 2. JWT의 작업 원칙에는 세 가지 단계가 포함됩니다. JWT 생성, JWT 확인 및 Parsing Payload. 3. PHP에서 인증에 JWT를 사용하면 JWT를 생성하고 확인할 수 있으며 사용자 역할 및 권한 정보가 고급 사용에 포함될 수 있습니다. 4. 일반적인 오류에는 서명 검증 실패, 토큰 만료 및 대형 페이로드가 포함됩니다. 디버깅 기술에는 디버깅 도구 및 로깅 사용이 포함됩니다. 5. 성능 최적화 및 모범 사례에는 적절한 시그니처 알고리즘 사용, 타당성 기간 설정 합리적,
 문자열로 모음을 계산하는 PHP 프로그램
Feb 07, 2025 pm 12:12 PM
문자열은 문자, 숫자 및 기호를 포함하여 일련의 문자입니다. 이 튜토리얼은 다른 방법을 사용하여 PHP의 주어진 문자열의 모음 수를 계산하는 방법을 배웁니다. 영어의 모음은 A, E, I, O, U이며 대문자 또는 소문자 일 수 있습니다. 모음이란 무엇입니까? 모음은 특정 발음을 나타내는 알파벳 문자입니다. 대문자와 소문자를 포함하여 영어에는 5 개의 모음이 있습니다. a, e, i, o, u 예 1 입력 : String = "Tutorialspoint" 출력 : 6 설명하다 문자열의 "Tutorialspoint"의 모음은 u, o, i, a, o, i입니다. 총 6 개의 위안이 있습니다
 PHP에서 늦은 정적 결합을 설명하십시오 (정적 : :).
Apr 03, 2025 am 12:04 AM
정적 바인딩 (정적 : :)는 PHP에서 늦은 정적 바인딩 (LSB)을 구현하여 클래스를 정의하는 대신 정적 컨텍스트에서 호출 클래스를 참조 할 수 있습니다. 1) 구문 분석 프로세스는 런타임에 수행됩니다. 2) 상속 관계에서 통화 클래스를 찾아보십시오. 3) 성능 오버 헤드를 가져올 수 있습니다.
 php magic 방법 (__construct, __destruct, __call, __get, __set 등)이란 무엇이며 사용 사례를 제공합니까?
Apr 03, 2025 am 12:03 AM
PHP의 마법 방법은 무엇입니까? PHP의 마법 방법은 다음과 같습니다. 1. \ _ \ _ Construct, 객체를 초기화하는 데 사용됩니다. 2. \ _ \ _ 파괴, 자원을 정리하는 데 사용됩니다. 3. \ _ \ _ 호출, 존재하지 않는 메소드 호출을 처리하십시오. 4. \ _ \ _ get, 동적 속성 액세스를 구현하십시오. 5. \ _ \ _ Set, 동적 속성 설정을 구현하십시오. 이러한 방법은 특정 상황에서 자동으로 호출되어 코드 유연성과 효율성을 향상시킵니다.


