

Angular의 세 가지 유형의 콘텐츠 프로젝션(단일 슬롯, 다중 슬롯, 조건부)을 이해하는 기사 1개

이 글은 angular의 콘텐츠 프로젝션을 이해하는 데 도움이 될 것이며, 단일 슬롯 콘텐츠 프로젝션, 멀티 슬롯 콘텐츠 프로젝션 및 조건부 콘텐츠 프로젝션을 소개하는 것이 모든 사람에게 도움이 되기를 바랍니다.

【관련 튜토리얼 추천: "angular tutorial"】
단일 슬롯 콘텐츠 프로젝션
단일 슬롯 콘텐츠 프로젝션은 컴포넌트를 프로젝션할 수 있는 컴포넌트를 생성하는 것을 의미합니다.
zippy-basic.comComponent.ts
import { Component } from '@angular/core';

@Component({
  selector: 'app-zippy-basic',
  template: `
  <h2 id="单插槽内容投影">单插槽内容投影</h2>
  <ng-content></ng-content>
`
})
export class ZippyBasicComponent {}ng-content 요소를 사용하면 이 구성 요소의 사용자는 이제 자신의 메시지를 구성 요소에 투영할 수 있습니다. 예: ng-content 元素,该组件的用户现在可以将自己的消息投影到该组件中。例如:
app.component.html
<!-- 将 app-zippy-basic 元素包裹的全部内容投影到 zippy-basic 组件中去 -->
<app-zippy-basic>
  <p>单插槽内容投影:投影数据</p>
</app-zippy-basic>
效果如下: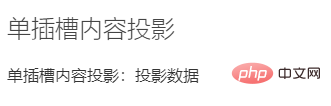
ng-content 元素是一个占位符,它不会创建真正的 DOM 元素。
ng-content的那些自定义属性将被忽略。
多插槽内容投影
- 组件模板含有多个
ng-content标签。- 为了区分投影的内容可以投影到对应
ng-content标签,需要使用ng-content标签上的select属性作为识别。select属性支持标签名、属性、CSS 类和 :not 伪类的任意组合。- 不添加
select属性的ng-content标签将作为默认插槽。所有为匹配的投影内容都会投影在该ng-content的位置。
zippy-multislot.component.ts
import { Component } from '@angular/core';

@Component({
  selector: 'app-zippy-multislot',
  template: `
  <h2 id="多插槽内容投影">多插槽内容投影</h2>
  <ng-content></ng-content>
  <ng-content select="[question]"></ng-content>
`
})
export class ZippyMultislotComponent {}app.component.html
<!-- 使用 question 属性的内容将投影到带有 `select=[question]` 属性的 ng-content 元素。 -->
<app-zippy-multislot>
  <p question style="color: hotpink;">
    带question属性的p元素
  </p>
  <p style="color: lightgreen">不带question属性的p元素-->匹配到不带select属性的ng-content</p>
  <p>不带question属性的p元素-->匹配到不带select属性的ng-content</p>
</app-zippy-multislot>效果如下: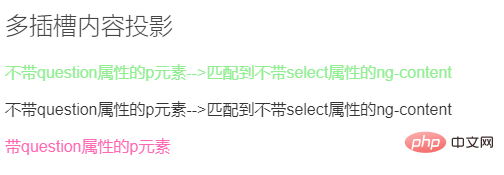
在前面的示例中,只有第二个 ng-content 元素定义了select 属性。结果,第一个 ng-content 元素就会接收投影到组件中的任何其他内容。
有条件的内容投影
推荐使用
ng-container标签,因为该标签不需要渲染真实的 DOM 元素。
<ng-container *ngTemplateOutlet="templateRefExp; context: contextExp"></ng-container>
<!-- 等同 -->
<ng-container [ngTemplateOutlet]="templateRefExp" [ngTemplateOutletContext]="contextExp"></ng-container>
| 参数 | 类型 | 说明 |
|---|---|---|
| templateRefExp | TemplateRef | null | 一个字符串,用于定义模板引用以及模板的上下文对象 |
| contextExp | Object | null | 是一个对象,该对象的键名将可以在局部模板中使用 let 声明中进行绑定。在上下文对象中使用 $implicit 为键名时,将把它作为默认值。 |
ng-template 标签的#ID会匹配templateRefExp,将ng-template标签的内容嵌入到指定的ngTemplateOutlet中。
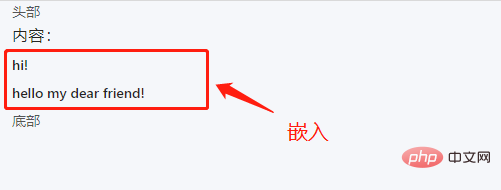
例一:
<header>头部</header>
<main>
	<h3 id="内容">内容:</h3>
	<ng-container [ngTemplateOutlet]="greet"></ng-container>
</main>
<footer>底部</footer>

<ng-template #greet>
	<div>
		<h4 id="hi">hi!</h4>
		<h4 id="hello-nbsp-my-nbsp-dear-nbsp-friend">hello my dear friend!</h4>
	</div>
</ng-template>
效果:
ViewChild和ContentChild
ContentChild:与内容子节点有关,操作投影进来的内容;ViewChild:与视图子节点有关,操作自身的视图内容;
ContentChild
在上一部分,我们通过内容投影,让自定义的组件标签能够嵌入html标签或自定义组件标签,那么它如何操作投影进来的内容呢?
首先创建两个组件
/**** part-b.component.ts ****/
import { Component, OnInit,Output} from '@angular/core';

@Component({
	selector: 'app-content-part-b',
	templateUrl: './part-b.component.html',
	styleUrls: ['./part-b.component.scss']
})

export class PartBComponent implements OnInit {
	constructor() { }
	ngOnInit() { }

	public func():void{
		console.log("PartB");
	}
}/**** part-a.component.ts ****/
import { Component, OnInit, ContentChild } from '@angular/core';
// 1、引入 part-b 组件
import { PartBComponent } from '../part-b/part-b.component';
@Component({
selector: 'app-content-part-a',
templateUrl: './part-a.component.html',
styleUrls: ['./part-a.component.scss']
})
export class PartAComponent implements OnInit {
// 2、获取投影
@ContentChild(PartBComponent) PartB:PartBComponent
constructor() { }
ngOnInit() {}
ngAfterContentInit(): void {
// 3、调用 part-b 组件的 func() 方法
this.PartB.func();
}
public func() {
console.log('PartA')
}
}将part-b组件的内容投影到part-a组件中
 <!-- content.component.html -->
<div>
	<div>Content</div>
	<div>
		<app-content-part-a>
		<!-- 投影在part-a组件中的内容 -->
			<h1 id="PartA-start">PartA--start</h1>
			<app-content-part-b></app-content-part-b>
			<span>PartA--end</span>
		</app-content-part-a>
	</div>
</div>
在组件的生命周期里面,有一个钩子
ngAfterContentInit()是与投影内容初始化有关,所以我们有关投影的内容操作尽量放在它初始化完成之后进行
ViewChild
上一部分的ContentChild操作的时投影进来的内容,而ViewChild操作的是自身的视图内容
给上一部分的content.component.html修改如下:
 <!-- content.component.html -->
<div>
	<div>Content</div>
	<div>
	<!-- 在此处引用模板变量 #partA -->
		<app-content-part-a #partA>
			<h1 id="PartA-start">PartA--start</h1>
				<app-content-part-b></app-content-part-b>
			<span>PartA--end</span>
		</app-content-part-a>
	</div>
</div>
/**** content.component.ts ****/
import { Component, OnInit, ViewChild } from '@angular/core';

@Component({
	selector: 'app-content',
	templateUrl: './content.component.html',
	styleUrls: ['./content.component.scss']
})

export class ContentComponent implements OnInit {
	// 2、获取视图 partA
	@ViewChild('partA') partA: any;
	constructor() { }
	ngOnInit() {}
	ngAfterViewInit(): void {
		// 3、调用 part-a 组件的 func() 方法
		this.partA.func();
	}
}
ngAfterContentInit()对应的是ngAfterViewInit()(视图节点初始化是在投影内容初始化之后)
ContentChild和ViewChild还存在复数的形式,即ContentChildren和ViewChildren
import { Component, OnInit, ContentChild,ContentChildren ,QueryList } from '@angular/core';
import { PartBComponent } from '../part-b/part-b.component';

@Component({
	selector: 'app-content-part-a',
	templateUrl: './part-a.component.html',
	styleUrls: ['./part-a.component.scss']
})
export class PartAComponent implements OnInit {

	@ContentChildren(PartBComponent) PartBs: QueryList<PartBComponent>;

	constructor() { }
	ngOnInit() {}
}ng-content 요소는 자리 표시자이며 실제 DOM 요소를 생성하지 않습니다. ng-content의 사용자 정의 속성은 무시됩니다.
- 구성 요소 템플릿에는 여러
ng-content태그가 포함되어 있습니다. - 해당
ng-content태그에 프로젝션할 수 있는 프로젝션된 콘텐츠를 구별하려면ng에서 <code>select를 사용해야 합니다. -content 태그 >식별 속성. -
select속성은 태그 이름, 속성, CSS 클래스 및 :not 의사 클래스의 모든 조합을 지원합니다. -
select속성을 추가하지 않은ng-content태그가 기본 슬롯으로 사용됩니다. 일치하는 모든 투영된 콘텐츠는 ng-content의 위치에 투영됩니다.
🎜🎜🎜이전 예에서는 두 번째 ng-content 요소에만 선택 속성이 정의되어 있습니다. 결과적으로 첫 번째 ng-content 요소는 구성 요소에 투영된 다른 콘텐츠를 수신합니다. 🎜🎜🎜🎜🎜조건부 콘텐츠 투영🎜🎜🎜🎜 ng-container 태그는 실제 DOM 요소의 렌더링이 필요하지 않으므로 이 태그를 사용하는 것이 좋습니다. 🎜🎜rrreee| 매개변수 | 유형 | 설명 |
|---|---|---|
| templateRefExp | TemplateRef | null | 템플릿 참조와 템플릿의 컨텍스트 객체를 정의하는 데 사용되는 문자열 | contextExp | Object | null | 는 로컬 템플릿의 let 문에 키 이름을 바인딩할 수 있는 개체입니다. 컨텍스트 객체에서 $implicit를 키 이름으로 사용하는 경우 기본값으로 사용됩니다. |
ng-template 태그의 #ID는 templateRefExp와 일치하며 ng-template 태그의 내용은 지정된 ngTemplateOutlet에 포함됩니다. 🎜🎜예 1: 🎜rrreee🎜효과: 🎜🎜🎜🎜🎜ViewChild 및 ContentChild🎜🎜-
ContentChild: 콘텐츠 하위 노드와 관련, 🎜투영된 콘텐츠를 작동🎜; -
ViewChild: 뷰 하위 노드와 관련하여 🎜자체 뷰 콘텐츠를 운영🎜;
🎜ContentChild🎜
🎜이전 부분에서는 콘텐츠 프로젝션을 사용했습니다. 사용자 정의 구성 요소 태그에 html 태그 또는 사용자 정의 구성 요소 태그를 포함할 수 있도록 하려면 투영된 콘텐츠에서 어떻게 작동합니까? 🎜🎜먼저 두 개의 구성 요소를 생성하세요🎜rrreeerrreee🎜part-b 구성 요소의 콘텐츠를 투영하세요. part-a 컴포넌트에 🎜rrreee🎜🎜컴포넌트의 라이프사이클에는 투사된 콘텐츠의 초기화와 관련된 후크 ngAfterContentInit()가 있고, 그래서 투영된 콘텐츠가 걱정됩니다. 초기화가 완료된 후 작업을 수행해 보세요🎜🎜🎜ViewChild🎜
🎜이전 부분의ContentChild 작업은 투영된 콘텐츠이고, ViewChild 작동하는 것은 자체 보기 콘텐츠입니다.이전 부분의
content.comComponent.html를 다음과 같이 수정합니다: 🎜rrreeerrreee🎜🎜ngAfterContentInit()는 <code> ngAfterViewInit()에 해당합니다(뷰 노드 초기화는 투영된 콘텐츠가 초기화된 후입니다). 🎜🎜🎜ContentChild 및 ViewChild도 복수형, 즉 ContentChildren 및 ViewChildren은 노드 컬렉션을 가져오며 다른 노드 간에 차이가 없습니다. 🎜🎜쓰기는 다음과 같습니다. 🎜rrreee🎜For 프로그래밍 관련 지식을 더 보려면 🎜프로그래밍 입문🎜을 방문하세요! ! 🎜위 내용은 Angular의 세 가지 유형의 콘텐츠 프로젝션(단일 슬롯, 다중 슬롯, 조건부)을 이해하는 기사 1개의 상세 내용입니다. 자세한 내용은 PHP 중국어 웹사이트의 기타 관련 기사를 참조하세요!

핫 AI 도구

Undresser.AI Undress
사실적인 누드 사진을 만들기 위한 AI 기반 앱

AI Clothes Remover
사진에서 옷을 제거하는 온라인 AI 도구입니다.

Undress AI Tool
무료로 이미지를 벗다

Clothoff.io
AI 옷 제거제

AI Hentai Generator
AI Hentai를 무료로 생성하십시오.

인기 기사
뜨거운 도구

메모장++7.3.1
사용하기 쉬운 무료 코드 편집기

SublimeText3 중국어 버전
중국어 버전, 사용하기 매우 쉽습니다.

스튜디오 13.0.1 보내기
강력한 PHP 통합 개발 환경

드림위버 CS6
시각적 웹 개발 도구

SublimeText3 Mac 버전
신 수준의 코드 편집 소프트웨어(SublimeText3)
뜨거운 주제
 7518
7518
 15
1378
52
81
11
53
19
21
68
15
1378
52
81
11
53
19
21
68

 Angular의 메타데이터와 데코레이터에 대해 이야기해 보겠습니다.
Feb 28, 2022 am 11:10 AM
Angular의 메타데이터와 데코레이터에 대해 이야기해 보겠습니다.
Feb 28, 2022 am 11:10 AM
이 글은 Angular에 대한 학습을 계속하고, Angular의 메타데이터와 데코레이터를 이해하고, 그 사용법을 간략하게 이해하는 데 도움이 되기를 바랍니다.
 Ubuntu 24.04에 Angular를 설치하는 방법
Mar 23, 2024 pm 12:20 PM
Ubuntu 24.04에 Angular를 설치하는 방법
Mar 23, 2024 pm 12:20 PM
Angular.js는 동적 애플리케이션을 만들기 위해 자유롭게 액세스할 수 있는 JavaScript 플랫폼입니다. HTML 구문을 템플릿 언어로 확장하여 애플리케이션의 다양한 측면을 빠르고 명확하게 표현할 수 있습니다. Angular.js는 코드를 작성, 업데이트 및 테스트하는 데 도움이 되는 다양한 도구를 제공합니다. 또한 라우팅 및 양식 관리와 같은 많은 기능을 제공합니다. 이 가이드에서는 Ubuntu24에 Angular를 설치하는 방법에 대해 설명합니다. 먼저 Node.js를 설치해야 합니다. Node.js는 서버 측에서 JavaScript 코드를 실행할 수 있게 해주는 ChromeV8 엔진 기반의 JavaScript 실행 환경입니다. Ub에 있으려면
 각도 학습 상태 관리자 NgRx에 대한 자세한 설명
May 25, 2022 am 11:01 AM
각도 학습 상태 관리자 NgRx에 대한 자세한 설명
May 25, 2022 am 11:01 AM
이 글은 Angular의 상태 관리자 NgRx에 대한 심층적인 이해를 제공하고 NgRx 사용 방법을 소개하는 글이 될 것입니다.
 각도에서 monaco-editor를 사용하는 방법에 대한 간략한 분석
Oct 17, 2022 pm 08:04 PM
각도에서 monaco-editor를 사용하는 방법에 대한 간략한 분석
Oct 17, 2022 pm 08:04 PM
각도에서 모나코 편집기를 사용하는 방법은 무엇입니까? 다음 글은 최근 비즈니스에서 사용되는 Monaco-Editor의 활용 사례를 기록한 글입니다.
 Angular의 서버 측 렌더링(SSR)을 탐색하는 기사
Dec 27, 2022 pm 07:24 PM
Angular의 서버 측 렌더링(SSR)을 탐색하는 기사
Dec 27, 2022 pm 07:24 PM
앵귤러 유니버셜(Angular Universal)을 아시나요? 웹사이트가 더 나은 SEO 지원을 제공하는 데 도움이 될 수 있습니다!
 Angular + NG-ZORRO로 백엔드 시스템을 빠르게 개발
Apr 21, 2022 am 10:45 AM
Angular + NG-ZORRO로 백엔드 시스템을 빠르게 개발
Apr 21, 2022 am 10:45 AM
이 기사는 Angular의 실제 경험을 공유하고 ng-zorro와 결합된 angualr을 사용하여 백엔드 시스템을 빠르게 개발하는 방법을 배우게 될 것입니다. 모든 사람에게 도움이 되기를 바랍니다.
 프론트엔드 개발에 PHP와 Angular를 사용하는 방법
May 11, 2023 pm 04:04 PM
프론트엔드 개발에 PHP와 Angular를 사용하는 방법
May 11, 2023 pm 04:04 PM
인터넷의 급속한 발전과 함께 프론트엔드 개발 기술도 지속적으로 개선되고 반복되고 있습니다. PHP와 Angular는 프런트엔드 개발에 널리 사용되는 두 가지 기술입니다. PHP는 양식 처리, 동적 페이지 생성, 액세스 권한 관리와 같은 작업을 처리할 수 있는 서버측 스크립팅 언어입니다. Angular는 단일 페이지 애플리케이션을 개발하고 구성 요소화된 웹 애플리케이션을 구축하는 데 사용할 수 있는 JavaScript 프레임워크입니다. 이 기사에서는 프론트엔드 개발에 PHP와 Angular를 사용하는 방법과 이들을 결합하는 방법을 소개합니다.
 Angular의 독립 구성요소에 대한 간략한 분석 및 사용 방법 알아보기
Jun 23, 2022 pm 03:49 PM
Angular의 독립 구성요소에 대한 간략한 분석 및 사용 방법 알아보기
Jun 23, 2022 pm 03:49 PM
이 기사에서는 Angular의 독립 구성 요소, Angular에서 독립 구성 요소를 만드는 방법, 기존 모듈을 독립 구성 요소로 가져오는 방법을 안내합니다.
