10분 안에 하나의 div와 CSS만 사용하여 원형 차트를 구현하는 방법을 배우게 됩니다.
이 기사는 질병 다이어그램을 구현하기 위해 CSS와 함께 div를 사용하는 방법에 대한 몇 가지 관련 질문을 제공합니다.

전체 코드를 보려면 기사 끝으로 스크롤하세요.
원형 차트를 구현하기 위해 하나의 div와 CSS만 사용합니다.
HTMl 구조
<div class="pie" style="--p:60;--b:10px;--c:purple;">60%</div>
몇 가지 CSS 변수를 추가했습니다.
--p: 진행률 표시줄의 백분율(%가 없는 순수 숫자), 원형 차트 값은 div 콘텐츠(% 포함)와 일치합니다.
--b: 테두리 두께 값
--c: 테두리의 기본 색상
이 기사에서는 가독성을 높이기 위해 축약된 변수를 사용합니다. --p -> --percentage, --b -> --border-thickness, --c ->
파이 기본 설정
파이 차트의 기본 스타일을 설정합니다.
.pie {
  --w: 150px; // --w -> --width
  width: var(--w);
  aspect-ratio: 1; // 纵横比,1 说明是正方形
  display: inline-grid;
  place-content: center;
  margin: 5px;
  font-size: 25px;
  font-weight: bold;
  font-family: sans-serif;
}위에서는 div가 정사각형인지 확인하기 위해 Aspect-ratio: 1;을 사용했습니다. 물론 height: var(--w)를 사용하여 효과를 얻을 수도 있습니다.
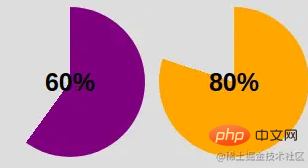
다음으로, 간단한 원형 차트를 구현하기 위해 의사 요소를 사용합니다:
.pie:before {
  content: "",
  position: absoute;
  border-radius: 50%;
  inset: 0; // 知识点 1
  background: conic-gradient(var(--c) calc(var(--p)*1%),#0000 0); // 知识点 2
}Knowledge point 1: inset: 0; top: 0; Bottom: 0; : 원뿔-그라디언트 원뿔 그라디언트, CSS 방법, 추가 내용, #0000 여기서는 투명의 16진수 값입니다.
#0000 Hex Color · 빨간색(0%) · 녹색(0%) · 파란색(0%)
원추형 그라데이션을 적용한 후:
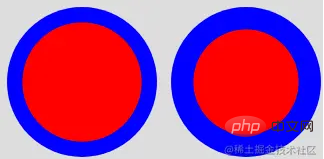
 테두리 영역만 보이도록 하려면 원의 중간 부분을 숨기는 마스크 속성입니다. 우리는 Radial-Gradient() 메소드를 사용할 것입니다:
radial-gradient(farthest-side,red calc(99% - var(--b)),blue calc(100% - var(--b)))
위의 코드를 적용한 후, 효과 다이어그램은 다음과 같이 얻을 수 있습니다:
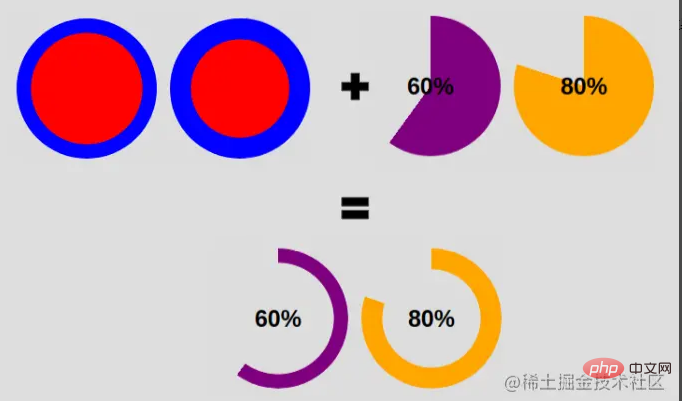
 우리의 목표는 다음과 같습니다:
 우리는 그것을 달성할 수 있습니다 코드 변경:
<div class="pie" style="max-width:90%">60%</div>
.pie {
  --w:150px;

  width: var(--w);
  aspect-ratio: 1;
  position: relative;
  display: inline-grid;
  place-content: center;
  margin: 5px;
  font-size: 25px;
  font-weight: bold;
  font-family: sans-serif;
}
.pie:before {
  content: "";
  position: absolute;
  border-radius: 50%;
  inset: 0;
  background: conic-gradient(var(--c) calc(var(--p)*1%),#0000 0);
  -webkit-mask:radial-gradient(farthest-side,#0000 calc(99% - var(--b)),#000 calc(100% - var(--b)));
          mask:radial-gradient(farthest-side,#0000 calc(99% - var(--b)),#000 calc(100% - var(--b)));
}둥근 모서리 추가
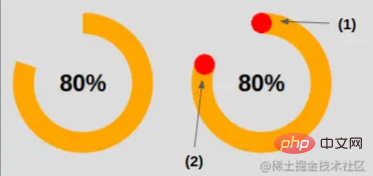
둥근 모서리를 추가하는 방법 아래 그림을 보면 이 작은 요령을 이해할 수 있을 것입니다.
 그림의 (1) 효과를 위해 원을 시작 가장자리에 배치합니다.
.pie:before {
  background:
    radial-gradient(farthest-side, var(--c) 98%, #0000) top/var(--b) var(--b) no-repeat,
    conic-gradient(var(--c) calc(var(--p)*1%), #0000 0);
}그림의 (2) 효과를 위해 원을 끝부분 가장자리에 배치하세요.
.pipe: after {
  content: "";
  position: absolute;
  border-radius: 50%;
  inset: calc(50% - var(--b)/2); // 知识点1
  background: var(--c);
  transform: rotate(calc(var(--p)*3.6deg)) translateY(calc(50% - var(--w)/2)); // 知识点2
}지식 1: 위에서도 언급한 삽입: 0; 오른쪽: 0;의 약어입니다.
여기에는 다음이 있습니다.
left = right = 50% - b/2
여기서 요소를 왼쪽과 오른쪽으로 50% 이동했습니다. b/2는 요소 너비가 b인 것과 동일하며 왼쪽과 오른쪽의 중앙에 위치합니다. 높이도 마찬가지입니다.
지식 2: 회전 각도 계산 --
angle = percentage * 360deg / 100
먼저 요소를 해당 각도만큼 회전한 다음 위치를 이동합니다. 여기에는 Y축 중심이 포함됩니다. 텍스트가 조금 이해하기 어려울 수 있으므로 다음 그림을 통해 이해해 봅시다.
 애니메이션 추가
지금까지 우리가 구현한 것은 정적 원형 차트입니다. 다음에 애니메이션을 추가하겠습니다.
먼저 변수를 등록합니다:
@property --p {
syntax: '<number>';
inherits: true;
initial-value: 0;
}그런 다음 키 프레임을 만듭니다:
@keyframes p {
  from {
    --p: 0
  }
}참고: 여기서는 from의 --p 값만 설정하면 됩니다. 브라우저는 자동으로 사전 설정 값을 (div class="pie" style="--p:60;">60%
마지막으로 애니메이션을 호출합니다.
animation: p 1s .5s both;
안녕하세요~ 아래 코드를 복사해서 사용해 보세요. 물론 사진도 제공합니다.
코드 및 렌더링
<div class="pie" style="--p:20"> 20%</div>
<div class="pie" style="--p:40;--c:darkblue;--b:10px"> 40%</div>
<div class="pie no-round" style="--p:60;--c:purple;--b:15px"> 60%</div>
<div class="pie animate no-round" style="--p:80;--c:orange;"> 80%</div>
<div class="pie animate" style="--p:90;--c:lightgreen"> 90%</div>
@property --p{
syntax: '<number>';
inherits: true;
initial-value: 1;
}
.pie {
--p:20;
--b:22px;
--c:darkred;
--w:150px;
width: var(--w);
aspect-ratio: 1;
position: relative;
display: inline-grid;
margin: 5px;
place-content: center;
font-size: 25px;
font-weight: bold;
font-family: sans-serif;
}
.pie:before,
.pie:after {
content: "";
position: absolute;
border-radius: 50%;
}
.pie:before {
inset: 0;
background:
radial-gradient(farthest-side,var(--c) 98%,#0000) top/var(--b) var(--b) no-repeat,
conic-gradient(var(--c) calc(var(--p)*1%),#0000 0);
-webkit-mask: radial-gradient(farthest-side,#0000 calc(99% - var(--b)),#000 calc(100% - var(--b)));
mask: radial-gradient(farthest-side,#0000 calc(99% - var(--b)),#000 calc(100% - var(--b)));
}
.pie:after {
inset: calc(50% - var(--b)/2);
background: var(--c);
transform: rotate(calc(var(--p)*3.6deg)) translateY(calc(50% - var(--w)/2));
}
.animate {
animation: p 1s .5s both;
}
.no-round:before {
background-size: 0 0, auto;
}
.no-round:after {
content: none;
}
@keyframes p{
from{--p:0}
}렌더링:
 (동영상 공유 학습:
위 내용은 10분 안에 하나의 div와 CSS만 사용하여 원형 차트를 구현하는 방법을 배우게 됩니다.의 상세 내용입니다. 자세한 내용은 PHP 중국어 웹사이트의 기타 관련 기사를 참조하세요!

핫 AI 도구

Undresser.AI Undress
사실적인 누드 사진을 만들기 위한 AI 기반 앱

AI Clothes Remover
사진에서 옷을 제거하는 온라인 AI 도구입니다.

Undress AI Tool
무료로 이미지를 벗다

Clothoff.io
AI 옷 제거제

Video Face Swap
완전히 무료인 AI 얼굴 교환 도구를 사용하여 모든 비디오의 얼굴을 쉽게 바꾸세요!

인기 기사

뜨거운 도구

메모장++7.3.1
사용하기 쉬운 무료 코드 편집기

SublimeText3 중국어 버전
중국어 버전, 사용하기 매우 쉽습니다.

스튜디오 13.0.1 보내기
강력한 PHP 통합 개발 환경

드림위버 CS6
시각적 웹 개발 도구

SublimeText3 Mac 버전
신 수준의 코드 편집 소프트웨어(SublimeText3)

뜨거운 주제
 7733
7733
 15
15
 1643
1643
 14
14
 1397
1397
 52
52
 1290
1290
 25
25
 1233
1233
 29
29
 Vue에서 부트 스트랩을 사용하는 방법
Apr 07, 2025 pm 11:33 PM
vue.js에서 bootstrap 사용은 5 단계로 나뉩니다 : Bootstrap 설치. main.js.의 부트 스트랩 가져 오기 부트 스트랩 구성 요소를 템플릿에서 직접 사용하십시오. 선택 사항 : 사용자 정의 스타일. 선택 사항 : 플러그인을 사용하십시오.
 HTML, CSS 및 JavaScript의 역할 : 핵심 책임
Apr 08, 2025 pm 07:05 PM
HTML은 웹 구조를 정의하고 CSS는 스타일과 레이아웃을 담당하며 JavaScript는 동적 상호 작용을 제공합니다. 세 사람은 웹 개발에서 의무를 수행하고 화려한 웹 사이트를 공동으로 구축합니다.
 부트 스트랩에 분할 라인을 작성하는 방법
Apr 07, 2025 pm 03:12 PM
부트 스트랩 분할 라인을 만드는 두 가지 방법이 있습니다 : 태그를 사용하여 수평 분할 라인이 생성됩니다. CSS 테두리 속성을 사용하여 사용자 정의 스타일 분할 라인을 만듭니다.
 HTML, CSS 및 JavaScript 이해 : 초보자 안내서
Apr 12, 2025 am 12:02 AM
WebDevelopmentReliesonHtml, CSS 및 JavaScript : 1) HtmlStructuresContent, 2) CSSSTYLESIT, 및 3) JAVASCRIPTADDSINGINTERACTIVITY, BASISOFMODERNWEBEXPERIENCES를 형성합니다.
 부트 스트랩을위한 프레임 워크를 설정하는 방법
Apr 07, 2025 pm 03:27 PM
부트 스트랩 프레임 워크를 설정하려면 다음 단계를 따라야합니다. 1. CDN을 통해 부트 스트랩 파일 참조; 2. 자신의 서버에서 파일을 다운로드하여 호스팅하십시오. 3. HTML에 부트 스트랩 파일을 포함; 4. 필요에 따라 Sass/Less를 컴파일하십시오. 5. 사용자 정의 파일을 가져옵니다 (선택 사항). 설정이 완료되면 Bootstrap의 그리드 시스템, 구성 요소 및 스타일을 사용하여 반응 형 웹 사이트 및 응용 프로그램을 만들 수 있습니다.
 부트 스트랩에 사진을 삽입하는 방법
Apr 07, 2025 pm 03:30 PM
Bootstrap에 이미지를 삽입하는 방법에는 여러 가지가 있습니다. HTML IMG 태그를 사용하여 이미지를 직접 삽입하십시오. 부트 스트랩 이미지 구성 요소를 사용하면 반응 형 이미지와 더 많은 스타일을 제공 할 수 있습니다. 이미지 크기를 설정하고 IMG-Fluid 클래스를 사용하여 이미지를 적응할 수 있도록하십시오. IMG 통과 클래스를 사용하여 테두리를 설정하십시오. 둥근 모서리를 설정하고 IMG 라운드 클래스를 사용하십시오. 그림자를 설정하고 그림자 클래스를 사용하십시오. CSS 스타일을 사용하여 이미지를 조정하고 배치하십시오. 배경 이미지를 사용하여 배경 이미지 CSS 속성을 사용하십시오.
 부트 스트랩 버튼을 사용하는 방법
Apr 07, 2025 pm 03:09 PM
부트 스트랩 버튼을 사용하는 방법? 부트 스트랩 CSS를 소개하여 버튼 요소를 만들고 부트 스트랩 버튼 클래스를 추가하여 버튼 텍스트를 추가하십시오.


