노드에서 mongooes는 타사 모듈이자 ODM(객체 문서 모델) 라이브러리입니다. 이는 Node의 기본 MongoDB 모듈을 더욱 최적화하고 캡슐화하며 객체 모델을 작동하여 MongoDB 데이터베이스를 작동할 수 있습니다.

이 튜토리얼의 운영 환경: windows7 시스템, nodejs 버전 12.19.0, DELL G3 컴퓨터.
Mongoose
Mongoose는 Nodejs의 모듈입니다. 이 모듈은 MongoDB 모듈을 작동하여 데이터베이스를 작동할 수 있습니다.
Mongooose는 Node의 기본 MongoDB 모듈을 더욱 최적화하고 캡슐화하는 ODM(객체 문서 모델) 라이브러리입니다. , 더 많은 기능을 제공합니다.
Mongoose는 MongoDB용 객체 모델 도구입니다. node-mongodb-native를 기반으로 개발된 MongoDB용 nodejs 드라이버이며 현재 MongoDB를 운영하기 위해 Node.js에서 선호하는 라이브러리이기도 합니다.
Mongoose의 장점
문서에 대한 스키마 구조(제약조건)(Schema)을 생성할 수 있습니다.
모델의 개체/문서에 대한 유효성 검사를 수행할 수 있습니다.
데이터를 개체 모델로 변환할 수 있습니다. 유형별
미들웨어를 사용하여 비즈니스 로직 후크를 적용할 수 있습니다
Node의 기본 MongoDB 드라이버보다 쉽습니다
참고: 사용하려면 먼저 node.js와 mongodb를 설치해야 합니다.
mongoose 설치
npm install mongoose
설치 성공 후 아래와 같이

설치 성공 후 require('mongoose')를 통해 사용하실 수 있습니다!
연결 문자열
db.js를 생성
var mongoose = require('mongoose'),
    DB_URL = 'mongodb://localhost:27017/mongoosesample';/**
 * 连接 */mongoose.connect(DB_URL);/**
  * 连接成功  */mongoose.connection.on('connected', function () {
    console.log('Mongoose connection open to ' + DB_URL);
});

/**
 * 连接异常 */mongoose.connection.on('error',function (err) {
    console.log('Mongoose connection error: ' + err);
});

/**
 * 连接断开 */mongoose.connection.on('disconnected', function () {
    console.log('Mongoose connection disconnected');
});node db.js를 호출하여 실행하면 아래와 같이 출력되는 것을 볼 수 있습니다.

코드에서 볼 수 있듯이 여러 이벤트가 그리고 실행은 연결된 이벤트를 트리거합니다. 이는 연결이 성공했음을 의미합니다
연결에는 위의 이벤트보다 더 많은 이벤트가 모니터링하려는 이벤트에 따라 다릅니다.
다른 이벤트는 직접 볼 수 있습니다: http://mongoosejs.com/docs/api.html#connection_Connection
이것은 가장 간단한 연결 문자열입니다. 물론 연결 비밀번호, 데이터베이스 연결과 같은 다른 형식도 있습니다. 설정, 클러스터 메소드, 연결 유형 등에 대해서는 API 문서를 직접 확인하여 사용하세요
http://mongoosejs.com/docs/api.html#index-js
Schema mongoose에서 사용됩니다. 데이터 스키마는 테이블 구조의 정의로 이해될 수 있습니다. 각 스키마는 데이터베이스를 작동할 수 있는 기능이 없는 mongodb의 컬렉션에 매핑됩니다.
먼저 db.js를 변환하고 mongoose object
var mongoose = require('mongoose'),
    DB_URL = 'mongodb://localhost:27017/mongoosesample';/**
 * 连接 */mongoose.connect(DB_URL);/**
  * 连接成功  */mongoose.connection.on('connected', function () {
    console.log('Mongoose connection open to ' + DB_URL);
});

/**
 * 连接异常 */mongoose.connection.on('error',function (err) {
    console.log('Mongoose connection error: ' + err);
});

/**
 * 连接断开 */mongoose.connection.on('disconnected', function () {
    console.log('Mongoose connection disconnected');
});

module.exports = mongoose;다음으로 user.js
 mongoose = require('./db.js'= UserSchema =
    userpwd: {type: String},
    userage: {type: Number},
logindate : { type: Date}라는 사용자 스키마를 정의합니다. 스키마 정의는 매우 간단합니다. 필드 이름과 유형을 지정합니다.
스키마 유형 내장 유형은 다음과 같습니다.
문자열
숫자
부울
Array
Buffer
Date
ObjectId | Oid
Mixed
나중에 설명할 몇 가지 일반적인 작업을 수행할 수도 있습니다!
스키마를 정의한 후 다음 단계는 모델을 생성하는 것입니다.
모델은 스키마에 의해 생성된 모델로, 데이터베이스를 운영할 수 있습니다.
위에서 정의한 사용자의 스키마에 대해 User 모델을 생성하고 이를 내보냅니다. 수정된 코드는 다음과 같습니다.
/**
 * 用户信息 */
 var mongoose = require('./db.js'),
    Schema = mongoose.Schema;var UserSchema = new Schema({
    username : { type: String },                    //用户账号
    userpwd: {type: String},                        //密码
    userage: {type: Number},                        //年龄
    logindate : { type: Date}                       //最近登录时间
 });
module.exports = mongoose.model('User',UserSchema);다음 생성 몇 가지 일반적인 작업을 보여주는 test.js 파일입니다.
Insert
Model#save([fn])
var User = require("./user.js");
/**
 * 插入
*/
 function insert() {
    var user = new User({
        username : 'Tracy McGrady',                 //用户账号
        userpwd: 'abcd',                            //密码
        userage: 37,                                //年龄
        logindate : new Date()                      //最近登录时间
    });

    user.save(function (err, res) {
       if (err) {
            console.log("Error:" + err);
        }        else {
            console.log("Res:" + res);
        }

    });
}

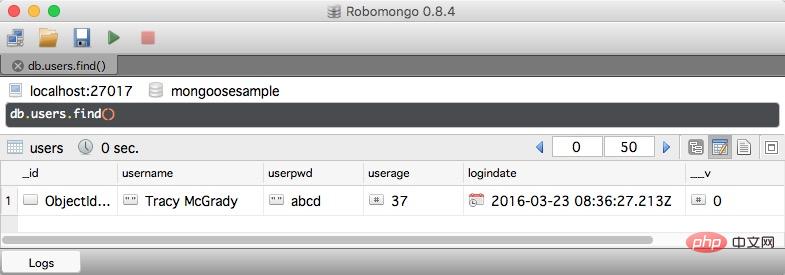
insert();결과는 robmongo 도구에서 볼 수 있습니다

사진에서 삽입된 것을 볼 수 있습니다 성공했어요!
更新
Model.update(conditions, update, [options], [callback])
var User = require("./user.js");function update(){
    var wherestr = {'username' : 'Tracy McGrady'};
    var updatestr = {'userpwd': 'zzzz'};

    User.update(wherestr, updatestr, function(err, res){
       if (err) {
            console.log("Error:" + err);
        }        else {
            console.log("Res:" + res);
        }
    })
}

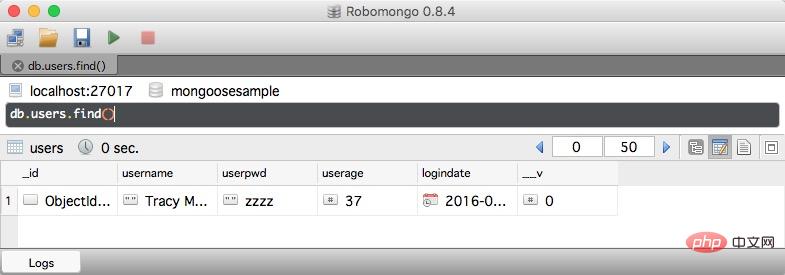
update();根据用户名更新密码,执行后结果如图

图中可以看出,密码更新成功!update方法基本可以满足所有更新!
常用方法还有findByIdAndUpdate,这种比较有指定性,就是根据_id
Model.findByIdAndUpdate(id, [update], [options], [callback])
var User = require("./user.js");function findByIdAndUpdate(){
    var id = '56f2558b2dd74855a345edb2';
    var updatestr = {'userpwd': 'abcd'};

    User.findByIdAndUpdate(id, updatestr, function(err, res){
       if (err) {
            console.log("Error:" + err);
        }        else {
            console.log("Res:" + res);
        }
    })
}

findByIdAndUpdate();其它更新方法
Model.findOneAndUpdate([conditions], [update], [options], [callback]) //找到一条记录并更新
删除
Model.remove(conditions, [callback])
var User = require("./user.js");function del(){
    var wherestr = {'username' : 'Tracy McGrady'};

    User.remove(wherestr, function(err, res){
        if (err) {
            console.log("Error:" + err);
        }        else {
            console.log("Res:" + res);
        }
    })
}

del();结果就不贴了,res中会返回是否成功以及影响的行数:{"ok":1,"n":1}
其它常用方法还有:
Model.findByIdAndRemove(id, [options], [callback])
Model.findOneAndRemove(conditions, [options], [callback])
条件查询
已先插入一些测试数据 。。
Model.find(conditions, [fields], [options], [callback])
var User = require("./user.js");

function getByConditions(){
    var wherestr = {'username' : 'Tracy McGrady'};

    User.find(wherestr, function(err, res){
        if (err) {
            console.log("Error:" + err);
        }
        else {
            console.log("Res:" + res);
        }
    })
}

getByConditions();结果我就不展示了
第2个参数可以设置要查询输出的字段,比如改成
var User = require("./user.js");

function getByConditions(){
    var wherestr = {'username' : 'Tracy McGrady'};
    var opt = {"username": 1 ,"_id": 0};

    User.find(wherestr, opt, function(err, res){
        if (err) {
            console.log("Error:" + err);
        }
        else {
            console.log("Res:" + res);
        }
    })
}

getByConditions();输出只会有username字段,设置方法如上,1表示查询输出该字段,0表示不输出
比如我要查询年龄范围条件应该怎么写呢?
User.find({userage: {$gte: 21, $lte: 65}}, callback); //这表示查询年龄大于等21而且小于等于65岁
其实类似的还有:
$or 或关系
$nor 或关系取反
$gt 大于
$gte 大于等于
$lt 小于
$lte 小于等于
$ne 不等于
$in 在多个值范围内
$nin 不在多个值范围内
$all 匹配数组中多个值
$regex 正则,用于模糊查询
$size 匹配数组大小
$maxDistance 范围查询,距离(基于LBS)
$mod 取模运算
$near 邻域查询,查询附近的位置(基于LBS)
$exists 字段是否存在
$elemMatch 匹配内数组内的元素
$within 范围查询(基于LBS)
$box 范围查询,矩形范围(基于LBS)
$center 范围醒询,圆形范围(基于LBS)
$centerSphere 范围查询,球形范围(基于LBS)
$slice 查询字段集合中的元素(比如从第几个之后,第N到第M个元素)
可能还有一些,没什么印象,大家自行看看api ^_^!
数量查询
Model.count(conditions, [callback])
var User = require("./user.js");

function getCountByConditions(){
    var wherestr = {};

    User.count(wherestr, function(err, res){
        if (err) {
            console.log("Error:" + err);
        }
        else {
            console.log("Res:" + res);
        }
    })
}
getCountByConditions();res会输出数量,也可以传入条件做条件查询!
根据_id查询
Model.findById(id, [fields], [options], [callback])
var User = require("./user.js");

function getById(){
    var id = '56f261fb448779caa359cb73';

    User.findById(id, function(err, res){
        if (err) {
            console.log("Error:" + err);
        }
        else {
            console.log("Res:" + res);
        }
    })
}

getById();这个还是比较常用,要据ID得到数据!
模糊查询
var User = require("./user.js");

function getByRegex(){
    var whereStr = {'username':{$regex:/m/i}};

    User.find(whereStr, function(err, res){
        if (err) {
            console.log("Error:" + err);
        }
        else {
            console.log("Res:" + res);
        }
    })
}

getByRegex();上面示例中查询出所有用户名中有'm'的名字,且不区分大小写,模糊查询比较常用,正则形式匹配,正则方式就是javascript正则,用到的比较多!
分页查询
var User = require("./user.js");

function getByPager(){

    var pageSize = 5;                   //一页多少条
    var currentPage = 1;                //当前第几页
    var sort = {'logindate':-1};        //排序(按登录时间倒序)
    var condition = {};                 //条件
    var skipnum = (currentPage - 1) * pageSize;   //跳过数

    User.find(condition).skip(skipnum).limit(pageSize).sort(sort).exec(function (err, res) {
        if (err) {
            console.log("Error:" + err);
        }
        else {
            console.log("Res:" + res);
        }
    })
}

getByPager();分页是用得比较多的查询,分页原理用过其它数据库的都知道,分页用到的函数和mysql的比较类似
上面我用到sort(),这个是排序规则,就不单讲了!
其它还有比较多常用的
索引和默认值
再看看我对user.js这个schema的修改
/**
 * 用户信息
 */
var mongoose = require('./db.js'),
    Schema = mongoose.Schema;

var UserSchema = new Schema({
    username : { type: String , index: true},                    //用户账号
    userpwd: {type: String},                        //密码
    userage: {type: Number},                        //年龄
    logindate : { type: Date, default:Date.now}                       //最近登录时间
});

module.exports = mongoose.model('User',UserSchema);index :建索引
default:默认值
LBS地址位置
lbs : { type: Array, index: '2d', sparse: true } //地理位置上面有介绍过很多基于LBS的条件查询,Schema中定义时如上
LBS查询对于一些基于LBS应用会用得比较多。
其它常用方法
Model.distinct(field, [conditions], [callback]) //去重
Model.findOne(conditions, [fields], [options], [callback]) //查找一条记录
Model.findOneAndRemove(conditions, [options], [callback]) //查找一条记录并删除
Model.findOneAndUpdate([conditions], [update], [options], [callback]) //查找一条记录并更新
更多node相关知识,请访问:nodejs 教程!
위 내용은 노드의 몽구는 무엇입니까의 상세 내용입니다. 자세한 내용은 PHP 중국어 웹사이트의 기타 관련 기사를 참조하세요!


