반응에서 모달은 루트 뷰를 포함하는 기본 뷰를 덮는 데 사용되며, 이는 마스킹 효과를 얻을 수 있습니다. 구문은 "
모달>" 또는 "Modal.confirm()".

이 튜토리얼의 운영 환경: Windows 10 시스템, 반응 버전 17.0.1, Dell G3 컴퓨터.
모달 간략한 설명
모달 대화 상자. 사용자가 트랜잭션을 처리해야 하지만 페이지로 이동하여 작업 흐름을 중단하고 싶지 않은 경우 Modal을 사용하여 현재 페이지 중간에 부동 레이어를 열어 해당 작업을 수행할 수 있습니다.
또한 사용자에게 물어볼 간결한 확인 상자가 필요한 경우 Modal.confirm()과 같은 구문 설탕 메서드를 사용할 수 있습니다.
핵심 기능 포인트 추출
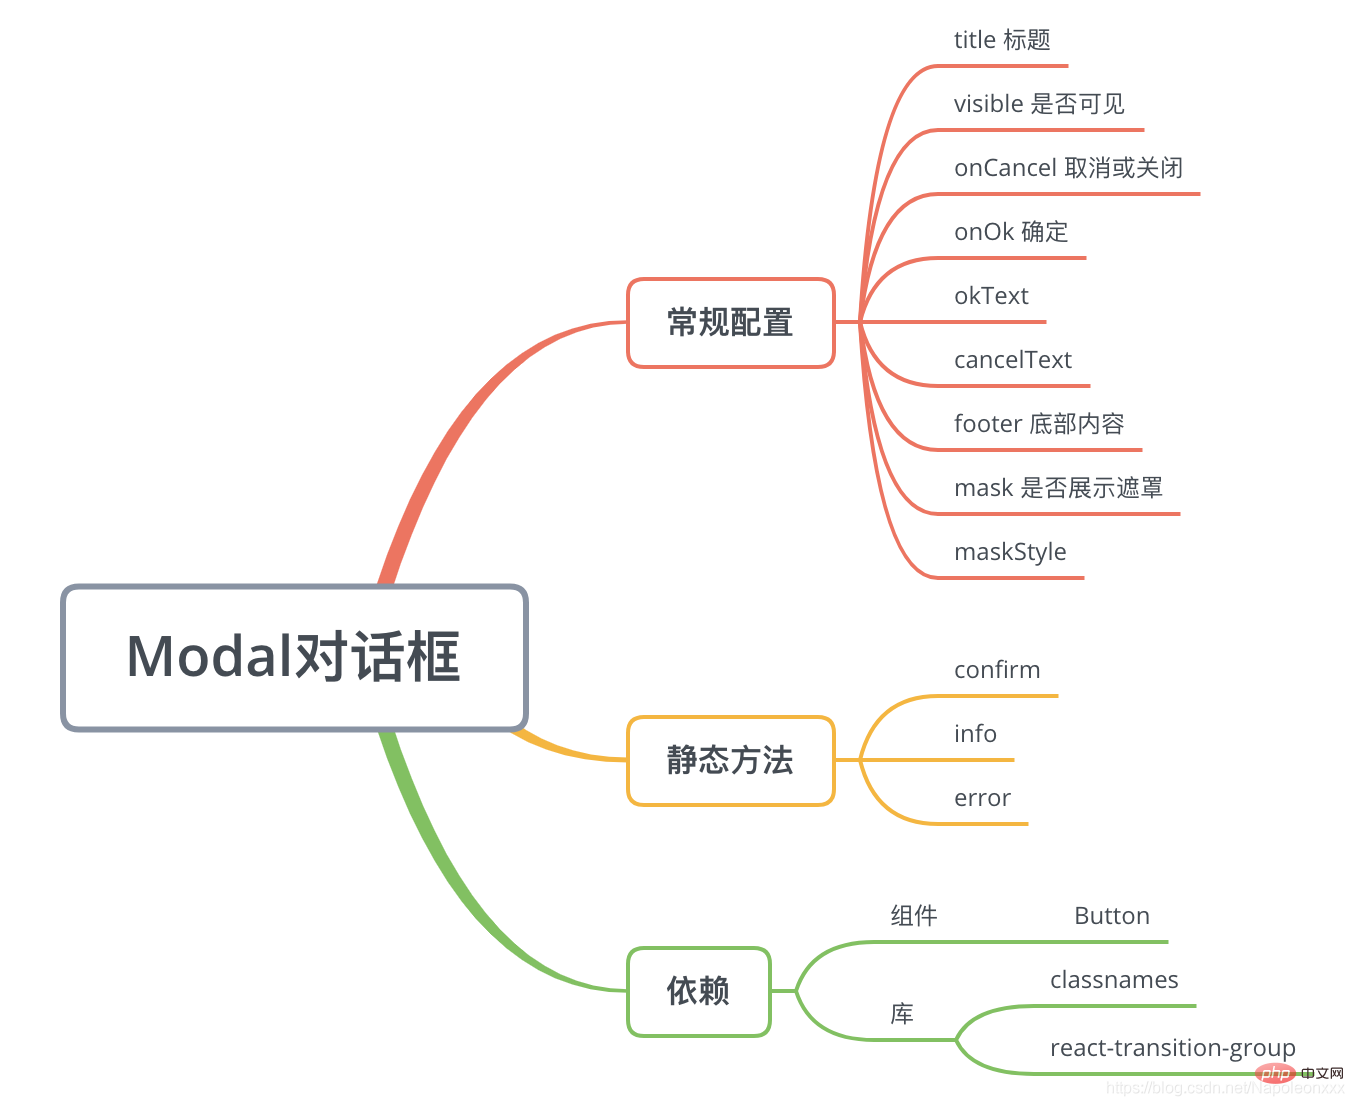
Antd Modal 문서에서 제공하는 인터페이스를 기반으로 모달을 구현합니다.
핵심 구현
Modal 구성 요소는 두 가지 용도가 있다는 점에서 특별합니다.
<modal visible="{this.state.visible}"></modal>
Modal.confirm({ title: '取消后,已编辑的脚本信息将不会保存,请确认是否取消。', okText: '确认取消', cancelText: '暂不取消', onOk() { me.props.onCancel(); } })
Modal.confirm({ title: ' 취소 후에는 편집된 스크립트 정보가 저장되지 않으니 취소 여부를 확인해주세요', okText: '취소 확인', cancelText: '아직 취소하지 마세요', onOk() { me.props.onCancel() } }) code>
제 생각에는 두 호출이 모두 internalModal.tsx
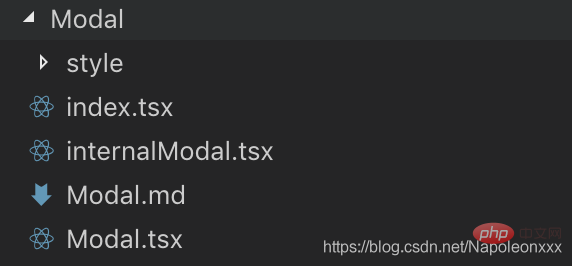
에서 Modal.tsx
에 대해 균일하게 유지된다는 것입니다. 1) 렌더링 메소드는 유지되지 않지만, internalModal.tsx
는 컴포넌트DidMount / componentDidUpdate 라이프사이클에서 호출되어 렌더링을 완료합니다. 2) 관련 정적 메소드인 확인, 오류, 정보 등은 Modal에서 유지됩니다. tsx.
// Modal.tsxexport default class Modal extends React.Component<modalprops> {
    static propTypes = {
		...
    };

    static confirm(content) {
        const modal = new InternalModal();
        const props = {
            ...Modal.defaultProps,
            title: '提示',
            children: content,
            cancelButton: true,
            okButton: true,
            okButtonText: '确定',
            cancelButtonText: '取消',
            closable: false,
            visible: true,
            onOk() {
                modal.destroy();
            },
            onCancel() {
                modal.destroy();
            }
        };
        modal.render(props);
    }

    private modal;
    constructor(props: ModalProps) {
        super(props);
        this.modal = new InternalModal();
    }

    componentWillUnmount() {
        this.modal.destory();
        this.modal = null;
    }

    componentDidMount() {
        this.modal.render(this.props);
    }

    componentDidUpdate() {
        this.modal.render(this.props);
    }

    componentWillReceiveProps(nextProps) {
        if (nextProps.visible) {
            this.modal.show();
        } else {
            this.modal.hide();
        }
    }

    render() {
        return null;
}}</modalprops>다음 단계가 가장 중요합니다. internalModal.tsx :
export default class InternalModal {

    private props;

    render(props) {
        const {...} = this.props;

        this.createContainer();
        const icon = require('../../assets/icon/info.svg') as string;

        const modalDOM = ...;

        ReactDOM.render({modalDOM}, modalContainer,
	        () => {
	            if (visible) {
	                this.show();
	            }
	        });
    }

	...

    createContainer() {
        if (!modalContainer) {
            modalContainer = document.createElement('p');
            document.body.appendChild(modalContainer);
        }
    }

    destroy() {
        if (modalContainer) {
            ReactDOM.unmountComponentAtNode(modalContainer);
        }
    }

    show() {
        if (modalContainer) {
            modalContainer.style.display = 'block';
        }
    }

    hide() {
        if (modalContainer) {
            modalContainer.style.display = 'none';
        }
}}코드에서 internalModal의 구현 지점을 찾을 수 있습니다.
일반 js 클래스(React.Component를 상속하지 않음) ), 렌더링 방법을 제공합니다. 렌더링에서는 ReactDOM.render(element, 컨테이너[, 콜백])을 사용하여 팝업 창을 렌더링합니다
문서에 p 컨테이너를 만들어 모달을 곱하고 제어합니다. 실제로 CSS 표시를 통해 표시/숨기기는 React Portal을 사용할 수도 있습니다.
React-transition-group과 같은 일부 타사 라이브러리를 사용하여 모달 표시/숨기기 애니메이션 효과를 향상할 수 있습니다.
추천 학습: "react 비디오 튜토리얼"
위 내용은 반응에서 모달의 사용법은 무엇입니까의 상세 내용입니다. 자세한 내용은 PHP 중국어 웹사이트의 기타 관련 기사를 참조하세요!


