
이 글은 python에 대한 관련 지식을 제공하며, 문자열 입력 및 출력, 목록 루프 탐색, 목록 추가, 삭제, 수정 및 포함 등을 포함하여 문자 및 목록과 관련된 문제를 주로 소개합니다. 함께 살펴보도록 하겠습니다. 모두에게 도움이 되기를 바랍니다.

추천 학습: python 비디오 튜토리얼
문자열 표현
a = "100"b = "hello world"c = 'hello world'd = '100'e = ‘18.20520'
Python len() 메서드는 객체( 문자 , 목록, 튜플, 사전 등) 항목의 길이 또는 수입니다.
In [1]: a="abcdefg"In [2]: len(a)Out[2]: 7In [3]: b = [1,2,3,4,5,66,77,8888]In [4]: len(b)Out[4]: 8
문자열이 이어지고 숫자가 추가됩니다.
In [5]: a ="lao"In [6]: b="wang"In [7]: c=a+b
In [8]: c
Out[8]: 'laowang'In [9]: d= "===="+a+b+"===="In [10]: d
Out[10]: '====laowang===='In [11]: f="===%s===="%(a+b)In [12]: f
Out[12]: '===laowang===='
입력 정보
name = input(“ 请输入你的姓名:”)position = input(“ 请输入你的职业:”)address = input(“ 请输入你的地址:”)
출력 information
print("="*50)print(" 姓名:%s\n 职业:%s\n 地址:%s" % (name,position,address))print("="*50)데이터를 형식화된 방식으로 표시하며 다양한 방식으로 데이터를 표시할 수 있습니다. 예를 들어 위치를 통해, 키워드 매개변수를 통해, 매핑 목록을 통해.
1. 위치별
print("내 이름은 {0},나이는 {1}".format('Liu Bei',20))
print("내 이름은 {},나이는 {}입니다." .format('Liu Bei',20))
print("{1},{0},{1}".format('Liu Bei',20))
2. 키워드 매개변수 전달
print("{age }, {이름}".format(age=28,name="조조"))
print("{이름},{이름},{age}".format(age=28,name="조조" ))
3 .By 매핑 목록
alist = ["Sun Quan", 20, "China"]
blist = ["Diao Chan", 18, "China"]
print("내 이름은 {1[0]입니다. }, {0[ 2]}부터 age는 {0[1]}”.format(alist,blist))
python3에서 입력으로 얻은 데이터는 모두 문자열 형식으로 저장됩니다. 숫자이기도 하고 문자열 형식이기도 합니다. 문자열 형식으로 저장
#비밀번호가 맞는지 판단하세요
user_name = input(“ 请输入用户名:”)password = input(“ 请输入密码:”)if user_name == “beijing” and password == “123” :print(“ 欢迎登录北京官网!")else :print(" 你的账户或者密码错误!")첨자 인덱스 인덱스
소위 "첨자" 는 슈퍼마켓의 수납장 번호와 마찬가지로 숫자로 해당 수납 공간을 찾을 수 있습니다.
첨자를 통해 일부 문자 가져오기
문자열이 있는 경우: name = 'abcdef', 메모리의 실제 저장 공간은 다음과 같습니다: 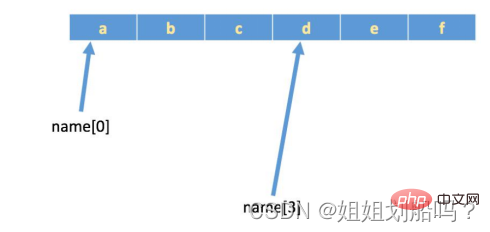
In [1]: len(name)
Out[1]: 7
In [2]: name[len(name)-1]
Out[2]: 'g'
In [3]: name[-1]
Out[3]: 'g' 양수는 왼쪽에서 시작합니다. 오른쪽, 음수 오른쪽에서 왼쪽으로
슬라이싱이란 조작 대상의 일부를 가로채는 조작을 말합니다. 문자열, 목록 및 튜플은 모두 슬라이싱 작업을 지원합니다.
슬라이싱 구문: [시작: 끝: 단계]
참고: 선택한 간격은 왼쪽이 닫히고 오른쪽이 열립니다. 즉, "시작" 비트에서 시작하여 "끝" 비트의 이전 비트에서 끝납니다. (끝 비트 자체 제외), 단계 크기를 쓰지 않으면 기본값은 1입니다.
단계 크기는 방향을 제어하고, 양수는 왼쪽에서 오른쪽으로, 음수는 오른쪽에서 왼쪽으로 가져옵니다
In [1]: name="abcdefABCDEF"In [2]: name[0:3]Out[2]: 'abc'In [3]: name[0:5:2]Out[3]: 'ace'In [4]: name[-1::-1] #逆序(倒叙)Out[4]: 'FEDCBAfedcba'
첨자 및 슬라이싱 요약
[:] 전체 문자열을 처음(기본 위치 0)부터 끝까지 추출
[start:] 처음부터 끝까지 추출
[:end] 처음부터 끝까지 추출 - 1
[start:end] 처음부터 끝까지 추출 - 1
[startstep] 처음부터 끝까지 추출 - 1, 단계당 한 문자 추출
[::-1] 역순
find( ), rfind(), index(), rindex() , 바꾸기(), 분할(), parttion(), rparttion(), 분할선(), startwith(), endwith(), lower(), upper(), …………
In [1]: mystr="hello world yanzilu and yanziluPython"In [2]: mystr
Out[2]: 'hello world yanzilu and yanziluPython
In [3]: mystr.find("and")Out[3]: 20In [4]: mystr.find("world") #存在则返回该单词开始的下标Out[4]: 6In [5]: mystr.find("world1") #不存在则返回-1Out[5]: -1In [6]: mystr.find("yanzilu")Out[6]: 12In [7]: mystr.find("yanzilu",20,len(mystr)) #指定查找区域Out[7]: 24In [8]: mystr.rfind("yanzilu") #rfind,从右往左搜索Out[8]: 24는 find와 동일한 기능을 갖고 있지만, 한 가지 차이점은 index에 없는 내용이 오류를 보고한다는 것입니다
In [9]: mystr.index("and") Out[9]: 20In [10]: mystr.index("yanzilu")Out[10]: 12In [11]: mystr.index("yanzilu",20,len(mystr)) #指定查找区域Out[11]: 24In [12]: mystr.rindex("yanzilu") #从右往左搜索Out[12]: 24In [13]: mystr.rindex("zhangsan") #搜索不存在的会报错---------------------------------------------------------------------------ValueError Traceback (most recent call last)<ipython-input-67-6aff7ee60ad5> in <module>----> 1 mystr.rindex("zhangsan")ValueError: substring not found</module></ipython-input-67-6aff7ee60ad5>In [14]: mystr
Out[14]: 'hello world yanzilu and yanziluPython'In [15]: mystr.replace("world","WORLD")Out[15]: 'hello WORLD yanzilu and yanziluPython'In [16]: mystr
Out[16]: 'hello world yanzilu and yanziluPython'In [17]: mystr.replace("yan","zhang")Out[17]: 'hello world zhangzilu and zhangziluPython'In [18]: mystr.replace("yan","zhang",1) #指定替换次数Out[18]: 'hello world zhangzilu and yanziluPython'In [19]: mystr.replace("yan","xxx",1)Out19]: 'hello world xxxzilu and yanziluPython'In [20]: mystr.replace("yan","xxx",2)Out[20]: 'hello world xxxzilu and xxxziluPython'In [21]: mystr.replace("yan","xxx",33) #替换次数可以超过最大值Out[21]: 'hello world xxxzilu and xxxziluPython'In [22]: mystr
Out[22]: 'hello world yanzilu and yanziluPython'In [23]: mystr.split(" ")Out[23]: ['hello', 'world', 'yanzilu', 'and', 'yanziluPython']In [24]: mystr.split("and")Out[24]: ['hello world yanzilu ', ' yanziluPython']In [25]: mystr.split(" ",3)Out[25]: ['hello', 'world', 'yanzilu', 'and yanziluPython']In [26]: mystr.split()Out[26]: ['hello', 'world', 'yanzilu', 'and', 'yanziluPython']In [27]: mystr
Out[27]: 'hello world yanzilu and yanziluPython'In [28]: mystr.partition("and")Out[28]: ('hello world yanzilu ', 'and', ' yanziluPython')In [29]: mystr.partition("yanzilu")Out[29]: ('hello world ', 'yanzilu', ' and yanziluPython')In [30]: mystr.rpartition("yanzilu")Out[30]: ('hello world yanzilu and ', 'yanzilu', 'Python')In [31]: mystr1 Out[31]: 'hello\nworld\nyanzilu\nand\nyanziluPython'In [32]: mystr1.splitlines()Out[32]: ['hello', 'world', 'yanzilu', 'and', 'yanziluPython']
In [33]: mystr
Out[33]: 'hello world yanzilu and yanziluPython'In [34]: mystr.startswith("hello")Out[34]: TrueIn [35]: mystr.startswith("Hello")Out[35]: FalseIn [36]: mystr.startswith("h")Out[36]: TrueIn [37]: mystr.endswith("Pthon")Out[37]: FalseIn [38]: mystr.endswith("Python")Out[38]: TrueIn [39]: mystr.upper()。 Out[39]: 'HELLO WORLD YANZILU AND YANZILUPYTHON'In [40]: mystr.lower() Out[40]: 'hello world yanzilu and yanzilupython'
In [41]: mystr = "那一夜我伤害了你"In [42]: mystr = mystr.center(30)  In [43]: mystr
Out[43]: '           那一夜我伤害了你
###3.10 lstrip은 문자열 왼쪽의 공백을 제거합니다
In [44]: mystr.lstrip()Out[44]: '那一夜我伤害了你
In [45]: mystr.rstrip()Out[45]: ' 那一夜我伤害了你'
In [46]: mystr.strip()Out[46]: '那一夜我伤害了你'
In [47]: mystr.isspace()Out[47]: FalseIn [48]: mystr = " "In [49]: mystr.isspace()Out[49]: True
In [50]: mystr = "abc" In [51]: mystr.isalpha()Out[51]: TrueIn [52]: mystr = "abc1"In [53]: mystr.isalpha()Out[53]: False
In [54]: mystr = "123123"In [55]: mystr.isdigit()Out[55]: TrueIn [56]: mystr = "123123aa"In [57]: mystr.isdigit()Out[57]: False
In [58]: mystr.isalnum()Out[58]: TrueIn [59]: mystr = "123123 aa"In [60]: mystr.isalnum()Out[60]: False
In [61]: mystr = 'hello world yanzilu and yanziluPython'In [62]: mystr.title()Out[63]: 'Hello World Yanzilu And Yanzilupython'
In [64]: mystr.capitalize()Out[64]: 'Hello world yanzilu and yanzilupython'
In [65]: mystr.count("hello")Out[65]: 1In [66]: mystr.count("yan")Out[66]: 2In [67]: mystr = " "In [68]: name Out[68]: ['hello', 'world', 'yanzilu', 'and', 'yanziluPython']In [69]: mystr.join(name)Out[69]: 'hello world yanzilu and yanziluPython'In [70]: mystr = "_"In [71]: mystr.join(name)Out[71]: 'hello_world_yanzilu_and_yanziluPython'
#变量names_list的类型为列表names_list = [' 刘备',' 曹操',' 孙权']
#打印多个姓名names_list = [' 刘备',' 曹操',' 孙权']print(names_list[0])print(names_list[1])print(names_list[2]) names = [' 刘备',' 曹操',' 孙权'] for x in names    print(x)i=1while i<len><h2>5.列表的增删改查:</h2>
<p>列表中存放的数据是可以进行修改的,比如"增"、“删”、“改”</p>
<h3><strong>5.1列表的添加元素("增"append, extend, insert)</strong></h3>
<p>append可以向列表添加元素<br> extend将另一个集合中的元素逐一添加到列表中<br> insert在指定位置index前插入元素</p>
<pre class="brush:php;toolbar:false">name=[“刘备” , ”曹操” , ”孙权”]print(“增加之前:”,name)info=[“黄忠” , ”魏延”]append追加
names.append("吕布")names.append("貂蝉")names.append(info)
#append把中括号也增加上了print("增加之后:",names)这里是引用
使用extend合并列表
info = ["黄忠","魏延"]names.extend(info)print("增加之后:",names)这里是引用
insert在指定位置前插入元素
names.insert(0,"刘禅")print("增加之后:",names)del根据下标进行删除
pop删除最后一个元素
remove根据元素的值进行删除
names = ['刘备', '曹操', '孙权', '吕布', '貂蝉', '黄忠', '魏延']print("删除前:",names)del names[1]print("del删除后:",names)names.pop()names.pop()print("pop删除后:",names)name = input("请输入您要删除的历史人物:")names.remove(name)print("remove删除后:",names)通过下标修改元素 (" 改 ")
names = ["刘备","曹操","孙权"]names[0] = "刘禅"print(names)
python中查找的常用方法为:
in (存在), 如果存在那么结果为True ,否则为False
not in (不存在),如果不存在那么结果为True ,否则False
index和count与字符串中的用法相同
names = ['刘备', '曹操', '孙权', '吕布', '貂蝉', '黄忠', '魏延',"曹操"]findName = input("请输入您要查找的姓名:")if findName in names:
    print("已经找到:%s"%findName)else:
print("没有找到:%s"%findName)In [1]: names = ['刘备', '曹操', '孙权', '吕布', '貂蝉', '黄忠', '魏延',’曹操’]In [2]: name.index(“曹操”)Out[2]:1In [3]: name.index(“曹操”,2,leb(names))Out[3]:7In [4]: name.count(“曹操”)Out[4]:2
sort方法是将list按特定顺序重新排列,默认为由小到大(True:从小到大;False从大到小)
reverse=True可改为倒序,由大到小。
reverse方法是将list逆置。需要先排序再降序
类似while循环的嵌套,列表也是支持嵌套的一个列表中的元素又是一个列表,那么这就是列表的嵌套
示例:
school_names = [[' 北京大学',' 清华大学'],[' 南开大学',' 天津大学'],[' 贵州大学',' 青海大学']]print(school_names)
#print(school_names)#print(len(school_names))#print(school_names[2][1])for school in school_names:
    print("="*30)
    print(school)
    for name in school:
print(name)一个学校,有3个办公室,现在有8位老师等待工位的分配,请编写程序,完成随机的分配
import random
offices = [[ ],[ ],[ ]]names = ['刘备', '曹操', '孙权', '吕布', '貂蝉', '黄忠', '魏延','大乔']for office in offices:
    #得到一个教师的下标
    index = random.randint(0,len(names)-1)
    #分配老师
    name = names[index]
    office.append(name)
    #要移除已经完成分配的老师
    names.remove(name)for name in names:
    #得到办公室编号
    index = random.randint(0,2)
    offices[index].append(name)#print(offices)#打印出来哪些办公室有哪些老师i= 1for office in offices:
    #office = ["刘备","曹操"]
    print("办公室%s : 共%s人"%(i,len(office)))
    i+=1
    for name in office:
        print("%s"%name,end="\t\t")
    print()
print("="*30)推荐学习:python视频教程
위 내용은 Python 문자 및 목록을 간단하게 알아보기(상세 예시)의 상세 내용입니다. 자세한 내용은 PHP 중국어 웹사이트의 기타 관련 기사를 참조하세요!


![[웹 프런트엔드] Node.js 빠른 시작](https://img.php.cn/upload/course/000/000/067/662b5d34ba7c0227.png)


