

Java는 IO 스트림의 원리와 스트림 분류를 요약합니다.

이 기사에서는 노드 흐름, 버퍼 흐름, 변환 흐름, 출력 흐름 등을 포함하여 O 흐름 원리 및 흐름 분류와 관련된 문제를 주로 정리한 java에 대한 관련 지식을 다음과 같이 살펴보겠습니다. 모두에게 도움이 될 것입니다.

추천 학습: "java video tutorial"
1. 개요
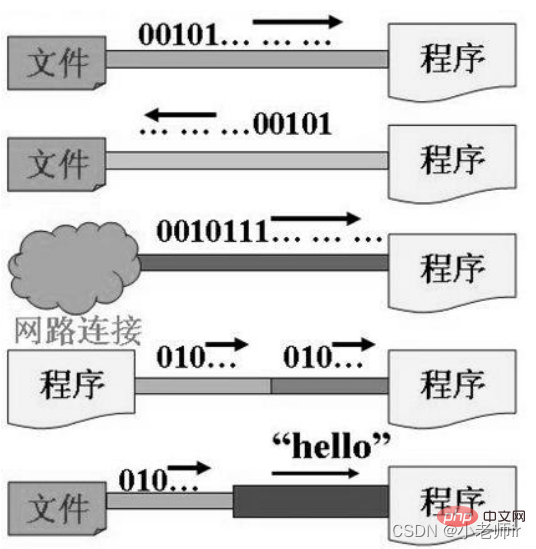
I/O는Input/Output의 약어입니다. > ,I/O기술은 장치 간 데이터 전송을 처리하는 데 사용되는 매우 실용적인 기술입니다. 파일 읽기/쓰기, 네트워크 통신 등I/O是Input/Output的缩写,I/O技术是非常实用的技术,用于处理设备之间的数据传输。如读/写文件,网络通讯等。
- 输入
input:读取外部数据(磁 盘、光盘等存储设备的数据)到程序(内存)中。- 输出
output:将程序(内存)数据输出到磁盘、光盘等存储设 备中。
Java程序中,对于数据的输入/输出操作以“流(
stream)” 的方式进行。
java.io包下提供了各种“流”类和接口,用以获取不种类的数据,并通过标准的方法输入或输出数据。
二、流的分类
1. 概述
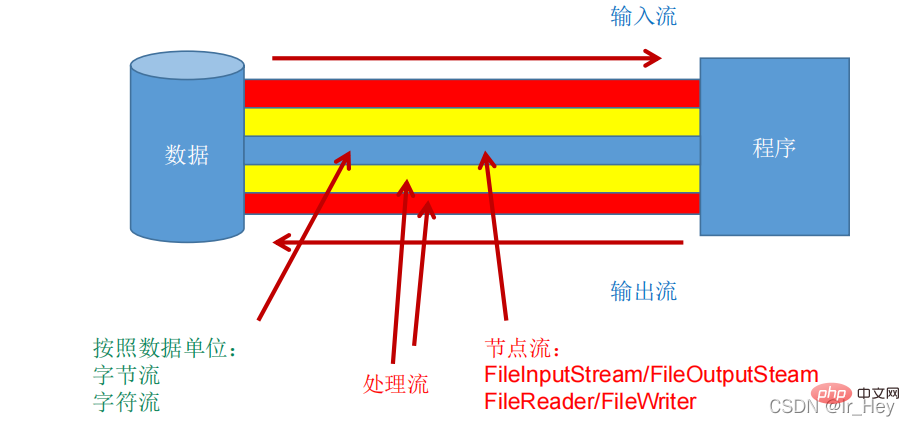
按操作数据单位不同分为:字节流(8
bit),字符流(16bit)
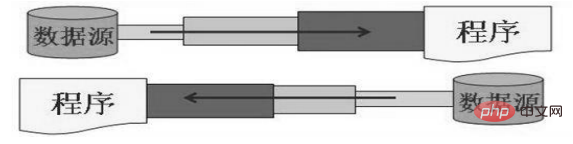
按数据流的流向不同分为:输入流,输出流
按流的角色的不同分为:节点流,处理流
节点流:直接从数据源或目的地读写数据
处理流:不直接连接到数据源或目的地,而是“连接”在已存在的流(节点流或处理流)之上,通过对数据的处理为程序提供更为强大的读写功能。

Java的IO流共涉及40多个类,实际上非常规则,都是从以上4个抽象基类派生的,由这4个类派生出来的子类名称都是以其父类名作为子类名后缀。
| (抽象基类) | 字节流 | 字符流 |
|---|---|---|
| 输入流 | InputStream |
Reader |
| 输出流 | OutputStream |
Writer |
IO 流体系体系:
2. InputStream
概述
典型实现:
FileInputStream
方法
| 方法 | 描述 |
|---|---|
int read() |
从输入流中读取数据的下一个字节。返回 0 到 255 范围内的 int 字节值。如果因为已经到达流末尾而没有可用的字节,则返回值 -1。 |
int read(byte[] b) |
从此输入流中将最多 b.length 个字节的数据读入一个 byte 数组中。如果因为已经到达流末尾而没有可用的字节,则返回值 -1。否则以整数形式返回实际读取的字节数。 |
int read(byte[] b, int off,int len) |
将输入流中最多 len 个数据字节读入 byte 数组。尝试读取 len 个字节,但读取的字节也可能小于该值。以整数形式返回实际读取的字节数。如果因为流位于文件末尾而没有可用的字节,则返回值 -1。 |
public void close() throws IOException
|
Java 프로그램에서는 데이터 입출력 작업이 "스트림(stream)" 형식으로 수행됩니다. |
🎜🎜 2 . 스트림 분류🎜1. 개요
🎜🎜 다양한 작동 데이터 단위에 따라 바이트 스트림(8bit), 문자 스트림(16 )으로 나뉩니다. bit)🎜🎜🎜 데이터 흐름의 다양한 흐름 방향에 따라 입력 스트림, 출력 스트림으로 구분됩니다.🎜🎜🎜 흐름의 다양한 역할에 따라 노드 흐름, 처리 흐름🎜<ul> <li>🎜노드 흐름: 데이터 소스 또는 대상에서 직접 데이터를 읽고 씁니다<br><img src="/static/imghw/default1.png" data-src="https://img.php.cn/upload/article/000/000/067/0a7881848e79bce34e3884eeac3bd014-2.png" class="lazy" alt="여기에 이미지 설명 삽입">🎜</li>
<li>🎜처리 흐름: 데이터 소스 또는 대상에 직접 연결되지는 않지만 기존 흐름(노드 흐름 또는 처리 스트림)에 '연결'되어 데이터를 처리함으로써 프로그램에 더욱 강력한 읽기 및 쓰기 기능을 제공합니다. <br><img src="/static/imghw/default1.png" data-src="https://img.php.cn/upload/article/000/000/067/0a7881848e79bce34e3884eeac3bd014-2.png" class="lazy" alt="여기에 이미지 설명 삽입">🎜</li> </ul>🎜<strong>Java의 IO 스트림에는 40개 이상의 클래스가 포함되어 있습니다. 실제로는 모두 위의 4개 추상 기본 클래스에서 파생됩니다. 클래스 이름은 다음과 같습니다. 하위 클래스 이름으로 상위 클래스 이름이 접미사로 붙습니다. </strong>🎜<table>
<thead><tr class="firstRow">
<th>(추상 기본 클래스)</th>
<th>바이트 스트림</th>
<th>문자 스트림</th> 🎜 </tr></thead>
<tbody>
<tr>🎜<strong>InputStream</strong>🎜🎜<code>InputStream🎜🎜Reader🎜🎜
OutputStream🎜🎜작성자🎜🎜🎜🎜🎜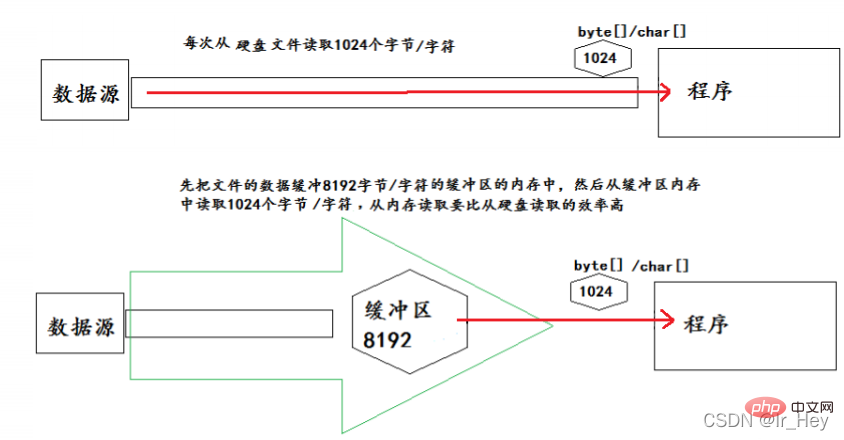
IO 흐름 시스템:
🎜2.InputStream
🎜 개요🎜🎜 🎜일반적인 구현:FileInputStream🎜🎜 메소드🎜| 메소드 | 설명🎜||||||||||||||||||||||||||||||||||||||||||||||||||||||||||||
|---|---|---|---|---|---|---|---|---|---|---|---|---|---|---|---|---|---|---|---|---|---|---|---|---|---|---|---|---|---|---|---|---|---|---|---|---|---|---|---|---|---|---|---|---|---|---|---|---|---|---|---|---|---|---|---|---|---|---|---|---|
| 方法 | 描述 |
|---|---|
int read() |
读取单个字符。作为整数读取的字符,范围在 0 到 65535 之间 (0x00-0xffff)(2个字节的Unicode码),如果已到达流的末尾,则返回 -1 |
int read(char[] cbuf) |
将字符读入数组。如果已到达流的末尾,则返回 -1。否则返回本次读取的字符数。 |
int read(char[] cbuf,int off,int len) |
将字符读入数组的某一部分。存到数组cbuf中,从off处开始存储,最多读len个字符。如果已到达流的末尾,则返回 -1。否则返回本次读取的字符数。 |
public void close() throws IOException |
关闭此输入流并释放与该流关联的所有系统资源。 |
典型实现类:FileReader
@Test
    public void testFileReader(){
        FileReader fr = null;
        try {
            //1.实例化File类的对象,指明要操作的文件
            File file = new File("hello.txt");//相较于当前Module
            //2.提供具体的流
            fr = new FileReader(file);

            //3.数据的读入
            //read():返回读入的一个字符。如果达到文件末尾,返回-1
            //方式一://        int data = fr.read();//        while(data != -1){//            System.out.print((char)data);//            data = fr.read();//        }

            //方式二:语法上针对于方式一的修改
            int data;
            while((data = fr.read()) != -1){
                System.out.print((char)data);
            }
        } catch (IOException e) {
            e.printStackTrace();
        } finally {
            //4.流的关闭操作//            try {//                if(fr != null)//                    fr.close();//            } catch (IOException e) {//                e.printStackTrace();//            }
            //或
            if(fr != null){
                try {
                    fr.close();
                } catch (IOException e) {
                    e.printStackTrace();
                }
            }
        }

    }

    //对read()操作升级:使用read的重载方法
    @Test
    public void testFileReader1()  {
        FileReader fr = null;
        try {
            //1.File类的实例化
            File file = new File("hello.txt");

            //2.FileReader流的实例化
            fr = new FileReader(file);

            //3.读入的操作
            //read(char[] cbuf):返回每次读入cbuf数组中的字符的个数。如果达到文件末尾,返回-1
            char[] cbuf = new char[5];
            int len;
            while((len = fr.read(cbuf)) != -1){
                //方式一:
//错误的写法// for(int i = 0;i <h3 id="OutputStream">4. OutputStream</h3><p><strong> 概述</strong></p><blockquote><p>典型实现:<code>FileOutputStream</code></p></blockquote><p><strong> 方法</strong></p>| 方法 | 描述 |
|---|---|
void write(int b) |
将指定的字节写入此输出流。write 的常规协定是:向输出流写入一个字节。要写入的字节是参数 b 的八个低位。b 的 24 个高位将被忽略。 即写入0~255范围的。 |
void write(byte[] b) |
将 b.length 个字节从指定的 byte 数组写入此输出流。write(b) 的常规协定是:应该与调用 write(b, 0, b.length) 的效果完全相同。 |
void write(byte[] b,int off,int len) |
将指定 byte 数组中从偏移量 off 开始的 len 个字节写入此输出流。 |
public void flush()throws IOException |
刷新此输出流并强制写出所有缓冲的输出字节,调用此方法指示应将这些字节立即写入它们预期的目标。 |
public void close() throws IOException |
关闭此输出流并释放与该流关联的所有系统资源。 |
主要实现类:FileInputOutputStream
/*
    实现对图片的复制操作
     */
    @Test
    public void testFileInputOutputStream()  {
        FileInputStream fis = null;
        FileOutputStream fos = null;
        try {
            //
            File srcFile = new File("爱情与友情.jpg");
            File destFile = new File("爱情与友情2.jpg");

            //
            fis = new FileInputStream(srcFile);
            fos = new FileOutputStream(destFile);

            //复制的过程
            byte[] buffer = new byte[5];
            int len;
            while((len = fis.read(buffer)) != -1){
                fos.write(buffer,0,len);
            }

        } catch (IOException e) {
            e.printStackTrace();
        } finally {
            if(fos != null){
                //
                try {
                    fos.close();
                } catch (IOException e) {
                    e.printStackTrace();
                }
            }
            if(fis != null){
                try {
                    fis.close();
                } catch (IOException e) {
                    e.printStackTrace();
                }

            }
        }

}5. Writer
概述
典型实现:
FileWriter
方法
| 方法 | 描述 | |||||||||||||||
|---|---|---|---|---|---|---|---|---|---|---|---|---|---|---|---|---|
void write(int c) |
写入单个字符。要写入的字符包含在给定整数值的 16 个低位中,16 高位被忽略。 即写入0 到 65535 之间的Unicode码。 | |||||||||||||||
void write(char[] cbuf) |
写入字符数组。 | |||||||||||||||
void write(char[] cbuf,int off,int len) |
写入字符数组的某一部分。从off开始,写入len个字符 | |||||||||||||||
void write(String str) |
写入字符串。 | |||||||||||||||
void write(String str,int off,int len) |
写入字符串的某一部分。 | |||||||||||||||
void flush() |
刷新该流的缓冲,则立即将它们写入预期目标。 | |||||||||||||||
public void close() throws IOException |
method |
| 메서드 | 설명 |
|---|---|
int read() 🎜🎜단일 문자를 읽습니다. 0~65535(0x00-0xffff) 범위(2바이트 유니코드 코드)의 정수로 문자를 읽거나, 스트림 끝에 도달한 경우 -1 🎜🎜int read(char[ ] cbuf)🎜🎜문자를 배열로 읽어옵니다. 스트림의 끝에 도달하면 -1이 반환됩니다. 그렇지 않으면 이번에 읽은 문자 수를 반환합니다. 🎜🎜int read(char[] cbuf,int off,int len)🎜🎜문자를 배열의 특정 부분으로 읽어옵니다. off부터 시작하여 cbuf 배열에 저장하고 최대 len 문자까지 읽습니다. 스트림의 끝에 도달하면 -1이 반환됩니다. 그렇지 않으면 이번에 읽은 문자 수를 반환합니다. 🎜🎜public void close()는 IOException을 발생시킵니다.🎜🎜이 입력 스트림을 닫고 스트림과 관련된 모든 시스템 리소스를 해제합니다. 🎜🎜🎜🎜🎜🎜 일반적인 구현 클래스: FileReader🎜🎜//从内存中写出数据到硬盘的文件里。
@Test
public void testFileWriter() {
FileWriter fw = null;
try {
//1.提供File类的对象,指明写出到的文件
File file = new File("hello1.txt");
//2.提供FileWriter的对象,用于数据的写出
fw = new FileWriter(file,false);
//3.写出的操作
fw.write("I have a dream!\n");
fw.write("you need to have a dream!");
} catch (IOException e) {
e.printStackTrace();
} finally {
//4.流资源的关闭
if(fw != null){
try {
fw.close();
} catch (IOException e) {
e.printStackTrace();
}
}
}
}FileOutputStream🎜🎜🎜 Method🎜 🎜 void write(int b) code>🎜🎜이 출력 스트림에 지정된 바이트를 씁니다. 쓰기의 일반적인 계약은 다음과 같습니다. 출력 스트림에 1바이트를 씁니다. 기록될 바이트는 매개변수 b의 하위 8비트입니다. b의 상위 24비트는 무시됩니다. 즉, 0~255 범위를 쓴다. 🎜🎜<tr>🎜<code>void write(byte[] b)🎜🎜지정된 바이트 배열의 b.length 바이트를 이 출력 스트림에 씁니다. write(b)의 일반적인 계약은 write(b, 0, b.length)를 호출하는 것과 정확히 동일한 효과를 가져야 한다는 것입니다. 🎜🎜void write(byte[] b,int off,int len)🎜🎜지정된 바이트 배열의 오프셋 off에서 시작하는 len 바이트를 이 출력 스트림에 씁니다. 🎜🎜public void flash() throws IOException🎜🎜 이 출력 스트림을 플러시하고 버퍼링된 모든 출력 바이트를 강제로 기록합니다. 이 메서드를 호출하면 해당 바이트를 즉시 기록해야 함을 나타냅니다. 원하는 목표. 🎜🎜public void close()가 IOException을 발생시킵니다.🎜🎜이 출력 스트림을 닫고 스트림과 관련된 모든 시스템 리소스를 해제합니다. 🎜🎜🎜🎜🎜🎜주요 구현 클래스: FileInputOutputStream🎜🎜 @Test
public void testFileReaderFileWriter() {
FileReader fr = null;
FileWriter fw = null;
try {
//1.创建File类的对象,指明读入和写出的文件
File srcFile = new File("hello.txt");
File destFile = new File("hello2.txt");
//不能使用字符流来处理图片等字节数据// File srcFile = new File("爱情与友情.jpg");// File destFile = new File("爱情与友情1.jpg");
//2.创建输入流和输出流的对象
fr = new FileReader(srcFile);
fw = new FileWriter(destFile);
//3.数据的读入和写出操作
char[] cbuf = new char[5];
int len;//记录每次读入到cbuf数组中的字符的个数
while((len = fr.read(cbuf)) != -1){
//每次写出len个字符
fw.write(cbuf,0,len);
}
} catch (IOException e) {
e.printStackTrace();
} finally {
//4.关闭流资源
//方式一:// try {// if(fw != null)// fw.close();// } catch (IOException e) {// e.printStackTrace();// }finally{// try {// if(fr != null)// fr.close();// } catch (IOException e) {// e.printStackTrace();// }// }
//方式二:
try {
if(fw != null)
fw.close();
} catch (IOException e) {
e.printStackTrace();
}
try {
if(fr != null)
fr.close();
} catch (IOException e) {
e.printStackTrace();
}
}
}}FileWriter🎜🎜🎜 메서드🎜 🎜 void write(int c) code>🎜🎜한 글자씩 작성하세요. 쓰여질 문자는 주어진 정수값의 하위 16비트에 포함되며, 상위 16비트는 무시됩니다. 즉, 0~65535 사이의 유니코드 코드를 작성합니다. 🎜🎜<tr>🎜<code>void write(char[] cbuf)🎜🎜Write 문자 배열. 🎜🎜void write(char[] cbuf,int off,int len)🎜🎜문자 배열의 특정 부분을 씁니다. 처음부터 len 문자를 작성합니다🎜🎜void write(String str)🎜🎜문자열을 작성합니다. 🎜🎜void write(String str,int off,int len)🎜🎜문자열의 특정 부분을 씁니다. 🎜🎜voidlush()🎜🎜스트림의 버퍼를 플러시하고 즉시 의도한 대상에 씁니다. 🎜🎜public void close()가 IOException을 발생시킵니다.🎜🎜이 출력 스트림을 닫고 스트림과 관련된 모든 시스템 리소스를 해제합니다. 🎜🎜🎜🎜主要实现类:FileWriter
- 概述
输出操作,对应的
File可以不存在的。并不会报异常
File对应的硬盘中的文件如果不存在,在输出的过程中,会自动创建此文件。
File对应的硬盘中的文件如果存在:
- 如果流使用的构造器是:
FileWriter(file,false) / FileWriter(file):对原有文件的覆盖- 如果流使用的构造器是:
FileWriter(file,true):不会对原有文件覆盖,而是在原有文件基础上追加内容
- 代码演示
//从内存中写出数据到硬盘的文件里。
    @Test
    public void testFileWriter() {
        FileWriter fw = null;
        try {
            //1.提供File类的对象,指明写出到的文件
            File file = new File("hello1.txt");

            //2.提供FileWriter的对象,用于数据的写出
            fw = new FileWriter(file,false);

            //3.写出的操作
            fw.write("I have a dream!\n");
            fw.write("you need to have a dream!");
        } catch (IOException e) {
            e.printStackTrace();
        } finally {
            //4.流资源的关闭
            if(fw != null){

                try {
                    fw.close();
                } catch (IOException e) {
                    e.printStackTrace();
                }
            }
        }
}6. 练习:复制操作
代码演示:
- 实现对文本的复制操作
 @Test
    public void testFileReaderFileWriter() {
        FileReader fr = null;
        FileWriter fw = null;
        try {
            //1.创建File类的对象,指明读入和写出的文件
            File srcFile = new File("hello.txt");
            File destFile = new File("hello2.txt");

            //不能使用字符流来处理图片等字节数据//            File srcFile = new File("爱情与友情.jpg");//            File destFile = new File("爱情与友情1.jpg");


            //2.创建输入流和输出流的对象
            fr = new FileReader(srcFile);
            fw = new FileWriter(destFile);


            //3.数据的读入和写出操作
            char[] cbuf = new char[5];
            int len;//记录每次读入到cbuf数组中的字符的个数
            while((len = fr.read(cbuf)) != -1){
                //每次写出len个字符
                fw.write(cbuf,0,len);

            }
        } catch (IOException e) {
            e.printStackTrace();
        } finally {
            //4.关闭流资源
            //方式一://            try {//                if(fw != null)//                    fw.close();//            } catch (IOException e) {//                e.printStackTrace();//            }finally{//                try {//                    if(fr != null)//                        fr.close();//                } catch (IOException e) {//                    e.printStackTrace();//                }//            }
            //方式二:
            try {
                if(fw != null)
                    fw.close();
            } catch (IOException e) {
                e.printStackTrace();
            }

            try {
                if(fr != null)
                    fr.close();
            } catch (IOException e) {
                e.printStackTrace();
            }
        }
}}- 实现对图片的复制操作
    @Test
    public void testFileInputOutputStream()  {
        FileInputStream fis = null;
        FileOutputStream fos = null;
        try {
            //
            File srcFile = new File("爱情与友情.jpg");
            File destFile = new File("爱情与友情2.jpg");

            //
            fis = new FileInputStream(srcFile);
            fos = new FileOutputStream(destFile);

            //复制的过程
            byte[] buffer = new byte[5];
            int len;
            while((len = fis.read(buffer)) != -1){
                fos.write(buffer,0,len);
            }

        } catch (IOException e) {
            e.printStackTrace();
        } finally {
            if(fos != null){
                //
                try {
                    fos.close();
                } catch (IOException e) {
                    e.printStackTrace();
                }
            }
            if(fis != null){
                try {
                    fis.close();
                } catch (IOException e) {
                    e.printStackTrace();
                }

            }
        }

    }

    //指定路径下文件的复制
    public void copyFile(String srcPath,String destPath){
        FileInputStream fis = null;
        FileOutputStream fos = null;
        try {
            //
            File srcFile = new File(srcPath);
            File destFile = new File(destPath);

            //
            fis = new FileInputStream(srcFile);
            fos = new FileOutputStream(destFile);

            //复制的过程
            byte[] buffer = new byte[1024];
            int len;
            while((len = fis.read(buffer)) != -1){
                fos.write(buffer,0,len);
            }

        } catch (IOException e) {
            e.printStackTrace();
        } finally {
            if(fos != null){
                //
                try {
                    fos.close();
                } catch (IOException e) {
                    e.printStackTrace();
                }
            }
            if(fis != null){
                try {
                    fis.close();
                } catch (IOException e) {
                    e.printStackTrace();
                }

            }
        }


    }

    @Test
    public void testCopyFile(){

        long start = System.currentTimeMillis();

        String srcPath = "C:\\Users\\Administrator\\Desktop\\01-视频.avi";
        String destPath = "C:\\Users\\Administrator\\Desktop\\02-视频.avi";//        String srcPath = "hello.txt";//        String destPath = "hello3.txt";

        copyFile(srcPath,destPath);


        long end = System.currentTimeMillis();

        System.out.println("复制操作花费的时间为:" + (end - start));//618
}}三、节点流(或文件流)
1. 概述
定义文件路径时,注意:可以用“
/”或者“\\”。
在写入一个文件时,如果使用构造器
FileOutputStream(file),则目录下有同名文 件将被覆盖。 如果使用构造器FileOutputStream(file,true),则目录下的同名文件不会被覆盖, 在文件内容末尾追加内容。
在读取文件时,必须保证该文件已存在,否则报异常。
字节流操作字节,比如:
.mp3,.avi,.rmvb,.mp4,.jpg,.doc,.ppt
字符流操作字符,只能操作普通文本文件。最常见的文本文件:
txt,.java,.c,.cpp等语言的源代码。尤其注意.doc,excel,ppt这些不是文本文件。
2. 读取文件
- 概述
1.建立一个流对象,将已存在的一个文件加载进流。
java FileReader fr = new FileReader(new File(“Test.txt”));2.创建一个临时存放数据的数组。
java char[] ch = new char[1024];3.调用流对象的读取方法将流中的数据读入到数组中。
java fr.read(ch);4.关闭资源。
java fr.close();
- 代码演示
FileReader fr = null;try {fr = new FileReader(new File("c:\\test.txt"));char[] buf = new char[1024];int len;while ((len = fr.read(buf)) != -1) {System.out.print(new String(buf, 0, len));}} catch (IOException e) {System.out.println("read-Exception :" + e.getMessage());} finally {if (fr != null) {try {fr.close();} catch (IOException e) {System.out.println("close-Exception :" + e.getMessage());} } }3. 写入文件
- 概述
1.创建流对象,建立数据存放文件
FileWriter fw = new FileWriter(new File(“Test.txt”));
2.调用流对象的写入方法,将数据写入流fw.write(“atguigu-songhongkang”);
3.关闭流资源,并将流中的数据清空到文件中。fw.close();
- 代码演示
FileWriter fw = null;try {fw = new FileWriter(new File("Test.txt"));fw.write("atguigu-songhongkang");} catch (IOException e) {e.printStackTrace();} finally {if (fw != null)try {fw.close();} catch (IOException e) {e.printStackTrace();} }四、缓冲流
1. 概述
为了提高数据读写的速度,Java API提供了带缓冲功能的流类,在使用这些流类时,会创建一个内部缓冲区数组,缺省使用8192个字节(8Kb)的缓冲区。
缓冲流要“套接”在相应的节点流之上,根据数据操作单位可以把缓冲流分为:
BufferedInputStream和BufferedOutputStreamBufferedReader和BufferedWriter
当读取数据时,数据按块读入缓冲区,其后的读操作则直接访问缓冲区
当使用
BufferedInputStream读取字节文件时,BufferedInputStream会一次性从文件中读取8192个(8Kb),存在缓冲区中,直到缓冲区装满了,才重新从文件中读取下一个8192个字节数组。
向流中写入字节时,不会直接写到文件,先写到缓冲区中直到缓冲区写满,
BufferedOutputStream才会把缓冲区中的数据一次性写到文件里。使用方法flush()可以强制将缓冲区的内容全部写入输出流
关闭流的顺序和打开流的顺序相反。只要关闭最外层流即可,关闭最外层流也 会相应关闭内层节点流
flush()方法的使用:手动将buffer中内容写入文件
如果是带缓冲区的流对象的close()方法,不但会关闭流,还会在关闭流之前刷新缓冲区,关闭后不能再写出
2. 实现非文本文件的复制
    @Test
    public void BufferedStreamTest() throws FileNotFoundException {
        BufferedInputStream bis = null;
        BufferedOutputStream bos = null;

        try {
            //1.造文件
            File srcFile = new File("爱情与友情.jpg");
            File destFile = new File("爱情与友情3.jpg");
            //2.造流
            //2.1 造节点流
            FileInputStream fis = new FileInputStream((srcFile));
            FileOutputStream fos = new FileOutputStream(destFile);
            //2.2 造缓冲流
            bis = new BufferedInputStream(fis);
            bos = new BufferedOutputStream(fos);

            //3.复制的细节:读取、写入
            byte[] buffer = new byte[10];
            int len;
            while((len = bis.read(buffer)) != -1){
                bos.write(buffer,0,len);//                bos.flush();//刷新缓冲区

            }
        } catch (IOException e) {
            e.printStackTrace();
        } finally {
            //4.资源关闭
            //要求:先关闭外层的流,再关闭内层的流
            if(bos != null){
                try {
                    bos.close();
                } catch (IOException e) {
                    e.printStackTrace();
                }

            }
            if(bis != null){
                try {
                    bis.close();
                } catch (IOException e) {
                    e.printStackTrace();
                }

            }
            //说明:关闭外层流的同时,内层流也会自动的进行关闭。关于内层流的关闭,我们可以省略.//        fos.close();//        fis.close();
        }


}3. 实现文件复制
    @Test
    public void testCopyFileWithBuffered(){
        long start = System.currentTimeMillis();

        String srcPath = "C:\\Users\\Administrator\\Desktop\\01-视频.avi";
        String destPath = "C:\\Users\\Administrator\\Desktop\\03-视频.avi";


        copyFileWithBuffered(srcPath,destPath);


        long end = System.currentTimeMillis();

        System.out.println("复制操作花费的时间为:" + (end - start));//618 - 176
    }

 //实现文件复制的方法
    public void copyFileWithBuffered(String srcPath,String destPath){
        BufferedInputStream bis = null;
        BufferedOutputStream bos = null;

        try {
            //1.造文件
            File srcFile = new File(srcPath);
            File destFile = new File(destPath);
            //2.造流
            //2.1 造节点流
            FileInputStream fis = new FileInputStream((srcFile));
            FileOutputStream fos = new FileOutputStream(destFile);
            //2.2 造缓冲流
            bis = new BufferedInputStream(fis);
            bos = new BufferedOutputStream(fos);

            //3.复制的细节:读取、写入
            byte[] buffer = new byte[1024];
            int len;
            while((len = bis.read(buffer)) != -1){
                bos.write(buffer,0,len);
            }
        } catch (IOException e) {
            e.printStackTrace();
        } finally {
            //4.资源关闭
            //要求:先关闭外层的流,再关闭内层的流
            if(bos != null){
                try {
                    bos.close();
                } catch (IOException e) {
                    e.printStackTrace();
                }

            }
            if(bis != null){
                try {
                    bis.close();
                } catch (IOException e) {
                    e.printStackTrace();
                }

            }
            //说明:关闭外层流的同时,内层流也会自动的进行关闭。关于内层流的关闭,我们可以省略.//        fos.close();//        fis.close();
        }
    }

 /*
    使用BufferedReader和BufferedWriter实现文本文件的复制

     */
    @Test
    public void testBufferedReaderBufferedWriter(){
        BufferedReader br = null;
        BufferedWriter bw = null;
        try {
            //创建文件和相应的流
            br = new BufferedReader(new FileReader(new File("dbcp.txt")));
            bw = new BufferedWriter(new FileWriter(new File("dbcp1.txt")));

            //读写操作
            //方式一:使用char[]数组//            char[] cbuf = new char[1024];//            int len;//            while((len = br.read(cbuf)) != -1){//                bw.write(cbuf,0,len);//    //            bw.flush();//            }

            //方式二:使用String
            String data;
            while((data = br.readLine()) != null){
                //方法一://                bw.write(data + "\n");//data中不包含换行符
                //方法二:
                bw.write(data);//data中不包含换行符
                bw.newLine();//提供换行的操作

            }


        } catch (IOException e) {
            e.printStackTrace();
        } finally {
            //关闭资源
            if(bw != null){

                try {
                    bw.close();
                } catch (IOException e) {
                    e.printStackTrace();
                }
            }
            if(br != null){
                try {
                    br.close();
                } catch (IOException e) {
                    e.printStackTrace();
                }

            }
        }

}}五、 转换流
1. 概述
转换流提供了在字节流和字符流之间的转换
Java API提供了两个转换流:
InputStreamReader:将InputStream转换为ReaderOutputStreamWriter:将Writer转换为OutputStream
字节流中的数据都是字符时,转成字符流操作更高效。
很多时候我们使用转换流来处理文件乱码问题。实现编码和 解码的功能。
2. InputStreamReader
概述
- 实现将字节的输入流按指定字符集转换为字符的输入流。
- 需要和
InputStream“套接”。
构造器
public InputStreamReader(InputStream in) |
public InputSreamReader(InputStream in,String charsetName) |
3. OutputStreamWriter
概述
- 实现将字符的输出流按指定字符集转换为字节的输出流。
- 需要和
OutputStream“套接”。
(2)构造器
public OutputStreamWriter(OutputStream out) |
public OutputSreamWriter(OutputStream out,String charsetName) |
4. 代码演示
代码演示1:
  @Test
    public void test1() throws IOException {

        FileInputStream fis = new FileInputStream("dbcp.txt");//        InputStreamReader isr = new InputStreamReader(fis);//使用系统默认的字符集
        //参数2指明了字符集,具体使用哪个字符集,取决于文件dbcp.txt保存时使用的字符集
        InputStreamReader isr = new InputStreamReader(fis,"UTF-8");//使用系统默认的字符集

        char[] cbuf = new char[20];
        int len;
        while((len = isr.read(cbuf)) != -1){
            String str = new String(cbuf,0,len);
            System.out.print(str);
        }

        isr.close();

}代码演示2:
    @Test
    public void test2() throws Exception {
        //1.造文件、造流
        File file1 = new File("dbcp.txt");
        File file2 = new File("dbcp_gbk.txt");

        FileInputStream fis = new FileInputStream(file1);
        FileOutputStream fos = new FileOutputStream(file2);

        InputStreamReader isr = new InputStreamReader(fis,"utf-8");
        OutputStreamWriter osw = new OutputStreamWriter(fos,"gbk");

        //2.读写过程
        char[] cbuf = new char[20];
        int len;
        while((len = isr.read(cbuf)) != -1){
            osw.write(cbuf,0,len);
        }

        //3.关闭资源
        isr.close();
        osw.close();


}}六、标准输入、输出流
1. 概述
System.in和System.out分别代表了系统标准的输入和输出设备
默认输入设备是:键盘,输出设备是:显示器
System.in的类型是InputStream,System.out的类型是PrintStream,其是OutputStream的子类,FilterOutputStream的子类
重定向:通过System类的setIn,setOut方法对默认设备进行改变。
public static void setIn(InputStream in)public static void setOut(PrintStream out)
2. 代码演示
/*
从键盘输入字符串,要求将读取到的整行字符串转成大写输出。然后继续进行输入操作,
直至当输入“e”或者“exit”时,退出程序。
 方法一:使用Scanner实现,调用next()返回一个字符串
 方法二:使用System.in实现。System.in  --->  转换流 ---> BufferedReader的readLine()

     */
    public static void main(String[] args) {
        BufferedReader br = null;
        try {
            InputStreamReader isr = new InputStreamReader(System.in);
            br = new BufferedReader(isr);

            while (true) {
                System.out.println("请输入字符串:");
                String data = br.readLine();
                if ("e".equalsIgnoreCase(data) || "exit".equalsIgnoreCase(data)) {
                    System.out.println("程序结束");
                    break;
                }

                String upperCase = data.toUpperCase();
                System.out.println(upperCase);

            }
        } catch (IOException e) {
            e.printStackTrace();
        } finally {
            if (br != null) {
                try {
                    br.close();
                } catch (IOException e) {
                    e.printStackTrace();
                }
            }
        }
}七. 打印流
1. 概述
实现将基本数据类型的数据格式转化为字符串输出
打印流:
PrintStream和PrintWriter
提供了一系列重载的
print()和println()方法,用于多种数据类型的输出
PrintStream和PrintWriter的输出不会抛出IOException异常
PrintStream和PrintWriter有自动flush功能
PrintStream打印的所有字符都使用平台的默认字符编码转换为字节。 在需要写入字符而不是写入字节的情况下,应该使用PrintWriter类。
System.out返回的是PrintStream的实例
2. 代码演示
 /*
    2. 打印流:PrintStream 和PrintWriter

    2.1 提供了一系列重载的print() 和 println()
    2.2 练习:


     */

    @Test
    public void test2() {
        PrintStream ps = null;
        try {
            FileOutputStream fos = new FileOutputStream(new File("D:\\IO\\text.txt"));
            // 创建打印输出流,设置为自动刷新模式(写入换行符或字节 '\n' 时都会刷新输出缓冲区)
            ps = new PrintStream(fos, true);
            if (ps != null) {// 把标准输出流(控制台输出)改成文件
                System.setOut(ps);
            }


            for (int i = 0; i <h2 id="八-数据流">八、数据流</h2><blockquote><p> 为了方便地操作Java语言的基本数据类型和String的数据,可以使用数据流。</p></blockquote><blockquote>
<p> 数据流有两个类:(用于读取和写出基本数据类型、String类的数据)</p>
<ol>
<li><code>DataInputStream</code></li>
<li><code>DataOutputStream</code></li>
</ol>
<p>分别“套接”在 <code>InputStream</code> 和 <code>OutputStream</code> 子类的流上</p>
</blockquote><blockquote><p><code>DataInputStream</code>中的方法:</p></blockquote>boolean readBoolean() |
byte readByte() char |
readChar() |
float readFloat() |
double readDouble() |
long readLong() |
int readInt() |
short readShort() |
String readUTF() |
void readFully(byte[] b) |
보충: DataOutputStream의 메소드: 위 메소드의 읽기를 해당 write
로 변경합니다. 권장 학습: "java 비디오 튜토리얼"
위 내용은 Java는 IO 스트림의 원리와 스트림 분류를 요약합니다.의 상세 내용입니다. 자세한 내용은 PHP 중국어 웹사이트의 기타 관련 기사를 참조하세요!

핫 AI 도구

Undresser.AI Undress
사실적인 누드 사진을 만들기 위한 AI 기반 앱

AI Clothes Remover
사진에서 옷을 제거하는 온라인 AI 도구입니다.

Undress AI Tool
무료로 이미지를 벗다

Clothoff.io
AI 옷 제거제

Video Face Swap
완전히 무료인 AI 얼굴 교환 도구를 사용하여 모든 비디오의 얼굴을 쉽게 바꾸세요!

인기 기사
뜨거운 도구

메모장++7.3.1
사용하기 쉬운 무료 코드 편집기

SublimeText3 중국어 버전
중국어 버전, 사용하기 매우 쉽습니다.

스튜디오 13.0.1 보내기
강력한 PHP 통합 개발 환경

드림위버 CS6
시각적 웹 개발 도구

SublimeText3 Mac 버전
신 수준의 코드 편집 소프트웨어(SublimeText3)


 Java 8 Stream foreach에서 나누거나 돌아 오시겠습니까?
Feb 07, 2025 pm 12:09 PM
Java 8 Stream foreach에서 나누거나 돌아 오시겠습니까?
Feb 07, 2025 pm 12:09 PM
Java 8은 스트림 API를 소개하여 데이터 컬렉션을 처리하는 강력하고 표현적인 방법을 제공합니다. 그러나 스트림을 사용할 때 일반적인 질문은 다음과 같은 것입니다. 기존 루프는 조기 중단 또는 반환을 허용하지만 스트림의 Foreach 메소드는이 방법을 직접 지원하지 않습니다. 이 기사는 이유를 설명하고 스트림 처리 시스템에서 조기 종료를 구현하기위한 대체 방법을 탐색합니다. 추가 읽기 : Java Stream API 개선 스트림 foreach를 이해하십시오 Foreach 메소드는 스트림의 각 요소에서 하나의 작업을 수행하는 터미널 작동입니다. 디자인 의도입니다
 PHP : 웹 개발의 핵심 언어
Apr 13, 2025 am 12:08 AM
PHP : 웹 개발의 핵심 언어
Apr 13, 2025 am 12:08 AM
PHP는 서버 측에서 널리 사용되는 스크립팅 언어이며 특히 웹 개발에 적합합니다. 1.PHP는 HTML을 포함하고 HTTP 요청 및 응답을 처리 할 수 있으며 다양한 데이터베이스를 지원할 수 있습니다. 2.PHP는 강력한 커뮤니티 지원 및 오픈 소스 리소스를 통해 동적 웹 컨텐츠, 프로세스 양식 데이터, 액세스 데이터베이스 등을 생성하는 데 사용됩니다. 3. PHP는 해석 된 언어이며, 실행 프로세스에는 어휘 분석, 문법 분석, 편집 및 실행이 포함됩니다. 4. PHP는 사용자 등록 시스템과 같은 고급 응용 프로그램을 위해 MySQL과 결합 할 수 있습니다. 5. PHP를 디버깅 할 때 error_reporting () 및 var_dump ()와 같은 함수를 사용할 수 있습니다. 6. 캐싱 메커니즘을 사용하여 PHP 코드를 최적화하고 데이터베이스 쿼리를 최적화하며 내장 기능을 사용하십시오. 7
 PHP vs. Python : 차이점 이해
Apr 11, 2025 am 12:15 AM
PHP vs. Python : 차이점 이해
Apr 11, 2025 am 12:15 AM
PHP와 Python은 각각 고유 한 장점이 있으며 선택은 프로젝트 요구 사항을 기반으로해야합니다. 1.PHP는 간단한 구문과 높은 실행 효율로 웹 개발에 적합합니다. 2. Python은 간결한 구문 및 풍부한 라이브러리를 갖춘 데이터 과학 및 기계 학습에 적합합니다.
 PHP 대 기타 언어 : 비교
Apr 13, 2025 am 12:19 AM
PHP 대 기타 언어 : 비교
Apr 13, 2025 am 12:19 AM
PHP는 특히 빠른 개발 및 동적 컨텐츠를 처리하는 데 웹 개발에 적합하지만 데이터 과학 및 엔터프라이즈 수준의 애플리케이션에는 적합하지 않습니다. Python과 비교할 때 PHP는 웹 개발에 더 많은 장점이 있지만 데이터 과학 분야에서는 Python만큼 좋지 않습니다. Java와 비교할 때 PHP는 엔터프라이즈 레벨 애플리케이션에서 더 나빠지지만 웹 개발에서는 더 유연합니다. JavaScript와 비교할 때 PHP는 백엔드 개발에서 더 간결하지만 프론트 엔드 개발에서는 JavaScript만큼 좋지 않습니다.
 PHP vs. Python : 핵심 기능 및 기능
Apr 13, 2025 am 12:16 AM
PHP vs. Python : 핵심 기능 및 기능
Apr 13, 2025 am 12:16 AM
PHP와 Python은 각각 고유 한 장점이 있으며 다양한 시나리오에 적합합니다. 1.PHP는 웹 개발에 적합하며 내장 웹 서버 및 풍부한 기능 라이브러리를 제공합니다. 2. Python은 간결한 구문과 강력한 표준 라이브러리가있는 데이터 과학 및 기계 학습에 적합합니다. 선택할 때 프로젝트 요구 사항에 따라 결정해야합니다.
 캡슐의 양을 찾기위한 Java 프로그램
Feb 07, 2025 am 11:37 AM
캡슐의 양을 찾기위한 Java 프로그램
Feb 07, 2025 am 11:37 AM
캡슐은 3 차원 기하학적 그림이며, 양쪽 끝에 실린더와 반구로 구성됩니다. 캡슐의 부피는 실린더의 부피와 양쪽 끝에 반구의 부피를 첨가하여 계산할 수 있습니다. 이 튜토리얼은 다른 방법을 사용하여 Java에서 주어진 캡슐의 부피를 계산하는 방법에 대해 논의합니다. 캡슐 볼륨 공식 캡슐 볼륨에 대한 공식은 다음과 같습니다. 캡슐 부피 = 원통형 볼륨 2 반구 볼륨 안에, R : 반구의 반경. H : 실린더의 높이 (반구 제외). 예 1 입력하다 반경 = 5 단위 높이 = 10 단위 산출 볼륨 = 1570.8 입방 단위 설명하다 공식을 사용하여 볼륨 계산 : 부피 = π × r2 × h (4
 PHP의 영향 : 웹 개발 및 그 이상
Apr 18, 2025 am 12:10 AM
PHP의 영향 : 웹 개발 및 그 이상
Apr 18, 2025 am 12:10 AM
phphassignificallyimpactedwebdevelopmentandextendsbeyondit
 PHP : 많은 웹 사이트의 기초
Apr 13, 2025 am 12:07 AM
PHP : 많은 웹 사이트의 기초
Apr 13, 2025 am 12:07 AM
PHP가 많은 웹 사이트에서 선호되는 기술 스택 인 이유에는 사용 편의성, 강력한 커뮤니티 지원 및 광범위한 사용이 포함됩니다. 1) 배우고 사용하기 쉽고 초보자에게 적합합니다. 2) 거대한 개발자 커뮤니티와 풍부한 자원이 있습니다. 3) WordPress, Drupal 및 기타 플랫폼에서 널리 사용됩니다. 4) 웹 서버와 밀접하게 통합하여 개발 배포를 단순화합니다.
