

매우 상세합니다! 그래픽과 텍스트로 Vue3의 결합된 API를 설명합니다!

Composition API
- Composition API는 우리 개발자에게 매우 귀중한 vue3 API 업데이트입니다. 먼저 특정 구문에 초점을 맞추지 말고 먼저 이에 대한 일반적인 이해를 합시다.
1. 구성과 옵션
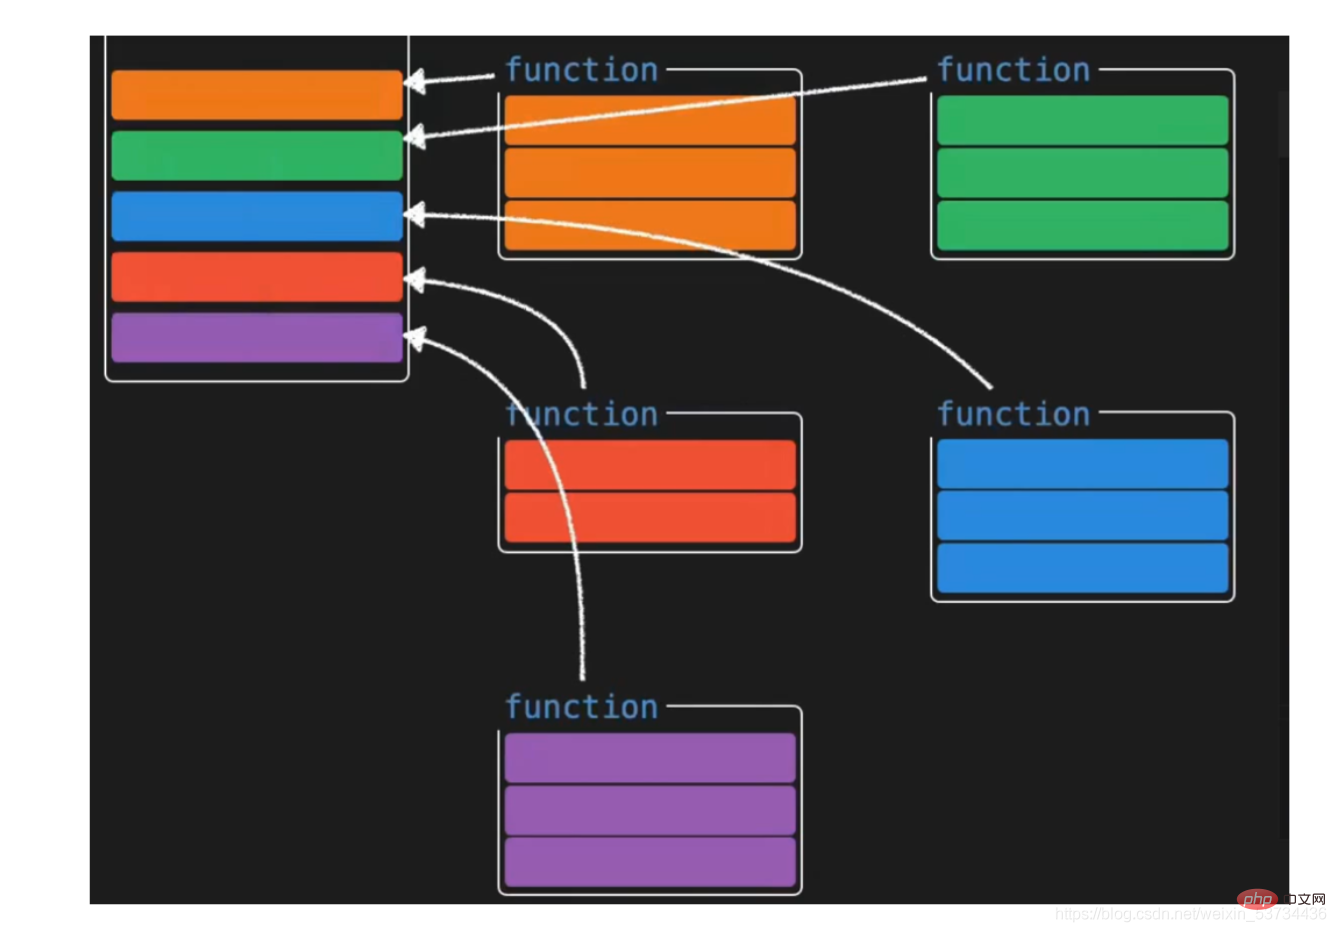
- 옵션 API 옵션 API로 개발된 vue 애플리케이션은 각 옵션마다 고정된 쓰기 위치가 있으므로 이해하기 쉽습니다. 예를 들어 데이터 선택에 대한 응답 데이터가 기록되고 작업 방법이 기록됩니다. 메소드 구성 항목이 커지면 누구나 코드를 검색해야 하는 딜레마에 빠질 것이라고 생각합니다.
- composition API로 개발된 vue 애플리케이션은 오른쪽과 같이 특정 기능과 관련된 모든 것이 특징입니다. 기능 A와 관련된 응답 데이터, 데이터 작동 방법 등 유지 관리를 위해 모두 모아서 응용 프로그램의 크기에 관계없이 특정 기능의 모든 관련 코드를 빠르게 읽고 찾을 수 있습니다. 유지 관리가 쉽고 기능 설정이 복잡하더라도 코드 양이 많아도 논리적 분할 처리도 수행할 수 있습니다. [추천: vue 비디오 튜토리얼]

특별 참고 사항: 옵션 API와 결합 API의 두 가지 스타일이 공존하며 관련이 없습니다.
컴피션 API

2를 사용하여 많은 논리적 조합이 필요한 시나리오를 향상시킬 수 있습니다.
위에서 일러스트 양식을 통해 vue3에서 가져온 새로운 API에 대해 간략하게 알아보았습니다. 특정 작은 사례를 사용하여 두 API의 개발 모델 비교를 더 깊이 이해해 보겠습니다. 구문 세부 사항은 일시적으로 무시하고 집중해 보겠습니다. 코드 작성 양식에2.1 요구 사항 이해
 두 가지 독립적인 기능:
- 버튼을 클릭하여 p의 표시 및 숨기기를 제어합니다.
- p의 글꼴 색상 변경을 제어합니다. 버튼
<template>
<div>
<!-- 功能一模板 -->
<button @click="show">显示</button>
<button @click="hide">隐藏</button>
<div v-if="showDiv">一个被控制显隐的div</div>
</div>
<div>
<!-- 功能二模板 -->
<button @click="changeRed">红色</button>
<button @click="changeYellow">蓝色</button>
<div :style="`color:${fontColor}`">一个被控制字体颜色的的div</div>
</div>
</template>
<script>
export default {
name: 'App',
data() {
return {
showDiv: true, // 功能一数据
fontColor: '' // 功能二数据
}
},
methods: {
// 功能一方法
show() {
this.showDiv = true
},
hide() {
this.showDiv = false
},
// 功能二方法
changeRed() {
this.fontColor = 'red'
},
changeYellow() {
this.fontColor = 'blue'
}
}
}
</script>로그인 후 복사
2.3 vue3.0 구성 api 버전 <template>
<div>
<!-- 功能一模板 -->
<button @click="show">显示</button>
<button @click="hide">隐藏</button>
<div v-if="showDiv">一个被控制显隐的div</div>
</div>
<div>
<!-- 功能二模板 -->
<button @click="changeRed">红色</button>
<button @click="changeYellow">蓝色</button>
<div :style="`color:${fontColor}`">一个被控制字体颜色的的div</div>
</div>
</template>
<script>
export default {
name: 'App',
data() {
return {
showDiv: true, // 功能一数据
fontColor: '' // 功能二数据
}
},
methods: {
// 功能一方法
show() {
this.showDiv = true
},
hide() {
this.showDiv = false
},
// 功能二方法
changeRed() {
this.fontColor = 'red'
},
changeYellow() {
this.fontColor = 'blue'
}
}
}
</script><template>
<div>
<!-- 功能一模板 -->
<button @click="show">显示</button>
<button @click="hide">隐藏</button>
<div v-if="showDivFlag">一个被控制显隐的div</div>
</div>
<div>
<!-- 功能二模板 -->
<button @click="changeRed">红色</button>
<button @click="changeBlue">蓝色</button>
<div :style="`color:${fontColor}`">一个被控制字体颜色的的div</div>
</div>
</template>
<script>
import { ref } from 'vue'
export default {
name: 'App',
setup() {
// 功能一
const showDivFlag = ref(true)
function show() {
showDivFlag.value = true
}
function hide() {
showDivFlag.value = false
}
// 功能二
const fontColor = ref('')
function changeRed() {
fontColor.value = 'red'
}
function changeBlue() {
fontColor.value = 'blue'
}
return { showDivFlag, show, hide, fontColor, changeRed, changeBlue }
}
}
</script>로그인 후 복사
2.4 구성 api 버전 최적화 <template>
<div>
<!-- 功能一模板 -->
<button @click="show">显示</button>
<button @click="hide">隐藏</button>
<div v-if="showDivFlag">一个被控制显隐的div</div>
</div>
<div>
<!-- 功能二模板 -->
<button @click="changeRed">红色</button>
<button @click="changeBlue">蓝色</button>
<div :style="`color:${fontColor}`">一个被控制字体颜色的的div</div>
</div>
</template>
<script>
import { ref } from 'vue'
export default {
name: 'App',
setup() {
// 功能一
const showDivFlag = ref(true)
function show() {
showDivFlag.value = true
}
function hide() {
showDivFlag.value = false
}
// 功能二
const fontColor = ref('')
function changeRed() {
fontColor.value = 'red'
}
function changeBlue() {
fontColor.value = 'blue'
}
return { showDivFlag, show, hide, fontColor, changeRed, changeBlue }
}
}
</script>여기서 의구심이 들 수도 있지만 이제 기능과 관련된 모든 데이터 및 동작을 유지 관리합니다. 애플리케이션이 크고 기능이 많으면 설정 기능이 커지지 않을까요? 유지 관리가 더 어려워지지 않을까요? 다음으로 거대한 설정 기능을 해체해 보겠습니다위에서는 기능적으로 관련된 두 코드를 기능적 기능을 정의하여 독립적인 작은 기능으로 분리한 다음, 두 개의 작은 기능을 setUp 기능을 사용하면 설정 기능을 더 명확하게 할 수 있을 뿐만 아니라 빠른 위치 지정 기능의 유지 관리도 용이하게 할 수 있습니다.<script>import { ref } from 'vue'function useShow() { const showpFlag = ref(true) function show() { showpFlag.value = true } function hide() { showpFlag.value = false } return { showpFlag, show, hide }}function useColor() { const fontColor = ref('') function changeRed() { fontColor.value = 'red' } function changeBlue() { fontColor.value = 'blue' } return { fontColor, changeRed, changeBlue }}export default { name: 'App', setup() { // 功能一 const { showpFlag, show, hide } = useShow() // 功能二 const { fontColor, changeRed, changeBlue } = useColor() return { showpFlag, show, hide, fontColor, changeRed, changeBlue } }}</script>로그인 후 복사
지금까지 API 세부 사항에는 주의를 기울이지 않았습니다. API가 우리에게 가져온 다음에는 API의 세부 사항을 살펴보고 새로운 API를 사용하는 방법을 살펴보겠습니다 ↓3. 설정 입력 기능
- 설정 기능은 시작점(입력)으로 새로운 구성 요소 옵션입니다. )의 컴포넌트에 결합된 API이것은 설정에서 사용할 수 없습니다. 이는 정의되지 않음을 가리킵니다설정 함수는 컴포넌트가 초기화될 때 한 번만 실행됩니다.설정 함수는 beforeCreate 수명 주기 후크 전에 실행됩니다.
export default {
  setup () {
    console.log('setup执行了')
    console.log(this)
  },
  beforeCreate() {
    console.log('beforeCreate执行了')
    console.log(this)
  }}
로그인 후 복사4. 리액티브 시스템 API
4.1 리액티브 함수
함수: 리액티브는 일반 객체를 받아 객체 데이터를 반응형 객체로 변환하고사용 단계
를 반환하는 함수입니다.
- vue 프레임워크에서 반응 함수 가져오기
- 설정 함수에서 반응 함수를 호출하고 객체 데이터를
- 설정 함수에서 형식으로 반응 함수가 호출된 후 반환 값을 반환합니다. 객체의
- 코드 구현
<template>
<div>{{ state.name }}</div>
<div>{{ state.age }}</div>
<button @click="state.name = 'pink'">改值</button>
</template>
<script>
import { reactive } from 'vue'
export default {
setup () {
const state = reactive({
name: 'cp',
age: 18
})
return {
state
}
}
}
</script>4.2 ref 함수
함수: ref는 단순하거나 복잡한 유형을 허용하고 반응형 가변 참조 객체를 반환하는 함수입니다사용 단계
- vue 프레임워크에서 ref 함수 내보내기
- 설정 함수에서 ref 함수를 호출하고 데이터(단순 유형 또는 복합 유형)를 전달합니다.
- 설정 함수에서 ref 함수의 반환 값을 뒤에 넣습니다. 호출하면 객체의 형태가 반환됩니다
- 참고: 설정 함수에서 ref 결과를 사용할 때는 .value를 통해 액세스해야 합니다. 템플릿에서 사용할 때는 .value
- 를 추가할 필요가 없습니다.
<template> <div>{{ money }}</div> <button @click="changeMondy">改值</button> </template> <script> import { ref } from 'vue' export default { setup() { let money = ref(100) console.log(money.value) return { money } } } </script>로그인 후 복사요약:
- ref 함수는 단순 유형 값을 수신할 수 있으며 변경 가능한 참조 응답 객체를 반환하므로 반응 함수가 단순 유형을 지원하지 않는 문제를 보완합니다
reactive和ref函数都可以提供响应式数据的转换,具体什么时候需要使用哪个API社区还没有最佳实践,大家暂时可以使用自己熟练的API进行转换
推荐一种写法:只有我们明确知道要转换的对象内部的字段名称我们才使用reactive,否则就一律使用ref,从而降低在语法选择上的心智负担
4.3 toRefs 函数
- 场景: 经过reactive函数处理之后返回的对象,如果给这个对象解构或者展开,会让数据丢失响应式的能力,为了解决这个问题需要引入toRefs函数,使用 toRefs函数 可以保证该对象展开的每个属性都是响应式的
4.3.1 问题复现
还是之前的案例,如果我们想在模板中省略到state,直接书写name和age,你可能会想到,那我在return出去的时候把state中的属性解构出来不就好了
修改前
<template>
<div>{{ state.name }}</div>
<div>{{ state.age }}</div>
<button @click="state.name = 'pink'">改值</button>
</template>
<script>
import { reactive } from 'vue'
export default {
setup() {
const state = reactive({
name: 'cp',
age: 18
})
return {
state
}
}
}
</script>解构修改后
<template>
<div>{{ name }}</div>
<div>{{ age }}</div>
<button @click="name = 'pink'">改值</button>
</template>
<script>
import { reactive } from 'vue'
export default {
setup() {
const state = reactive({
name: 'cp',
age: 18
})
return {
...state
}
}
}
</script>- 点击改值按钮,发现视图已经不发生变化了,这就是我们所说的,如果解构reactive的返回值,将破坏调用响应式特性,就需要我们使用toRefs方法进行处理了
4.3.2 toRefs包裹处理
<template>
<div>{{ name }}</div>
<div>{{ age }}</div>
<button @click="name = 'pink'">改值</button>
</template>
<script>
import { reactive,toRefs } from 'vue'
export default {
setup() {
const state = reactive({
name: 'cp',
age: 18
})
return {
...toRefs(state)
}
}
}
</script>4.4 computed
- 在setup函数中使用计算属性函数
作用:根据现有响应式数据经过一定的计算得到全新的数据
使用步骤
从vue框架中导入computed 函数
在setup函数中执行computed函数,并传入一个函数,在函数中定义计算公式
把computed函数调用完的执行结果放到setup的return值对象中
<template>
{{ list }}
{{ filterList }} <button @click="changeList">change list</button></template><script>import { computed, ref } from 'vue'export default {
setup() {
const list = ref([1, 2, 3, 4, 5])
// 输入大于3的数字
const filterList = computed(() => {
return list.value.filter(item => item > 3)
})
// 修改list的函数
function changeList() {
list.value.push(6, 7, 8)
}
return {
list,
filterList,
changeList }
}}</script>4.5 watch 侦听器
- 在setup函数中侦听器的使用
作用:基于响应式数据的变化执行回调逻辑,和vue2中的watch的功能完全一致
普通监听
立即执行
深度监听
使用步骤
从vue框架中导入watch函数
在setup函数中执行watch函数开启对响应式数据的监听
watch函数接收三个常规参数
- 第一个参数为函数,返回你要监听变化的响应式数据
- 第二个参数为响应式数据变化之后要执行的回调函数
- 第三个参数为一个对象,在里面配置是否开启立刻执行或者深度监听
4.5.1 普通监听
<template>
{{ age }} <button @click="age++">change age</button></template><script>import { ref, watch } from 'vue'export default {
setup() {
const age = ref(18)
watch(() => {
// 返回你想要监听的响应式属性(ref产生的对象必须加.value)
return age.value }, () => {
// 数据变化之后的回调函数
console.log('age发生了变化')
})
return {
age }
}}</script>4.5.2 开启立刻执行
watch的效果默认状态下,只有监听的数据发生变化才会执行回调,如果你需要在一上来的时候就立刻执行一次,需要配置一下
immediate属性
<template>
{{ age }} <button @click="age++">change age</button></template><script>import { ref, watch } from 'vue'export default {
setup() {
const age = ref(18)
watch(() => {
// 返回你想要监听的响应式属性(ref产生的对象必须加.value)
return age.value }, () => {
// 数据变化之后的回调函数
console.log('age发生了变化')
},{ immediate: true})
return {
age }
}}</script>4.5.3 开启深度监听
当我们监听的数据是一个对象的时候,默认状态下,对象内部的属性发生变化是不会引起回调函数执行的,如果想让对象下面所有属性都能得到监听,需要开启
deep配置
<template>
{{ name }}
{{ info.age }} <button @click="name = 'pink'">change name</button>
<button @click="info.age++">change age</button></template><script>import { reactive, toRefs, watch } from 'vue'export default {
setup() {
const state = reactive({
name: 'cp',
info: {
age: 18
}
})
watch(() => {
return state }, () => {
// 数据变化之后的回调函数
console.log('age发生了变化')
}, {
deep: true
})
return {
...toRefs(state)
}
}}</script>4.5.4 更好的做法
使用watch的时候,尽量详细的表明你到底要监听哪个属性,避免使用deep引起的性能问题,比如我仅仅只是想在state对象的age属性变化的时候执行回调,可以这么写
<template>
{{ name }}
{{ info.age }} <button @click="name = 'pink'">change name</button>
<button @click="info.age++">change age</button></template><script>import { reactive, toRefs, watch } from 'vue'export default {
setup() {
const state = reactive({
name: 'cp',
info: {
age: 18
}
})
watch(() => {
// 详细的告知你要监听谁
return state.info.age }, () => {
// 数据变化之后的回调函数
console.log('age发生了变化')
})
return {
...toRefs(state)
}
}}</script>5. 生命周期函数
使用步骤
先从vue中导入以on打头的生命周期钩子函数
在setup函数中调用生命周期函数并传入回调函数
生命周期钩子函数可以调用多次
<template>
<div>生命周期函数</div>
</template>
<script>
import { onMounted } from 'vue'
export default {
setup() {
// 时机成熟 回调函数自动执行
onMounted(() => {
console.log('mouted生命周期执行了')
})
onMounted(() => {
console.log('mouted生命周期函数又执行了')
})
}
}
</script>| 选项式API | 组合式API |
|---|---|
beforeCreate | 不需要(直接写到setup函数中) |
created | 不需要(直接写到setup函数中) |
beforeMount | onBeforeMount |
mounted | onMounted |
beforeUpdate | onBeforeUpdate |
updated | onUpdated |
beforeDestroyed | onBeforeUnmount |
destroyed | onUnmounted |
6. 父子通信
在vue3的组合式API中,父传子的基础套路完全一样,基础思想依旧为:父传子是通过prop进行传入,子传父通过调用自定义事件完成
实现步骤
setup函数提供俩个参数,第一个参数为props,第二个参数为一个对象context
props为一个对象,内部包含了父组件传递过来的所有prop数据,context对象包含了attrs,slots, emit属性,其中的emit可以触发自定义事件的执行从而完成子传父
代码落地app.vue
<template>
<son :name="name" @get-msg="getMsg"></son></template><script>import { ref } from 'vue'import Son from './components/son'export default {
components: {
Son },
setup() {
const name = ref('cp')
function getMsg(msg) {
console.log(msg)
}
return {
name,
getMsg }
}}</script>components/son.vue
<template>
<div>
{{name}}
<button @click="setMsgToSon">set</button>
</div>
</template>
<script>
export default {
props: {
name: {
type: String
}
},
emits: ['get-msg'], // 声明当前组件触发的自定义事件
setup(props,{emit}) {
console.log(props.name)
function setMsgToSon(){
emit('get-msg','这是一条来自子组件的msg信息')
}
return {
setMsgToSon
}
}
}
</script>7. provide 和 inject
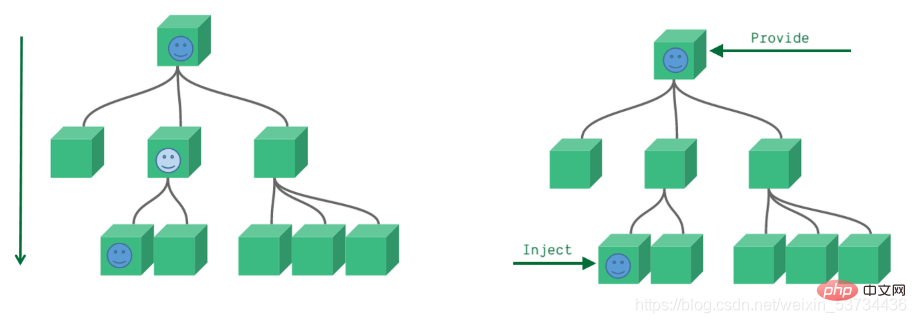
通常我们使用props进行父子之间的数据传递,但是如果组件嵌套层级较深,一层一层往下传递将会变的非常繁琐,有没有一种手段可以把这个过程简化一下呢,有的,就是我们马上要学习的provide 和 inject,它们配合起来可以方便的完成跨层传递数据
7.1 基础使用
- 在setup函数中使用provide和inject的基础用法
来个需求: 爷组件中有一份数据 传递给孙组件直接使用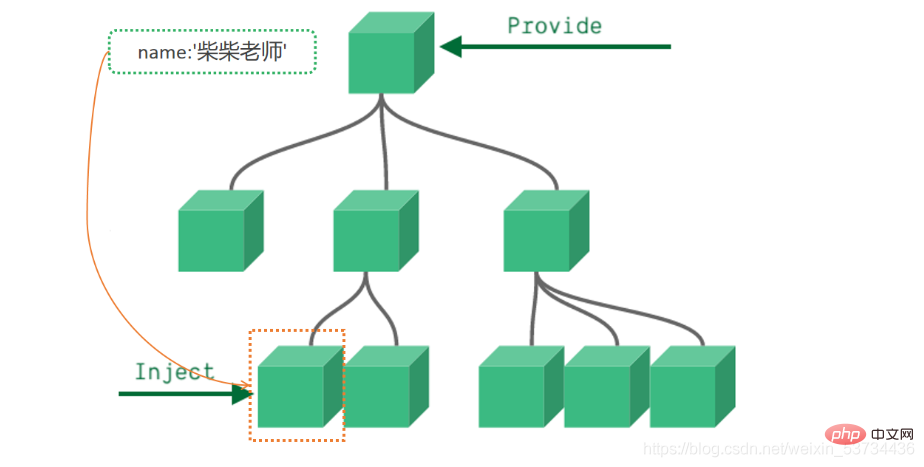
实现步骤:
顶层组件在setup方法中使用provide函数提供数据
任何底层组件在setup方法中使用inject函数获取数据
代码落地爷爷组件 - app.vue
<template>
<father></father></template><script>import Father from '@/components/Father'import { provide } from 'vue'export default {
components: {
Father },
setup() {
let name = '柴柴老师'
// 使用provide配置项注入数据 key - value
provide('name', name)
}}</script>孙组件 - components/Son.vue
<template>
我是子组件
{{ name }}</template><script>import { inject } from 'vue'export default {
setup() {
const name = inject('name')
return {
name }
}}</script>事实上,只要是后代组件,都可以方便的获取顶层组件提供的数据
7.2 传递响应式数据
provide默认情况下传递的数据不是响应式的,也就是如果对provide提供的数据进行修改,并不能响应式的影响到底层组件使用数据的地方,如果想要传递响应数据也非常简单,只需要将传递的数据使用ref或者reactive生成即可
- 通过provide/inject传递响应式数据
app.vue
<template>
<father></father>
<button @click="changeName">change name</button></template><script>import Father from '@/components/Father'import { provide, ref } from 'vue'export default {
components: {
Father },
setup() {
// 使用ref转换成响应式再传递
let name = ref('柴柴老师')
function changeName(){
name.value = 'pink'
}
provide('name', name)
return {
changeName }
}}</script>8. 模板中 ref 的使用
在模板中使用ref,我们都很清楚,它一般有三种使用场景
ref + 普通dom标签 获取真实dom对象
ref + 组件标签 获取组件实例对象
ref + v-for 获取由dom对象(实例对象)组成的数组 (不经常使用)
- 在setup函数中使用ref获取真实dom获取组件实例的方法
实现步骤
使用ref函数传入null创建 ref对象 =>
const hRef = ref(null)模板中通过定义ref属性等于1中创建的ref对象名称建立关联 =>
<h1 ref="hRef"></h1>使用 =>
hRef.value
代码落地components/RefComponent.vue
<template>
  我是一个普通的组件</template>
app.vue
<template>
<h1 id="我是普通dom标签">我是普通dom标签</h1>
<ref-comoonent ref="comRef"></ref-comoonent></template><script>import { onMounted, ref } from 'vue'import RefComoonent from '@/components/RefComponent'export default {
components: {
RefComoonent },
setup() {
const h1Ref = ref(null)
const comRef = ref(null)
onMounted(() => {
console.log(h1Ref.value)
console.log(comRef.value)
})
// 必须return
return {
h1Ref,
comRef }
}}</script>9. 来个案例吧 - Todos
核心功能
渲染列表数据 v-for
点击删除当前列表 splice + index
回车添加新项目 @keyup.enter=“addTodo” list.unshift
选择状态切换 v-model
多选和取消多选 计算属性的set和get
未完成任务数量统计 computed
<template>
<section class="todoapp">
<!-- 头部输入框区域 -->
<header class="header">
<h1 id="todos">todos</h1>
<input
class="new-todo"
placeholder="请输入要完成的任务"
autofocus
v-model="curTask"
@keyup.enter="add"
/>
</header>
<section class="main">
<!-- 全选切换input -->
<input id="toggle-all" class="toggle-all" type="checkbox" v-model="isAll"/>
<label for="toggle-all">标记所有已经完成</label>
<ul class="todo-list">
<!-- 任务列表 -->
<li v-for="(item, index) in list" :key="item.id">
<p class="view">
<!-- 双向绑定 flag -->
<input class="toggle" type="checkbox" v-model="item.flag" />
<label>{{ item.name }}</label>
<!-- 删除按钮 -->
<button class="destroy" @click="del(index)"></button>
</p>
</li>
</ul>
</section>
<footer class="footer">
<span class="todo-count"> 还未完成的任务有:<strong>{{count}}</strong>项 </span>
</footer>
</section></template><script>import { computed, ref } from 'vue'export default {
setup() {
const list = ref([
{ id: 1, name: '吃饭', flag: false },
{ id: 2, name: '睡觉', flag: false },
{ id: 3, name: '打豆豆', flag: true }
])
// 删除函数
function del(index) {
// index 要删除项的下标值
// splice
list.value.splice(index, 1)
}
const curTask = ref('')
function add() {
// 添加逻辑
list.value.unshift({
id: new Date(),
name: curTask.value,
flag: false
})
curTask.value = ''
}
// 全选取消全选
// {name:"cp"} console.log(info.name) info.name = 'pink'
const isAll = computed({
// 获取isAll数据的时候会执行get函数
get() {
// 当list列表中所有项的flag属性都为true 就为true
// every
return list.value.every(item => item.flag === true)
},
set(val) {
// 拿到isAll最新值 遍历一下list 把里面的flag属性设置为最新值
list.value.forEach(item => {
item.flag = val })
}
})
// 计算未完成的任务
const count = computed(()=>{
return list.value.filter(item=>item.flag === false).length })
return {
list,
del,
curTask,
add,
isAll,
count }
}}</script><style>html,
body {
margin: 0;
padding: 0;}button {
margin: 0;
padding: 0;
border: 0;
background: none;
font-size: 100%;
vertical-align: baseline;
font-family: inherit;
font-weight: inherit;
color: inherit;
-webkit-appearance: none;
appearance: none;
-webkit-font-smoothing: antialiased;
-moz-osx-font-smoothing: grayscale;}body {
font: 14px "Helvetica Neue", Helvetica, Arial, sans-serif;
line-height: 1.4em;
background: #f5f5f5;
color: #111111;
min-width: 230px;
max-width: 550px;
margin: 0 auto;
-webkit-font-smoothing: antialiased;
-moz-osx-font-smoothing: grayscale;
font-weight: 300;}:focus {
outline: 0;}.hidden {
display: none;}.todoapp {
background: #fff;
margin: 130px 0 40px 0;
position: relative;
box-shadow: 0 2px 4px 0 rgba(0, 0, 0, 0.2), 0 25px 50px 0 rgba(0, 0, 0, 0.1);}.todoapp input::-webkit-input-placeholder {
font-style: italic;
font-weight: 300;
color: rgba(0, 0, 0, 0.4);}.todoapp input::-moz-placeholder {
font-style: italic;
font-weight: 300;
color: rgba(0, 0, 0, 0.4);}.todoapp input::input-placeholder {
font-style: italic;
font-weight: 300;
color: rgba(0, 0, 0, 0.4);}.todoapp h1 {
position: absolute;
top: -140px;
width: 100%;
font-size: 80px;
font-weight: 200;
text-align: center;
color: #b83f45;
-webkit-text-rendering: optimizeLegibility;
-moz-text-rendering: optimizeLegibility;
text-rendering: optimizeLegibility;}.new-todo,
.edit {
position: relative;
margin: 0;
width: 100%;
font-size: 24px;
font-family: inherit;
font-weight: inherit;
line-height: 1.4em;
color: inherit;
padding: 6px;
border: 1px solid #999;
box-shadow: inset 0 -1px 5px 0 rgba(0, 0, 0, 0.2);
box-sizing: border-box;
-webkit-font-smoothing: antialiased;
-moz-osx-font-smoothing: grayscale;}.new-todo {
padding: 16px 16px 16px 60px;
border: none;
background: rgba(0, 0, 0, 0.003);
box-shadow: inset 0 -2px 1px rgba(0, 0, 0, 0.03);}.main {
position: relative;
z-index: 2;
border-top: 1px solid #e6e6e6;}.toggle-all {
width: 1px;
height: 1px;
border: none; /* Mobile Safari */
opacity: 0;
position: absolute;
right: 100%;
bottom: 100%;}.toggle-all + label {
width: 60px;
height: 34px;
font-size: 0;
position: absolute;
top: -52px;
left: -13px;
-webkit-transform: rotate(90deg);
transform: rotate(90deg);}.toggle-all + label:before {
content: "❯";
font-size: 22px;
color: #e6e6e6;
padding: 10px 27px 10px 27px;}.toggle-all:checked + label:before {
color: #737373;}.todo-list {
margin: 0;
padding: 0;
list-style: none;}.todo-list li {
position: relative;
font-size: 24px;
border-bottom: 1px solid #ededed;}.todo-list li:last-child {
border-bottom: none;}.todo-list li.editing {
border-bottom: none;
padding: 0;}.todo-list li.editing .edit {
display: block;
width: calc(100% - 43px);
padding: 12px 16px;
margin: 0 0 0 43px;}.todo-list li.editing .view {
display: none;}.todo-list li .toggle {
text-align: center;
width: 40px;
/* auto, since non-WebKit browsers doesn't support input styling */
height: auto;
position: absolute;
top: 0;
bottom: 0;
margin: auto 0;
border: none; /* Mobile Safari */
-webkit-appearance: none;
appearance: none;}.todo-list li .toggle {
opacity: 0;}.todo-list li .toggle + label {
background-image: url("data:image/svg+xml;utf8,%3Csvg%20xmlns%3D%22http%3A//www.w3.org/2000/svg%22%20width%3D%2240%22%20height%3D%2240%22%20viewBox%3D%22-10%20-18%20100%20135%22%3E%3Ccircle%20cx%3D%2250%22%20cy%3D%2250%22%20r%3D%2250%22%20fill%3D%22none%22%20stroke%3D%22%23ededed%22%20stroke-width%3D%223%22/%3E%3C/svg%3E");
background-repeat: no-repeat;
background-position: center left;}.todo-list li .toggle:checked + label {
background-image: url("data:image/svg+xml;utf8,%3Csvg%20xmlns%3D%22http%3A//www.w3.org/2000/svg%22%20width%3D%2240%22%20height%3D%2240%22%20viewBox%3D%22-10%20-18%20100%20135%22%3E%3Ccircle%20cx%3D%2250%22%20cy%3D%2250%22%20r%3D%2250%22%20fill%3D%22none%22%20stroke%3D%22%23bddad5%22%20stroke-width%3D%223%22/%3E%3Cpath%20fill%3D%22%235dc2af%22%20d%3D%22M72%2025L42%2071%2027%2056l-4%204%2020%2020%2034-52z%22/%3E%3C/svg%3E");}.todo-list li label {
word-break: break-all;
padding: 15px 15px 15px 60px;
display: block;
line-height: 1.2;
transition: color 0.4s;
font-weight: 400;
color: #4d4d4d;}.todo-list li.completed label {
color: #cdcdcd;
text-decoration: line-through;}.todo-list li .destroy {
display: none;
position: absolute;
top: 0;
right: 10px;
bottom: 0;
width: 40px;
height: 40px;
margin: auto 0;
font-size: 30px;
color: #cc9a9a;
margin-bottom: 11px;
transition: color 0.2s ease-out;}.todo-list li .destroy:hover {
color: #af5b5e;}.todo-list li .destroy:after {
content: "×";}.todo-list li:hover .destroy {
display: block;}.todo-list li .edit {
display: none;}.todo-list li.editing:last-child {
margin-bottom: -1px;}.footer {
padding: 10px 15px;
height: 20px;
text-align: center;
font-size: 15px;
border-top: 1px solid #e6e6e6;}.footer:before {
content: "";
position: absolute;
right: 0;
bottom: 0;
left: 0;
height: 50px;
overflow: hidden;
box-shadow: 0 1px 1px rgba(0, 0, 0, 0.2), 0 8px 0 -3px #f6f6f6,
0 9px 1px -3px rgba(0, 0, 0, 0.2), 0 16px 0 -6px #f6f6f6,
0 17px 2px -6px rgba(0, 0, 0, 0.2);}.todo-count {
float: left;
text-align: left;}.todo-count strong {
font-weight: 300;}.filters {
margin: 0;
padding: 0;
list-style: none;
position: absolute;
right: 0;
left: 0;}.filters li {
display: inline;}.filters li a {
color: inherit;
margin: 3px;
padding: 3px 7px;
text-decoration: none;
border: 1px solid transparent;
border-radius: 3px;}.filters li a:hover {
border-color: rgba(175, 47, 47, 0.1);}.filters li a.selected {
border-color: rgba(175, 47, 47, 0.2);}.clear-completed,
html .clear-completed:active {
float: right;
position: relative;
line-height: 20px;
text-decoration: none;
cursor: pointer;}.clear-completed:hover {
text-decoration: underline;}.info {
margin: 65px auto 0;
color: #4d4d4d;
font-size: 11px;
text-shadow: 0 1px 0 rgba(255, 255, 255, 0.5);
text-align: center;}.info p {
line-height: 1;}.info a {
color: inherit;
text-decoration: none;
font-weight: 400;}.info a:hover {
text-decoration: underline;}/*
Hack to remove background from Mobile Safari.
Can't use it globally since it destroys checkboxes in Firefox
*/@media screen and (-webkit-min-device-pixel-ratio: 0) {
.toggle-all,
.todo-list li .toggle {
background: none;
}
.todo-list li .toggle {
height: 40px;
}}@media (max-width: 430px) {
.footer {
height: 50px;
}
.filters {
bottom: 10px;
}}</style>위 내용은 매우 상세합니다! 그래픽과 텍스트로 Vue3의 결합된 API를 설명합니다!의 상세 내용입니다. 자세한 내용은 PHP 중국어 웹사이트의 기타 관련 기사를 참조하세요!

핫 AI 도구

Undresser.AI Undress
사실적인 누드 사진을 만들기 위한 AI 기반 앱

AI Clothes Remover
사진에서 옷을 제거하는 온라인 AI 도구입니다.

Undress AI Tool
무료로 이미지를 벗다

Clothoff.io
AI 옷 제거제

AI Hentai Generator
AI Hentai를 무료로 생성하십시오.

인기 기사
뜨거운 도구

메모장++7.3.1
사용하기 쉬운 무료 코드 편집기

SublimeText3 중국어 버전
중국어 버전, 사용하기 매우 쉽습니다.

스튜디오 13.0.1 보내기
강력한 PHP 통합 개발 환경

드림위버 CS6
시각적 웹 개발 도구

SublimeText3 Mac 버전
신 수준의 코드 편집 소프트웨어(SublimeText3)
뜨거운 주제
 7552
7552
 15
1382
52
83
11
59
19
22
95
15
1382
52
83
11
59
19
22
95

 Vue 용 버튼에 기능을 추가하는 방법
Apr 08, 2025 am 08:51 AM
Vue 용 버튼에 기능을 추가하는 방법
Apr 08, 2025 am 08:51 AM
HTML 템플릿의 버튼을 메소드에 바인딩하여 VUE 버튼에 함수를 추가 할 수 있습니다. 메소드를 정의하고 VUE 인스턴스에서 기능 로직을 작성하십시오.
 Vue에서 부트 스트랩을 사용하는 방법
Apr 07, 2025 pm 11:33 PM
Vue에서 부트 스트랩을 사용하는 방법
Apr 07, 2025 pm 11:33 PM
vue.js에서 bootstrap 사용은 5 단계로 나뉩니다 : Bootstrap 설치. main.js.의 부트 스트랩 가져 오기 부트 스트랩 구성 요소를 템플릿에서 직접 사용하십시오. 선택 사항 : 사용자 정의 스타일. 선택 사항 : 플러그인을 사용하십시오.
 vue.js로 JS 파일을 참조하는 방법
Apr 07, 2025 pm 11:27 PM
vue.js로 JS 파일을 참조하는 방법
Apr 07, 2025 pm 11:27 PM
vue.js에서 JS 파일을 참조하는 세 가지 방법이 있습니다. & lt; script & gt; 꼬리표;; mounted () 라이프 사이클 후크를 사용한 동적 가져 오기; Vuex State Management Library를 통해 수입.
 Vue에서 시계를 사용하는 방법
Apr 07, 2025 pm 11:36 PM
Vue에서 시계를 사용하는 방법
Apr 07, 2025 pm 11:36 PM
vue.js의 시계 옵션을 사용하면 개발자가 특정 데이터의 변경 사항을들을 수 있습니다. 데이터가 변경되면 콜백 기능을 트리거하여 업데이트보기 또는 기타 작업을 수행합니다. 구성 옵션에는 즉시 콜백을 실행할지 여부와 DEEP를 지정하는 즉시 포함되며, 이는 객체 또는 어레이에 대한 변경 사항을 재귀 적으로 듣는 지 여부를 지정합니다.
 Vue 다중 페이지 개발은 무엇을 의미합니까?
Apr 07, 2025 pm 11:57 PM
Vue 다중 페이지 개발은 무엇을 의미합니까?
Apr 07, 2025 pm 11:57 PM
VUE 멀티 페이지 개발은 vue.js 프레임 워크를 사용하여 응용 프로그램을 구축하는 방법입니다. 여기서 응용 프로그램은 별도의 페이지로 나뉩니다. 코드 유지 보수 : 응용 프로그램을 여러 페이지로 분할하면 코드를보다 쉽게 관리하고 유지 관리 할 수 있습니다. 모듈 식 : 각 페이지는 쉬운 재사용 및 교체를 위해 별도의 모듈로 사용할 수 있습니다. 간단한 라우팅 : 페이지 간의 탐색은 간단한 라우팅 구성을 통해 관리 할 수 있습니다. SEO 최적화 : 각 페이지에는 자체 URL이있어 SEO가 도움이됩니다.
 Vue가 이전 페이지로 돌아 오는 방법
Apr 07, 2025 pm 11:30 PM
Vue가 이전 페이지로 돌아 오는 방법
Apr 07, 2025 pm 11:30 PM
vue.js는 이전 페이지로 돌아갈 수있는 네 가지 방법이 있습니다. $ router.go (-1) $ router.back () 사용 & lt; router-link to = & quot;/quot; Component Window.history.back () 및 메소드 선택은 장면에 따라 다릅니다.
 VUE 버전을 쿼리하는 방법
Apr 07, 2025 pm 11:24 PM
VUE 버전을 쿼리하는 방법
Apr 07, 2025 pm 11:24 PM
Vue DevTools를 사용하여 브라우저 콘솔에서 vue 탭을 보면 VUE 버전을 쿼리 할 수 있습니다. npm을 사용하여 "npm list -g vue"명령을 실행하십시오. package.json 파일의 "종속성"객체에서 vue 항목을 찾으십시오. Vue Cli 프로젝트의 경우 "vue -version"명령을 실행하십시오. & lt; script & gt에서 버전 정보를 확인하십시오. vue 파일을 나타내는 html 파일의 태그.
 함수 인터셉트 vue를 사용하는 방법
Apr 08, 2025 am 06:51 AM
함수 인터셉트 vue를 사용하는 방법
Apr 08, 2025 am 06:51 AM
VUE의 기능 차단은 지정된 기간 내에 기능이 호출되는 횟수를 제한하고 성능 문제를 방지하는 데 사용되는 기술입니다. 구현 방법은 다음과 같습니다. lodash 라이브러리 가져 오기 : 'lodash'에서 import {debounce}; Debounce 기능을 사용하여 인터셉트 기능을 만듭니다. const debouncedfunction = debounce (() = & gt; { / logical /}, 500); 인터셉트 함수를 호출하면 제어 기능이 최대 500 밀리 초 안에 한 번 호출됩니다.
