먼저 설치해 보세요Vue CLI
vue-router 중국 공식 웹사이트: https://router.vuejs.org/zh/
Vue Router는 Vue.js의 공식 라우팅 관리자입니다. Vue.js의 핵심과 긴밀하게 통합되어 단일 페이지 애플리케이션을 쉽게 구축할 수 있습니다. 라우팅은 실제로 가리키는 것으로 이해될 수 있습니다. 즉, 페이지의 버튼을 클릭하면 해당 페이지로 이동해야 합니다. 이것이 라우팅 점프입니다.
먼저 세 단어(route, Routes, Router)를 배워보겠습니다. :
경로: 우선 단수이며 경로로 번역됩니다. 즉, 단일 경로 또는 특정 경로로 이해할 수 있습니다.
경로: 복수형이므로 모음을 의미합니다. of multiples는 복수형일 수 있습니다. 즉, 여러 경로의 컬렉션으로 이해할 수 있습니다. JS에는 여러 가지 상태를 나타내는 두 가지 형태의 컬렉션만 있습니다. 실제로 경로의 공식 정의는 배열입니다. 따라서 경로는 여러 배열의 모음을 나타낸다는 것을 기억합니다.
라우터: 라우터로 번역됩니다. 위는 모두 경로이고 이것은 위의 두 가지를 포함하는 컨테이너 또는 관리자로 이해할 수 있습니다. 위의 두 가지 관리를 담당합니다. 일반적인 시나리오의 예를 들어 보겠습니다. 사용자가 페이지의 버튼을 클릭하면 이때 라우터는 경로를 찾기 위해 경로로 이동합니다. 즉, 라우터는 경로 수집으로 이동합니다. 해당 경로 찾기 [관련 추천: vue.js 비디오 튜토리얼]
1. 프로젝트 생성
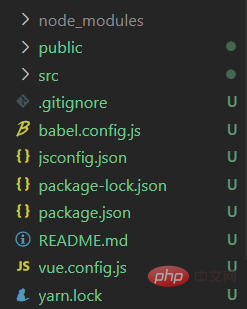
프로젝트 설치 후 프로젝트 디렉토리는 다음과 같습니다. 
2. 라우팅 설치
프로젝트 아래 package.json 파일을 열고 vue 버전을 확인하세요.
vue 버전은 2.x입니다. vue-router는 3.x 버전을 설치하는 것이 좋습니다.
vue 버전은 3.x입니다. vue-router는 4.x 버전을 설치하는 것이 좋습니다. 
그런 다음 프로젝트 디렉터리에 명령을 입력하세요
npm install vue-router@版本号
3. 파일 만들기
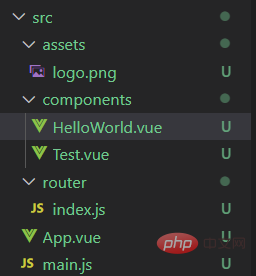
src 폴더를 열고 다음 파일을 만듭니다(일부는 기본적으로 생성됩니다)
이 파일은 데모의 편의를 위해 중복된 코드를 삭제했습니다
<template>
<div class="hello">
<h1>HelloWorld</h1>
</div>
</template>
<script>
export default {
name: 'HelloWorld',
props: {
msg: String
}
}
</script>
<!-- Add "scoped" attribute to limit CSS to this component only -->
<style scoped>
h3 {
margin: 40px 0 0;
}
ul {
list-style-type: none;
padding: 0;
}
li {
display: inline-block;
margin: 0 10px;
}
a {
color: #42b983;
}
</style><template>
<div>
<h2>Test</h2>
</div>
</template>
<script>
// 导出
export default {
name: 'TestItem'
}
</script>
<style>
</style>// 引入vue
import Vue from 'vue';
// 引入vue-router
import VueRouter from 'vue-router';
// 注册 第三方库需要use一下才能用
Vue.use(VueRouter)
// 引入HelloWorld页面
import HelloWorld from '../components/HelloWorld.vue'
// 引入Test页面
import Test from '../components/Test.vue'
// 定义routes路由的集合,数组类型
const routes=[
//单个路由均为对象类型,path代表的是路径,component代表组件
{path:'/hw',component:HelloWorld},
{path:"/test",component:Test}
]
// 实例化VueRouter并将routes添加进去
const router = new VueRouter({
// ES6简写,等于routes:routes
routes
});
// 抛出这个这个实例对象方便外部读取以及访问
export default routerimport Vue from 'vue'
import App from './App.vue'
import router from './router/index.js'
// 阻止vue在启动时生成的生产提示
Vue.config.productionTip = false
new Vue({
router: router,
render: h => h(App),
}).$mount('#app')<template>
<div id="app">
<!--使用 router-link 组件进行导航 -->
<!--通过传递 `to` 来指定链接 -->
<!--`<router-link>` 将呈现一个带有正确 `href` 属性的 `<a>` 标签-->
<router-link to="/hw">HelloWorld</router-link>
<router-link to="/test">Test</router-link>
<hr>
<!-- 路由出口 -->
<!-- 路由匹配到的组件将渲染在这里 -->
<router-view></router-view>
</div>
</template>
<script>
export default {
name: 'App',
}
</script>
<style>
#app {
font-family: Avenir, Helvetica, Arial, sans-serif;
-webkit-font-smoothing: antialiased;
-moz-osx-font-smoothing: grayscale;
text-align: center;
color: #2c3e50;
margin-top: 60px;
}
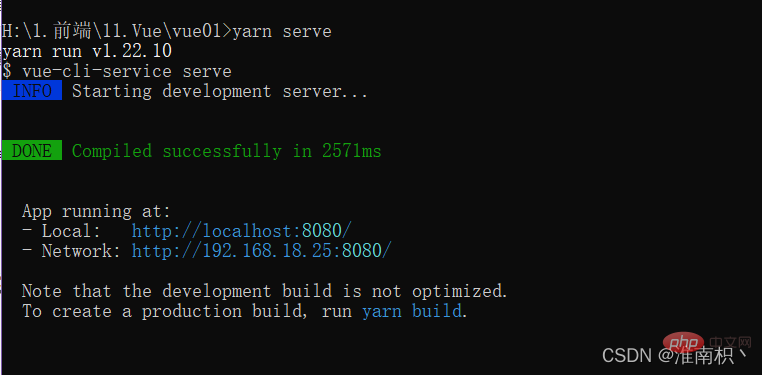
</style>1. 프로젝트 파일 아래에 cmd를 열고 Yarn Serve

2를 입력합니다.

3. HelloWorld를 클릭하면 페이지를 새로 고칠 필요가 없습니다. http://localhost:8080/#/hw

4로 이동합니다. 테스트를 클릭하면 페이지가 필요하지 않습니다. 새로 고치려면 http://localhost: 8080/#/test

위 내용은 Vue Router 라우팅 프로세스가 간단하게 정리됩니다(사용 단계)의 상세 내용입니다. 자세한 내용은 PHP 중국어 웹사이트의 기타 관련 기사를 참조하세요!


