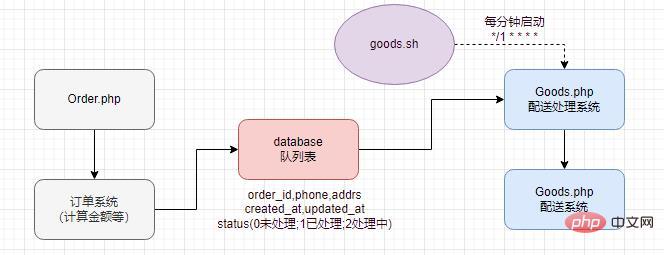
아키텍처 설계 1 예정된 작업 채택 
처리를 위해 유통 처리 시스템을 사용할 경우 현재 데이터베이스에서 처리해야 하는 주문의 상태를 2로 설정하고, 처리가 완료된 후 상태를 1로 설정합니다
매회 업데이트할 데이터 수를 지정할 수 있습니다
큐 데이터 구조를 사용
다이어그램은 다음과 같습니다
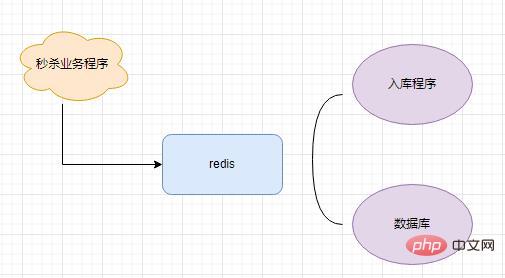
코드 흐름은 다음과 같습니다
플래시 킬 프로그램이 redis(uid, time)에 요청을 씁니다
redis 목록 저장 공간의 길이를 확인하세요. 10개 이상은 바로 폐기
redis 데이터를 무한 루프로 읽어서 데이터베이스에 저장
// Spike.php 秒杀程序if(Redis::llen('lottery') <pre class="brush:php;toolbar:false">// Warehousing.php 入库程序while(true){
    $user = Redis::rpop('lottery');
    if (!$user || $user == 'nil') {
        sleep(2);
        continue;
    }
    $user_arr = explode($user, '%');
    $insert_user = [
        'uid' => $user_arr[0],
        'time' => $user_arr[1]
    ];
    $res = DB::table('lottery_queue')->insert($insert_user);
    if (!$res) {
        Redis::lpush('lottery', $user);
}}위 코드의 동시성이 너무 크면 과매도 상황이 발생합니다. 시간이 지나면 파일 잠금이나 Redis 분산 잠금을 사용하여 제어할 수 있습니다. 먼저 Redis 목록에 제품을 넣고 rpop을 사용하십시오. 얻을 수 없으면 품절되었음을 의미합니다. 구체적인 아이디어와 의사 코드는 다음과 같습니다
  // 先将商品放入redis中
  $goods_id = 2;

  $sql = select id,num from goods where id = $goods_id;
  $res = DB::select($sql);
  if (!empty($res)) {
      // 也可以指定多少件
      Redis::del('lottery_goods' . $goods_id);
      for($i=0;$i<pre class="brush:php;toolbar:false">  // 开始秒杀
  $count = Redis::rpop('lottery_goods' . $goods_id);
  if (!$count) {
      // 商品已抢完
      ...
  }

  // 用户抢购队列
  $user_list = 'user_goods_id_' . $goods_id;
  $user_status = Redis::sismember($user_list, $user_id);
  if ($user_status) {
      // 已抢过
      ...
  }

  // 将抢到的放到列表中
  Redis::sadd($user_list, $uid);
  $msg = '用户:' . $uid . '顺序' . $count;
  Log::info($msg);
  // 生成订单等
  ...
  // 减库存
  $sql = update goods set num = num -1 where id = $goods_id and num > 0; // 防止超卖
  DB::update($sql)
  // 抢购成功
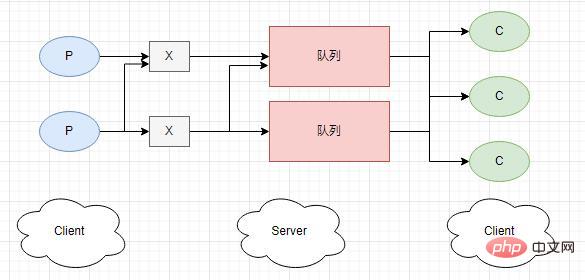
간단하게 사용
  // Send.php
  require_once __DIR__.'/vendor/autoload.php';

  use PhpAmqpLib\Connection\AMQPStreamConnection;
  use PhpAmqpLib\Message\AMQPMessage;

  $connection = new AMQPStreamConnection('localhost', 5672, 'guest', 'guest');

  // 创建通道
  $channel = $connection->channel();
  // 声明一个队列
  $channel->queue_declare('user_email', false, false, false, false);
  // 制作消息
  $msg = new AMQPMessage('send email');
  // 将消息推送到队列
  $channel->basic_publish($msg, '', 'user_email');

  echo '[x] send email';

  $channel->close();
$connection->close(); // Receive.php
require_once __DIR__.'/vendor/autoload.php';
use PhpAmqpLib\Connection\AMQPStreamConnection;
use PhpAmqpLib\Message\AMQPMessage;
$connection = new AMQPStreamConnection('localhost', 5672, 'guest', 'guest');
//创建通道
$channel = $connection->channel();
$channel->queue_declare('user_email', false, false, false, false);
// 当收到消息时的回调函数
$callback = function($msg){
//发送邮件
echo 'Received '.$msg->body.'\n';
};
$channel->basic_consume('user_email', '', false, true, false, false, $callback);
// 保持监听状态
while($channel->is_open()){
$channel->wait();
}위 내용은 PHP 메시지 큐 구현 및 적용에 대한 자세한 설명(흐름도 포함)의 상세 내용입니다. 자세한 내용은 PHP 중국어 웹사이트의 기타 관련 기사를 참조하세요!