반응 axios 요청 차단을 구현하는 방법: 1. axios를 다운로드합니다. 2. src 디렉토리에 utils 폴더를 생성하여 공개 js를 저장합니다. 3. utils 디렉토리에 http.js 파일을 생성합니다. 5. 요청 인터셉터를 추가합니다. 6. 쿠키가 토큰을 저장하는지 확인하고 요청 헤더를 처리합니다.

이 튜토리얼의 운영 환경: Windows 7 시스템, 반응 버전 17.0.1, Dell G3 컴퓨터.
React에서 Axios 요청 차단을 구현하는 방법은 무엇입니까?
react는 Axios 요청 차단, 응답 차단, 게시물 캡슐화, 요청 가져오기를 캡슐화합니다.
기본적으로 React 프로젝트를 생성했습니다
먼저 Axios를 다운로드해야 합니다. 사용자 정보는 React-cookie를 사용하여 저장하며, 로컬 저장소를 사용하도록 선택할 수 있습니다.
npm i axios --save
npm i react-cookie --save
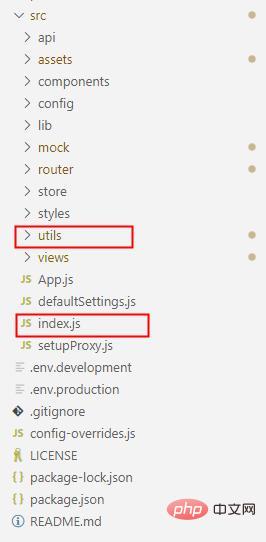
그런 다음 src 디렉터리에 utils 폴더를 만들어 공개 js를 저장하고,
계속해서 utils 디렉터리에 http.js 파일을 만듭니다.
표시된 또 다른 index.js는 아래에 언급된 항목 파일입니다
http.js 파일을 열면 작업을 시작해야 합니다
Axios와 쿠키를 다운로드했다면 그 중에서 가져와야 합니다. , axios는 필수 쿠키이지
import axios from "axios";
import cookie from 'react-cookies'

//这是使用代理的路径,如果你想了解的话可以看我之前的文章或者~~问我
let baseUrl = '/api'

// 创建axios实例,在这里可以设置请求的默认配置
const instance = axios.create({
    timeout: 10000, // 设置超时时间10s,如果10秒没有返回结果则中断请求,认为连接超时
    baseURL: baseUrl // 根据自己配置的代理去设置不同环境的baseUrl
})

// 文档中的统一设置post请求头
instance.defaults.headers.post['Content-Type'] = 'application/json';

// 如果你是上传文件的话需要设置为
// instance.defaults.headers.post['Content-Type'] = 'multipart/form-data';요청 차단 부분 시작
요청 차단은 요청이 전송되기 전이므로 요청을 일부 수정할 수 있습니다.
/** 添加请求拦截器 **/
instance.interceptors.request.use(config => {
    var token = cookie.load('token')//获取你登录时存储的token
// 判断cookie有没有存储token,有的话加入到请求头里
    if (token) {
        config.headers['token'] = token//在请求头中加入token
    }
// 如果还需要在请求头内添加其他内容可以自己添加 "[]" 内为自定义的字段名 "=" 后的内容为字段名对应的内容
    // config.headers['自定义键'] = '自定义内容'
// 如果此时觉得某些参数不合理,你可以删除它,删除后将不会发送给服务器
// delete config.data.userName
// userName是你传递的参数名,或许你可以试着在控制台输出config看看它包含了什么

// 对应可以删除也可以在此添加一些参数
// config.data.userName = '天道酬勤'
    return config
}, error => {
    // 对请求错误做些什么
    return Promise.reject(error)
})응답 차단 부분 시작
응답 차단은 바로 직후입니다. 인터페이스가 데이터를 반환하면 인터셉터가 먼저 데이터를 가져옵니다. 정상인지 데이터가 손상되지 않았는지 판단한 다음 요청이 시작된 위치로 데이터를 반환할 수 있습니다.
/** 添加响应拦截器  **/
instance.interceptors.response.use(response => {
    if (response.statusText === 'OK') {
        return Promise.resolve(response.data)
    } else {
        return Promise.reject(response.data.msg)
    }
}, error => {
// 请求报错的回调可以和后端协调返回什么状态码,在此根据对应状态码进行对应处理
    if (error.response) {
// 如401我就让用户返回登录页
        if (error.response.status === 401) {
            this.props.history.push('/login');
        }
// 比如返回报错你的页面可能会崩溃,你需要在它崩溃之前做一些操作的话,可以在这里
        return Promise.reject(error)
    } else {
        return Promise.reject('请求超时, 请刷新重试')
    }
})요청 인터셉터를 추가하는 경우 반드시 사용자 정의 요청을 사용하지 않으면 차단됩니다. 장치는 의미가 없습니다
일반적으로 두 개의 요청을 캡슐화합니다. 하나의 게시물과 하나의 가져오기로 충분합니다
/* 统一封装get请求 */
export const get = (url, params, config = {}) => {
    return new Promise((resolve, reject) => {
        instance({
            method: 'get',
            url,
            params,
            ...config
        }).then(response => {
            resolve(response)
        }).catch(error => {
            reject(error)
        })
    })
}

/* 统一封装post请求  */
export const post = (url, data, config = {}) => {
    return new Promise((resolve, reject) => {
        instance({
            method: 'post',
            url,
            data,
            ...config
        }).then(response => {
            resolve(response)
        }).catch(error => {
            reject(error)
        })
    })
}캡슐화된 요청 방법은 여기에서 제외되었으며 다음에서 참조해야 합니다. 필요한 곳에 import 할 수도 있지만 추천하진 않습니다
엔트리 파일은 src 디렉토리에 있는 index.js 파일인데, 불명확하다면 위의 그림은 다음과 같습니다. 표시됨
import React, { Component } from 'react';
import { get, post } from './utils/http';
Component.prototype.get = get;
Component.prototype.post = post;사용하시면
let data = {
userName: 'admin',
password: '123456'
}
// post请求实例
this.post("url",data).then(res=>{
// 这里是成功回调
console.log(res)
}).catch(err=>{
// 这里是错误回调
console.log(err)
})
// get请求实例
this.get("url",data).then(res=>{
// 这里是成功回调
console.log(res)
}).catch(err=>{
// 这里是错误回调
console.log(err)
})찾아주셔서 감사합니다. 여기에서 전체 코드는
import axios from "axios";
import cookie from 'react-cookies'
let baseUrl = '/api'
// 创建axios实例,在这里可以设置请求的默认配置
const instance = axios.create({
    timeout: 20000, // 设置超时时间10s
    // baseURL: baseUrl // 根据自己配置的反向代理去设置不同环境的baseUrl
})
// 文档中的统一设置post请求头。下面会说到post请求的几种'Content-Type'
instance.defaults.headers.post['Content-Type'] = 'application/json'
/** 添加请求拦截器 **/
instance.interceptors.request.use(config => {
    var token = cookie.load('token')//获取本地存储的token
// 判断cookie有没有存储token,有的话加入到请求头里
    if (token) {
        config.headers['token'] = token//在请求头中加入token
    }
// 如果还需要在请求头内添加其他内容可以自己添加 [] 内为自定义的字段名 = 后的内容为字段名对应的内容
    // config.headers['api'] = api
    return config
}, error => {
    // 对请求错误做些什么
    return Promise.reject(error)
})
/** 添加响应拦截器  **/
instance.interceptors.response.use(response => {
    if (response.statusText === 'OK') {
        return Promise.resolve(response.data)
    } else {
        return Promise.reject(response.data.msg)
    }
}, error => {
// 请求报错的回调可以和后端协调返回什么状态码,在此根据对应状态码进行对应处理
    if (error.response) {
// 如401我就让用户返回登录页
        if (error.response.status === 401) {
            this.props.history.push('/login');
        }
        return Promise.reject(error)
    } else {
        return Promise.reject('请求超时, 请刷新重试')
    }
})
/* 统一封装get请求 */
export const get = (url, params, config = {}) => {
    return new Promise((resolve, reject) => {
        instance({
            method: 'get',
            url,
            params,
            ...config
        }).then(response => {
            resolve(response)
        }).catch(error => {
            reject(error)
        })
    })
}
/* 统一封装post请求  */
export const post = (url, data, config = {}) => {
    return new Promise((resolve, reject) => {
        instance({
            method: 'post',
            url,
            data,
            ...config
        }).then(response => {
            resolve(response)
        }).catch(error => {
            reject(error)
        })
    })
}에 제공됩니다. 추천 학습: "react 비디오 튜토리얼"
위 내용은 React Axios 요청 차단을 구현하는 방법의 상세 내용입니다. 자세한 내용은 PHP 중국어 웹사이트의 기타 관련 기사를 참조하세요!
