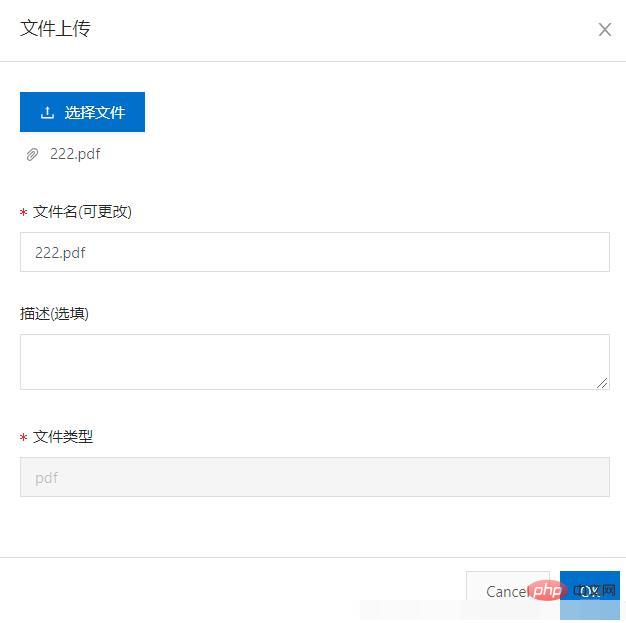
반응으로 파일 업로드를 구현하는 방법
반응에서 파일 업로드를 구현하는 방법: 1. 'antd'에서 { 테이블, 버튼, 모달, 양식, 입력, 업로드, 아이콘, 알림 } 가져오기를 통해 필수 antd 구성요소를 소개합니다. 2. "handleOk = e => {const { fileList } = this.state...}" 양식을 제출하고 파일을 업로드하세요.

이 튜토리얼의 운영 환경: Windows 10 시스템, 반응 버전 18.0.0, Dell G3 컴퓨터.
React에서 파일을 업로드하는 방법은 무엇인가요?
react는 antd를 사용하여 수동 파일 업로드(제출 양식)를 구현합니다.
서문: 저는 현재 파일 업로드와 관련된 백그라운드 관리 프로젝트를 진행 중이며 antd에서 Upload를 사용하여 파일을 업로드합니다. 직면한 문제와 함정을 기록하십시오.
1. 얻고자 하는 효과

얻고 싶은 효과는 파일을 선택한 후 확인을 클릭하는 것입니다(즉, 양식 제출 후 업로드). 파일을 수동으로. 내 접근 방식과 내가 직면한 몇 가지 함정을 소개하겠습니다.
2. 구현 단계
1. 필수 antd 구성 요소를 소개합니다
import { Table, Button, Modal, Form, Input, Upload, Icon, notification } from 'antd';
<Modal
title="文件上传"
visible={this.state.visible}
onOk={this.handleOk} //点击按钮提价表单并上传文件
onCancel={this.handleCancel}
>
<Form layout="vertical" onSubmit={this.handleSubmit}>
<Form.Item>
<div key={Math.random()}>//点击关闭在次打开还会有上次上传文件的缓存
<Upload {...props}>
<Button type="primary">
<Icon type="upload" />选择文件
</Button>
</Upload>
</div>
</Form.Item>
<Form.Item label="文件名(可更改)">
{getFieldDecorator('filename', {
// initialValue:this.state.defEmail,
rules: [
{
message: '请输入正确的文件名',
// pattern: /^[0-9]+$/,
},
{
required: true,
message: '请输入文件名',
},
],
})(<Input />)}
</Form.Item>
<Form.Item label="描述(选填)">
{getFieldDecorator('describe', {
rules: [
{
message: '描述不能为空',
},
{
required: false,
message: '请输入描述',
},
],
})(<TextArea />)}
</Form.Item>
<Form.Item label="文件类型">
{getFieldDecorator('filetype', {
rules: [
{
message: '文件类型',
},
{
required: true,
message: '文件类型',
},
],
})(<Input disabled={true} />)}
</Form.Item>
</Form>
</Modal>다음 코드는 Upload
  const props = {
      showUploadList: true,
      onRemove: file => {
        this.setState(state => {
          const index = state.fileList.indexOf(file);
          const newFileList = state.fileList.slice();
          newFileList.splice(index, 1);
          return {
            fileList: newFileList,
          };
        });
      },
      beforeUpload: file => {
        console.log(file)
        let { name } = file;
        var fileExtension = name.substring(name.lastIndexOf('.') + 1);//截取文件后缀名
        this.props.form.setFieldsValue({ 'filename': name, 'filetype': fileExtension });//选择完文件后把文件名和后缀名自动填入表单
        this.setState(state => ({
          fileList: [...state.fileList, file],
        }));
        return false;
      },
      fileList,
};의 props입니다. 다음은 양식 제출 및 파일 업로드에 중점을 둡니다
handleOk = e => {//点击ok确认上传
    const { fileList } = this.state;
    let formData = new FormData();
    fileList.forEach(file => {
      formData.append('file', file);
    });

    this.props.form.validateFields((err, values) => { //获取表单值
      let { filename, filetype, describe } = values;
      formData.append('name', filename);
      formData.append('type', filetype);
      formData.append("dir", "1");
      if(describe==undefined){
        formData.append('description',"");
      }else{
        formData.append('description',describe);
      }

      UploadFile(formData).then(res => { //这个是请求
        if (res.status == 200 && res.data != undefined) {
          notification.success({
            message: "上传成功",
            description: res.data,
          });
        } else {
          notification.error({
            message: "上传失败",
            description: res.status,
          });
        }
      })
      this.setState({
        visible: false
      });

    })
};Axios의 경우 게시물은 formData.append("인터페이스 매개변수 이름", "전달할 값")를 사용해야 합니다. Axios를 사용하지 않으려면 다른 요청을 사용할 수도 있습니다.
fetch(url, { //fetch请求
        method: 'POST',
        body: formData,
    })


      axios({ //axios
        method: 'post',
        url: url,
        data: formData,
        headers:{ //可加可不加
          'Content-Type': 'multipart/form-data; boundary=----
           WebKitFormBoundary6jwpHyBuz5iALV7b'
        }
    })
    .then(function (response) {
        console.log(response);
    })
    .catch(function (error) {
        console.log(error);
});수동으로 파일을 업로드할 수 있는 방법입니다.
3. 함정
처음으로 파일을 선택한 후 업로드를 클릭하세요. 두 번째로 모델을 열었을 때 지난번의 파일 목록이 그대로 남아 있는 것을 발견했습니다. 온라인에서 찾은 방법은 업로드와 키 값을 제공하는 것이었지만 확인을 클릭하고 열어야 캐시가 사라집니다. 두 번째 모델이지만 취소를 클릭하면 계속 존재합니다.
<div key={Math.random()}>
                <Upload  {...props}>
                  <Button type="primary">
                    <Icon type="upload" />选择文件
                 </Button>
                </Upload>

</div>가장 좋은 방법은 this.setState를 사용하여 상태의 파일 목록을 비우는 것입니다
 this.props.form.resetFields()//添加之前把input值清空
    this.setState({
      visible: true,
      fileList: [] //把文件列表清空
});또한 Modal에 destroyOnClose 속성을 추가하여 Modal이 닫힐 때 Modal의 하위 요소를 삭제할 수도 있습니다.
권장 학습: " 리액트 영상 튜토리얼"
위 내용은 반응으로 파일 업로드를 구현하는 방법의 상세 내용입니다. 자세한 내용은 PHP 중국어 웹사이트의 기타 관련 기사를 참조하세요!

핫 AI 도구

Undresser.AI Undress
사실적인 누드 사진을 만들기 위한 AI 기반 앱

AI Clothes Remover
사진에서 옷을 제거하는 온라인 AI 도구입니다.

Undress AI Tool
무료로 이미지를 벗다

Clothoff.io
AI 옷 제거제

Video Face Swap
완전히 무료인 AI 얼굴 교환 도구를 사용하여 모든 비디오의 얼굴을 쉽게 바꾸세요!

인기 기사

뜨거운 도구

메모장++7.3.1
사용하기 쉬운 무료 코드 편집기

SublimeText3 중국어 버전
중국어 버전, 사용하기 매우 쉽습니다.

스튜디오 13.0.1 보내기
강력한 PHP 통합 개발 환경

드림위버 CS6
시각적 웹 개발 도구

SublimeText3 Mac 버전
신 수준의 코드 편집 소프트웨어(SublimeText3)
 React와 RabbitMQ를 사용하여 안정적인 메시징 앱을 구축하는 방법
Sep 28, 2023 pm 08:24 PM
React 및 RabbitMQ를 사용하여 안정적인 메시징 애플리케이션을 구축하는 방법 소개: 최신 애플리케이션은 실시간 업데이트 및 데이터 동기화와 같은 기능을 달성하기 위해 안정적인 메시징을 지원해야 합니다. React는 사용자 인터페이스 구축을 위한 인기 있는 JavaScript 라이브러리인 반면 RabbitMQ는 안정적인 메시징 미들웨어입니다. 이 기사에서는 React와 RabbitMQ를 결합하여 안정적인 메시징 애플리케이션을 구축하는 방법을 소개하고 구체적인 코드 예제를 제공합니다. RabbitMQ 개요:
 React Router 사용자 가이드: 프런트엔드 라우팅 제어 구현 방법
Sep 29, 2023 pm 05:45 PM
ReactRouter 사용자 가이드: 프런트엔드 라우팅 제어 구현 방법 단일 페이지 애플리케이션의 인기로 인해 프런트엔드 라우팅은 무시할 수 없는 중요한 부분이 되었습니다. React 생태계에서 가장 널리 사용되는 라우팅 라이브러리인 ReactRouter는 풍부한 기능과 사용하기 쉬운 API를 제공하여 프런트 엔드 라우팅 구현을 매우 간단하고 유연하게 만듭니다. 이 기사에서는 ReactRouter를 사용하는 방법을 소개하고 몇 가지 구체적인 코드 예제를 제공합니다. ReactRouter를 먼저 설치하려면 다음이 필요합니다.
 PHP, Vue 및 React: 가장 적합한 프런트엔드 프레임워크를 선택하는 방법은 무엇입니까?
Mar 15, 2024 pm 05:48 PM
PHP, Vue 및 React: 가장 적합한 프런트엔드 프레임워크를 선택하는 방법은 무엇입니까? 인터넷 기술이 지속적으로 발전함에 따라 프런트엔드 프레임워크는 웹 개발에서 중요한 역할을 합니다. PHP, Vue, React는 세 가지 대표적인 프론트엔드 프레임워크로 각각 고유한 특성과 장점을 가지고 있습니다. 사용할 프런트 엔드 프레임워크를 선택할 때 개발자는 프로젝트 요구 사항, 팀 기술 및 개인 선호도를 기반으로 정보를 바탕으로 결정을 내려야 합니다. 이 글에서는 세 가지 프론트엔드 프레임워크인 PHP, Vue, React의 특징과 용도를 비교해보겠습니다.
 React를 사용하여 반응형 백엔드 관리 시스템을 개발하는 방법
Sep 28, 2023 pm 04:55 PM
React를 사용하여 반응형 백엔드 관리 시스템을 개발하는 방법 인터넷의 급속한 발전으로 인해 점점 더 많은 회사와 조직에서 일상적인 작업을 처리하기 위해 효율적이고 유연하며 관리하기 쉬운 백엔드 관리 시스템이 필요합니다. 현재 가장 인기 있는 JavaScript 라이브러리 중 하나인 React는 사용자 인터페이스를 구축하는 간결하고 효율적이며 유지 관리 가능한 방법을 제공합니다. 이 기사에서는 React를 사용하여 반응형 백엔드 관리 시스템을 개발하는 방법을 소개하고 구체적인 코드 예제를 제공합니다. 먼저 React 프로젝트를 생성하세요
 Java 프레임워크와 프런트엔드 React 프레임워크의 통합
Jun 01, 2024 pm 03:16 PM
Java 프레임워크와 React 프레임워크의 통합: 단계: 백엔드 Java 프레임워크를 설정합니다. 프로젝트 구조를 만듭니다. 빌드 도구를 구성합니다. React 애플리케이션을 만듭니다. REST API 엔드포인트를 작성합니다. 통신 메커니즘을 구성합니다. 실제 사례(SpringBoot+React): Java 코드: RESTfulAPI 컨트롤러를 정의합니다. React 코드: API에서 반환된 데이터를 가져오고 표시합니다.
 vue.js vs. React : 프로젝트 별 고려 사항
Apr 09, 2025 am 12:01 AM
vue.js는 중소형 프로젝트 및 빠른 반복에 적합한 반면 React는 크고 복잡한 응용 프로그램에 적합합니다. 1) vue.js는 사용하기 쉽고 팀이 불충분하거나 프로젝트 규모가 작는 상황에 적합합니다. 2) React는 더 풍부한 생태계를 가지고 있으며 고성능 및 복잡한 기능적 요구가있는 프로젝트에 적합합니다.
 반응에는 어떤 클로저가 있습니까?
Oct 27, 2023 pm 03:11 PM
React에는 이벤트 처리 함수, useEffect 및 useCallback, 고차 구성요소 등과 같은 클로저가 있습니다. 자세한 소개: 1. 이벤트 처리 함수 클로저: React에서 컴포넌트에 이벤트 처리 함수를 정의하면 함수가 클로저를 형성하고 컴포넌트 범위 내의 상태와 속성에 액세스할 수 있습니다. 이러한 방식으로 구성 요소의 상태와 속성을 이벤트 처리 함수에서 사용하여 대화형 논리를 구현할 수 있습니다. 2. useEffect 및 useCallback 등의 클로저.
 HTML에서 React의 역할 : 사용자 경험 향상
Apr 09, 2025 am 12:11 AM
React는 JSX와 HTML을 결합하여 사용자 경험을 향상시킵니다. 1) JSX는 개발을보다 직관적으로 만들기 위해 HTML을 포함시킨다. 2) 가상 DOM 메커니즘은 성능을 최적화하고 DOM 운영을 줄입니다. 3) 유지 보수성을 향상시키기위한 구성 요소 기반 관리 UI. 4) 상태 관리 및 이벤트 처리는 상호 작용을 향상시킵니다.


