Angular에서 스타일 격리를 구현하는 방법은 무엇입니까? 다음 기사에서는 Angular의 스타일 격리 구현 메커니즘을 이해하는 데 도움이 되기를 바랍니다.

angular는 구성 요소를 기본 단위로 사용합니다. 구성 요소를 하나씩 작성한 다음 이러한 구성 요소를 구성 요소 트리로 결합합니다. 그러나 개발 과정에서 상위 구성 요소에서 하위 구성 요소의 스타일을 재정의해야 하는 경우가 종종 있습니다. 예를 들어 이제 상위 구성 요소와 하위 구성 요소가 있으며 하위 구성 요소에 범위가 있고 해당 범위의 글꼴은 빨간색입니다.
아래와 같이:
//child.componet.html
<span class="child-span">child span</span>
//child.component.scss
.child-span {
  color: red;
}이제 상위 구성 요소는 하위 구성 요소의 범위 내용을 녹색으로 바꾸려고 합니다. 다음 방법을 사용할 수 있습니다
//parent.component.scss
app-child {
  ::ng-deep {
    .child-span {
      color: green;
    }
  }
}상위 컴포넌트에서 각도에서 제공하는 ::ng-deep 关键字进行样式的覆盖。【相关教程推荐:《angular教程》】
现在我们修改一下child 组件的内容,在span 外面加上一层div,毕竟现实中的组件肯定不会只有一层这么简单。
//child.componet.html
<div class="child-div">
  <span class="child-span">child span</span>
</div>
//child.component.scss
.child-div {
  .child-span {
    color: red;
  }
}这时候,我们会发现child 组件中span 的内容又变回了红色,之前parent 组件对其的覆盖并没有生效。
::ng-deep 为什么会失效呢?或者说,::ng-deep 키워드를 사용하여 스타일을 재정의합니다. [추천 관련 튜토리얼: "Angular 튜토리얼"]
a[target] {
    background-color:yellow;
}왜 실패하나요? 즉, 언제 가 효과적일까요? 언제 만료되나요? 또한 Angular의 구성 요소와 구성 요소 간의 스타일 격리는 어떻게 달성됩니까?
css 선택기
css는 요소 선택기, ID 선택기, 클래스 선택기 및
속성 선택기를 제공합니다. Angular의 스타일 격리 문제에서 더 중요한 것은
속성 선택기입니다. 속성 선택기에서는 속성을 추가하여 요소를 정확하게 선택할 수 있습니다. 예를 들어
[attr] span {
    color: green;
}위의 선택기를 통해 target 속성이 있는 모든 요소를 선택할 수 있습니다.
다른 하나는 하위 선택자입니다. CSS에서 하위 선택기는 지정된 요소의 모든 하위 요소를 선택합니다.
예를 들어 ::ng-deep
//child.componet.html
<span class="child-span">child span</span>
//child.component.scss
.child-span {
  color: red;
}하위 선택기
를 사용하면 구성 요소 스타일 격리를 완료하는 데 필요한 모든 도구를 얻을 수 있습니다. Angle의 구성요소 스타일 분리와는 전적으로 이 두 가지 내용을 기반으로 합니다.
angular 스타일 격리 구현 메커니즘
//parent.component.html
<app-child></app-child>
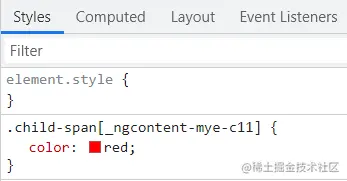
_ngcontent-mye-c13 和_nghost-mye-c12 两个属性,而child 组件上面多了_ngcontent-mye-c12 和_nghost-mye-c11 两个属性,child 组件下的span 标签,增加了_nghost-mye-c11 属性。对于scss 文件,经过angular 的处理以后,在child 组件中的.child-span 类,变成了.child-span[_nghost-mye-c11]。

通过这些内容我们就可以看出来angular 的样式隔离就是利用属性选择器完成的。
_nghost-mye-c11 这个属性只会出现在child 组件中。在child.component.scss 中的.child-span类变成了.child-span[_nghost-mye-c11],根据之前提到的属性选择器的机制,.child-span 只会对child 组件的内容生效。
如果在parent 组件内部也写一个.child-span类选择器,那么生成的类选择器就会是.child-span[_nghost-mye-c12]。而_nghost-mye-c12 这个属性是属于parent 组件的,于是这个.child-span 类只会对parent 组件的内容生效。并不会影响到child 组件,样式的隔离也就完成了。
那为什么通过::ng-deep 부모 컴포넌트의 내용은
//parent.component.scss
app-child {
  ::ng-deep {
    .child-span {
      color: green;
    }
  }
}_nghost-mye-c12 두 가지 속성이 추가되고 하위 구성 요소에 _ngcontent-mye-c12</가 더 많이 있습니다. code> 및 <code>_nghost-mye-c11 하위 구성 요소 아래의 span 태그라는 두 가지 특성에 _nghost-mye-c11 특성이 추가되었습니다. 🎜🎜scss 파일의 경우 각도 처리 후 하위 구성 요소의 .child-span 클래스는 .child-span[_nghost-mye-c11]</code >가 됩니다. 🎜🎜<img src="/static/imghw/default1.png" data-src="https://img.php.cn/upload/image/935/130/999/1637058673702408.png" class="lazy" title="1637058673702408.png" alt="Angular에서 스타일 격리를 구현하는 방법은 무엇입니까? 구현 메커니즘에 대한 자세한 설명"/>🎜🎜통과 이러한 내용에서 우리는 Angular의 스타일 격리가 속성 선택자를 사용하여 수행된다는 것을 알 수 있습니다. 🎜🎜<code>_nghost-mye-c11 이 속성은 하위 구성 요소에만 나타납니다. child.comComponent.scss의 .child-span 클래스는 이전 메커니즘에 언급된 속성 선택기에 따라 .child-span[_nghost-mye-c11]가 됩니다. >.child-span은 하위 구성 요소의 콘텐츠에만 적용됩니다. 🎜🎜상위 구성 요소 내에 .child-span 클래스 선택기도 작성하면 생성된 클래스 선택기는 .child-span[_nghost-mye-c12]</ code>가 됩니다. . <code>_nghost-mye-c12 속성은 상위 구성 요소에 속하므로 .child-span 클래스는 상위 구성 요소의 콘텐츠에만 적용됩니다. 하위 구성 요소에는 영향을 미치지 않으며 스타일 격리가 완료됩니다. 🎜//parent.component.scss
app-child {
::ng-deep {
.child-span {
color: green;
}
}
}上面的内容通过angular 处理以后,生成的内容为app-child[_nghost-mye-c12] .child_span。位于::ng-deep 后面的类,去掉了自动添加的属性,这时候根据css 的后代选择器机制。app-child[_nghost-mye-c12] .child_span会选中child 组件下面的所有带有.child_span 类的标签,而且根据优先级计算,app-child[_nghost-mye-c12] .child_span 高于child 组件生成的.child_span[_nghost-mye-c11] ,于是child 组件中的样式就被覆盖掉了。
那为什么有时候::ng-deep不能够覆盖掉呢?比如,当child 组件代码如下的时候
//child.componet.html
<div class="child-div">
  <span class="child-span">child span</span>
</div>
//child.component.scss
.child-div {
  .child-span {
    color: red;
  }
}这时候即使我们发现child 组件中span 的颜色依旧是红色。
实际上原因也不复杂,检查angular 生成的样式文件后,我们可以发现,之所以没有把覆盖掉,纯粹是因为css 选择器优先级的问题。child 组件生成的样式.child-div[_nghost-mye-c11] .child-span[_nghost-mye-c11] 优先级高于parent 组件生成的样式app-child[_nghost-mye-c12] .child。于是,我们看到的效果就是parent 组件中的::ng-deep 没有生效,一种比较快捷的做法是直接在parent 组件的样式后面加上!important。但是由于!important 权重太高的原因,并不是很推荐。歪个楼,在发现angular ::ng-deep 失效的原因之前,很遗憾,项目之前很多地方的都有这种用法。
另一个方法就是,既然是因为优先级不够,那么提高parent 组件生成的样式的优先级就可以了。 修改parent 组件的代码为
:host {
  app-child {
    ::ng-deep {
      .child-div {
        .child-span {
          color: green;
        }
      }
    }
  }
}这时候,parent 组件生成的样式[_nghost-mye-c12] app-child[_nghost-mye-c12] .child-div .child-span 优先级高于child 组件生成的样式.child-div[_nghost-mye-c11] .child-span[_nghost-mye-c11] ,child 组件中span 的颜色也就变绿了。
这里我们使用了:host 关键字,接下来,我们简单看看它的作用。
上个小结中,parent 组件生成的样式是[_nghost-mye-c12] app-child[_nghost-mye-c12] .child-div .child-span,如果去掉:host,就会发现,生成的样式变成了app-child[_nghost-mye-c12] .child-div .child-span。所以:host 关键字只是给生成的样式,加上了parent 组件属性字段而已。
那这个:host有什么用呢?
常见的作用有两个。
一个就是选择当前的组件标签,在angular 中,我们自定义的组件,比如这里的parent 组件app-parent 和child 组件app-child 最后都是会渲染到生成的html 文档上的。如果需要选中这些标签,就可以使用:host 关键字。
另一个作用还是隔离样式,将class 类写在:host 内部,这个类无论如何也是不可能泄漏到全局去的。实际上,通过前面的内容分析可以发现,不写在:host 里面,也不会泄漏到全局。但是如果出现了以下的情况
//some.component.scss
::ng-deep {
    .random-class {
        xxxx
    }
}这个类经过angular 处理以后,最后会变为
.random-class {
    xxxx
}random-class 将会对全局造成影响。
但是如果把它包裹在:host 内部,哪怕使用了::ng-deep 关键字,最多也只会影响到这个组件的后代元素。
所以在angular 官方文档中有下面的一段话。
Applying the
::ng-deeppseudo-class to any CSS rule completely disables view-encapsulation for that rule. Any style with::ng-deepapplied becomes a global style. In order to scope the specified style to the current component and all its descendants, be sure to include the:hostselector before::ng-deep. If the::ng-deepcombinator is used without the:hostpseudo-class selector, the style can bleed into other components.
我们首先介绍了css 的属性选择器和后代选择器。通过分析angular 生成的html 和css 代码,发现angular 的样式隔离功能,完全是基于这两个内容实现的。接下来,分析了::ng-deep 有时候生效,有时候有不生效的原因。最后介绍了使用:host 关键字来完全避免样式泄漏到全局。
更多编程相关知识,请访问:编程视频!!
위 내용은 Angular에서 스타일 격리를 구현하는 방법은 무엇입니까? 구현 메커니즘에 대한 자세한 설명의 상세 내용입니다. 자세한 내용은 PHP 중국어 웹사이트의 기타 관련 기사를 참조하세요!