먼저 구현 단계를 살펴보고 발생할 수 있는 문제에 대해 이야기해 보겠습니다
1. javax.mail 종속성을 소개합니다. 저는 springboot를 사용하고 있으므로 종속성은 다음과 같이 소개됩니다
<dependency>
    <groupId>org.springframework.boot</groupId>
    <artifactId>spring-boot-starter-mail</artifactId>
</dependency>
springboot 프레임워크를 사용하지 않는다면 직접 찾을 수 있습니다
2. 이메일 기본정보 수업
package com.example.demo.comment.sendemail;

import java.util.Properties;

/**
 * 发送邮件需要使用的基本信息
 *
 * @author 860118060
 */
public class MailSenderInfo {
    /**
     * 发送邮件的服务器的IP和端口
     */
    private String mailServerHost;
    private String mailServerPort = "25";
    /**
     * 邮件发送者的地址
     */
    private String fromAddress;
    /**
     * 邮件接收者的地址
     */
    private String toAddress;
    /**
     * 登陆邮件发送服务器的用户名和密码
     */
    private String userName;
    private String password;
    /**
     * 是否需要身份验证
     */
    private boolean validate = false;
    /**
     * 邮件主题
     */
    private String subject;
    /**
     * 邮件的文本内容
     */
    private String content;
    /**
     * 邮件附件的文件名
     */
    private String[] attachFileNames;

    /**
     * 获得邮件会话属性
     */
    public Properties getProperties() {
        Properties p = new Properties();
        p.put("mail.smtp.host", this.mailServerHost);
        p.put("mail.smtp.port", this.mailServerPort);
        p.put("mail.smtp.auth", validate ? "true" : "false");
        return p;
    }

    public String getMailServerHost() {
        return mailServerHost;
    }

    public void setMailServerHost(String mailServerHost) {
        this.mailServerHost = mailServerHost;
    }

    public String getMailServerPort() {
        return mailServerPort;
    }

    public void setMailServerPort(String mailServerPort) {
        this.mailServerPort = mailServerPort;
    }

    public boolean isValidate() {
        return validate;
    }

    public void setValidate(boolean validate) {
        this.validate = validate;
    }

    public String[] getAttachFileNames() {
        return attachFileNames;
    }

    public void setAttachFileNames(String[] fileNames) {
        this.attachFileNames = fileNames;
    }

    public String getFromAddress() {
        return fromAddress;
    }

    public void setFromAddress(String fromAddress) {
        this.fromAddress = fromAddress;
    }

    public String getPassword() {
        return password;
    }

    public void setPassword(String password) {
        this.password = password;
    }

    public String getToAddress() {
        return toAddress;
    }

    public void setToAddress(String toAddress) {
        this.toAddress = toAddress;
    }

    public String getUserName() {
        return userName;
    }

    public void setUserName(String userName) {
        this.userName = userName;
    }

    public String getSubject() {
        return subject;
    }

    public void setSubject(String subject) {
        this.subject = subject;
    }

    public String getContent() {
        return content;
    }

    public void setContent(String textContent) {
        this.content = textContent;
    }
}구성하기 3. 이메일 발신자 구축
package com.example.demo.comment.sendemail;
import java.util.Date;
import java.util.Properties;
import javax.mail.Address;
import javax.mail.BodyPart;
import javax.mail.Message;
import javax.mail.MessagingException;
import javax.mail.Multipart;
import javax.mail.Session;
import javax.mail.Transport;
import javax.mail.internet.InternetAddress;
import javax.mail.internet.MimeBodyPart;
import javax.mail.internet.MimeMessage;
import javax.mail.internet.MimeMultipart;

/**
 * 简单邮件(不带附件的邮件)发送器
 */
public class SimpleMailSender  {
    /**
     * 以文本格式发送邮件
     * @param mailInfo 待发送的邮件的信息
     */
    public static boolean sendTextMail(MailSenderInfo mailInfo) {
        // 判断是否需要身份认证
        MyAuthenticator authenticator = null;
        Properties pro = mailInfo.getProperties();
        if (mailInfo.isValidate()) {
            // 如果需要身份认证,则创建一个密码验证器
            authenticator = new MyAuthenticator(mailInfo.getUserName(), mailInfo.getPassword());
        }
        // 根据邮件会话属性和密码验证器构造一个发送邮件的session
        Session sendMailSession = Session.getDefaultInstance(pro,authenticator);
        try {
            // 根据session创建一个邮件消息
            Message mailMessage = new MimeMessage(sendMailSession);
            // 创建邮件发送者地址
            Address from = new InternetAddress(mailInfo.getFromAddress());
            // 设置邮件消息的发送者
            mailMessage.setFrom(from);
            // 创建邮件的接收者地址,并设置到邮件消息中
            Address to = new InternetAddress(mailInfo.getToAddress());
            mailMessage.setRecipient(Message.RecipientType.TO,to);
            // 设置邮件消息的主题
            mailMessage.setSubject(mailInfo.getSubject());
            // 设置邮件消息发送的时间
            mailMessage.setSentDate(new Date());
            // 设置邮件消息的主要内容
            String mailContent = mailInfo.getContent();
            mailMessage.setText(mailContent);
            // 发送邮件
            Transport.send(mailMessage);
            return true;
        } catch (MessagingException ex) {
            ex.printStackTrace();
        }
        return false;
    }

    /**
     * 以HTML格式发送邮件
     * @param mailInfo 待发送的邮件信息
     */
    public static boolean sendHtmlMail(MailSenderInfo mailInfo){
        // 判断是否需要身份认证
        MyAuthenticator authenticator = null;
        Properties pro = mailInfo.getProperties();
        //如果需要身份认证,则创建一个密码验证器
        if (mailInfo.isValidate()) {
            authenticator = new MyAuthenticator(mailInfo.getUserName(), mailInfo.getPassword());
        }
        // 根据邮件会话属性和密码验证器构造一个发送邮件的session
        Session sendMailSession = Session.getDefaultInstance(pro,authenticator);
        try {
            // 根据session创建一个邮件消息
            Message mailMessage = new MimeMessage(sendMailSession);
            // 创建邮件发送者地址
            Address from = new InternetAddress(mailInfo.getFromAddress());
            // 设置邮件消息的发送者
            mailMessage.setFrom(from);
            // 创建邮件的接收者地址,并设置到邮件消息中
            Address to = new InternetAddress(mailInfo.getToAddress());
            // Message.RecipientType.TO属性表示接收者的类型为TO
            mailMessage.setRecipient(Message.RecipientType.TO,to);
            // 设置邮件消息的主题
            mailMessage.setSubject(mailInfo.getSubject());
            // 设置邮件消息发送的时间
            mailMessage.setSentDate(new Date());
            // MiniMultipart类是一个容器类,包含MimeBodyPart类型的对象
            Multipart mainPart = new MimeMultipart();
            // 创建一个包含HTML内容的MimeBodyPart
            BodyPart html = new MimeBodyPart();
            // 设置HTML内容
            html.setContent(mailInfo.getContent(), "text/html; charset=utf-8");
            mainPart.addBodyPart(html);
            // 将MiniMultipart对象设置为邮件内容
            mailMessage.setContent(mainPart);
            // 发送邮件
            Transport.send(mailMessage);
            return true;
        } catch (MessagingException ex) {
            ex.printStackTrace();
        }
        return false;
    }
}4. 비밀번호 검사기 만들기
package com.example.demo.comment.sendemail;
import javax.mail.*;

/**
 * @author 860118060
 */
public class MyAuthenticator extends Authenticator{
    String userName=null;
    String password=null;

    public MyAuthenticator(){
    }
    public MyAuthenticator(String username, String password) {
        this.userName = username;
        this.password = password;
    }

    @Override
    protected PasswordAuthentication getPasswordAuthentication(){
        return new PasswordAuthentication(userName, password);
    }
}이제 준비작업이 완료되었으니 어떻게 호출하는지 살펴보겠습니다
5. 데모
package com.example.demo.comment.sendemail;

public class SendEmailDemo {
    public static void main(String[] args){
        //这个类主要是设置邮件
        MailSenderInfo mailInfo = new MailSenderInfo();
        mailInfo.setMailServerHost("smtp.163.com");
        mailInfo.setMailServerPort("25");
        mailInfo.setValidate(true);
        // 发送方邮箱
        mailInfo.setUserName("xxxxxxxx@163.com");
        // 发送方邮箱密码
        mailInfo.setPassword("xxxxxxxx");
        // 发送方邮箱
        mailInfo.setFromAddress("xxxxxxxx@163.com");
        // 接收方邮箱
        mailInfo.setToAddress("xxxxxxxx@qq.com");
        // 邮件标题
        mailInfo.setSubject("测试用邮箱发送邮件");
        // 邮件内容
        mailInfo.setContent("<h2>邮件内容非常丰富<h2>");

        //发送文体格式
        SimpleMailSender.sendTextMail(mailInfo);
        //发送html格式
        SimpleMailSender.sendHtmlMail(mailInfo);
    }
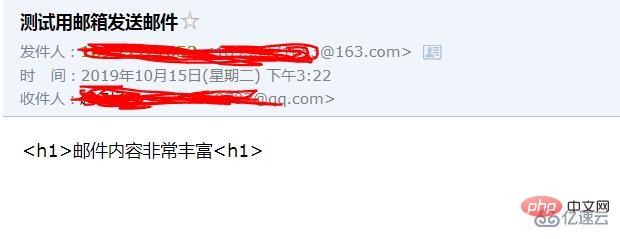
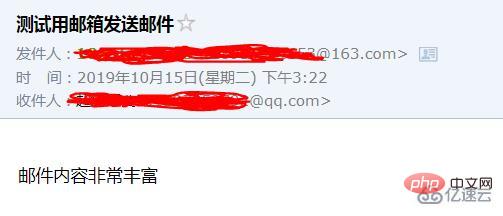
}에 전화하세요. 다음은 두 가지 이메일 전송 형식입니다


아무 문제가 없으면 두 개의 이메일이 성공적으로 전송되어야 합니다. 그러나 모든 문제가 실패할 수 있는지 분석해 보겠습니다.
1.mailInfo.setMailServerHost("smtp.163.com"); mailInfo.setFromAddress("xxxxxxxx@163.com");. 즉, 163smtp 서버를 사용하는 경우 이메일 주소는 163 이메일 주소여야 합니다. 그렇지 않으면 이메일이 성공적으로 전송되지 않습니다.
2. 방금 등록한 이메일 주소를 프로그램에서 이메일을 보내는 데 사용하지 마십시오. 163 이메일 주소가 방금 등록된 경우에는 "smtp.163.com"을 사용하지 마십시오. 발송할 수 없기 때문입니다. 방금 등록한 이메일은 이러한 권한을 부여하지 않으므로 인증을 통과할 수 없습니다. 자주 사용하는 이메일 주소와 오랫동안 사용하는 이메일 주소를 사용하세요
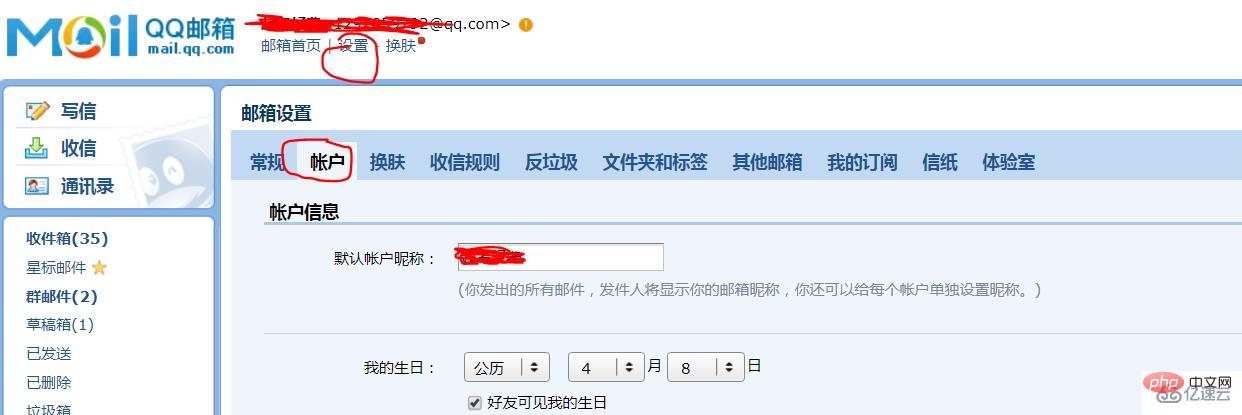
3. QQ 메일함은 발신자로서 인증 확인이 필요할 수 있습니다.
승인은 다음과 같습니다:
설정에서 계정을 찾고 아래로 스크롤하여 프롬프트를 찾아 따라 인증을 활성화한 다음 획득한 인증 코드를 이메일 비밀번호로 사용하여 이메일을 성공적으로 보내세요

마지막으로 자주 사용하는 이메일 주소를 첨부해 주세요:
일반적으로 사용되는 이메일 서버(SMTP, POP3) 주소 및 포트
sina.com:
POP3 서버 주소: pop3.sina.com.cn (포트: 110) SMTP 서버 주소: smtp.sina.com.cn (포트: 25)
시나VIP:
POP3 서버: pop3.vip.sina.com (포트: 110) SMTP 서버: smtp.vip.sina.com (포트: 25)
sohu.com:
POP3 서버 주소: pop3.sohu.com (포트: 110) SMTP 서버 주소: smtp.sohu.com (포트: 25)
126 이메일:
POP3 서버 주소: pop.126.com(포트: 110) SMTP 서버 주소: smtp.126.com(포트: 25)
139 이메일:
POP3 서버 주소: POP.139.com (포트: 110) SMTP 서버 주소: SMTP.139.com (포트: 25)
163.com:
POP3 서버 주소: pop.163.com (포트: 110) SMTP 서버 주소: smtp.163.com (포트: 25)
QQ 메일함
POP3 서버 주소: pop.qq.com (포트: 110)
SMTP 서버 주소: smtp.qq.com (포트: 25)
QQ 비즈니스 이메일
POP3 서버 주소: pop.exmail.qq.com (SSL 활성화 포트: 995) SMTP 서버 주소: smtp.exmail.qq.com (SSL 활성화 포트: 587/465)
yahoo.com:
POP3 서버 주소: pop.mail.yahoo.com SMTP 서버 주소: smtp.mail.yahoo.com
yahoo.com.cn:
POP3 서버 주소: pop.mail.yahoo.com.cn (포트: 995) SMTP 서버 주소: smtp.mail.yahoo.com.cn (포트: 587
핫메일
POP3 서버 주소: pop3.live.com (포트: 995) SMTP 서버 주소: smtp.live.com (포트: 587)
지메일(google.com)
POP3 서버 주소: pop.gmail.com (SSL 활성화, 포트: 995) SMTP 서버 주소: smtp.gmail.com (SSL 활성화, 포트: 587)
263.net:
POP3 서버 주소: pop3.263.net (포트: 110) SMTP 서버 주소: smtp.263.net (포트: 25)
263.net.cn:
POP3 서버 주소: pop.263.net.cn (포트: 110) SMTP 서버 주소: smtp.263.net.cn (포트: 25)
x263.net:
POP3 서버 주소: pop.x263.net (포트: 110) SMTP 서버 주소: smtp.x263.net (포트: 25)
21cn.com:
POP3 서버 주소: pop.21cn.com(포트: 110) SMTP 서버 주소: smtp.21cn.com(포트: 25)
폭스메일:
POP3 서버 주소: POP.foxmail.com(포트: 110) SMTP 서버 주소: SMTP.foxmail.com(포트: 25)
china.com:
POP3 서버 주소: pop.china.com (포트: 110) SMTP 서버 주소: smtp.china.com (포트: 25)
tom.com:
POP3 서버 주소: pop.tom.com(포트: 110) SMTP 서버 주소: smtp.tom.com(포트: 25)
etang.com:
POP3 서버 주소: pop.etang.com SMTP 서버 주소: smtp.etang.com
위 내용은 Java를 사용하여 이메일을 보내는 방법의 상세 내용입니다. 자세한 내용은 PHP 중국어 웹사이트의 기타 관련 기사를 참조하세요!