

Java8 CompletableFuture는 비동기 다중 스레드 프로그래밍을 어떻게 구현합니까?

1. Future의 예시 검토
일부 비즈니스 시나리오에서는 작업 실행 속도를 높이기 위해 다중 스레드를 사용하여 작업을 비동기적으로 실행해야 합니다.
JDK5는 비동기 계산 결과를 설명하는 데 사용되는 새로운 Future 인터페이스를 추가합니다.
Future 및 관련 사용 방법은 작업을 비동기적으로 실행할 수 있는 기능을 제공하지만 결과를 얻는 것은 매우 불편합니다. Future.get()을 사용하여 호출 스레드를 차단하거나 폴링을 사용하여 작업이 Future.isDone인지 확인해야 합니다. 끝났으니 결과를 받아보세요.
두 가지 처리 방법 모두 그다지 우아하지 않습니다.
    @Test
    public void testFuture() throws ExecutionException, InterruptedException {
        ExecutorService executorService = Executors.newFixedThreadPool(5);
        Future<String> future = executorService.submit(() -> {
            Thread.sleep(2000);
            return "hello";
        });
        System.out.println(future.get());
        System.out.println("end");
}동시에 Future는 여러 비동기 작업이 서로 의존해야 하는 시나리오를 해결할 수 없습니다. 스레드는 하위 스레드 작업이 완료될 때까지 기다려야 합니다. 이때 "CountDownLatch"를 생각할 수 있습니다. 예, 코드는 다음과 같습니다.
여기서 두 개의 Future가 정의됩니다. 첫 번째는 사용자 ID를 통해 사용자 정보를 얻고, 두 번째는 제품 ID를 통해 제품 정보를 얻습니다.
    @Test
    public void testCountDownLatch() throws InterruptedException, ExecutionException {
        ExecutorService executorService = Executors.newFixedThreadPool(5);
        CountDownLatch downLatch = new CountDownLatch(2);
        long startTime = System.currentTimeMillis();
        Future<String> userFuture = executorService.submit(() -> {
            //模拟查询商品耗时500毫秒
            Thread.sleep(500);
            downLatch.countDown();
            return "用户A";
        });

        Future<String> goodsFuture = executorService.submit(() -> {
            //模拟查询商品耗时500毫秒
            Thread.sleep(400);
            downLatch.countDown();
            return "商品A";
        });

        downLatch.await();
        //模拟主程序耗时时间
        Thread.sleep(600);
        System.out.println("获取用户信息:" + userFuture.get());
        System.out.println("获取商品信息:" + goodsFuture.get());
        System.out.println("总共用时" + (System.currentTimeMillis() - startTime) + "ms");

}「실행 결과」
사용자 정보 가져오기: 사용자 A
상품 정보 가져오기: 제품 A
총 시간은 1110ms
실행 결과를 보면 결과가 나온 것을 알 수 있고, 비동기 작업을 사용하지 않으면 실행 시간은 500+400+600 = 1500이어야 합니다. 비동기 작업을 사용한 후에는 실제로 1110만 사용됩니다.
하지만 Java8 이후에는 이것이 더 이상 우아한 솔루션이라고 생각하지 않습니다. 다음으로 CompletableFuture의 사용에 대해 알아 보겠습니다.
2. CompletableFuture를 통해 위 예시를 구현
    @Test
    public void testCompletableInfo() throws InterruptedException, ExecutionException {
        long startTime = System.currentTimeMillis();

        //调用用户服务获取用户基本信息
        CompletableFuture<String> userFuture = CompletableFuture.supplyAsync(() ->
                //模拟查询商品耗时500毫秒
        {
            try {
                Thread.sleep(500);
            } catch (InterruptedException e) {
                e.printStackTrace();
            }
            return "用户A";
        });

        //调用商品服务获取商品基本信息
        CompletableFuture<String> goodsFuture = CompletableFuture.supplyAsync(() ->
                //模拟查询商品耗时500毫秒
        {
            try {
                Thread.sleep(400);
            } catch (InterruptedException e) {
                e.printStackTrace();
            }
            return "商品A";
        });

        System.out.println("获取用户信息:" + userFuture.get());
        System.out.println("获取商品信息:" + goodsFuture.get());

        //模拟主程序耗时时间
        Thread.sleep(600);
        System.out.println("总共用时" + (System.currentTimeMillis() - startTime) + "ms");
}실행 결과
사용자 정보 가져오기: 사용자 A
제품 정보 가져오기: 제품 A
총 시간은 1112ms
CompletableFuture를 통해 쉽게 CountDownLatch 기능을 구현할 수 있으며, 당신은 이것이 끝이라고 생각합니다. 그보다 훨씬 더 CompletableFuture는 이것보다 훨씬 낫습니다.
예를 들어, 태스크 1이 실행된 후 태스크 2가 실행되거나 태스크 1의 실행 결과도 태스크 2의 입력 매개변수 및 기타 강력한 기능으로 사용될 수 있습니다. CompletableFuture의 API를 배워보겠습니다. .
3. CompletableFuture 생성 방법
3.1.4 일반적으로 사용되는 생성 방법
CompletableFuture 소스 코드에는 비동기 작업을 수행하는 4가지 정적 메서드가 있습니다.
public static <U> CompletableFuture<U> supplyAsync(Supplier<U> supplier){..}
public static <U> CompletableFuture<U> supplyAsync(Supplier<U> supplier,Executor executor){..}
public static CompletableFuture<Void> runAsync(Runnable runnable){..}
public static CompletableFuture<Void> runAsync(Runnable runnable,Executor executor){..}일반적으로 우리는 CompletableFuture를 생성하기 위해 위의 정적 메서드를 사용합니다. 차이점은 다음과 같습니다.
"supplyAsync" 작업을 실행하고 반환 값을 지원합니다.
「runAsync」는 작업을 실행하며 반환 값이 없습니다.
3.1.1, "supplyAsync method"
//使用默认内置线程池ForkJoinPool.commonPool(),根据supplier构建执行任务
public static <U> CompletableFuture<U> supplyAsync(Supplier<U> supplier)
//自定义线程,根据supplier构建执行任务
public static <U> CompletableFuture<U> supplyAsync(Supplier<U> supplier, Executor executor)
3.1.2, "runAsync method"
//使用默认内置线程池ForkJoinPool.commonPool(),根据runnable构建执行任务
public static CompletableFuture<Void> runAsync(Runnable runnable)
//自定义线程,根据runnable构建执行任务
public static CompletableFuture<Void> runAsync(Runnable runnable,  Executor executor)
3.2, 결과를 얻는 4가지 방법
CompltableFuture 클래스는 결과를 얻는 4가지 방법을 제공합니다
//方式一
public T get()
//方式二
public T get(long timeout, TimeUnit unit)
//方式三
public T getNow(T valueIfAbsent)
//方式四
public T join()
설명:
「get() 및 get(long timeout, TimeUnit 단위)」 => 미래에는 이미 제공됩니다. 후자는 지정된 시간 내에 결과를 얻지 못하면 Timeout 예외가 발생합니다.
「getNow」 => 결과 계산이 완료되면 결과를 반환하거나, 계산이 완료되지 않은 경우에는 예외를 반환합니다. valueIfAbsent 값이 반환됩니다
"join" => 메서드에서 예외가 발생하지 않습니다
예: 示例:
    @Test
    public void testCompletableGet() throws InterruptedException, ExecutionException {

        CompletableFuture<String> cp1 = CompletableFuture.supplyAsync(() -> {
            try {
                Thread.sleep(1000);
            } catch (InterruptedException e) {
                e.printStackTrace();
            }
            return "商品A";
        });

        // getNow方法测试
        System.out.println(cp1.getNow("商品B"));

        //join方法测试
        CompletableFuture<Integer> cp2 = CompletableFuture.supplyAsync((() -> 1 / 0));
        System.out.println(cp2.join());
        System.out.println("-----------------------------------------------------");
        //get方法测试
        CompletableFuture<Integer> cp3 = CompletableFuture.supplyAsync((() -> 1 / 0));
        System.out.println(cp3.get());
}「运行结果」:
第一个执行结果为 「商品B」,因为要先睡上1秒结果不能立即获取
join方法获取结果方法里不会抛异常,但是执行结果会抛异常,抛出的异常为CompletionException
get方法获取结果方法里将抛出异常,执行结果抛出的异常为ExecutionException
4、异步回调方法
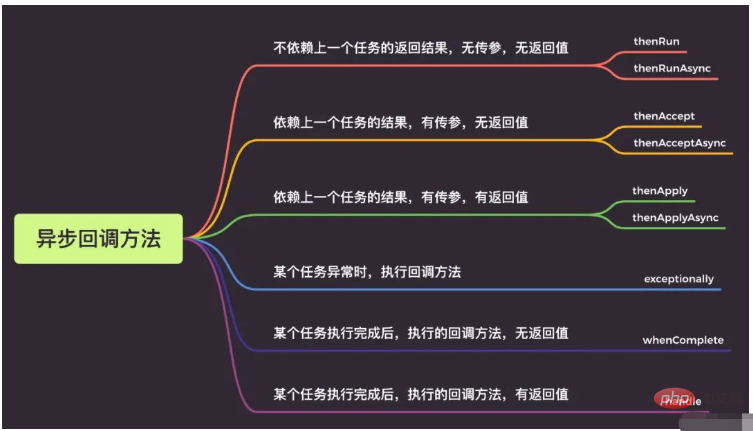
4.1、thenRun/thenRunAsync
通俗点讲就是,「做完第一个任务后,再做第二个任务,第二个任务也没有返回值」。
示例
    @Test
    public void testCompletableThenRunAsync() throws InterruptedException, ExecutionException {
        long startTime = System.currentTimeMillis();

        CompletableFuture<Void> cp1 = CompletableFuture.runAsync(() -> {
            try {
                //执行任务A
                Thread.sleep(600);
            } catch (InterruptedException e) {
                e.printStackTrace();
            }

        });

        CompletableFuture<Void> cp2 = cp1.thenRun(() -> {
            try {
                //执行任务B
                Thread.sleep(400);
            } catch (InterruptedException e) {
                e.printStackTrace();
            }
        });

        // get方法测试
        System.out.println(cp2.get());

        //模拟主程序耗时时间
        Thread.sleep(600);
        System.out.println("总共用时" + (System.currentTimeMillis() - startTime) + "ms");
    }

    //运行结果
    /**
     *  null
     *  总共用时1610ms
*/「thenRun 和thenRunAsync有什么区别呢?」
如果你执行第一个任务的时候,传入了一个自定义线程池:
调用thenRun方法执行第二个任务时,则第二个任务和第一个任务是共用同一个线程池。
调用thenRunAsync执行第二个任务时,则第一个任务使用的是你自己传入的线程池,第二个任务使用的是ForkJoin线程池。
说明: 后面介绍的thenAccept和thenAcceptAsync,thenApply和thenApplyAsync等,它们之间的区别也是这个。
4.2、thenAccept/thenAcceptAsync
第一个任务执行完成后,执行第二个回调方法任务,会将该任务的执行结果,作为入参,传递到回调方法中,但是回调方法是没有返回值的。
示例
    @Test
    public void testCompletableThenAccept() throws ExecutionException, InterruptedException {
        long startTime = System.currentTimeMillis();
        CompletableFuture<String> cp1 = CompletableFuture.supplyAsync(() -> {
            return "dev";

        });
        CompletableFuture<Void> cp2 = cp1.thenAccept((a) -> {
            System.out.println("上一个任务的返回结果为: " + a);
        });

        cp2.get();
} @Test
public void testCompletableThenApply() throws ExecutionException, InterruptedException {
CompletableFuture<String> cp1 = CompletableFuture.supplyAsync(() -> {
return "dev";
}).thenApply((a) -> {
if (Objects.equals(a, "dev")) {
return "dev";
}
return "prod";
});
System.out.println("当前环境为:" + cp1.get());
//输出: 当前环境为:dev
}설명: thenAccept와 thenAcceptAsync, 나중에 소개하는 thenApply와 thenApplyAsync의 차이점도 이렇습니다. 🎜🎜4.2, thenAccept/thenAcceptAsync🎜🎜첫 번째 작업 실행이 완료된 후 두 번째 콜백 메서드 작업이 실행됩니다. 🎜작업 실행 결과는 입력 매개변수🎜로 콜백 메서드에 전달되지만 콜백은 메소드가 반환 값이 아닙니다. 🎜🎜예🎜 @Test
public void testCompletableThenAccept() throws ExecutionException, InterruptedException {
long startTime = System.currentTimeMillis();
CompletableFuture<String> cp1 = CompletableFuture.supplyAsync(() -> {
return "dev";
});
CompletableFuture<Void> cp2 = cp1.thenAccept((a) -> {
System.out.println("上一个任务的返回结果为: " + a);
});
cp2.get();
}4.3、 thenApply/thenApplyAsync
表示第一个任务执行完成后,执行第二个回调方法任务,会将该任务的执行结果,作为入参,传递到回调方法中,并且回调方法是有返回值的。
示例
    @Test
    public void testCompletableThenApply() throws ExecutionException, InterruptedException {
        CompletableFuture<String> cp1 = CompletableFuture.supplyAsync(() -> {
            return "dev";

        }).thenApply((a) -> {
            if (Objects.equals(a, "dev")) {
                return "dev";
            }
            return "prod";
        });

        System.out.println("当前环境为:" + cp1.get());

        //输出: 当前环境为:dev
}5、异常回调
当CompletableFuture的任务不论是正常完成还是出现异常它都会调用「whenComplete」这回调函数。
「正常完成」:whenComplete返回结果和上级任务一致,异常为null;
「出现异常」:whenComplete返回结果为null,异常为上级任务的异常;
即调用get()时,正常完成时就获取到结果,出现异常时就会抛出异常,需要你处理该异常。
下面来看看示例
5.1、只用whenComplete
    @Test
    public void testCompletableWhenComplete() throws ExecutionException, InterruptedException {
        CompletableFuture<Double> future = CompletableFuture.supplyAsync(() -> {

            if (Math.random() < 0.5) {
                throw new RuntimeException("出错了");
            }
            System.out.println("正常结束");
            return 0.11;

        }).whenComplete((aDouble, throwable) -> {
            if (aDouble == null) {
                System.out.println("whenComplete aDouble is null");
            } else {
                System.out.println("whenComplete aDouble is " + aDouble);
            }
            if (throwable == null) {
                System.out.println("whenComplete throwable is null");
            } else {
                System.out.println("whenComplete throwable is " + throwable.getMessage());
            }
        });
        System.out.println("最终返回的结果 = " + future.get());
}正常完成,没有异常时:
正常结束
whenComplete aDouble is 0.11
whenComplete throwable is null
最终返回的结果 = 0.11
出现异常时:get()会抛出异常
whenComplete aDouble is null
whenComplete throwable is java.lang.RuntimeException: 出错了
java.util.concurrent.ExecutionException: java.lang.RuntimeException: 出错了
at java.util.concurrent.CompletableFuture.reportGet(CompletableFuture.java:357)
at java.util.concurrent.CompletableFuture.get(CompletableFuture.java:1895)
5.2、whenComplete + exceptionally示例
    @Test
    public void testWhenCompleteExceptionally() throws ExecutionException, InterruptedException {
        CompletableFuture<Double> future = CompletableFuture.supplyAsync(() -> {
            if (Math.random() < 0.5) {
                throw new RuntimeException("出错了");
            }
            System.out.println("正常结束");
            return 0.11;

        }).whenComplete((aDouble, throwable) -> {
            if (aDouble == null) {
                System.out.println("whenComplete aDouble is null");
            } else {
                System.out.println("whenComplete aDouble is " + aDouble);
            }
            if (throwable == null) {
                System.out.println("whenComplete throwable is null");
            } else {
                System.out.println("whenComplete throwable is " + throwable.getMessage());
            }
        }).exceptionally((throwable) -> {
            System.out.println("exceptionally中异常:" + throwable.getMessage());
            return 0.0;
        });

        System.out.println("最终返回的结果 = " + future.get());
}当出现异常时,exceptionally中会捕获该异常,给出默认返回值0.0。
whenComplete aDouble is null
whenComplete throwable is java.lang.RuntimeException: 出错了
exceptionally中异常:java.lang.RuntimeException: 出错了
最终返回的结果 = 0.0
6、多任务组合回调
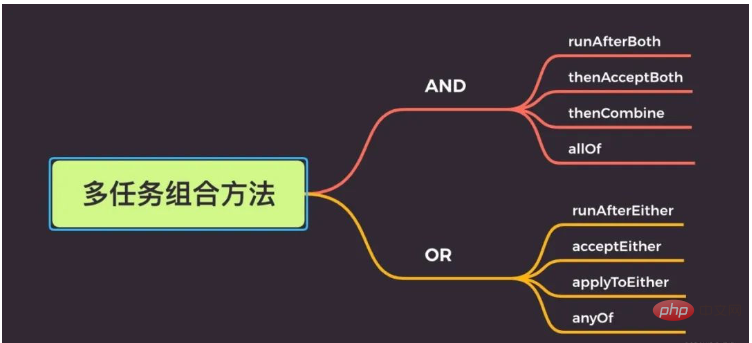
6.1、AND组合关系
thenCombine / thenAcceptBoth / runAfterBoth都表示:「当任务一和任务二都完成再执行任务三」。
区别在于:
「runAfterBoth」 不会把执行结果当做方法入参,且没有返回值
「thenAcceptBoth」: 会将两个任务的执行结果作为方法入参,传递到指定方法中,且无返回值
「thenCombine」:会将两个任务的执行结果作为方法入参,传递到指定方法中,且有返回值
示例
    @Test
    public void testCompletableThenCombine() throws ExecutionException, InterruptedException {
        //创建线程池
        ExecutorService executorService = Executors.newFixedThreadPool(10);
        //开启异步任务1
        CompletableFuture<Integer> task = CompletableFuture.supplyAsync(() -> {
            System.out.println("异步任务1,当前线程是:" + Thread.currentThread().getId());
            int result = 1 + 1;
            System.out.println("异步任务1结束");
            return result;
        }, executorService);

        //开启异步任务2
        CompletableFuture<Integer> task2 = CompletableFuture.supplyAsync(() -> {
            System.out.println("异步任务2,当前线程是:" + Thread.currentThread().getId());
            int result = 1 + 1;
            System.out.println("异步任务2结束");
            return result;
        }, executorService);

        //任务组合
        CompletableFuture<Integer> task3 = task.thenCombineAsync(task2, (f1, f2) -> {
            System.out.println("执行任务3,当前线程是:" + Thread.currentThread().getId());
            System.out.println("任务1返回值:" + f1);
            System.out.println("任务2返回值:" + f2);
            return f1 + f2;
        }, executorService);

        Integer res = task3.get();
        System.out.println("最终结果:" + res);
}「运行结果」
异步任务1,当前线程是:17
异步任务1结束
异步任务2,当前线程是:18
异步任务2结束
执行任务3,当前线程是:19
任务1返回值:2
任务2返回值:2
最终结果:4
6.2、OR组合关系
applyToEither / acceptEither / runAfterEither 都表示:「两个任务,只要有一个任务完成,就执行任务三」。
区别在于:
「runAfterEither」:不会把执行结果当做方法入参,且没有返回值
「acceptEither」: 会将已经执行完成的任务,作为方法入参,传递到指定方法中,且无返回值
「applyToEither」:会将已经执行完成的任务,作为方法入参,传递到指定方法中,且有返回值
示例
    @Test
    public void testCompletableEitherAsync() {
        //创建线程池
        ExecutorService executorService = Executors.newFixedThreadPool(10);
        //开启异步任务1
        CompletableFuture<Integer> task = CompletableFuture.supplyAsync(() -> {
            System.out.println("异步任务1,当前线程是:" + Thread.currentThread().getId());

            int result = 1 + 1;
            System.out.println("异步任务1结束");
            return result;
        }, executorService);

        //开启异步任务2
        CompletableFuture<Integer> task2 = CompletableFuture.supplyAsync(() -> {
            System.out.println("异步任务2,当前线程是:" + Thread.currentThread().getId());
            int result = 1 + 2;
            try {
                Thread.sleep(3000);
            } catch (InterruptedException e) {
                e.printStackTrace();
            }
            System.out.println("异步任务2结束");
            return result;
        }, executorService);

        //任务组合
        task.acceptEitherAsync(task2, (res) -> {
            System.out.println("执行任务3,当前线程是:" + Thread.currentThread().getId());
            System.out.println("上一个任务的结果为:" + res);
        }, executorService);
}运行结果
//通过结果可以看出,异步任务2都没有执行结束,任务3获取的也是1的执行结果
异步任务1,当前线程是:17
异步任务1结束
异步任务2,当前线程是:18
执行任务3,当前线程是:19
上一个任务的结果为:2
注意
如果把上面的核心线程数改为1也就是
ExecutorService executorService = Executors.newFixedThreadPool(1);
运行结果就是下面的了,会发现根本没有执行任务3,显然是任务3直接被丢弃了。
异步任务1,当前线程是:17
异步任务1结束
异步任务2,当前线程是:17
6.3、多任务组合
「allOf」:等待所有任务完成
「anyOf」:只要有一个任务完成
示例
allOf:等待所有任务完成
    @Test
    public void testCompletableAallOf() throws ExecutionException, InterruptedException {
        //创建线程池
        ExecutorService executorService = Executors.newFixedThreadPool(10);
        //开启异步任务1
        CompletableFuture<Integer> task = CompletableFuture.supplyAsync(() -> {
            System.out.println("异步任务1,当前线程是:" + Thread.currentThread().getId());
            int result = 1 + 1;
            System.out.println("异步任务1结束");
            return result;
        }, executorService);

        //开启异步任务2
        CompletableFuture<Integer> task2 = CompletableFuture.supplyAsync(() -> {
            System.out.println("异步任务2,当前线程是:" + Thread.currentThread().getId());
            int result = 1 + 2;
            try {
                Thread.sleep(3000);
            } catch (InterruptedException e) {
                e.printStackTrace();
            }
            System.out.println("异步任务2结束");
            return result;
        }, executorService);

        //开启异步任务3
        CompletableFuture<Integer> task3 = CompletableFuture.supplyAsync(() -> {
            System.out.println("异步任务3,当前线程是:" + Thread.currentThread().getId());
            int result = 1 + 3;
            try {
                Thread.sleep(4000);
            } catch (InterruptedException e) {
                e.printStackTrace();
            }
            System.out.println("异步任务3结束");
            return result;
        }, executorService);

        //任务组合
        CompletableFuture<Void> allOf = CompletableFuture.allOf(task, task2, task3);

        //等待所有任务完成
        allOf.get();
        //获取任务的返回结果
        System.out.println("task结果为:" + task.get());
        System.out.println("task2结果为:" + task2.get());
        System.out.println("task3结果为:" + task3.get());
}anyOf: 只要有一个任务完成
    @Test
    public void testCompletableAnyOf() throws ExecutionException, InterruptedException {
        //创建线程池
        ExecutorService executorService = Executors.newFixedThreadPool(10);
        //开启异步任务1
        CompletableFuture<Integer> task = CompletableFuture.supplyAsync(() -> {
            int result = 1 + 1;
            return result;
        }, executorService);

        //开启异步任务2
        CompletableFuture<Integer> task2 = CompletableFuture.supplyAsync(() -> {
            int result = 1 + 2;
            return result;
        }, executorService);

        //开启异步任务3
        CompletableFuture<Integer> task3 = CompletableFuture.supplyAsync(() -> {
            int result = 1 + 3;
            return result;
        }, executorService);

        //任务组合
        CompletableFuture<Object> anyOf = CompletableFuture.anyOf(task, task2, task3);
        //只要有一个有任务完成
        Object o = anyOf.get();
        System.out.println("完成的任务的结果:" + o);
}7、CompletableFuture使用有哪些注意点

CompletableFuture 使我们的异步编程更加便利的、代码更加优雅的同时,我们也要关注下它,使用的一些注意点。
7.1、Future需要获取返回值,才能获取异常信息
    @Test
    public void testWhenCompleteExceptionally() {
        CompletableFuture<Double> future = CompletableFuture.supplyAsync(() -> {
            if (1 == 1) {
                throw new RuntimeException("出错了");
            }
            return 0.11;
        });

        //如果不加 get()方法这一行,看不到异常信息
        //future.get();
}Future需要获取返回值,才能获取到异常信息。如果不加 get()/join()方法,看不到异常信息。
小伙伴们使用的时候,注意一下哈,考虑是否加try...catch...或者使用exceptionally方法。
7.2、CompletableFuture的get()方法是阻塞的
CompletableFuture的get()方法是阻塞的,如果使用它来获取异步调用的返回值,需要添加超时时间。
//反例
 CompletableFuture.get();
//正例
CompletableFuture.get(5, TimeUnit.SECONDS);
7.3、不建议使用默认线程池
CompletableFuture代码中又使用了默认的「ForkJoin线程池」,处理的线程个数是电脑「CPU核数-1」。在大量请求过来的时候,处理逻辑复杂的话,响应会很慢。一般建议使用自定义线程池,优化线程池配置参数。
7.4、自定义线程池时,注意饱和策略
CompletableFuture的get()方法是阻塞的,我们一般建议使用future.get(5, TimeUnit.SECONDS)。并且一般建议使用自定义线程池。
但是如果线程池拒绝策略是DiscardPolicy或者DiscardOldestPolicy,当线程池饱和时,会直接丢弃任务,不会抛弃异常。因此建议,CompletableFuture线程池策略最好使用AbortPolicy,然后耗时的异步线程,做好线程池隔离哈。
위 내용은 Java8 CompletableFuture는 비동기 다중 스레드 프로그래밍을 어떻게 구현합니까?의 상세 내용입니다. 자세한 내용은 PHP 중국어 웹사이트의 기타 관련 기사를 참조하세요!

핫 AI 도구

Undresser.AI Undress
사실적인 누드 사진을 만들기 위한 AI 기반 앱

AI Clothes Remover
사진에서 옷을 제거하는 온라인 AI 도구입니다.

Undress AI Tool
무료로 이미지를 벗다

Clothoff.io
AI 옷 제거제

Video Face Swap
완전히 무료인 AI 얼굴 교환 도구를 사용하여 모든 비디오의 얼굴을 쉽게 바꾸세요!

인기 기사
뜨거운 도구

메모장++7.3.1
사용하기 쉬운 무료 코드 편집기

SublimeText3 중국어 버전
중국어 버전, 사용하기 매우 쉽습니다.

스튜디오 13.0.1 보내기
강력한 PHP 통합 개발 환경

드림위버 CS6
시각적 웹 개발 도구

SublimeText3 Mac 버전
신 수준의 코드 편집 소프트웨어(SublimeText3)


 Java 8 Stream foreach에서 나누거나 돌아 오시겠습니까?
Feb 07, 2025 pm 12:09 PM
Java 8 Stream foreach에서 나누거나 돌아 오시겠습니까?
Feb 07, 2025 pm 12:09 PM
Java 8은 스트림 API를 소개하여 데이터 컬렉션을 처리하는 강력하고 표현적인 방법을 제공합니다. 그러나 스트림을 사용할 때 일반적인 질문은 다음과 같은 것입니다. 기존 루프는 조기 중단 또는 반환을 허용하지만 스트림의 Foreach 메소드는이 방법을 직접 지원하지 않습니다. 이 기사는 이유를 설명하고 스트림 처리 시스템에서 조기 종료를 구현하기위한 대체 방법을 탐색합니다. 추가 읽기 : Java Stream API 개선 스트림 foreach를 이해하십시오 Foreach 메소드는 스트림의 각 요소에서 하나의 작업을 수행하는 터미널 작동입니다. 디자인 의도입니다
 PHP : 웹 개발의 핵심 언어
Apr 13, 2025 am 12:08 AM
PHP : 웹 개발의 핵심 언어
Apr 13, 2025 am 12:08 AM
PHP는 서버 측에서 널리 사용되는 스크립팅 언어이며 특히 웹 개발에 적합합니다. 1.PHP는 HTML을 포함하고 HTTP 요청 및 응답을 처리 할 수 있으며 다양한 데이터베이스를 지원할 수 있습니다. 2.PHP는 강력한 커뮤니티 지원 및 오픈 소스 리소스를 통해 동적 웹 컨텐츠, 프로세스 양식 데이터, 액세스 데이터베이스 등을 생성하는 데 사용됩니다. 3. PHP는 해석 된 언어이며, 실행 프로세스에는 어휘 분석, 문법 분석, 편집 및 실행이 포함됩니다. 4. PHP는 사용자 등록 시스템과 같은 고급 응용 프로그램을 위해 MySQL과 결합 할 수 있습니다. 5. PHP를 디버깅 할 때 error_reporting () 및 var_dump ()와 같은 함수를 사용할 수 있습니다. 6. 캐싱 메커니즘을 사용하여 PHP 코드를 최적화하고 데이터베이스 쿼리를 최적화하며 내장 기능을 사용하십시오. 7
 PHP vs. Python : 차이점 이해
Apr 11, 2025 am 12:15 AM
PHP vs. Python : 차이점 이해
Apr 11, 2025 am 12:15 AM
PHP와 Python은 각각 고유 한 장점이 있으며 선택은 프로젝트 요구 사항을 기반으로해야합니다. 1.PHP는 간단한 구문과 높은 실행 효율로 웹 개발에 적합합니다. 2. Python은 간결한 구문 및 풍부한 라이브러리를 갖춘 데이터 과학 및 기계 학습에 적합합니다.
 PHP 대 기타 언어 : 비교
Apr 13, 2025 am 12:19 AM
PHP 대 기타 언어 : 비교
Apr 13, 2025 am 12:19 AM
PHP는 특히 빠른 개발 및 동적 컨텐츠를 처리하는 데 웹 개발에 적합하지만 데이터 과학 및 엔터프라이즈 수준의 애플리케이션에는 적합하지 않습니다. Python과 비교할 때 PHP는 웹 개발에 더 많은 장점이 있지만 데이터 과학 분야에서는 Python만큼 좋지 않습니다. Java와 비교할 때 PHP는 엔터프라이즈 레벨 애플리케이션에서 더 나빠지지만 웹 개발에서는 더 유연합니다. JavaScript와 비교할 때 PHP는 백엔드 개발에서 더 간결하지만 프론트 엔드 개발에서는 JavaScript만큼 좋지 않습니다.
 PHP vs. Python : 핵심 기능 및 기능
Apr 13, 2025 am 12:16 AM
PHP vs. Python : 핵심 기능 및 기능
Apr 13, 2025 am 12:16 AM
PHP와 Python은 각각 고유 한 장점이 있으며 다양한 시나리오에 적합합니다. 1.PHP는 웹 개발에 적합하며 내장 웹 서버 및 풍부한 기능 라이브러리를 제공합니다. 2. Python은 간결한 구문과 강력한 표준 라이브러리가있는 데이터 과학 및 기계 학습에 적합합니다. 선택할 때 프로젝트 요구 사항에 따라 결정해야합니다.
 PHP의 영향 : 웹 개발 및 그 이상
Apr 18, 2025 am 12:10 AM
PHP의 영향 : 웹 개발 및 그 이상
Apr 18, 2025 am 12:10 AM
phphassignificallyimpactedwebdevelopmentandextendsbeyondit
 캡슐의 양을 찾기위한 Java 프로그램
Feb 07, 2025 am 11:37 AM
캡슐의 양을 찾기위한 Java 프로그램
Feb 07, 2025 am 11:37 AM
캡슐은 3 차원 기하학적 그림이며, 양쪽 끝에 실린더와 반구로 구성됩니다. 캡슐의 부피는 실린더의 부피와 양쪽 끝에 반구의 부피를 첨가하여 계산할 수 있습니다. 이 튜토리얼은 다른 방법을 사용하여 Java에서 주어진 캡슐의 부피를 계산하는 방법에 대해 논의합니다. 캡슐 볼륨 공식 캡슐 볼륨에 대한 공식은 다음과 같습니다. 캡슐 부피 = 원통형 볼륨 2 반구 볼륨 안에, R : 반구의 반경. H : 실린더의 높이 (반구 제외). 예 1 입력하다 반경 = 5 단위 높이 = 10 단위 산출 볼륨 = 1570.8 입방 단위 설명하다 공식을 사용하여 볼륨 계산 : 부피 = π × r2 × h (4
 PHP : 많은 웹 사이트의 기초
Apr 13, 2025 am 12:07 AM
PHP : 많은 웹 사이트의 기초
Apr 13, 2025 am 12:07 AM
PHP가 많은 웹 사이트에서 선호되는 기술 스택 인 이유에는 사용 편의성, 강력한 커뮤니티 지원 및 광범위한 사용이 포함됩니다. 1) 배우고 사용하기 쉽고 초보자에게 적합합니다. 2) 거대한 개발자 커뮤니티와 풍부한 자원이 있습니다. 3) WordPress, Drupal 및 기타 플랫폼에서 널리 사용됩니다. 4) 웹 서버와 밀접하게 통합하여 개발 배포를 단순화합니다.
