Python을 통해 일괄 데이터 추출을 구현하는 방법
구성 요구 사항
1.ImageMagick
2.tesseract-OCR
3.Python3.7
4.from PIL 가져오기 이미지를 PI
5.import io
6.import os
7.import pyocr .builders
8.from cnocr import CnOcr
9.import xlwt

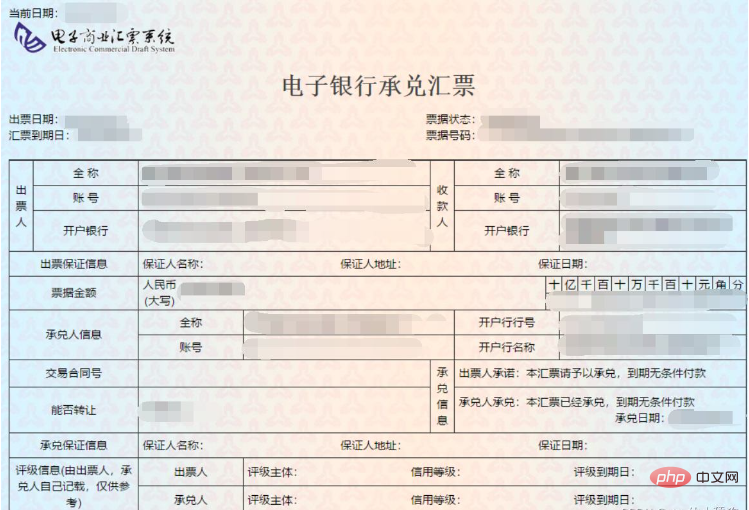
위 사진을 분석해 보니 청구 금액이 "20만 위안"이고, 데이터 금액이 중국어 대문자로 되어 있어서 Excel로 가져오기 전에 먼저 금액 청구서의 데이터를 숫자 형식으로 변환해야 합니다. 이를 기반으로 한자 대문자 및 숫자 변환을 먼저 완료해야 합니다.
def chineseNumber2Int(strNum: str):
    result = 0
    temp = 1  # 存放一个单位的数字如:十万
    count = 0  # 判断是否有chArr
    cnArr = ['壹', '贰', '叁', '肆', '伍', '陆', '柒', '捌', '玖']
    chArr = ['拾', '佰', '仟', '万', '亿']
    for i in range(len(strNum)):
        b = True
        c = strNum[i]
        for j in range(len(cnArr)):
            if c == cnArr[j]:
                if count != 0:
                    result += temp
                    count = 0
                temp = j + 1
                b = False
                break
        if b:
            for j in range(len(chArr)):
                if c == chArr[j]:
                    if j == 0:
                        temp *= 10
                    elif j == 1:
                        temp *= 100
                    elif j == 2:
                        temp *= 1000
                    elif j == 3:
                        temp *= 10000
                    elif j == 4:
                        temp *= 100000000
                count += 1
        if i == len(strNum) - 1:
            result += temp
return result위 코드를 사용하면 대문자와 숫자를 변환할 수 있습니다. 예를 들어 "200000"을 내보내려면 "20,000위안"을 입력한 다음 숫자로 변환하여 테이블 작업을 크게 단순화할 수도 있습니다. 테이블 작업을 완료하는 동안 데이터 보관에 도움이 됩니다.
다음으로 송장 내부 내용을 분석해야 합니다. 아래 그림 분석을 통해 "발행일", "어음 도착일", "어음" 데이터를 얻어야 함을 알 수 있습니다. 번호", "수취인", "청구 금액" 및 "서랍"은 그리기 소프트웨어를 통해 정확하게 위치를 지정할 수 있습니다.

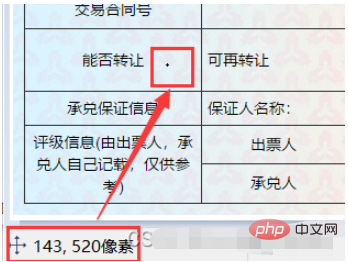
그림에 보이는 작은 검은 점은 마우스가 있는 곳이고, 그리기 소프트웨어의 왼쪽 하단이 마우스의 좌표입니다.

청구서 발행일 추출
def text1(new_img):
    #提取出票日期
    left = 80
    top = 143
    right = 162
    bottom = 162
    image_text1 = new_img.crop((left, top, right, bottom))
    #展示图片
    #image_text1.show()
    txt1 = tool.image_to_string(image_text1)
    print(txt1)
return str(txt1)금액 추출
def text2(new_img):
    #提取金额
    left = 224
    top = 355
    right = 585
    bottom = 380
    image_text2 = new_img.crop((left, top, right, bottom))
    #展示图片
    #image_text2.show()
    image_text2.save("img/tmp.png")
    temp = ocr.ocr("img/tmp.png")
    temp="".join(temp[0])
    txt2=chineseNumber2Int(temp)
    print(txt2)
return txt2서랍 추출
def text3(new_img):
    #提取出票人
    left = 177
    top = 207
    right = 506
    bottom = 231
    image_text3 = new_img.crop((left, top, right, bottom))
    #展示图片
    #image_text3.show()
    image_text3.save("img/tmp.png")
    temp = ocr.ocr("img/tmp.png")
    txt3="".join(temp[0])
    print(txt3)
return txt3결제은행 추출
def text4(new_img):
    #提取付款行
    left = 177
    top = 274
    right = 492
    bottom = 311
    image_text4 = new_img.crop((left, top, right, bottom))
    #展示图片
    #image_text4.show()
    image_text4.save("img/tmp.png")
    temp = ocr.ocr("img/tmp.png")
    txt4="".join(temp[0])
    print(txt4)
return txt4청구서 도착일 추출
def text5(new_img):
    #提取汇票到日期
    left = 92
    top = 166
    right = 176
    bottom = 184
    image_text5 = new_img.crop((left, top, right, bottom))
    #展示图片
    #image_text5.show()
    txt5 = tool.image_to_string(image_text5)
    print(txt5)
return txt5청구서 추출
def text6(new_img):
    #提取票据号码
    left = 598
    top = 166
    right = 870
    bottom = 182
    image_text6 = new_img.crop((left, top, right, bottom))
    #展示图片
    #image_text6.show()
    txt6 = tool.image_to_string(image_text6)
    print(txt6)
return txt6결국 데이터가 추출되었습니다. 그 후 설정 단계에 들어가면 먼저 모든 청구서 파일을 추출하고 해당 파일 이름과 경로를 가져와야 합니다.
ocr=CnOcr()
tool = pyocr.get_available_tools()[0]
filePath='img'
img_name=[]
for i,j,name in os.walk(filePath):
img_name=name완전히 얻은 후 데이터를 Excel로 가져올 수 있습니다.
count=1
book = xlwt.Workbook(encoding='utf-8',style_compression=0)
sheet = book.add_sheet('test',cell_overwrite_ok=True)
for i in img_name:
    img_url = filePath+"/"+i
    with open(img_url, 'rb') as f:
        a = f.read()
    new_img = PI.open(io.BytesIO(a))
    ## 写入csv
    col = ('年份','出票日期','金额','出票人','付款行全称','汇票到日期','备注')
    for j in range(0,7):
        sheet.write(0,j,col[j])
    book.save('1.csv')
    shijian=text1(new_img)
    sheet.write(count,0,shijian[0:4])
    sheet.write(count,1,shijian[5:])
    sheet.write(count,2,text2(new_img))
    sheet.write(count,3,text3(new_img))
    sheet.write(count,4,text4(new_img))
    sheet.write(count,5,text5(new_img))
    sheet.write(count,6,text6(new_img))
count = count + 1이제 모든 과정은 끝났습니다.
첨부된 소스코드는 모두
from  wand.image import  Image
from PIL import Image as PI
import pyocr
import io
import re
import os
import shutil
import pyocr.builders
from cnocr import CnOcr
import requests
import xlrd
import xlwt
from openpyxl import load_workbook

def chineseNumber2Int(strNum: str):
    result = 0
    temp = 1  # 存放一个单位的数字如:十万
    count = 0  # 判断是否有chArr
    cnArr = ['壹', '贰', '叁', '肆', '伍', '陆', '柒', '捌', '玖']
    chArr = ['拾', '佰', '仟', '万', '亿']
    for i in range(len(strNum)):
        b = True
        c = strNum[i]
        for j in range(len(cnArr)):
            if c == cnArr[j]:
                if count != 0:
                    result += temp
                    count = 0
                temp = j + 1
                b = False
                break
        if b:
            for j in range(len(chArr)):
                if c == chArr[j]:
                    if j == 0:
                        temp *= 10
                    elif j == 1:
                        temp *= 100
                    elif j == 2:
                        temp *= 1000
                    elif j == 3:
                        temp *= 10000
                    elif j == 4:
                        temp *= 100000000
                count += 1
        if i == len(strNum) - 1:
            result += temp
    return result


def text1(new_img):
    #提取出票日期

    left = 80
    top = 143
    right = 162
    bottom = 162
    image_text1 = new_img.crop((left, top, right, bottom))
    #展示图片
    #image_text1.show()
    txt1 = tool.image_to_string(image_text1)

    print(txt1)
    return str(txt1)
def text2(new_img):
    #提取金额

    left = 224
    top = 355
    right = 585
    bottom = 380
    image_text2 = new_img.crop((left, top, right, bottom))
    #展示图片
    #image_text2.show()
    image_text2.save("img/tmp.png")

    temp = ocr.ocr("img/tmp.png")

    temp="".join(temp[0])
    txt2=chineseNumber2Int(temp)
    print(txt2)

    return txt2

def text3(new_img):
    #提取出票人

    left = 177
    top = 207
    right = 506
    bottom = 231
    image_text3 = new_img.crop((left, top, right, bottom))
    #展示图片
    #image_text3.show()
    image_text3.save("img/tmp.png")

    temp = ocr.ocr("img/tmp.png")
    txt3="".join(temp[0])

    print(txt3)
    return txt3
def text4(new_img):
    #提取付款行

    left = 177
    top = 274
    right = 492
    bottom = 311
    image_text4 = new_img.crop((left, top, right, bottom))
    #展示图片
    #image_text4.show()
    image_text4.save("img/tmp.png")

    temp = ocr.ocr("img/tmp.png")
    txt4="".join(temp[0])

    print(txt4)
    return txt4
def text5(new_img):
    #提取汇票到日期

    left = 92
    top = 166
    right = 176
    bottom = 184
    image_text5 = new_img.crop((left, top, right, bottom))
    #展示图片
    #image_text5.show()
    txt5 = tool.image_to_string(image_text5)

    print(txt5)
    return txt5
def text6(new_img):
    #提取票据号码

    left = 598
    top = 166
    right = 870
    bottom = 182
    image_text6 = new_img.crop((left, top, right, bottom))
    #展示图片
    #image_text6.show()
    txt6 = tool.image_to_string(image_text6)

    print(txt6)
    return txt6


ocr=CnOcr()

tool = pyocr.get_available_tools()[0]

filePath='img'
img_name=[]
for i,j,name in os.walk(filePath):
    img_name=name
count=1

book = xlwt.Workbook(encoding='utf-8',style_compression=0)
sheet = book.add_sheet('test',cell_overwrite_ok=True)

for i in img_name:
    img_url = filePath+"/"+i
    with open(img_url, 'rb') as f:
        a = f.read()
    new_img = PI.open(io.BytesIO(a))
    ## 写入csv
    col = ('年份','出票日期','金额','出票人','付款行全称','汇票到日期','备注')
    for j in range(0,7):
        sheet.write(0,j,col[j])
    book.save('1.csv')
    shijian=text1(new_img)
    sheet.write(count,0,shijian[0:4])
    sheet.write(count,1,shijian[5:])
    sheet.write(count,2,text2(new_img))
    sheet.write(count,3,text3(new_img))
    sheet.write(count,4,text4(new_img))
    sheet.write(count,5,text5(new_img))
    sheet.write(count,6,text6(new_img))
count = count + 1위 내용은 Python을 통해 일괄 데이터 추출을 구현하는 방법의 상세 내용입니다. 자세한 내용은 PHP 중국어 웹사이트의 기타 관련 기사를 참조하세요!

핫 AI 도구

Undresser.AI Undress
사실적인 누드 사진을 만들기 위한 AI 기반 앱

AI Clothes Remover
사진에서 옷을 제거하는 온라인 AI 도구입니다.

Undress AI Tool
무료로 이미지를 벗다

Clothoff.io
AI 옷 제거제

AI Hentai Generator
AI Hentai를 무료로 생성하십시오.

인기 기사

뜨거운 도구

메모장++7.3.1
사용하기 쉬운 무료 코드 편집기

SublimeText3 중국어 버전
중국어 버전, 사용하기 매우 쉽습니다.

스튜디오 13.0.1 보내기
강력한 PHP 통합 개발 환경

드림위버 CS6
시각적 웹 개발 도구

SublimeText3 Mac 버전
신 수준의 코드 편집 소프트웨어(SublimeText3)

뜨거운 주제
 7450
7450
 15
15
 1374
1374
 52
52
 77
77
 11
11
 40
40
 19
19
 14
14
 8
8
 PS가 계속 로딩을 보여주는 이유는 무엇입니까?
Apr 06, 2025 pm 06:39 PM
PS "로드"문제는 자원 액세스 또는 처리 문제로 인한 것입니다. 하드 디스크 판독 속도는 느리거나 나쁘다 : CrystalDiskinfo를 사용하여 하드 디스크 건강을 확인하고 문제가있는 하드 디스크를 교체하십시오. 불충분 한 메모리 : 고해상도 이미지 및 복잡한 레이어 처리에 대한 PS의 요구를 충족시키기 위해 메모리 업그레이드 메모리. 그래픽 카드 드라이버는 구식 또는 손상됩니다. 운전자를 업데이트하여 PS와 그래픽 카드 간의 통신을 최적화하십시오. 파일 경로는 너무 길거나 파일 이름에는 특수 문자가 있습니다. 짧은 경로를 사용하고 특수 문자를 피하십시오. PS 자체 문제 : PS 설치 프로그램을 다시 설치하거나 수리하십시오.
 PS가 시작될 때 로딩 문제를 해결하는 방법은 무엇입니까?
Apr 06, 2025 pm 06:36 PM
부팅 할 때 "로드"에 PS가 붙어있는 여러 가지 이유로 인해 발생할 수 있습니다. 손상되거나 충돌하는 플러그인을 비활성화합니다. 손상된 구성 파일을 삭제하거나 바꾸십시오. 불충분 한 메모리를 피하기 위해 불필요한 프로그램을 닫거나 메모리를 업그레이드하십시오. 하드 드라이브 독서 속도를 높이기 위해 솔리드 스테이트 드라이브로 업그레이드하십시오. 손상된 시스템 파일 또는 설치 패키지 문제를 복구하기 위해 PS를 다시 설치합니다. 시작 오류 로그 분석의 시작 과정에서 오류 정보를 봅니다.
 PS의 로딩 속도 속도를 높이는 방법?
Apr 06, 2025 pm 06:27 PM
느린 Photoshop 스타트 업 문제를 해결하려면 다음을 포함한 다중 프론트 접근 방식이 필요합니다. 하드웨어 업그레이드 (메모리, 솔리드 스테이트 드라이브, CPU); 구식 또는 양립 할 수없는 플러그인 제거; 정기적으로 시스템 쓰레기 및 과도한 배경 프로그램 청소; 주의를 기울여 관련없는 프로그램 폐쇄; 시작하는 동안 많은 파일을 열지 않도록합니다.
 PS가 파일을 열 때로드 문제를 해결하는 방법은 무엇입니까?
Apr 06, 2025 pm 06:33 PM
"로드"는 PS에서 파일을 열 때 말더듬이 발생합니다. 그 이유에는 너무 크거나 손상된 파일, 메모리 불충분, 하드 디스크 속도가 느리게, 그래픽 카드 드라이버 문제, PS 버전 또는 플러그인 충돌이 포함될 수 있습니다. 솔루션은 다음과 같습니다. 파일 크기 및 무결성 확인, 메모리 증가, 하드 디스크 업그레이드, 그래픽 카드 드라이버 업데이트, 의심스러운 플러그인 제거 또는 비활성화 및 PS를 다시 설치하십시오. 이 문제는 PS 성능 설정을 점차적으로 확인하고 잘 활용하고 우수한 파일 관리 습관을 개발함으로써 효과적으로 해결할 수 있습니다.
 느린 PS로드가 컴퓨터 구성과 관련이 있습니까?
Apr 06, 2025 pm 06:24 PM
PS 로딩이 느린 이유는 하드웨어 (CPU, 메모리, 하드 디스크, 그래픽 카드) 및 소프트웨어 (시스템, 백그라운드 프로그램)의 결합 된 영향 때문입니다. 솔루션에는 하드웨어 업그레이드 (특히 솔리드 스테이트 드라이브 교체), 소프트웨어 최적화 (시스템 쓰레기 청소, 드라이버 업데이트, PS 설정 확인) 및 PS 파일 처리가 포함됩니다. 정기적 인 컴퓨터 유지 보수는 또한 PS 달리기 속도를 향상시키는 데 도움이 될 수 있습니다.
 PS가 항상 로딩되고 있음을 보여줄 때 로딩 문제를 해결하는 방법은 무엇입니까?
Apr 06, 2025 pm 06:30 PM
PS 카드가 "로드"되어 있습니까? 솔루션에는 컴퓨터 구성 (메모리, 하드 디스크, 프로세서) 확인, 하드 디스크 조각 청소, 그래픽 카드 드라이버 업데이트, PS 설정 조정, PS 재설치 및 우수한 프로그래밍 습관 개발이 포함됩니다.
 PDF 수출을 PS에 의해 배치로 내보낼 수 있습니까?
Apr 06, 2025 pm 04:54 PM
PS에서 PDF를 배치로 내보내는 세 가지 방법이 있습니다 : PS 동작 기능 사용 : 파일을 기록하고 열기 및 PDF 작업을 내보내고, 루프에서 동작을 실행합니다. 타사 소프트웨어의 도움으로 : 파일 관리 소프트웨어 또는 자동화 도구를 사용하여 입력 및 출력 폴더를 지정하고 파일 이름 형식을 설정하십시오. 스크립트 사용 : 스크립트를 작성하여 배치 내보내기 로직을 사용자 정의하지만 프로그래밍 지식이 필요합니다.
 PS 페더 링은 어떻게 전환의 부드러움을 제어합니까?
Apr 06, 2025 pm 07:33 PM
깃털 통제의 열쇠는 점진적인 성격을 이해하는 것입니다. PS 자체는 그라디언트 곡선을 직접 제어하는 옵션을 제공하지 않지만 여러 깃털, 일치하는 마스크 및 미세 선택으로 반경 및 구배 소프트를 유연하게 조정하여 자연스럽게 전이 효과를 달성 할 수 있습니다.


