
이전 기사에서는 코딩을 통해 Runnable 인터페이스를 구현하면 지정된 스레드(또는 스레드 풀)에서 실행되는 경계 "작업"을 얻게 된다고 이야기했습니다.
인터페이스를 다시 관찰해보면 메소드 반환 값이 없다는 것을 어렵지 않게 발견할 수 있습니다:
public interface Runnable {
    void run();
}JDK1.5 이전에는 태스크의 실행 결과를 사용하려면 조심스럽게 조작해야 합니다. 임계 섹션 리소스에 액세스하는 스레드입니다. 디커플링을 위해 콜백을 사용하는 것은 매우 좋은 선택입니다. 回调 进行解耦是非常不错的选择。
注意,为了减少篇幅使用了lambda,但jdk1.5之前并不支持lambda
将计算任务分离到其他线程执行,再回到主线程消费结果
我们将计算、IO等耗时任务丢到其他线程,让主线程专注于自身业务,假想它在接受用户输入以及处理反馈,但我们略去这一部分
我们可以设计出类似下面的代码:
虽然它还有很多不合理之处值得优化,但也足以用于演示
class Demo {
    static final Object queueLock = new Object();
    static List<Runnable> mainQueue = new ArrayList<>();
    static boolean running = true;
    static final Runnable FINISH = () -> running = false;
    public static void main(String[] args) {
        synchronized (queueLock) {
            mainQueue.add(Demo::onStart);
        }
        while (running) {
            Runnable runnable = null;
            synchronized (queueLock) {
                if (!mainQueue.isEmpty())
                    runnable = mainQueue.remove(0);
            }
            if (runnable != null) {
                runnable.run();
            }
            Thread.yield();
        }
    }
    public static void onStart() {
        //...
    }
    public static void finish() {
        synchronized (queueLock) {
            mainQueue.clear();
            mainQueue.add(FINISH);
        }
    }
}再模拟一个计算的线程和任务回调:
interface Callback {
    void onResultCalculated(int result);
}
class CalcThread extends Thread {
    private final Callback callback;
    private final int a;
    private final int b;
    public CalcThread(Callback callback, int a, int b) {
        this.callback = callback;
        this.a = a;
        this.b = b;
    }
    @Override
    public void run() {
        super.run();
        try {
            Thread.sleep(10);
        } catch (InterruptedException e) {
            e.printStackTrace();
        }
        final int result = a + b;
        System.out.println("threadId" + Thread.currentThread().getId() + ",calc result:" + result + ";" + System.currentTimeMillis());
        synchronized (queueLock) {
            mainQueue.add(() -> callback.onResultCalculated(result));
        }
    }
}填充一下onStart业务:
class Demo {
    public static void onStart() {
        System.out.println("threadId" + Thread.currentThread().getId() + ",onStart," + System.currentTimeMillis());
        new CalcThread(result -> {
            System.out.println("threadId" + Thread.currentThread().getId() + ",onResultCalculated:" + result + ";" + System.currentTimeMillis());
            finish();
        }, 200, 300).start();
    }
}在前文我们提到,如果业务仅关注任务的执行,并不过于关心线程本身,则可以利用Runnable:
class Demo {
    static class CalcRunnable implements Runnable {
        private final Callback callback;
        private final int a;
        private final int b;
        public CalcRunnable(Callback callback, int a, int b) {
            this.callback = callback;
            this.a = a;
            this.b = b;
        }
        @Override
        public void run() {
            try {
                Thread.sleep(10);
            } catch (InterruptedException e) {
                e.printStackTrace();
            }
            final int result = a + b;
            System.out.println("threadId" + Thread.currentThread().getId() + ",calc result:" + result + ";" + System.currentTimeMillis());
            synchronized (queueLock) {
                mainQueue.add(() -> callback.onResultCalculated(result));
            }
        }
    }
    public static void onStart() {
        System.out.println("threadId" + Thread.currentThread().getId() + ",onStart," + System.currentTimeMillis());
        new Thread(new CalcRunnable(result -> {
            System.out.println("threadId" + Thread.currentThread().getId() + ",onResultCalculated:" + result + ";" + System.currentTimeMillis());
            finish();
        }, 200, 300)).start();
    }
}不难想象出:我们非常需要
让特定线程、特定类型的线程方便地接收任务,回顾本系列文章中的 线程池篇 ,线程池是应运而生
拥有比Synchronize更轻量的机制
拥有更方便的数据结构
至此,我们可以体会到:JDK1.5之前,因为JDK的功能不足,Java程序对于线程的使用 较为粗糙。
终于在JDK1.5中,迎来了新特性: Future 以及先前文章中提到的线程池, 时光荏苒,一晃将近20年了。
/**
* 略
* @since 1.5
* @author Doug Lea
* @param <V> The result type returned by this Future's {@code get} method
*/
public interface Future<V> {
boolean cancel(boolean mayInterruptIfRunning);
boolean isCancelled();
boolean isDone();
V get() throws InterruptedException, ExecutionException;
V get(long timeout, TimeUnit unit)
throws InterruptedException, ExecutionException, TimeoutException;
}尽管已经移除了API注释,但仍然能够理解每个API的含义,不多做赘述。
显而易见,为了增加返回值,没有必要用如此复杂的 接口来替代 Runnable。简单思考后可以对返回值的情况进行归纳:
返回Runnable中业务的结果,例如计算、读取资源等
单纯的在Runnable执行完毕后返回一个结果
从业务层上看,仅需要如下接口即可,它增加了返回值、并可以更友好地让使用者处理异常:
作者按:抛开底层实现,仅看业务方编码需要
public interface Callable<V> {
    /**
     * Computes a result, or throws an exception if unable to do so.
     *
     * @return computed result
     * @throws Exception if unable to compute a result
     */
    V call() throws Exception;
}显然,JDK需要提供后向兼容能力:
Runnable 不能够丢弃,也不应当丢弃
不能要求使用者完全的重构代码
所以一并提供了适配器,让使用者进行简单的局部重构即可用上新特性
static final class RunnableAdapter<T> implements Callable<T> {
    final Runnable task;
    final T result;
    RunnableAdapter(Runnable task, T result) {
        this.task = task;
        this.result = result;
    }
    public T call() {
        task.run();
        return result;
    }
}而Future恰如其名,它代表了在 "未来" 的一个结果和状态,为了更方便地处理异步而生。
并且内置了 FutureTask,在 FutureTask详解 章节中再行展开。
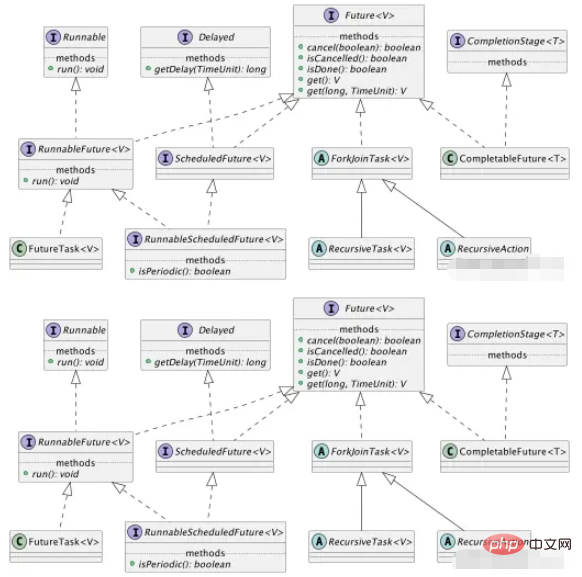
在JDK1.8的基础上,看一下精简的类图结构:
public class FutureTask {
    public FutureTask(Callable<V> callable) {
        if (callable == null)
            throw new NullPointerException();
        this.callable = callable;
        this.state = NEW;       // ensure visibility of callable
    }
    public FutureTask(Runnable runnable, V result) {
        this.callable = Executors.callable(runnable, result);
        this.state = NEW;       // ensure visibility of callable
    }
}public class FutureTask {
//新建
private static final int NEW = 0;
//处理中
private static final int COMPLETING = 1;
//正常
private static final int NORMAL = 2;
//异常
private static final int EXCEPTIONAL = 3;
//已取消
private static final int CANCELLED = 4;
//中断中
private static final int INTERRUPTING = 5;
//已中断
private static final int INTERRUPTED = 6;
}可能的生命周期转换如下:
NEW -> COMPLETING -> NORMAL
NEW -> COMPLETING -> EXCEPTIONAL
NEW -> CANCELLED
NEW -> INTERRUPTING -> INTERRUPTED
JDK中原汁原味的解释如下:
The run state of this task, initially NEW. The run state transitions to a terminal state only in methods set, setException, and cancel. During completion, state may take on transient values of COMPLETING (while outcome is being set) or INTERRUPTING (only while interrupting the runner to satisfy a cancel(true)). Transitions from these intermediate to final states use cheaper ordered/lazy writes because values are unique and cannot be further modified.
本节从以下三块入手阅读源码
状态判断
取消
获取结果
状态判断API的实现非常简单
public class FutureTask {
    public boolean isCancelled() {
        return state >= CANCELLED;
    }
    public boolean isDone() {
        return state != NEW;
    }
}取消:
当前状态为 NEW 且 CAS修改 state 成功,否则返回取消失败
如果 mayInterruptIfRunning
public class FutureTask {
    public boolean cancel(boolean mayInterruptIfRunning) {
        if (!(state == NEW &&
                UNSAFE.compareAndSwapInt(this, stateOffset, NEW,
                        mayInterruptIfRunning ? INTERRUPTING : CANCELLED))) {
            return false;
        }
        try {    // in case call to interrupt throws exception
            if (mayInterruptIfRunning) {
                try {
                    Thread t = runner;
                    if (t != null)
                        t.interrupt();
                } finally { // final state
                    UNSAFE.putOrderedInt(this, stateOffset, INTERRUPTED);
                }
            }
        } finally {
            finishCompletion();
        }
        return true;
    }
    private void finishCompletion() {
        // assert state > COMPLETING;
        for (WaitNode q; (q = waiters) != null; ) {
            if (UNSAFE.compareAndSwapObject(this, waitersOffset, q, null)) {
                for (; ; ) {
                    Thread t = q.thread;
                    if (t != null) {
                        q.thread = null;
                        LockSupport.unpark(t);
                    }
                    WaitNode next = q.next;
                    if (next == null)
                        break;
                    q.next = null; // unlink to help gc
                    q = next;
                }
                break;
            }
        }
        done();
        callable = null;        // to reduce footprint
    }
}public class FutureTask {
public V get() throws InterruptedException, ExecutionException {
int s = state;
if (s <= COMPLETING)
s = awaitDone(false, 0L);
return report(s);
}
public V get(long timeout, TimeUnit unit)
throws InterruptedException, ExecutionException, TimeoutException {
if (unit == null)
throw new NullPointerException();
int s = state;
if (s <= COMPLETING &&
(s = awaitDone(true, unit.toNanos(timeout))) <= COMPLETING)
throw new TimeoutException();
return report(s);
}
private V report(int s) throws ExecutionException {
Object x = outcome;
if (s == NORMAL)
return (V) x;
if (s >= CANCELLED)
throw new CancellationException();
throw new ExecutionException((Throwable) x);
}
}class Demo {
static class CalcResult {
public int result;
}
public static void onStart() {
System.out.println("threadId" + Thread.currentThread().getId() + ",onStart," + System.currentTimeMillis());
final CalcResult calcResult = new CalcResult();
Future<CalcResult> resultFuture = Executors.newSingleThreadExecutor().submit(() -> {
try {
Thread.sleep(10);
} catch (InterruptedException e) {
e.printStackTrace();
}
final int result = 200 + 300;
System.out.println("threadId" + Thread.currentThread().getId() + ",calc result:" + result + ";" + System.currentTimeMillis());
calcResult.result = result;
}, calcResult);
System.out.println("threadId" + Thread.currentThread().getId() + "反正干点什么," + System.currentTimeMillis());
if (resultFuture.isDone()) {
try {
final int ret = resultFuture.get().result;
System.out.println("threadId" + Thread.currentThread().getId() + ",get result:" + ret + ";" + System.currentTimeMillis());
} catch (InterruptedException | ExecutionException e) {
e.printStackTrace();
}
}
finish();
}
}class Demo {
public static void onStart() {
System.out.println("threadId" + Thread.currentThread().getId() + ",onStart," + System.currentTimeMillis());
ExecutorService executor = Executors.newSingleThreadExecutor();
Future<CalcResult> resultFuture = executor.submit(() -> {
try {
Thread.sleep(10);
} catch (InterruptedException e) {
e.printStackTrace();
}
final int result = 200 + 300;
System.out.println("threadId" + Thread.currentThread().getId() + ",calc result:" + result + ";" + System.currentTimeMillis());
final CalcResult calcResult = new CalcResult();
calcResult.result = result;
return calcResult;
});
System.out.println("threadId" + Thread.currentThread().getId() + "反正干点什么," + System.currentTimeMillis());
if (resultFuture.isDone()) {
try {
final int ret = resultFuture.get().result;
System.out.println("threadId" + Thread.currentThread().getId() + ",get result:" + ret + ";" + System.currentTimeMillis());
} catch (InterruptedException | ExecutionException e) {
e.printStackTrace();
}
}
executor.shutdown();
finish();
}
}Future와 이전 기사에서 언급한 스레드 풀을 선보였습니다. 거의 20년이 지났습니다. 🎜rrreee🎜API 주석이 제거되었더라도 세부적으로 들어가지 않고도 각 API의 의미를 이해할 수 있습니다. 🎜🎜분명히 반환 값을 높이기 위해 Runnable을 그렇게 복잡한 인터페이스로 대체할 필요는 없습니다. 간단하게 생각한 후 반환 값을 요약하면 다음과 같습니다. 🎜FutureTask가 내장되어 있으며 이는 FutureTask 세부 설명 장에서 확장될 예정입니다. 🎜 🎜🎜FutureTask 자세한 설명🎜
🎜이 작업의 실행 상태는 처음에는 NEW 실행 상태는 set, setException 및 cancel 메소드에서만 터미널 상태로 전환됩니다. 완료 중에 상태는 COMPLETING(결과가 설정되는 동안) 또는 INTERRUPTING(실행을 중단하는 동안에만)의 일시적인 값을 취할 수 있습니다. cancel(true)) 이러한 중간 상태에서 최종 상태로의 전환은 값이 고유하고 더 이상 수정할 수 없기 때문에 더 저렴한 순서/지연 쓰기를 사용합니다.🎜
NEW이고 CAS는 상태를 성공적으로 수정했으며, 그렇지 않으면 취소 실패를 반환합니다🎜 🎜🎜🎜mayInterruptIfRunning이 실행 스레드를 중단하고 CAS가 이를 수정하는 경우 상태는 INTERRUPTED🎜🎜🎜🎜Call 끝Completion🎜🎜Delete 및 모든 대기 스레드 알림🎜🎜Call done()🎜🎜callable을 null로 설정 🎜public class FutureTask {
public boolean cancel(boolean mayInterruptIfRunning) {
if (!(state == NEW &&
UNSAFE.compareAndSwapInt(this, stateOffset, NEW,
mayInterruptIfRunning ? INTERRUPTING : CANCELLED))) {
return false;
}
try { // in case call to interrupt throws exception
if (mayInterruptIfRunning) {
try {
Thread t = runner;
if (t != null)
t.interrupt();
} finally { // final state
UNSAFE.putOrderedInt(this, stateOffset, INTERRUPTED);
}
}
} finally {
finishCompletion();
}
return true;
}
private void finishCompletion() {
// assert state > COMPLETING;
for (WaitNode q; (q = waiters) != null; ) {
if (UNSAFE.compareAndSwapObject(this, waitersOffset, q, null)) {
for (; ; ) {
Thread t = q.thread;
if (t != null) {
q.thread = null;
LockSupport.unpark(t);
}
WaitNode next = q.next;
if (next == null)
break;
q.next = null; // unlink to help gc
q = next;
}
break;
}
}
done();
callable = null; // to reduce footprint
}
}获取结果: 先判断状态,如果未进入到 COMPLETING(即为NEW状态),则阻塞等待状态改变,返回结果或抛出异常
public class FutureTask {
    public V get() throws InterruptedException, ExecutionException {
        int s = state;
        if (s <= COMPLETING)
            s = awaitDone(false, 0L);
        return report(s);
    }
    public V get(long timeout, TimeUnit unit)
            throws InterruptedException, ExecutionException, TimeoutException {
        if (unit == null)
            throw new NullPointerException();
        int s = state;
        if (s <= COMPLETING &&
                (s = awaitDone(true, unit.toNanos(timeout))) <= COMPLETING)
            throw new TimeoutException();
        return report(s);
    }
    private V report(int s) throws ExecutionException {
        Object x = outcome;
        if (s == NORMAL)
            return (V) x;
        if (s >= CANCELLED)
            throw new CancellationException();
        throw new ExecutionException((Throwable) x);
    }
}而使用则非常简单,也非常的朴素。
我们以文中的的例子进行改造:
沿用原Runnable逻辑
移除回调,增加 CalcResult
将 CalcResult 对象作为既定返回结果,Runnable中设置其属性
class Demo {
   static class CalcResult {
      public int result;
   }
   public static void onStart() {
      System.out.println("threadId" + Thread.currentThread().getId() + ",onStart," + System.currentTimeMillis());
      final CalcResult calcResult = new CalcResult();
      Future<CalcResult> resultFuture = Executors.newSingleThreadExecutor().submit(() -> {
         try {
            Thread.sleep(10);
         } catch (InterruptedException e) {
            e.printStackTrace();
         }
         final int result = 200 + 300;
         System.out.println("threadId" + Thread.currentThread().getId() + ",calc result:" + result + ";" + System.currentTimeMillis());
         calcResult.result = result;
      }, calcResult);
      System.out.println("threadId" + Thread.currentThread().getId() + "反正干点什么," + System.currentTimeMillis());
      if (resultFuture.isDone()) {
         try {
            final int ret = resultFuture.get().result;
            System.out.println("threadId" + Thread.currentThread().getId() + ",get result:" + ret + ";" + System.currentTimeMillis());
         } catch (InterruptedException | ExecutionException e) {
            e.printStackTrace();
         }
      }
      finish();
   }
}如果直接使用新特性Callback,则如下:
直接返回结果,当然也可以直接返回Integer,不再包裹一层
class Demo {
   public static void onStart() {
      System.out.println("threadId" + Thread.currentThread().getId() + ",onStart," + System.currentTimeMillis());
      ExecutorService executor = Executors.newSingleThreadExecutor();
      Future<CalcResult> resultFuture = executor.submit(() -> {
         try {
            Thread.sleep(10);
         } catch (InterruptedException e) {
            e.printStackTrace();
         }
         final int result = 200 + 300;
         System.out.println("threadId" + Thread.currentThread().getId() + ",calc result:" + result + ";" + System.currentTimeMillis());
         final CalcResult calcResult = new CalcResult();
         calcResult.result = result;
         return calcResult;
      });
      System.out.println("threadId" + Thread.currentThread().getId() + "反正干点什么," + System.currentTimeMillis());
      if (resultFuture.isDone()) {
         try {
            final int ret = resultFuture.get().result;
            System.out.println("threadId" + Thread.currentThread().getId() + ",get result:" + ret + ";" + System.currentTimeMillis());
         } catch (InterruptedException | ExecutionException e) {
            e.printStackTrace();
         }
      }
      executor.shutdown();
      finish();
   }
}相信读者诸君会有这样的疑惑:
为何使用Future比原先的回调看起来粗糙?
首先要明确一点:文中前段的回调Demo,虽然达成了既定目标,但效率并不高!!在当时计算很昂贵的背景下,并不会如此莽撞地使用!
而在JDK1.5开始,提供了大量内容支持多线程开发。考虑到篇幅,会在系列文章中逐步展开。
另外,FutureTask中的CAS与Happens-Before本篇中亦不做展开。
接下来,再做一些引申,简单看一看多线程业务模式。
常用的多线程设计模式包括:
Future模式
Master-Worker模式
Guarded Suspension模式
不变模式
生产者-消费
文中对于Future的使用方式遵循了Future模式。
业务方在使用时,已经明确了任务被分离到其他线程执行时有等待期,在此期间,可以干点别的事情,不必浪费系统资源。
在程序系统中设计两类线程,并相互协作:
Master线程(单个)
Worker线程
Master线程负责接受任务、分配任务、接收(必要时进一步组合)结果并返回;
Worker线程负责处理子任务,当子任务处理完成后,向Master线程返回结果;
作者按:此时可再次回想一下文章开头的Demo
使用缓存队列,使得 服务线程/服务进程 在未就绪、忙碌时能够延迟处理请求。
使用等待-通知机制,将消费 服务的返回结果 的方式规范化
在并行开发过程中,为确保数据的一致性和正确性,有必要对对象进行同步,而同步操作会对程序系统的性能产生相当的损耗。
因此,使用状态不可改变的对象,依靠其不变性来确保 并行操作 在 没有同步机制 的情况下,保持一致性和正确性。
对象创建后,其内部状态和数据不再发生改变
对象被共享、被多个线程访问
设计两类线程:若干个生产者线程和若干个消费者线程。
生产者线程负责提交用户请求,消费者线程负责处理用户请求。生产者和消费者之间通过共享内存缓冲区进行通信。
内存缓冲区的意义:
解决是数据在多线程间的共享问题
缓解生产者和消费者之间的性能差
这几种模式从不同角度出发解决特定问题,但亦有一定的相似之处,不再展开。
위 내용은 Java 다중 스레드 Future를 사용하여 비동기 작업을 얻는 방법의 상세 내용입니다. 자세한 내용은 PHP 중국어 웹사이트의 기타 관련 기사를 참조하세요!


![[웹 프런트엔드] Node.js 빠른 시작](https://img.php.cn/upload/course/000/000/067/662b5d34ba7c0227.png)


