

ttkbootstrap을 사용하여 Python GUI를 위한 아름다운 인터페이스를 만드는 방법은 무엇입니까?

이 두 사진은 공식 웹사이트에서 제공되는 디스플레이 렌더링의 스크린샷입니다.

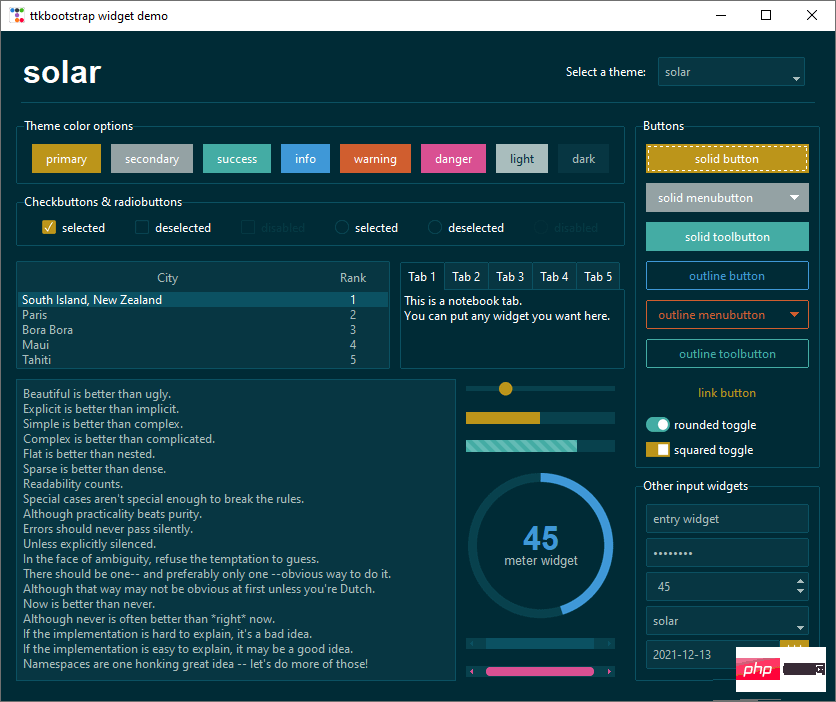
테마 전환
간단한 테마 전환은 현재 창에 구성 요소가 적기 때문에 효과가 뚜렷하지 않습니다. 하지만 구성 요소가 많을 때는 레이아웃이 좋아 보일 때입니다.
import ttkbootstrap as ttk
from ttkbootstrap.constants import *
root = ttk.Window()
style = ttk.Style()
theme_names = style.theme_names()#以列表的形式返回多个主题名
theme_selection = ttk.Frame(root, padding=(10, 10, 10, 0))
theme_selection.pack(fill=X, expand=YES)
lbl = ttk.Label(theme_selection, text="选择主题:")
theme_cbo = ttk.Combobox(
master=theme_selection,
text=style.theme.name,
values=theme_names,
)
theme_cbo.pack(padx=10, side=RIGHT)
theme_cbo.current(theme_names.index(style.theme.name))
lbl.pack(side=RIGHT)
def change_theme(event):
theme_cbo_value = theme_cbo.get()
style.theme_use(theme_cbo_value)
theme_selected.configure(text=theme_cbo_value)
theme_cbo.selection_clear()
theme_cbo.bind('<<ComboboxSelected>>', change_theme)
theme_selected = ttk.Label(
master=theme_selection,
text="litera",
font="-size 24 -weight bold"
)
theme_selected.pack(side=LEFT)
root.mainloop()ttkbootstrap 사용에 대한 간단한 소개
우선, 응용 프로그램 창을 생성하기 위한 인스턴스화에 대해 간략하게 소개합니다.
import ttkbootstrap as ttk
#实例化创建应用程序窗口
root = ttk.Window(
        title="窗口名字",        #设置窗口的标题
        themename="litera",     #设置主题
        size=(1066,600),        #窗口的大小
        position=(100,100),     #窗口所在的位置
        minsize=(0,0),          #窗口的最小宽高
        maxsize=(1920,1080),    #窗口的最大宽高
        resizable=None,         #设置窗口是否可以更改大小
        alpha=1.0,              #设置窗口的透明度(0.0完全透明)
        )
# root.place_window_center()    #让显现出的窗口居中
# root.resizable(False,False)   #让窗口不可更改大小
# root.wm_attributes('-topmost', 1)#让窗口位置其它窗口之上
root.mainloop()태그
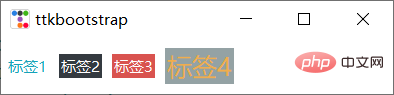
import ttkbootstrap as ttk
from ttkbootstrap.constants import *
root = ttk.Window()
ttk.Label(root,text="标签1",bootstyle=INFO).pack(side=ttk.LEFT, padx=5, pady=10)
ttk.Label(root,text="标签2",boot).pack(side=ttk.LEFT, padx=5, pady=10)
ttk.Label(root,text="标签3",boot).pack(side=ttk.LEFT, padx=5, pady=10)
ttk.Label(root, text="标签4", bootstyle=WARNING, font=("微软雅黑", 15), background='#94a2a4').pack(side=LEFT, padx=5, pady=10)
root.mainloop()
'''
# bootstyle colors
PRIMARY = 'primary'
SECONDARY = 'secondary'
SUCCESS = 'success'
DANGER = 'danger'
WARNING = 'warning'
INFO = 'info'
LIGHT = 'light'
DARK = 'dark'

# bootstyle types
OUTLINE = 'outline'
LINK = 'link'
TOGGLE = 'toggle'
INVERSE = 'inverse'
STRIPED = 'striped'
TOOLBUTTON = 'toolbutton'
ROUND = 'round'
SQUARE = 'square'
'''Button
버튼 스타일:

import ttkbootstrap as ttk
from ttkbootstrap.constants import *
root = ttk.Window()
ttk.Button(root, text="Button 1", bootstyle=SUCCESS).pack(side=LEFT, padx=5, pady=10)
ttk.Button(root, text="Button 2", bootstyle=(INFO, OUTLINE)).pack(side=LEFT, padx=5, pady=10)
ttk.Button(root, text="Button 3", bootstyle=(PRIMARY, "outline-toolbutton")).pack(side=LEFT, padx=5, pady=10)
ttk.Button(root, text="Button 4", boot).pack(side=LEFT, padx=5, pady=10)
ttk.Button(root, text="Button 5", boot).pack(side=LEFT, padx=5, pady=10)
ttk.Button(root, text="Button 6", state="disabled").pack(side=LEFT, padx=5, pady=10) #在禁用状态下创建按钮
root.mainloop()
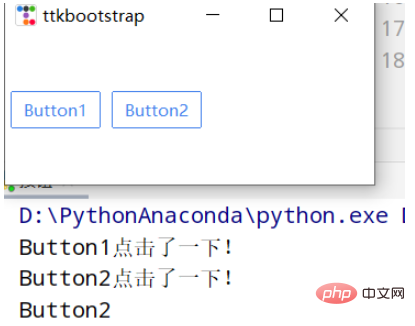
버튼 클릭:
import ttkbootstrap as ttk
from ttkbootstrap.constants import *
root = ttk.Window()
#为按钮添加点击事件
#法一
def button1():
    print("Button1点击了一下!")
ttk.Button(root,text="Button1", bootstyle=(PRIMARY, "outline-toolbutton"),command=button1).pack(side=LEFT, padx=5, pady=10)
#法二
def button2(event): #这里要加一个参数,不然会报错
    print("Button2点击了一下!")
    button_text = event.widget["text"] #得到按钮上的文本
    print(button_text)
b = ttk.Button(root,text="Button2", bootstyle=(PRIMARY, "outline-toolbutton"))
b.pack(side=LEFT, padx=5, pady=10)
b.bind("<Button-1>", button2) #<Button-1>鼠标左键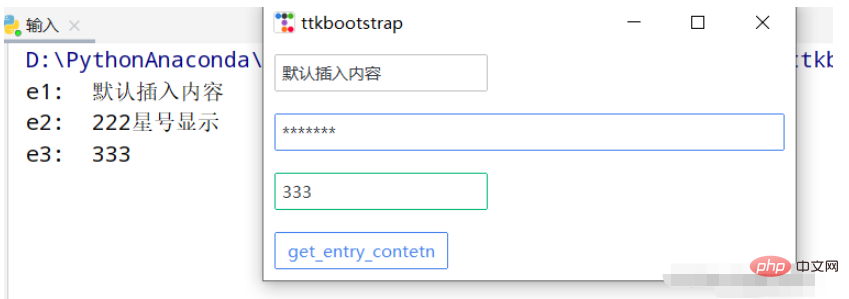
root.mainloop()입력 상자
import ttkbootstrap as ttk
from ttkbootstrap.constants import *
root = ttk.Window()
e1 = ttk.Entry(root,show=None)
e1.insert('0',"默认插入内容")
e1.grid(row=5, column=1, sticky=ttk.W, padx=10,pady=10)
e2 = ttk.Entry(root,show="*",width=50,bootstyle=PRIMARY)
e2.grid(row=10, column=1, sticky=ttk.W, padx=10, pady=10)
e3_content = ttk.StringVar()
e3 = ttk.Entry(root,bootstyle='success', textvariable=e3_content).grid(row=15, column=1, sticky=ttk.W, padx=10, pady=10)
def get_entry_contetn():
    print("e1: ",e1.get())
    print("e2: ",e2.get())
    print("e3: ",e3_content.get())
ttk.Button(root,text="get_entry_contetn", bootstyle=(PRIMARY, "outline-toolbutton"),command=get_entry_contetn).grid(row=20, column=1, sticky=ttk.W, padx=10, pady=10)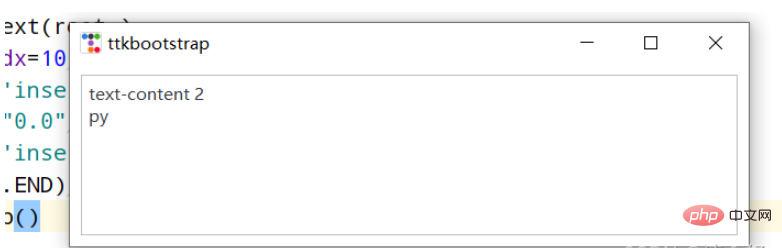
root.mainloop()텍스트 상자
import ttkbootstrap as ttk
from ttkbootstrap.constants import *
root = ttk.Window()
text = ttk.Text(root,)
text.pack(padx=10,pady=10,fill=BOTH)
text.insert('insert','text-content 1') #插入内容
text.delete("0.0",'end') #删除内容
text.insert('insert','text-content 2\npy')
text.see(ttk.END) #光标跟随着插入的内容移动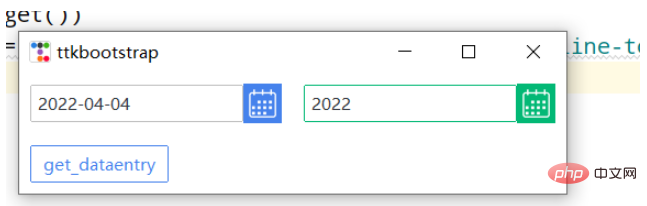
root.mainloop()날짜 입력
import ttkbootstrap as ttk
from ttkbootstrap.constants import *
root = ttk.Window()
de1 = ttk.DateEntry()
de1.grid(row=6, column=1, sticky=ttk.W,padx=10, pady=10)
print(de1.entry.get())

de2 = ttk.DateEntry(boot,dateformat=r"%Y") #r"%Y-%m-%d"
de2.grid(row=6, column=2, sticky=ttk.W,padx=10, pady=10)
def get_dataentry():
    print(de2.entry.get())
ttk.Button(root,text="get_dataentry", bootstyle=(PRIMARY, "outline-toolbutton"),command=get_dataentry).grid(row=20, column=1, sticky=ttk.W, padx=10, pady=10)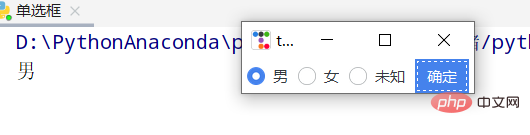
root.mainloop()라디오 버튼
import ttkbootstrap as ttk
root = ttk.Window()
variable_value = ttk.StringVar()
variable_value_dist = {
    "0":"男",
    "1":"女",
    "2":"未知"
}
ttk.Radiobutton(root, text='男', variable=variable_value, value=0).pack(side=ttk.LEFT, padx=5)
ttk.Radiobutton(root, text='女', variable=variable_value, value=1).pack(side=ttk.LEFT, padx=5)
ttk.Radiobutton(root, text='未知', variable=variable_value, value=2).pack(side=ttk.LEFT, padx=5)
def ensure():
    print(variable_value_dist[variable_value.get()])
ttk.Button(text="确定", command=ensure).pack(side=ttk.LEFT, padx=5)
root.mainloop()다중 선택 버튼
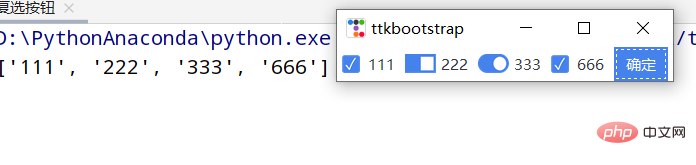
import ttkbootstrap as ttk
root = ttk.Window()
variable_content = [
    [ttk.StringVar(),"111"],
    [ttk.StringVar(),"222"],
    [ttk.StringVar(),"333"],
    [ttk.StringVar(),"666"]
]
ttk.Checkbutton(root, text="111", variable=variable_content[0][0]).pack(side=ttk.LEFT, padx=5)
ttk.Checkbutton(root, text="222", variable=variable_content[1][0], boot).pack(side=ttk.LEFT, padx=5)
ttk.Checkbutton(root, text="333", variable=variable_content[2][0], boot).pack(side=ttk.LEFT, padx=5)
ttk.Checkbutton(root, text="666", variable=variable_content[3][0]).pack(side=ttk.LEFT, padx=5)
def ensure():
    print([v for i, v in variable_content if i.get()])
ttk.Button(text="确定",command=ensure).pack(side=ttk.LEFT, padx=5)
root.mainloop()콤보 상자

import ttkbootstrap as ttk
from ttkbootstrap.constants import *
root = ttk.Window()
cbo = ttk.Combobox(
master=root,
bootstyle = DANGER,
font = ("微软雅黑",12),
values=['content 1', 'content 2', 'content 3'],
)
cbo.current(1) #首先展示values里面索引的对应的值
cbo.pack()
# cbo.set('set other')
def ensure(event):
print(cbo.get())
cbo.bind('<<ComboboxSelected>>', ensure)
root.mainloop()프레임 및 라벨 프레임
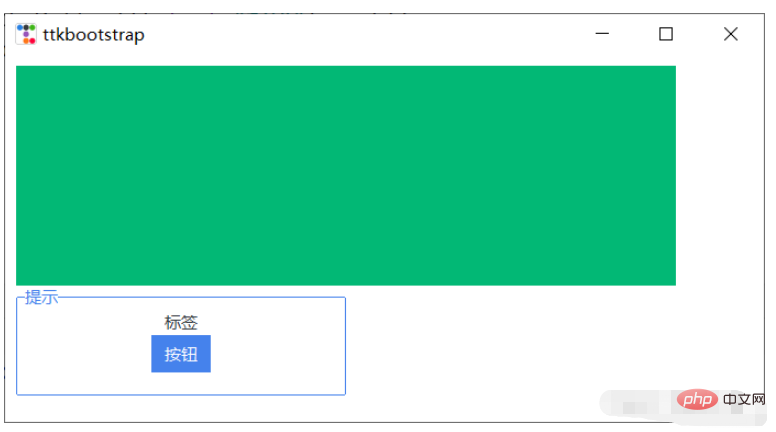
import ttkbootstrap as ttk
from ttkbootstrap.constants import *
root = ttk.Window()
f = ttk.Frame(bootstyle=SUCCESS)
f.place(x=10,y=10,width=600,height=200)

lf = ttk.Labelframe(text="提示",bootstyle=PRIMARY,width=100,height=60)
lf.place(x=10,y=210,width=300,height=100)
ttk.Label(lf,text="标签").pack()
ttk.Button(lf,text="按钮").pack()
root.mainloop()
악기
import psutil,time,threading
import ttkbootstrap as ttk
from ttkbootstrap.constants import *
root = ttk.Window()
ttk.Meter(
        master=root,
        bootstyle=DEFAULT,
        metertype="full",#将仪表显示为一个完整的圆形或半圆形(semi)
        wedgesize=5, #设置弧周围的指示器楔形长度,如果大于 0,则此楔形设置为以当前仪表值为中心的指示器
        amounttotal=50, #仪表的最大值,默认100
        amountused=10, #仪表的当前值
        metersize=200,#仪表大小
        showtext=True, #指示是否在仪表上显示左、中、右文本标签
        interactive=True, #是否可以手动调节数字的大小
        textleft='左边', #插入到中心文本左侧的短字符串
        textright='右边',
        textfont="-size 30", #中间数字大小
        subtext="文本",
        subtextstyle=DEFAULT,
        subtextfont="-size 20",#文本大小
        ).pack(side=ttk.LEFT, padx=5)
def _():
        meter = ttk.Meter(
                metersize=180,
                padding=50,
                amountused=0,
                metertype="semi",
                subtext="当前网速(kB/s)",
                subtext,
                interactive=False,
                bootstyle='primary',
                )
        meter.pack(side=ttk.LEFT, padx=5)
        while True:
                meter.configure(amountused=round(getNet(),2))
def getNet():
    recv_before = psutil.net_io_counters().bytes_recv
    time.sleep(1)
    recv_now = psutil.net_io_counters().bytes_recv
    recv = (recv_now - recv_before)/1024
    return recv

t = threading.Thread(target=_)
t.setDaemon(True)
t.start()
root.mainloop()진행률 표시줄
import time,threading
import ttkbootstrap as ttk
from ttkbootstrap.constants import *
root = ttk.Window(size=(500,380))
def _():
    f = ttk.Frame(root).pack(fill=BOTH, expand=YES)
    p1 = ttk.Progressbar(f, bootstyle=PRIMARY)
    p1.place(x=20, y=20, width=380, height=40)
    p1.start() #间隔默认为50毫秒(20步/秒)
    p2 = ttk.Progressbar(f, bootstyle=INFO,orient=VERTICAL)
    p2.place(x=200, y=100, width=40, height=200)
    p2.step(10) #步长
    while True:
        for i in range(0,50,5):
            p2.step(i) #以步长i增长
            # p2.stop()#停止
            time.sleep(1)
t = threading.Thread(target=_)
t.setDaemon(True)
t.start()
root.mainloop()Scale
import threading,time
import ttkbootstrap as ttk
from ttkbootstrap.constants import *
root = ttk.Window()
ttk.Scale(
    master=root,
    orient=HORIZONTAL,
    value=75,
    from_=0,
    to=100
).pack(fill=X, pady=5, expand=YES)
ttk.Scale(master=root,orient=HORIZONTAL,bootstyle=WARNING,value=75,from_=100,to=0).pack(fill=X, pady=5, expand=YES)
def scale():
    s2 = ttk.Scale(
        master=root,
        bootstyle=SUCCESS,
        orient=VERTICAL,
        value=0,
        from_=100,
        to=0
    )
    s2.pack(fill=X, pady=5, expand=YES)
    for i in range(101):
        s2.configure(value=i)
        time.sleep(0.1)
        # print(s2.get())
t = threading.Thread(target=scale)
t.setDaemon(True)
t.start()
root.mainloop()물 눈금
import ttkbootstrap as ttk
from ttkbootstrap.constants import *
root = ttk.Window()
fg1 = ttk.Floodgauge(
    master=None,
    cursor=None,
    font=None,
    length=None,
    maximum=100,
    mode=DETERMINATE,
    orient=HORIZONTAL,
    bootstyle=PRIMARY,
    takefocus=False,
    text=None,
    value=0,
    mask=None,
)
fg1.pack(side=ttk.LEFT, padx=5)
fg1.start()
fg2 = ttk.Floodgauge(
    master=root,
    boot,
    font=("微软雅黑",12), #文本字体
    length=100,  #水尺长度
    maximum=10, #增加到10
    mode=INDETERMINATE, #来回不确定
    orient=VERTICAL, #放置垂直方向
    text="文本", #文本
)
fg2.pack(side=ttk.LEFT, padx=5)
fg2.start()
fg3 = ttk.Floodgauge(
    root,
    bootstyle=INFO,
    length=300,
    maximum=200,
    font=("微软雅黑", 18, 'bold'),
    mask='loading...{}%',
)
fg3.pack(side=ttk.LEFT, padx=5)
fg3.start()
# fg3.stop()
# fg3.configure(mask='...{}%')
fg3.configure(value=25) #初始值
fg3.step(50) #将上面25该值增加50步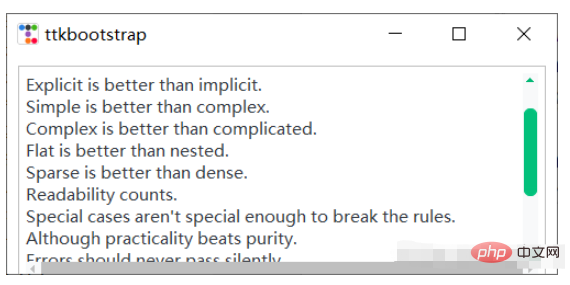
root.mainloop()스크롤 막대
import ttkbootstrap as ttk
from ttkbootstrap.constants import *
root = ttk.Window(size=(500,200))
f = ttk.Frame(root).pack(fill=BOTH, expand=YES)
text_content = '''
The Zen of Python, by Tim Peters

Beautiful is better than ugly.
Explicit is better than implicit.
Simple is better than complex.
Complex is better than complicated.
Flat is better than nested.
Sparse is better than dense.
Readability counts.
Special cases aren't special enough to break the rules.
Although practicality beats purity.
Errors should never pass silently.
Unless explicitly silenced.
In the face of ambiguity, refuse the temptation to guess.
There should be one-- and preferably only one --obvious way to do it.
Although that way may not be obvious at first unless you're Dutch.
Now is better than never.
Although never is often better than *right* now.
If the implementation is hard to explain, it's a bad idea.
If the implementation is easy to explain, it may be a good idea.
Namespaces are one honking great idea -- let's do more of those!
'''
# t = ttk.Text(f)
# t.insert("0.0",text_content)
# t.place(x=10,y=10,width=480,height=200)
# sl_x = ttk.Scrollbar(t,orient=HORIZONTAL) #使滚动条水平放置
# #放到窗口的底部, 填充X轴竖直方向
# sl_x.pack(side=ttk.BOTTOM, fill=ttk.X)
# sl_y = ttk.Scrollbar(t,boot) #滚动条默认垂直放置
# #放到窗口的右侧, 填充Y轴竖直方向
# sl_y.pack(side=ttk.RIGHT, fill=ttk.Y)
# #两个控件相关联
# sl_x.config(command=t.xview)
# t.config(yscrollcommand=sl_x.set)
# sl_y.config(command=t.yview)
# t.config(yscrollcommand=sl_y.set)

##滚动文本框
from ttkbootstrap.scrolled import ScrolledText
st = ScrolledText(f, padding=5, height=10, autohide=True)
st.pack(fill=BOTH, expand=YES)
st.insert(END, text_content)

root.mainloop()메시지 프롬프트 상자
import ttkbootstrap as ttk
from ttkbootstrap.dialogs import Messagebox
root = ttk.Window()
print("ok: ",Messagebox.ok(
    message="要在消息框中显示的消息",
    title="消息框的标题",
    alert=False, #指定是否响铃,默认False
))
print("okcancel: ",Messagebox.okcancel(message="确定取消"))
print("retrycancel: ",Messagebox.retrycancel(message="重试取消"))
print("retrycancel: ",Messagebox.show_error(message="显示错误"))
print("retrycancel: ",Messagebox.show_info(message="显示信息"))
print("retrycancel: ",Messagebox.show_question(message="显示问题"))
print("retrycancel: ",Messagebox.show_warning(message="显示警告"))
print("retrycancel: ",Messagebox.yesno(message="是的"))
print("retrycancel: ",Messagebox.yesnocancel(message="是的取消"))
root.mainloop()쿼리 상자
import ttkbootstrap as ttk
from ttkbootstrap.dialogs import Querybox
root = ttk.Window()
print("获取日期:",Querybox.get_date())
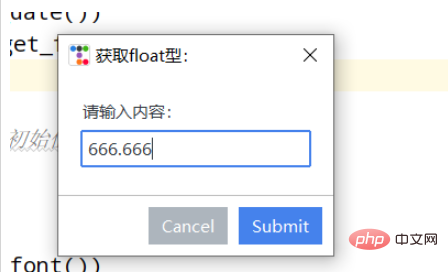
print("获取float型:",Querybox.get_float(
prompt="请输入内容:",
title="获取float型: ",
initialvalue=666.666, #设置初始值
# minvalue=None,
# maxvalue=None
))
print("获取字体:",Querybox.get_font())
print("获取整数:",Querybox.get_integer())
print("获取字符串:",Querybox.get_string())
root.mainloop()하위 창

import ttkbootstrap as ttk
root = ttk.Window()
root.wm_attributes('-topmost', 1)#让主窗口置顶
def my():
    ttk.Style("solar")
    #print(ttk.Style().theme_names())#可设置主题风格['cyborg', 'journal', 'darkly', 'flatly', 'solar', 'minty', 'litera', 'united', 'pulse', 'cosmo', 'lumen', 'yeti', 'superhero']
    mytoplevel = ttk.Toplevel(root,alpha=0.5)##里面的参数和Window()父窗口一致
ttk.Button(text="my_Toplevel ",command=my).pack()
root.mainloop()Menu
가 추가되었습니다. 예전에는 항상 뭔가 부족한 느낌이었는데 오늘에서야 생각났네요 하하하! ! !
import ttkbootstrap as ttk
from ttkbootstrap.dialogs import Messagebox
root = ttk.Window()
# 在窗口上创建一个菜单栏(最上方的菜单栏横条)
menubar = ttk.Menu(root)
def dianji(): #定义一个点击事件方法
Messagebox.show_info(title='走走走!', message='该功能还未开放!') #消息提示框窗口
# 定义一个竖条
filemenu = ttk.Menu(menubar)
# 在菜单单元中添加一个菜单项File
menubar.add_cascade(label='设置', menu=filemenu)
# 在设置菜单项添加命令选项
filemenu.add_command(label='更多', command=dianji)
# 添加一条分割线
filemenu.add_separator()
# 定义一个子菜单条
submenu = ttk.Menu(filemenu) # 和上面定义菜单一样,不过此处是在设置上创建一个空的菜单
submenu.add_command(label="背景") # 给submenu添加功能选项
submenu.add_command(label="字体")
submenu.add_command(label="大小")
# 添加一个展开下拉菜单,并把上面的子菜单嵌入给它
filemenu.add_cascade(label='个性化', menu=submenu, underline=0)
# 同样的在File中加入Exit小菜单,此处对应命令为window.quit
filemenu.add_command(label='退出', command=root.quit)
# 在顶部再添加多个菜单项
otherfunction = ttk.Menu(menubar)
menubar.add_cascade(label='选择', menu=otherfunction)
menubar.add_cascade(label='查看', menu=otherfunction)
otherfunction.add_command(label='该功能未开放!')
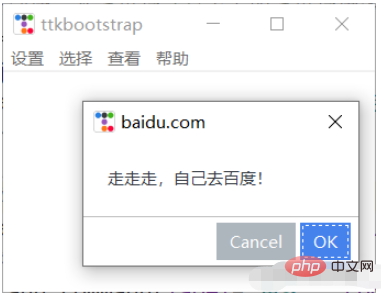
#帮助
def baidu():
Messagebox.okcancel(title='baidu.com', message='走走走,自己去百度!')
help = ttk.Menu(menubar, tearoff=0)
menubar.add_cascade(label='帮助', menu=help)
help.add_command(label='help', command=baidu)
# 将菜单配置给窗口
root.config(menu=menubar)
root.mainloop()Panel
import ttkbootstrap as ttk
from ttkbootstrap.constants import *
root = ttk.Window()
f = ttk.Frame(root)
f.pack(pady=5, fill=X, side=TOP)
nb = ttk.Notebook(f)
nb.pack(
    side=LEFT,
    padx=(10, 0),
    expand=YES,
    fill=BOTH
)
nb_text = "This is a notebook tab.\nYou can put any widget you want here."
nb.add(ttk.Label(nb, text=nb_text), text="Tab 1", sticky=NW)
nb.add(
    child=ttk.Label(nb, text="notebook tab 2."),
    text="Tab 2",
    sticky=NW
)
f2 = ttk.Frame(nb)
ttk.Button(f2,text="notebook button").pack(side=ttk.LEFT, padx=5, pady=10)
nb.add(f2, text='Tab 3')
root.mainloop()트리 뷰
import ttkbootstrap as ttk
from ttkbootstrap.constants import *
root = ttk.Window()
tv = ttk.Treeview(
master=root,
columns=[0, 1],
show=HEADINGS,
height=5
)
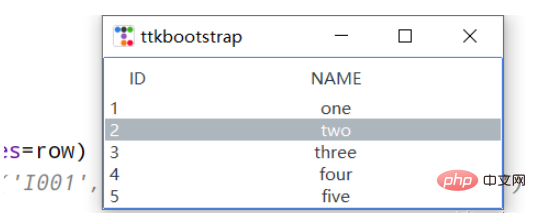
table_data = [
(1,'one'),
(2, 'two'),
(3, 'three'),
(4, 'four'),
(5, 'five')
]
for row in table_data:
tv.insert('', END, values=row)
# print(tv.get_children())#('I001', 'I002', 'I003', 'I004', 'I005')
tv.selection_set('I002')
tv.heading(0, text='ID')
tv.heading(1, text='NAME')
tv.column(0, width=60)
tv.column(1, width=300, anchor=CENTER)
tv.pack(side=LEFT, anchor=NE, fill=X)
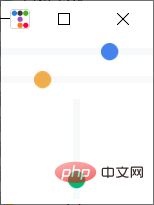
root.mainloop()加载gif动图
左边是官网上提供的方法,右边是一个自己定义的方法。
from pathlib import Path
from itertools import cycle
import ttkbootstrap as ttk
from ttkbootstrap.constants import *
from PIL import Image, ImageTk, ImageSequence
class AnimatedGif(ttk.Frame):
    def __init__(self, master):
        super().__init__(master, width=400, height=300)

        # open the GIF and create a cycle iterator
        file_path = Path(__file__).parent / "guanwang.gif"
        with Image.open(file_path) as im:
            # create a sequence
            sequence = ImageSequence.Iterator(im)
            images = [ImageTk.PhotoImage(s) for s in sequence]
            self.image_cycle = cycle(images)

            # length of each frame
            self.framerate = im.info["duration"]

        self.img_container = ttk.Label(self, image=next(self.image_cycle))
        self.img_container.pack(fill="both", expand="yes")
        self.after(self.framerate, self.next_frame)

    def next_frame(self):
        """Update the image for each frame"""
        self.img_container.configure(image=next(self.image_cycle))
        self.after(self.framerate, self.next_frame)

def loadingGif(app):
    numIdx = 12  # gif的帧数
    file_path = Path(__file__).parent / "TestGif.gif"
    frames = [ttk.PhotoImage(file=file_path, format='gif -index %i' % (i)) for i in range(numIdx)]
    def run(rate):
        frame = frames[rate]
        rate += 1
        gif_label.configure(image=frame)  # 显示当前帧的图片
        gif_label.after(100, run, rate % numIdx)  # 0.1秒(100毫秒)之后继续执行函数(run)
    gif_label = ttk.Label(app)
    gif_label.pack(side=LEFT,padx=20,fill=BOTH, expand=YES)
    run(0)
if __name__ == "__main__":
    app = ttk.Window("Animated GIF", themename="litera")
    gif = AnimatedGif(app)
    gif.pack(side=LEFT,padx=20,fill=BOTH, expand=YES)
    loadingGif(app)
app.mainloop()打开本地文件
import ttkbootstrap as ttk
from ttkbootstrap.constants import *
from tkinter.filedialog import askopenfilename
root = ttk.Window()
def open_file():
    path = askopenfilename()
    # print(path)
    if not path:
        return
ttk.Button(root, text="打开文件", command=open_file).pack(fill=X, padx=10, pady=10)
root.mainloop()打开浏览器
import ttkbootstrap as ttk
from ttkbootstrap.constants import *
import webbrowser
root = ttk.Window()
def open_url(event):
    webbrowser.open("http://www.baidu.com", new=0)  # 启动web浏览器访问给定的URL
label = ttk.Label(root,text="https://www.baidu.com/",bootstyle=PRIMARY)
label.pack(fill=BOTH)
label.bind("<Button-1>", open_url)
root.mainloop()위 내용은 ttkbootstrap을 사용하여 Python GUI를 위한 아름다운 인터페이스를 만드는 방법은 무엇입니까?의 상세 내용입니다. 자세한 내용은 PHP 중국어 웹사이트의 기타 관련 기사를 참조하세요!

핫 AI 도구

Undresser.AI Undress
사실적인 누드 사진을 만들기 위한 AI 기반 앱

AI Clothes Remover
사진에서 옷을 제거하는 온라인 AI 도구입니다.

Undress AI Tool
무료로 이미지를 벗다

Clothoff.io
AI 옷 제거제

AI Hentai Generator
AI Hentai를 무료로 생성하십시오.

인기 기사
뜨거운 도구

메모장++7.3.1
사용하기 쉬운 무료 코드 편집기

SublimeText3 중국어 버전
중국어 버전, 사용하기 매우 쉽습니다.

스튜디오 13.0.1 보내기
강력한 PHP 통합 개발 환경

드림위버 CS6
시각적 웹 개발 도구

SublimeText3 Mac 버전
신 수준의 코드 편집 소프트웨어(SublimeText3)
뜨거운 주제
 7489
7489
 15
1377
52
77
11
52
19
19
41
15
1377
52
77
11
52
19
19
41

 MySQL은 지불해야합니다
Apr 08, 2025 pm 05:36 PM
MySQL은 지불해야합니다
Apr 08, 2025 pm 05:36 PM
MySQL에는 무료 커뮤니티 버전과 유료 엔터프라이즈 버전이 있습니다. 커뮤니티 버전은 무료로 사용 및 수정할 수 있지만 지원은 제한되어 있으며 안정성이 낮은 응용 프로그램에 적합하며 기술 기능이 강합니다. Enterprise Edition은 안정적이고 신뢰할 수있는 고성능 데이터베이스가 필요하고 지원 비용을 기꺼이 지불하는 응용 프로그램에 대한 포괄적 인 상업적 지원을 제공합니다. 버전을 선택할 때 고려 된 요소에는 응용 프로그램 중요도, 예산 책정 및 기술 기술이 포함됩니다. 완벽한 옵션은없고 가장 적합한 옵션 만 있으므로 특정 상황에 따라 신중하게 선택해야합니다.
 hadidb : 파이썬의 가볍고 수평 확장 가능한 데이터베이스
Apr 08, 2025 pm 06:12 PM
hadidb : 파이썬의 가볍고 수평 확장 가능한 데이터베이스
Apr 08, 2025 pm 06:12 PM
HADIDB : 가볍고 높은 수준의 확장 가능한 Python 데이터베이스 HadIDB (HADIDB)는 파이썬으로 작성된 경량 데이터베이스이며 확장 수준이 높습니다. PIP 설치를 사용하여 HADIDB 설치 : PIPINSTALLHADIDB 사용자 관리 사용자 만들기 사용자 : createUser () 메소드를 작성하여 새 사용자를 만듭니다. Authentication () 메소드는 사용자의 신원을 인증합니다. Fromhadidb.operationimportuseruser_obj = user ( "admin", "admin") user_obj.
 MongoDB 데이터베이스 비밀번호를 보는 Navicat의 방법
Apr 08, 2025 pm 09:39 PM
MongoDB 데이터베이스 비밀번호를 보는 Navicat의 방법
Apr 08, 2025 pm 09:39 PM
해시 값으로 저장되기 때문에 MongoDB 비밀번호를 Navicat을 통해 직접 보는 것은 불가능합니다. 분실 된 비밀번호 검색 방법 : 1. 비밀번호 재설정; 2. 구성 파일 확인 (해시 값이 포함될 수 있음); 3. 코드를 점검하십시오 (암호 하드 코드 메일).
 MySQL은 인터넷이 필요합니까?
Apr 08, 2025 pm 02:18 PM
MySQL은 인터넷이 필요합니까?
Apr 08, 2025 pm 02:18 PM
MySQL은 기본 데이터 저장 및 관리를위한 네트워크 연결없이 실행할 수 있습니다. 그러나 다른 시스템과의 상호 작용, 원격 액세스 또는 복제 및 클러스터링과 같은 고급 기능을 사용하려면 네트워크 연결이 필요합니다. 또한 보안 측정 (예 : 방화벽), 성능 최적화 (올바른 네트워크 연결 선택) 및 데이터 백업은 인터넷에 연결하는 데 중요합니다.
 MySQL Workbench가 Mariadb에 연결할 수 있습니다
Apr 08, 2025 pm 02:33 PM
MySQL Workbench가 Mariadb에 연결할 수 있습니다
Apr 08, 2025 pm 02:33 PM
MySQL Workbench는 구성이 올바른 경우 MariadB에 연결할 수 있습니다. 먼저 커넥터 유형으로 "mariadb"를 선택하십시오. 연결 구성에서 호스트, 포트, 사용자, 비밀번호 및 데이터베이스를 올바르게 설정하십시오. 연결을 테스트 할 때는 마리아드 브 서비스가 시작되었는지, 사용자 이름과 비밀번호가 올바른지, 포트 번호가 올바른지, 방화벽이 연결을 허용하는지 및 데이터베이스가 존재하는지 여부를 확인하십시오. 고급 사용에서 연결 풀링 기술을 사용하여 성능을 최적화하십시오. 일반적인 오류에는 불충분 한 권한, 네트워크 연결 문제 등이 포함됩니다. 오류를 디버깅 할 때 오류 정보를 신중하게 분석하고 디버깅 도구를 사용하십시오. 네트워크 구성을 최적화하면 성능이 향상 될 수 있습니다
 고로드 애플리케이션의 MySQL 성능을 최적화하는 방법은 무엇입니까?
Apr 08, 2025 pm 06:03 PM
고로드 애플리케이션의 MySQL 성능을 최적화하는 방법은 무엇입니까?
Apr 08, 2025 pm 06:03 PM
MySQL 데이터베이스 성능 최적화 안내서 리소스 집약적 응용 프로그램에서 MySQL 데이터베이스는 중요한 역할을 수행하며 대규모 트랜잭션 관리를 담당합니다. 그러나 응용 프로그램 규모가 확장됨에 따라 데이터베이스 성능 병목 현상은 종종 제약이됩니다. 이 기사는 일련의 효과적인 MySQL 성능 최적화 전략을 탐색하여 응용 프로그램이 고 부하에서 효율적이고 반응이 유지되도록합니다. 실제 사례를 결합하여 인덱싱, 쿼리 최적화, 데이터베이스 설계 및 캐싱과 같은 심층적 인 주요 기술을 설명합니다. 1. 데이터베이스 아키텍처 설계 및 최적화 된 데이터베이스 아키텍처는 MySQL 성능 최적화의 초석입니다. 몇 가지 핵심 원칙은 다음과 같습니다. 올바른 데이터 유형을 선택하고 요구 사항을 충족하는 가장 작은 데이터 유형을 선택하면 저장 공간을 절약 할 수있을뿐만 아니라 데이터 처리 속도를 향상시킬 수 있습니다.
 MySQL을 해결하는 방법은 로컬 호스트에 연결할 수 없습니다
Apr 08, 2025 pm 02:24 PM
MySQL을 해결하는 방법은 로컬 호스트에 연결할 수 없습니다
Apr 08, 2025 pm 02:24 PM
MySQL 연결은 다음과 같은 이유로 인한 것일 수 있습니다. MySQL 서비스가 시작되지 않았고 방화벽이 연결을 가로 채고 포트 번호가 올바르지 않으며 사용자 이름 또는 비밀번호가 올바르지 않으며 My.cnf의 청취 주소가 부적절하게 구성되어 있습니다. 1. MySQL 서비스가 실행 중인지 확인합니다. 2. MySQL이 포트 3306을들을 수 있도록 방화벽 설정을 조정하십시오. 3. 포트 번호가 실제 포트 번호와 일치하는지 확인하십시오. 4. 사용자 이름과 암호가 올바른지 확인하십시오. 5. my.cnf의 바인드 아드 드레스 설정이 올바른지 확인하십시오.
 Amazon Athena와 함께 AWS Glue Crawler를 사용하는 방법
Apr 09, 2025 pm 03:09 PM
Amazon Athena와 함께 AWS Glue Crawler를 사용하는 방법
Apr 09, 2025 pm 03:09 PM
데이터 전문가는 다양한 소스에서 많은 양의 데이터를 처리해야합니다. 이것은 데이터 관리 및 분석에 어려움을 겪을 수 있습니다. 다행히도 AWS Glue와 Amazon Athena의 두 가지 AWS 서비스가 도움이 될 수 있습니다.
