Python 가상 머신에서 목록의 구현 원리는 무엇입니까?
목록의 구조
cpython으로 구현한 Python 가상 머신에서 다음은 cpython의 내부 목록 구현의 소스 코드입니다.
typedef struct {
    PyObject_VAR_HEAD
    /* Vector of pointers to list elements.  list[0] is ob_item[0], etc. */
    PyObject **ob_item;

    /* ob_item contains space for 'allocated' elements.  The number
     * currently in use is ob_size.
     * Invariants:
     *     0 <= ob_size <= allocated
     *     len(list) == ob_size
     *     ob_item == NULL implies ob_size == allocated == 0
     * list.sort() temporarily sets allocated to -1 to detect mutations.
     *
     * Items must normally not be NULL, except during construction when
     * the list is not yet visible outside the function that builds it.
     */
    Py_ssize_t allocated;
} PyListObject;

#define PyObject_VAR_HEAD      PyVarObject ob_base;
typedef struct {
    PyObject ob_base;
    Py_ssize_t ob_size; /* Number of items in variable part */
} PyVarObject;

typedef struct _object {
    _PyObject_HEAD_EXTRA // 这个宏定义为空
    Py_ssize_t ob_refcnt;
    struct _typeobject *ob_type;
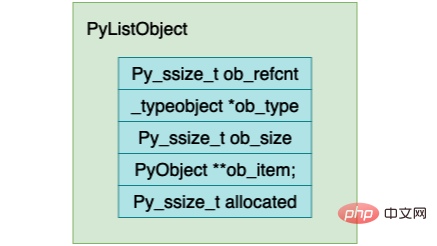
} PyObject;위의 구조를 확장하면 PyListObject의 구조는 대략 다음과 같습니다. :

이제 위의 각 필드의 의미를 설명하겠습니다.
Py_ssize_t, 정수 데이터 유형입니다.
ob_refcnt는 객체의 참조 횟수를 나타냅니다. 이는 가비지 수집에 매우 유용합니다. 나중에 가상 머신의 가비지 수집 부분을 심층적으로 분석하겠습니다.
ob_type은 이 객체의 데이터 유형을 나타냅니다. Python에서는 때로는 데이터의 데이터 유형을 판단해야 합니다. 예를 들어 isinstance와 type이라는 두 키워드가 이 필드를 사용합니다.
ob_size, 이 필드는 이 목록에 있는 요소 수를 나타냅니다.
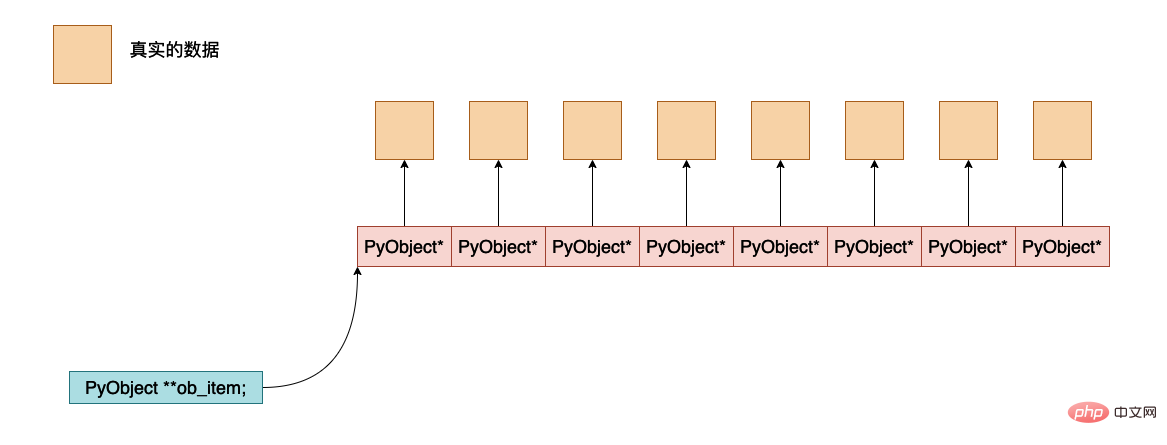
ob_item은 Python 개체 데이터가 실제로 저장되는 주소를 가리키는 포인터입니다. 이들 사이의 대략적인 메모리 레이아웃은 다음과 같습니다.

할당됨, 이는 메모리가 할당시 총 몇개(PyObject *)가 할당되며 실제 할당된 메모리 공간은
allocated * sizeof(PyObject *)입니다.
리스트 연산 함수 소스코드 분석
리스트 생성
먼저 이해하셔야 할 점은 Python 가상머신 내부에 리스트에 대한 배열이 생성되고, 생성된 해제된 메모리 공간은 모두 해제되지 않는다는 점입니다. 이러한 메모리 공간의 첫 번째 주소는 이 배열에 직접 저장되므로 다음에 새 목록을 생성하기 위해 신청할 때 메모리 공간을 신청할 필요가 없고 해제해야 하는 메모리를 직접 재사용할 수 있습니다. 전에.
/* Empty list reuse scheme to save calls to malloc and free */
#ifndef PyList_MAXFREELIST
#define PyList_MAXFREELIST 80
#endif
static PyListObject *free_list[PyList_MAXFREELIST];
static int numfree = 0;
free_list는 해제된 메모리 공간의 첫 번째 주소를 저장합니다.
numfree, 현재 free_list의 주소는 몇 개까지 사용할 수 있나요? 실제로 free_list의 첫 번째 numfree 주소를 사용할 수 있습니다.
연결된 목록을 생성하는 코드는 다음과 같습니다(간소화를 위해 일부 코드를 삭제하고 핵심 부분만 유지합니다).
PyObject *
PyList_New(Py_ssize_t size)
{
    PyListObject *op;
    size_t nbytes;

    /* Check for overflow without an actual overflow,
     *  which can cause compiler to optimise out */
    if ((size_t)size > PY_SIZE_MAX / sizeof(PyObject *))
        return PyErr_NoMemory();
    nbytes = size * sizeof(PyObject *);
  // 如果 numfree 不等于 0 那么说明现在 free_list 有之前使用被释放的内存空间直接使用这部分即可
    if (numfree) {
        numfree--;
        op = free_list[numfree]; // 将对应的首地址返回
        _Py_NewReference((PyObject *)op); // 这条语句的含义是将 op 这个对象的 reference count 设置成 1
    } else {
      // 如果没有空闲的内存空间 那么就需要申请内存空间 这个函数也会对对象的 reference count 进行初始化 设置成 1
        op = PyObject_GC_New(PyListObject, &PyList_Type);
        if (op == NULL)
            return NULL;
    }
  /* 下面是申请列表对象当中的 ob_item 申请内存空间,上面只是给列表本身申请内存空间,但是列表当中有许多元素
  	保存这些元素也是需要内存空间的 下面便是给这些对象申请内存空间
  */
    if (size <= 0)
        op->ob_item = NULL;
    else {
        op->ob_item = (PyObject **) PyMem_MALLOC(nbytes);
      // 如果申请内存空间失败 则报错
        if (op->ob_item == NULL) {
            Py_DECREF(op);
            return PyErr_NoMemory();
        }
      // 对元素进行初始化操作 全部赋值成 0
        memset(op->ob_item, 0, nbytes);
    }
  // Py_SIZE 是一个宏
    Py_SIZE(op) = size; // 这条语句会被展开成 (PyVarObject*)(ob))->ob_size = size
  // 分配数组的元素个数是 size
    op->allocated = size;
  // 下面这条语句对于垃圾回收比较重要 主要作用就是将这个列表对象加入到垃圾回收的链表当中
  // 后面如果这个对象的 reference count 变成 0 或者其他情况 就可以进行垃圾回收了
    _PyObject_GC_TRACK(op);
    return (PyObject *) op;
}cpython에서 연결 목록을 생성하는 바이트코드는 BUILD_LIST이며, 다음과 같이 할 수 있습니다. ceval.c 파일에서 해당 항목을 찾습니다. 바이트코드에 해당하는 실행 단계:
TARGET(BUILD_LIST) {
    PyObject *list =  PyList_New(oparg);
    if (list == NULL)
        goto error;
    while (--oparg >= 0) {
        PyObject *item = POP();
        PyList_SET_ITEM(list, oparg, item);
    }
    PUSH(list);
    DISPATCH();
}위의 BUILD_LIST 바이트코드에 해당하는 설명 단계에서 해석할 때 실제로 새 목록을 생성하기 위해 PyList_New 함수가 호출된다는 것을 알 수 있습니다. BUILD_LIST 바이트코드를 실행합니다.
목록 추가 기능
static PyObject *
// 这个函数的传入参数是列表本身 self 需要 append 的元素为 v
  // 也就是将对象 v 加入到列表 self 当中
listappend(PyListObject *self, PyObject *v)
{
    if (app1(self, v) == 0)
        Py_RETURN_NONE;
    return NULL;
}

static int
app1(PyListObject *self, PyObject *v)
{
  // PyList_GET_SIZE(self) 展开之后为 ((PyVarObject*)(self))->ob_size
    Py_ssize_t n = PyList_GET_SIZE(self);

    assert (v != NULL);
  // 如果元素的个数已经等于允许的最大的元素个数 就报错
    if (n == PY_SSIZE_T_MAX) {
        PyErr_SetString(PyExc_OverflowError,
            "cannot add more objects to list");
        return -1;
    }
	// 下面的函数 list_resize 会保存 ob_item 指向的位置能够容纳最少 n+1 个元素(PyObject *)
  // 如果容量不够就会进行扩容操作
    if (list_resize(self, n+1) == -1)
        return -1;

  // 将对象 v 的 reference count 加一 因为列表当中使用了一次这个对象 所以对象的引用计数需要进行加一操作
    Py_INCREF(v);
    PyList_SET_ITEM(self, n, v); // 宏展开之后 ((PyListObject *)(op))->ob_item[i] = v
    return 0;
}목록의 확장 메커니즘
static int
list_resize(PyListObject *self, Py_ssize_t newsize)
{
    PyObject **items;
    size_t new_allocated;
    Py_ssize_t allocated = self->allocated;

    /* Bypass realloc() when a previous overallocation is large enough
       to accommodate the newsize.  If the newsize falls lower than half
       the allocated size, then proceed with the realloc() to shrink the list.
    */
  // 如果列表已经分配的元素个数大于需求个数 newsize 的就直接返回不需要进行扩容
    if (allocated >= newsize && newsize >= (allocated >> 1)) {
        assert(self->ob_item != NULL || newsize == 0);
        Py_SIZE(self) = newsize;
        return 0;
    }

    /* This over-allocates proportional to the list size, making room
     * for additional growth.  The over-allocation is mild, but is
     * enough to give linear-time amortized behavior over a long
     * sequence of appends() in the presence of a poorly-performing
     * system realloc().
     * The growth pattern is:  0, 4, 8, 16, 25, 35, 46, 58, 72, 88, ...
     */
  // 这是核心的数组大小扩容机制 new_allocated 表示新增的数组大小
    new_allocated = (newsize >> 3) + (newsize < 9 ? 3 : 6);

    /* check for integer overflow */
    if (new_allocated > PY_SIZE_MAX - newsize) {
        PyErr_NoMemory();
        return -1;
    } else {
        new_allocated += newsize;
    }

    if (newsize == 0)
        new_allocated = 0;
    items = self->ob_item;
    if (new_allocated <= (PY_SIZE_MAX / sizeof(PyObject *)))
      	// PyMem_RESIZE 这是一个宏定义 会申请 new_allocated 个数元素并且将原来数组的元素拷贝到新的数组当中
        PyMem_RESIZE(items, PyObject *, new_allocated);
    else
        items = NULL;
  // 如果没有申请到内存 那么报错
    if (items == NULL) {
        PyErr_NoMemory();
        return -1;
    }
  // 更新列表当中的元素数据
    self->ob_item = items;
    Py_SIZE(self) = newsize;
    self->allocated = new_allocated;
    return 0;
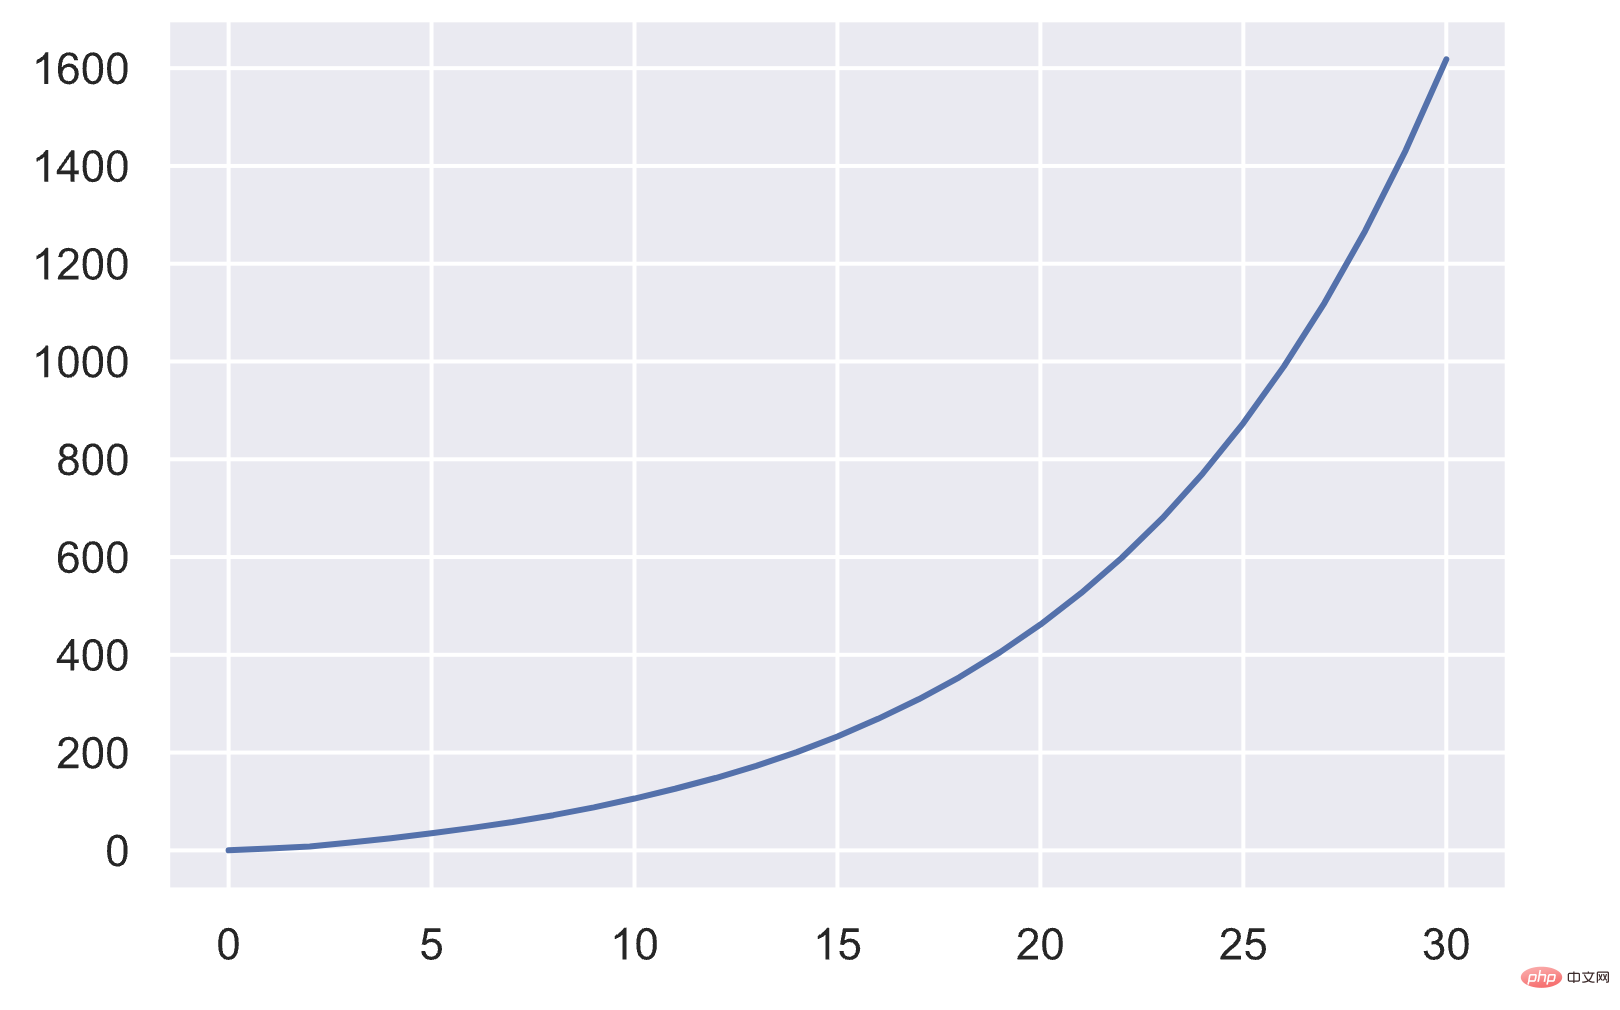
}위의 확장 메커니즘에서 배열의 크기는 대략 다음과 같이 변경됩니다.
newsize≈size⋅(size+1)1/8

목록 삽입 함수 insert
목록에 데이터를 삽입하는 것은 비교적 간단합니다. 삽입 위치와 그 뒤에 있는 요소를 한 위치 뒤로 이동하기만 하면 됩니다. 전체 프로세스는 다음과 같습니다.

cpython에서 list 삽입 함수의 구현은 다음과 같습니다.
매개변수 op는 요소를 삽입할 연결된 목록을 나타냅니다.
매개변수 where는 연결된 목록에서 요소를 삽입할 위치를 나타냅니다.
newitem 매개변수는 새로 삽입된 요소를 나타냅니다.
int
PyList_Insert(PyObject *op, Py_ssize_t where, PyObject *newitem)
{
  // 检查是否是列表类型
    if (!PyList_Check(op)) {
        PyErr_BadInternalCall();
        return -1;
    }
  // 如果是列表类型则进行插入操作
    return ins1((PyListObject *)op, where, newitem);
}

static int
ins1(PyListObject *self, Py_ssize_t where, PyObject *v)
{
    Py_ssize_t i, n = Py_SIZE(self);
    PyObject **items;
    if (v == NULL) {
        PyErr_BadInternalCall();
        return -1;
    }
  // 如果列表的元素个数超过限制 则进行报错
    if (n == PY_SSIZE_T_MAX) {
        PyErr_SetString(PyExc_OverflowError,
            "cannot add more objects to list");
        return -1;
    }
  // 确保列表能够容纳 n + 1 个元素
    if (list_resize(self, n+1) == -1)
        return -1;
  // 这里是 python 的一个小 trick 就是下标能够有负数的原理
    if (where < 0) {
        where += n;
        if (where < 0)
            where = 0;
    }
    if (where > n)
        where = n;
    items = self->ob_item;
  // 从后往前进行元素的拷贝操作,也就是将插入位置及其之后的元素往后移动一个位置
    for (i = n; --i >= where; )
        items[i+1] = items[i];
  // 因为链表应用的对象,因此对象的 reference count 需要进行加一操作
    Py_INCREF(v);
  // 在列表当中保存对象 v
    items[where] = v;
    return 0;
}목록 삭제 함수 제거
ob_item 배열의 경우 요소를 삭제하려면 이 요소 뒤에 있는 요소를 앞으로 이동해야 하므로 전체 프로세스는 다음과 같습니다.

static PyObject *
listremove(PyListObject *self, PyObject *v)
{
    Py_ssize_t i;
  	// 编译数组 ob_item 查找和对象 v 相等的元素并且将其删除
    for (i = 0; i < Py_SIZE(self); i++) {
        int cmp = PyObject_RichCompareBool(self->ob_item[i], v, Py_EQ);
        if (cmp > 0) {
            if (list_ass_slice(self, i, i+1,
                               (PyObject *)NULL) == 0)
                Py_RETURN_NONE;
            return NULL;
        }
        else if (cmp < 0)
            return NULL;
    }
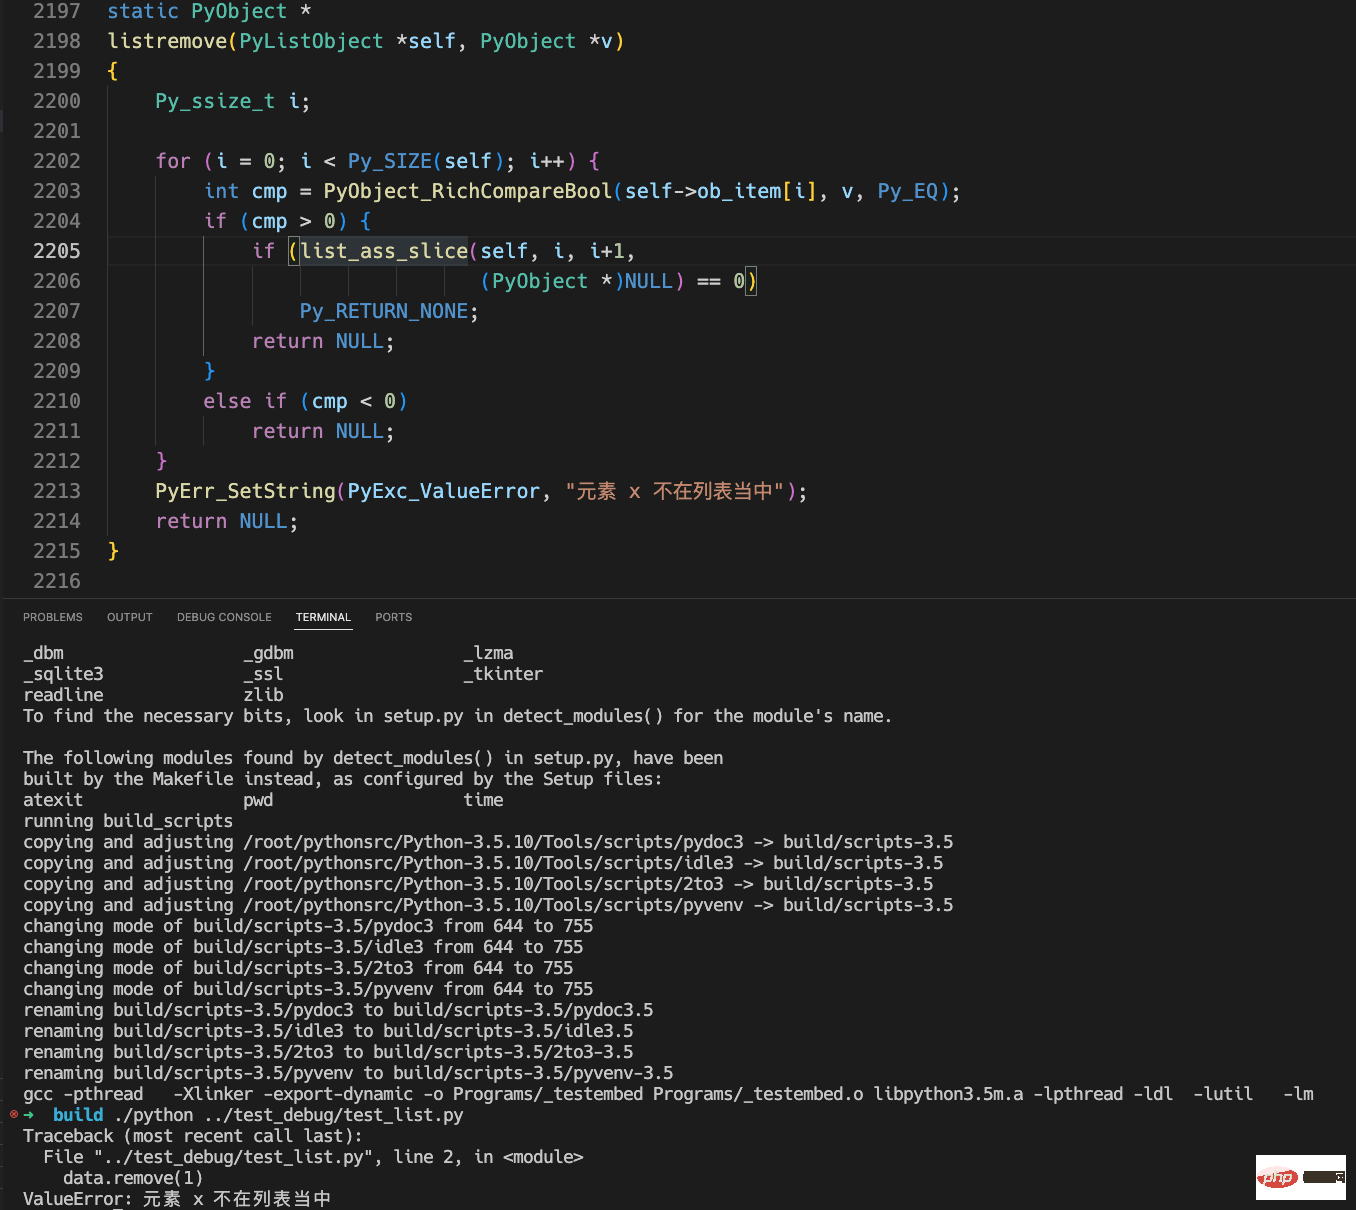
  	// 如果没有找到这个元素就进行报错处理 在下面有一个例子重新编译 python 解释器 将这个错误内容修改的例子
    PyErr_SetString(PyExc_ValueError, "list.remove(x): x not in list");
    return NULL;
}Python 프로그램 실행 내용은 다음과 같습니다.
data = []
data.remove(1)
다음은 전체 수정 내용 및 오류 결과입니다.

위 결과에서 우리가 수정한 오류 메시지가 올바르게 인쇄된 것을 확인할 수 있습니다.
목록 개수의 통계 함수
이 함수의 주요 기능은 목록 자체에서 v와 같은 요소 수를 계산하는 것입니다.
static PyObject *
listcount(PyListObject *self, PyObject *v)
{
    Py_ssize_t count = 0;
    Py_ssize_t i;

    for (i = 0; i < Py_SIZE(self); i++) {
        int cmp = PyObject_RichCompareBool(self->ob_item[i], v, Py_EQ);
      // 如果相等则将 count 进行加一操作
        if (cmp > 0)
            count++;
      // 如果出现错误就返回 NULL
        else if (cmp < 0)
            return NULL;
    }
  // 将一个 Py_ssize_t 的变量变成 python 当中的对象
    return PyLong_FromSsize_t(count);
}리스트의 복사 기능
리스트의 얕은 복사 기능입니다. 실제 Python 객체의 포인터만 복사하고 실제 Python 객체는 복사하지 않습니다. list는 얕은 복사본입니다. b가 목록의 요소를 수정하면 목록 a의 요소도 변경됩니다. Deep Copy를 수행해야 하는 경우 Copy 모듈의 DeepCopy 기능을 사용할 수 있습니다.
>>> a = [1, 2, [3, 4]]
>>> b = a.copy()
>>> b[2][1] = 5
>>> b
[1, 2, [3, 5]]
copy 函数对应的源代码(listcopy)如下所示:
static PyObject *
listcopy(PyListObject *self)
{
    return list_slice(self, 0, Py_SIZE(self));
}

static PyObject *
list_slice(PyListObject *a, Py_ssize_t ilow, Py_ssize_t ihigh)
{
  // Py_SIZE(a) 返回列表 a 当中元素的个数(注意不是数组的长度 allocated)
    PyListObject *np;
    PyObject **src, **dest;
    Py_ssize_t i, len;
    if (ilow < 0)
        ilow = 0;
    else if (ilow > Py_SIZE(a))
        ilow = Py_SIZE(a);
    if (ihigh < ilow)
        ihigh = ilow;
    else if (ihigh > Py_SIZE(a))
        ihigh = Py_SIZE(a);
    len = ihigh - ilow;
    np = (PyListObject *) PyList_New(len);
    if (np == NULL)
        return NULL;

    src = a->ob_item + ilow;
    dest = np->ob_item;
  // 可以看到这里循环拷贝的是指向真实 python 对象的指针 并不是真实的对象
    for (i = 0; i < len; i++) {
        PyObject *v = src[i];
      // 同样的因为并没有创建新的对象,但是这个对象被新的列表使用到啦 因此他的 reference count 需要进行加一操作 Py_INCREF(v) 的作用:将对象 v 的 reference count 加一
        Py_INCREF(v);
        dest[i] = v;
    }
    return (PyObject *)np;
}下图就是使用 a.copy() 浅拷贝的时候,内存的布局的示意图,可以看到列表指向的对象数组发生了变化,但是数组中元素指向的 python 对象并没有发生变化。

下面是对列表对象进行深拷贝的时候内存的大致示意图,可以看到数组指向的 python 对象也是不一样的。

列表的清空函数 clear
当我们在使用 list.clear() 的时候会调用下面这个函数。清空列表需要注意的就是将表示列表当中元素个数的 ob_size 字段设置成 0 ,同时将列表当中所有的对象的 reference count 设置进行 -1 操作,这个操作是通过宏 Py_XDECREF 实现的,这个宏还会做另外一件事就是如果这个对象的引用计数变成 0 了,那么就会直接释放他的内存。
static PyObject *
listclear(PyListObject *self)
{
    list_clear(self);
    Py_RETURN_NONE;
}

static int
list_clear(PyListObject *a)
{
    Py_ssize_t i;
    PyObject **item = a->ob_item;
    if (item != NULL) {
        /* Because XDECREF can recursively invoke operations on
           this list, we make it empty first. */
        i = Py_SIZE(a);
        Py_SIZE(a) = 0;
        a->ob_item = NULL;
        a->allocated = 0;
        while (--i >= 0) {
            Py_XDECREF(item[i]);
        }
        PyMem_FREE(item);
    }
    /* Never fails; the return value can be ignored.
       Note that there is no guarantee that the list is actually empty
       at this point, because XDECREF may have populated it again! */
    return 0;
}列表反转函数 reverse
在 python 当中如果我们想要反转类表当中的内容的话,就会使用这个函数 reverse 。
>>> a = [i for i in range(10)]
>>> a.reverse()
>>> a
[9, 8, 7, 6, 5, 4, 3, 2, 1, 0]
其对应的源程序如下所示:
static PyObject *
listreverse(PyListObject *self)
{
    if (Py_SIZE(self) > 1)
        reverse_slice(self->ob_item, self->ob_item + Py_SIZE(self));
    Py_RETURN_NONE;
}

static void
reverse_slice(PyObject **lo, PyObject **hi)
{
    assert(lo && hi);

    --hi;
    while (lo < hi) {
        PyObject *t = *lo;
        *lo = *hi;
        *hi = t;
        ++lo;
        --hi;
    }
}上面的源程序还是比较容易理解的,给 reverse_slice 传递的参数就是保存数据的数组的首尾地址,然后不断的将首尾数据进行交换(其实是交换指针指向的地址)。
위 내용은 Python 가상 머신에서 목록의 구현 원리는 무엇입니까?의 상세 내용입니다. 자세한 내용은 PHP 중국어 웹사이트의 기타 관련 기사를 참조하세요!

핫 AI 도구

Undresser.AI Undress
사실적인 누드 사진을 만들기 위한 AI 기반 앱

AI Clothes Remover
사진에서 옷을 제거하는 온라인 AI 도구입니다.

Undress AI Tool
무료로 이미지를 벗다

Clothoff.io
AI 옷 제거제

AI Hentai Generator
AI Hentai를 무료로 생성하십시오.

인기 기사

뜨거운 도구

메모장++7.3.1
사용하기 쉬운 무료 코드 편집기

SublimeText3 중국어 버전
중국어 버전, 사용하기 매우 쉽습니다.

스튜디오 13.0.1 보내기
강력한 PHP 통합 개발 환경

드림위버 CS6
시각적 웹 개발 도구

SublimeText3 Mac 버전
신 수준의 코드 편집 소프트웨어(SublimeText3)

뜨거운 주제
 7467
7467
 15
15
 1376
1376
 52
52
 77
77
 11
11
 48
48
 19
19
 19
19
 21
21
 MySQL은 지불해야합니다
Apr 08, 2025 pm 05:36 PM
MySQL에는 무료 커뮤니티 버전과 유료 엔터프라이즈 버전이 있습니다. 커뮤니티 버전은 무료로 사용 및 수정할 수 있지만 지원은 제한되어 있으며 안정성이 낮은 응용 프로그램에 적합하며 기술 기능이 강합니다. Enterprise Edition은 안정적이고 신뢰할 수있는 고성능 데이터베이스가 필요하고 지원 비용을 기꺼이 지불하는 응용 프로그램에 대한 포괄적 인 상업적 지원을 제공합니다. 버전을 선택할 때 고려 된 요소에는 응용 프로그램 중요도, 예산 책정 및 기술 기술이 포함됩니다. 완벽한 옵션은없고 가장 적합한 옵션 만 있으므로 특정 상황에 따라 신중하게 선택해야합니다.
 설치 후 MySQL을 사용하는 방법
Apr 08, 2025 am 11:48 AM
이 기사는 MySQL 데이터베이스의 작동을 소개합니다. 먼저 MySQLworkBench 또는 명령 줄 클라이언트와 같은 MySQL 클라이언트를 설치해야합니다. 1. MySQL-Uroot-P 명령을 사용하여 서버에 연결하고 루트 계정 암호로 로그인하십시오. 2. CreateABase를 사용하여 데이터베이스를 작성하고 데이터베이스를 선택하십시오. 3. CreateTable을 사용하여 테이블을 만들고 필드 및 데이터 유형을 정의하십시오. 4. InsertInto를 사용하여 데이터를 삽입하고 데이터를 쿼리하고 업데이트를 통해 데이터를 업데이트하고 DELETE를 통해 데이터를 삭제하십시오. 이러한 단계를 마스터하고 일반적인 문제를 처리하는 법을 배우고 데이터베이스 성능을 최적화하면 MySQL을 효율적으로 사용할 수 있습니다.
 다운로드 후 MySQL을 설치할 수 없습니다
Apr 08, 2025 am 11:24 AM
MySQL 설치 실패의 주된 이유는 다음과 같습니다. 1. 권한 문제, 관리자로 실행하거나 Sudo 명령을 사용해야합니다. 2. 종속성이 누락되었으며 관련 개발 패키지를 설치해야합니다. 3. 포트 충돌, 포트 3306을 차지하는 프로그램을 닫거나 구성 파일을 수정해야합니다. 4. 설치 패키지가 손상되어 무결성을 다운로드하여 확인해야합니다. 5. 환경 변수가 잘못 구성되었으며 운영 체제에 따라 환경 변수를 올바르게 구성해야합니다. 이러한 문제를 해결하고 각 단계를 신중하게 확인하여 MySQL을 성공적으로 설치하십시오.
 MySQL 다운로드 파일이 손상되어 설치할 수 없습니다. 수리 솔루션
Apr 08, 2025 am 11:21 AM
MySQL 다운로드 파일은 손상되었습니다. 어떻게해야합니까? 아아, mySQL을 다운로드하면 파일 손상을 만날 수 있습니다. 요즘 정말 쉽지 않습니다! 이 기사는 모든 사람이 우회를 피할 수 있도록이 문제를 해결하는 방법에 대해 이야기합니다. 읽은 후 손상된 MySQL 설치 패키지를 복구 할 수있을뿐만 아니라 향후에 갇히지 않도록 다운로드 및 설치 프로세스에 대해 더 깊이 이해할 수 있습니다. 파일 다운로드가 손상된 이유에 대해 먼저 이야기합시다. 이에 대한 많은 이유가 있습니다. 네트워크 문제는 범인입니다. 네트워크의 다운로드 프로세스 및 불안정성의 중단으로 인해 파일 손상이 발생할 수 있습니다. 다운로드 소스 자체에도 문제가 있습니다. 서버 파일 자체가 고장 났으며 물론 다운로드하면 고장됩니다. 또한 일부 안티 바이러스 소프트웨어의 과도한 "열정적 인"스캔으로 인해 파일 손상이 발생할 수 있습니다. 진단 문제 : 파일이 실제로 손상되었는지 확인하십시오
 MySQL 설치 후 시작할 수없는 서비스에 대한 솔루션
Apr 08, 2025 am 11:18 AM
MySQL이 시작을 거부 했습니까? 당황하지 말고 확인합시다! 많은 친구들이 MySQL을 설치 한 후 서비스를 시작할 수 없다는 것을 알았으며 너무 불안했습니다! 걱정하지 마십시오.이 기사는 침착하게 다루고 그 뒤에있는 마스터 마인드를 찾을 수 있습니다! 그것을 읽은 후에는이 문제를 해결할뿐만 아니라 MySQL 서비스에 대한 이해와 문제 해결 문제에 대한 아이디어를 향상시키고보다 강력한 데이터베이스 관리자가 될 수 있습니다! MySQL 서비스는 시작되지 않았으며 간단한 구성 오류에서 복잡한 시스템 문제에 이르기까지 여러 가지 이유가 있습니다. 가장 일반적인 측면부터 시작하겠습니다. 기본 지식 : 서비스 시작 프로세스 MySQL 서비스 시작에 대한 간단한 설명. 간단히 말해서 운영 체제는 MySQL 관련 파일을로드 한 다음 MySQL 데몬을 시작합니다. 여기에는 구성이 포함됩니다
 MySQL 설치 후 데이터베이스 성능을 최적화하는 방법
Apr 08, 2025 am 11:36 AM
MySQL 성능 최적화는 설치 구성, 인덱싱 및 쿼리 최적화, 모니터링 및 튜닝의 세 가지 측면에서 시작해야합니다. 1. 설치 후 innodb_buffer_pool_size 매개 변수와 같은 서버 구성에 따라 my.cnf 파일을 조정해야합니다. 2. 과도한 인덱스를 피하기 위해 적절한 색인을 작성하고 Execution 명령을 사용하여 실행 계획을 분석하는 것과 같은 쿼리 문을 최적화합니다. 3. MySQL의 자체 모니터링 도구 (showprocesslist, showstatus)를 사용하여 데이터베이스 건강을 모니터링하고 정기적으로 백업 및 데이터베이스를 구성하십시오. 이러한 단계를 지속적으로 최적화함으로써 MySQL 데이터베이스의 성능을 향상시킬 수 있습니다.
 고로드 애플리케이션의 MySQL 성능을 최적화하는 방법은 무엇입니까?
Apr 08, 2025 pm 06:03 PM
MySQL 데이터베이스 성능 최적화 안내서 리소스 집약적 응용 프로그램에서 MySQL 데이터베이스는 중요한 역할을 수행하며 대규모 트랜잭션 관리를 담당합니다. 그러나 응용 프로그램 규모가 확장됨에 따라 데이터베이스 성능 병목 현상은 종종 제약이됩니다. 이 기사는 일련의 효과적인 MySQL 성능 최적화 전략을 탐색하여 응용 프로그램이 고 부하에서 효율적이고 반응이 유지되도록합니다. 실제 사례를 결합하여 인덱싱, 쿼리 최적화, 데이터베이스 설계 및 캐싱과 같은 심층적 인 주요 기술을 설명합니다. 1. 데이터베이스 아키텍처 설계 및 최적화 된 데이터베이스 아키텍처는 MySQL 성능 최적화의 초석입니다. 몇 가지 핵심 원칙은 다음과 같습니다. 올바른 데이터 유형을 선택하고 요구 사항을 충족하는 가장 작은 데이터 유형을 선택하면 저장 공간을 절약 할 수있을뿐만 아니라 데이터 처리 속도를 향상시킬 수 있습니다.
 MySQL은 인터넷이 필요합니까?
Apr 08, 2025 pm 02:18 PM
MySQL은 기본 데이터 저장 및 관리를위한 네트워크 연결없이 실행할 수 있습니다. 그러나 다른 시스템과의 상호 작용, 원격 액세스 또는 복제 및 클러스터링과 같은 고급 기능을 사용하려면 네트워크 연결이 필요합니다. 또한 보안 측정 (예 : 방화벽), 성능 최적화 (올바른 네트워크 연결 선택) 및 데이터 백업은 인터넷에 연결하는 데 중요합니다.


