

Nginx 서버를 사용하도록 Node.js를 구성하는 방법

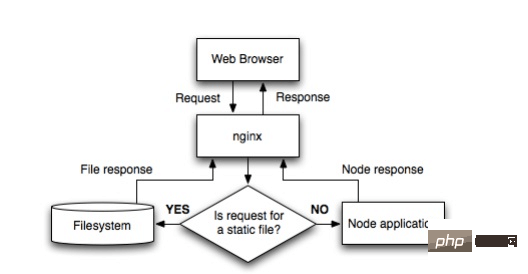
Flowchart
nginx 구성은 다음과 같습니다.
 http {
  proxy_cache_path /var/cache/nginx levels=1:2 keys_zone=one:8m max_size=3000m inactive=600m;
  proxy_temp_path /var/tmp;
  include    mime.types;
  default_type application/octet-stream;
  sendfile    on;
  keepalive_timeout 65;

  gzip on;
  gzip_comp_level 6;
  gzip_vary on;
  gzip_min_length 1000;
  gzip_proxied any;
  gzip_types text/plain text/html text/css application/json application/x-javascript text/xml application/xml application/xml+rss text/javascript;
  gzip_buffers 16 8k;

  ssl_certificate /some/location/sillyfacesociety.com.bundle.crt;
  ssl_certificate_key /some/location/sillyfacesociety.com.key;
  ssl_protocols    sslv3 tlsv1;
  ssl_ciphers high:!anull:!md5;

  upstream silly_face_society_upstream {
   server 127.0.0.1:61337;
   server 127.0.0.1:61338;
   keepalive 64;
  }

  server {
   listen 80;
   listen 443 ssl;

   server_name sillyfacesociety.com;
   return 301 $scheme://www.sillyfacesociety.com$request_uri;
  }

  server {
    listen 80;
    listen 443 ssl;

    server_name www.sillyfacesociety.com;

    error_page 502 /errors/502.html;

    location ~ ^/(images/|img/|javascript/|js/|css/|stylesheets/|flash/|media/|static/|robots.txt|humans.txt|favicon.ico) {
     root /usr/local/silly_face_society/node/public;
     access_log off;
     expires max;
    }

    location /errors {
     internal;
     alias /usr/local/silly_face_society/node/public/errors;
    }

    location / {
     proxy_redirect off;
     proxy_set_header  x-real-ip      $remote_addr;
     proxy_set_header  x-forwarded-for $proxy_add_x_forwarded_for;
     proxy_set_header  x-forwarded-proto $scheme;
     proxy_set_header  host          $http_host;
     proxy_set_header  x-nginx-proxy  true;
     proxy_set_header  connection "";
     proxy_http_version 1.1;
     proxy_cache one;
     proxy_cache_key sfs$request_uri$scheme;
     proxy_pass     http://silly_face_society_upstream;
    }
  }
}구성 섹션 설명
http {
  ...
  upstream silly_face_society_upstream {
   server 127.0.0.1:61337;
   server 127.0.0.1:61338;
   keepalive 64;
  }
  ...
}nginx는 여러 nodo.js 인스턴스의 부하를 분산합니다. keepalive 64는 nginx에게 언제든지 프록시 서버에 대한 최소 64개의 http/1.1 연결을 유지하도록 지시합니다. 트래픽이 더 많으면 nginx는 더 많은 연결을 엽니다.
http {
  ...
  server {
    ...
    location / {
     proxy_redirect off;
     proxy_set_header  x-real-ip      $remote_addr;
     proxy_set_header  x-forwarded-for $proxy_add_x_forwarded_for;
     proxy_set_header  host          $http_host;
     proxy_set_header  x-nginx-proxy  true;
     ...
     proxy_set_header  connection "";
     proxy_http_version 1.1;
     proxy_pass     http://silly_face_society_upstream;
    }
    ...
  }
} 일치하는 요청을 프록시에 보냅니다. nginx의 일치 규칙에 대해서는 이전 기사를 읽을 수 있습니다.
nginx는 정적 콘텐츠를 처리합니다
http {
  ...
  server {
    ...
    location ~ ^/(images/|img/|javascript/|js/|css/|stylesheets/|flash/|media/|static/|robots.txt|humans.txt|favicon.ico) {
     root /usr/local/silly_face_society/node/public;
     access_log off;
     expires max;
    }
    ...
  }
}캐시 설정
http {
  ...
  proxy_cache_path /var/cache/nginx levels=1:2 keys_zone=one:8m max_size=3000m inactive=600m;
  proxy_temp_path /var/tmp;
  ...
}


http {
 server {
   ...
   location / {
     ...
     proxy_cache one;
     proxy_cache_key sfs$request_uri$scheme;
     ...
   }
   ...
 }
}캐시는 http 헤더를 통해 제어됩니다.
helloworld
한번 시도해 보겠습니다. helloworld.js
var http = require('http');


http.createserver(function (request, response) {

 response.writehead(200, {'content-type': 'text/plain'});
 response.end('hello world\n');
}).listen(61337);


console.log('server running at http://127.0.0.1:61337/');를 작성하고 node helloworld.js 명령을 사용하여 열어보겠습니다. 이렇게 하면 로컬 머신에서 실행 중인 nodejs 프로그램이 열리고 차지하게 됩니다. 포트 8000. 직접 수정할 수 있습니다.
이 시점에서 nginx의 vhost.conf 설정이 다음과 같아야 합니다:
server {
  listen 80;
  server_name jb51.net.jb51.net;
  location / {
  proxy_pass http://127.0.0.1:61337;
  }
}웹사이트 도메인 이름을 설정한 다음 포트를 80으로 설정하고 마지막으로 Proxy_pass를 http://127.0.0.1:61337로 설정합니다. , 그리고 jb51.net:80의 요청이 nodejs 프로그램으로 전달됩니다.
nginx를 다시 시작하고 도메인 이름에 액세스하면 helloworld를 볼 수 있습니다.
node.js 자체가 서버로 사용될 수 있는 것은 사실이지만, 예를 들어 Welcome.js에 포트 80을 설정하면 됩니다.
그러나 하나의 기계가 여러 웹사이트를 운영하고 다른 웹사이트는 다른 서버를 사용합니다. 포트 80이 이미 사용 중이면 다른 포트로 프록시를 통해 처리될 수 있습니다.
위 내용은 Nginx 서버를 사용하도록 Node.js를 구성하는 방법의 상세 내용입니다. 자세한 내용은 PHP 중국어 웹사이트의 기타 관련 기사를 참조하세요!

핫 AI 도구

Undresser.AI Undress
사실적인 누드 사진을 만들기 위한 AI 기반 앱

AI Clothes Remover
사진에서 옷을 제거하는 온라인 AI 도구입니다.

Undress AI Tool
무료로 이미지를 벗다

Clothoff.io
AI 옷 제거제

Video Face Swap
완전히 무료인 AI 얼굴 교환 도구를 사용하여 모든 비디오의 얼굴을 쉽게 바꾸세요!

인기 기사
뜨거운 도구

메모장++7.3.1
사용하기 쉬운 무료 코드 편집기

SublimeText3 중국어 버전
중국어 버전, 사용하기 매우 쉽습니다.

스튜디오 13.0.1 보내기
강력한 PHP 통합 개발 환경

드림위버 CS6
시각적 웹 개발 도구

SublimeText3 Mac 버전
신 수준의 코드 편집 소프트웨어(SublimeText3)
뜨거운 주제
 7675
7675
 15
1393
52
1207
24
91
11
73
19
15
1393
52
1207
24
91
11
73
19

 nginx가 시작되었는지 확인하는 방법
Apr 14, 2025 pm 01:03 PM
nginx가 시작되었는지 확인하는 방법
Apr 14, 2025 pm 01:03 PM
nginx가 시작되었는지 확인하는 방법 : 1. 명령 줄을 사용하십시오 : SystemCTL 상태 nginx (linux/unix), netstat -ano | Findstr 80 (Windows); 2. 포트 80이 열려 있는지 확인하십시오. 3. 시스템 로그에서 nginx 시작 메시지를 확인하십시오. 4. Nagios, Zabbix 및 Icinga와 같은 타사 도구를 사용하십시오.
 Nginx에서 클라우드 서버 도메인 이름을 구성하는 방법
Apr 14, 2025 pm 12:18 PM
Nginx에서 클라우드 서버 도메인 이름을 구성하는 방법
Apr 14, 2025 pm 12:18 PM
클라우드 서버에서 nginx 도메인 이름을 구성하는 방법 : 클라우드 서버의 공개 IP 주소를 가리키는 레코드를 만듭니다. Nginx 구성 파일에 가상 호스트 블록을 추가하여 청취 포트, 도메인 이름 및 웹 사이트 루트 디렉토리를 지정합니다. Nginx를 다시 시작하여 변경 사항을 적용하십시오. 도메인 이름 테스트 구성에 액세스하십시오. 기타 참고 : HTTPS를 활성화하려면 SSL 인증서를 설치하고 방화벽에서 포트 80 트래픽을 허용하고 DNS 해상도가 적용되기를 기다립니다.
 nginx 버전을 확인하는 방법
Apr 14, 2025 am 11:57 AM
nginx 버전을 확인하는 방법
Apr 14, 2025 am 11:57 AM
nginx 버전을 쿼리 할 수있는 메소드는 다음과 같습니다. nginx -v 명령을 사용하십시오. nginx.conf 파일에서 버전 지시문을 봅니다. nginx 오류 페이지를 열고 페이지 제목을 봅니다.
 Docker 컨테이너의 이름을 확인하는 방법
Apr 15, 2025 pm 12:21 PM
Docker 컨테이너의 이름을 확인하는 방법
Apr 15, 2025 pm 12:21 PM
단계를 따르면 Docker 컨테이너 이름을 쿼리 할 수 있습니다. 모든 컨테이너 (Docker PS)를 나열하십시오. 컨테이너 목록을 필터링합니다 (GREP 명령 사용). 컨테이너 이름 ( "이름"열에 위치)을 가져옵니다.
 Windows에서 nginx를 구성하는 방법
Apr 14, 2025 pm 12:57 PM
Windows에서 nginx를 구성하는 방법
Apr 14, 2025 pm 12:57 PM
Windows에서 Nginx를 구성하는 방법은 무엇입니까? nginx를 설치하고 가상 호스트 구성을 만듭니다. 기본 구성 파일을 수정하고 가상 호스트 구성을 포함하십시오. 시작 또는 새로 고침 Nginx. 구성을 테스트하고 웹 사이트를보십시오. SSL을 선택적으로 활성화하고 SSL 인증서를 구성하십시오. 포트 80 및 443 트래픽을 허용하도록 방화벽을 선택적으로 설정하십시오.
 nginx 서버를 시작하는 방법
Apr 14, 2025 pm 12:27 PM
nginx 서버를 시작하는 방법
Apr 14, 2025 pm 12:27 PM
Nginx 서버를 시작하려면 다른 운영 체제에 따라 다른 단계가 필요합니다. Linux/Unix System : Nginx 패키지 설치 (예 : APT-Get 또는 Yum 사용). SystemCTL을 사용하여 nginx 서비스를 시작하십시오 (예 : Sudo SystemCtl start nginx). Windows 시스템 : Windows 바이너리 파일을 다운로드하여 설치합니다. nginx.exe 실행 파일을 사용하여 nginx를 시작하십시오 (예 : nginx.exe -c conf \ nginx.conf). 어떤 운영 체제를 사용하든 서버 IP에 액세스 할 수 있습니다.
 Docker 용 컨테이너를 만드는 방법
Apr 15, 2025 pm 12:18 PM
Docker 용 컨테이너를 만드는 방법
Apr 15, 2025 pm 12:18 PM
Docker에서 컨테이너 만들기 : 1. 이미지를 당기기 : Docker Pull [Mirror Name] 2. 컨테이너 만들기 : Docker Run [옵션] [미러 이름] [명령] 3. 컨테이너 시작 : Docker Start [컨테이너 이름]
 Docker가 컨테이너를 시작하는 방법
Apr 15, 2025 pm 12:27 PM
Docker가 컨테이너를 시작하는 방법
Apr 15, 2025 pm 12:27 PM
Docker Container Startup 단계 : 컨테이너 이미지를 당기기 : "Docker Pull [Mirror Name]"을 실행하십시오. 컨테이너 생성 : "docker"[옵션] [미러 이름] [명령 및 매개 변수]를 사용하십시오. 컨테이너를 시작하십시오 : "Docker start [컨테이너 이름 또는 ID]"를 실행하십시오. 컨테이너 상태 확인 : 컨테이너가 "Docker PS"로 실행 중인지 확인하십시오.
