페이징 기능은 다양한 웹사이트 및 시스템(바이두 검색결과 페이지 매김 등)에서 없어서는 안 될 부분으로, 페이지에 데이터 양이 많을 경우 페이징 기능이 반영됩니다. 그 기능은 다음과 같습니다: 아래 5개.
(1) 시스템 리소스 소비 감소
(2) 데이터베이스 쿼리 성능 향상
(3) 페이지 액세스 속도 향상
(4) 사용자의 탐색 습관 충족
(5) 적응 페이지 레이아웃
페이징 기능을 구현해야 하므로 더 많은 데이터가 필요합니다
DROP TABLE IF EXISTS tb_user;

CREATE TABLE tb_user (
    id int(11) NOT NULL AUTO_INCREMENT COMMENT '主键id',
    name varchar(100) NOT NULL DEFAULT '' COMMENT '登录名',
    password varchar(100) NOT NULL DEFAULT '' COMMENT '密码',
    PRIMARY KEY (id) USING BTREE
) ENGINE = InnoDB CHARACTER SET = utf8;

insert into tb_user (id,name,password)
value (1,'C','123456'),
(2,'C++','123456'),
(3,'Java','123456'),
(4,'Python','123456'),
(5,'R','123456'),
(6,'C#','123456');

insert into tb_user (id,name,password) value (7,'test1','123456');
insert into tb_user (id,name,password) value (8,'test2','123456');
insert into tb_user (id,name,password) value (9,'test3','123456');
insert into tb_user (id,name,password) value (10,'test4','123456');
insert into tb_user (id,name,password) value (11,'test5','123456');
insert into tb_user (id,name,password) value (12,'test6','123456');
insert into tb_user (id,name,password) value (13,'test7','123456');
insert into tb_user (id,name,password) value (14,'test8','123456');
insert into tb_user (id,name,password) value (15,'test9','123456');
insert into tb_user (id,name,password) value (16,'test10','123456');
insert into tb_user (id,name,password) value (17,'test11','123456');
insert into tb_user (id,name,password) value (18,'test12','123456');
insert into tb_user (id,name,password) value (19,'test13','123456');
insert into tb_user (id,name,password) value (20,'test14','123456');
insert into tb_user (id,name,password) value (21,'test15','123456');
insert into tb_user (id,name,password) value (22,'test16','123456');
insert into tb_user (id,name,password) value (23,'test17','123456');
insert into tb_user (id,name,password) value (24,'test18','123456');
insert into tb_user (id,name,password) value (25,'test19','123456');
insert into tb_user (id,name,password) value (26,'test20','123456');
insert into tb_user (id,name,password) value (27,'test21','123456');
insert into tb_user (id,name,password) value (28,'test22','123456');
insert into tb_user (id,name,password) value (29,'test23','123456');
insert into tb_user (id,name,password) value (30,'test24','123456');
insert into tb_user (id,name,password) value (31,'test25','123456');
insert into tb_user (id,name,password) value (32,'test26','123456');
insert into tb_user (id,name,password) value (33,'test27','123456');
insert into tb_user (id,name,password) value (34,'test28','123456');
insert into tb_user (id,name,password) value (35,'test29','123456');
insert into tb_user (id,name,password) value (36,'test30','123456');
insert into tb_user (id,name,password) value (37,'test31','123456');
insert into tb_user (id,name,password) value (38,'test32','123456');
insert into tb_user (id,name,password) value (39,'test33','123456');
insert into tb_user (id,name,password) value (40,'test34','123456');
insert into tb_user (id,name,password) value (41,'test35','123456');
insert into tb_user (id,name,password) value (42,'test36','123456');
insert into tb_user (id,name,password) value (43,'test37','123456');
insert into tb_user (id,name,password) value (44,'test38','123456');
insert into tb_user (id,name,password) value (45,'test39','123456');
insert into tb_user (id,name,password) value (46,'test40','123456');
insert into tb_user (id,name,password) value (47,'test41','123456');
insert into tb_user (id,name,password) value (48,'test42','123456');
insert into tb_user (id,name,password) value (49,'test43','123456');
insert into tb_user (id,name,password) value (50,'test44','123456');
insert into tb_user (id,name,password) value (51,'test45','123456');유틸 패키지를 생성합니다. 패키지의 새로운 Result 일반 결과 클래스 코드는 다음과 같습니다.
package ltd.newbee.mall.entity;

public class User {
    private Integer id;
    private String name;
    private String password;

    public Integer getId() {
        return id;
    }

    public void setId(Integer id) {
        this.id = id;
    }

    public String getName() {
        return name;
    }

    public void setName(String name) {
        this.name = name;
    }

    public String getPassword() {
        return password;
    }

    public void setPassword(String password) {
        this.password = password;
    }
}백엔드 인터페이스에서 반환된 데이터는 비즈니스 코드, 반환 정보 및 실제 데이터 결과를 포함하여 위 형식에 따라 캡슐화됩니다. 이 형식은 개발자가 직접 설정하며 다른 더 나은 솔루션이 있는 경우 적절하게 조정할 수 있습니다.
util 패키지에 새로운 PageResult 일반 결과 클래스를 생성합니다. 코드는 다음과 같습니다:
package ltd.newbee.mall.util;

import java.util.List;

/**
 * 分页工具类
 */
public class PageResult {
    //总记录数
    private int totalCount;
    //每页记录数
    private int pageSize;
    //总页数
    private int totalPage;
    //当前页数
    private int currPage;
    //列表数据
    private List<?> list;

    /**
     *
     * @param totalCount 总记录数
     * @param pageSize 每页记录数
     * @param currPage 当前页数
     * @param list 列表数据
     */
    public PageResult(int totalCount, int pageSize, int currPage, List<?> list) {
        this.totalCount = totalCount;
        this.pageSize = pageSize;
        this.currPage = currPage;
        this.list = list;
        this.totalPage = (int) Math.ceil((double) totalCount / pageSize);
    }

    public int getTotalCount() {
        return totalCount;
    }

    public void setTotalCount(int totalCount) {
        this.totalCount = totalCount;
    }

    public int getPageSize() {
        return pageSize;
    }

    public void setPageSize(int pageSize) {
        this.pageSize = pageSize;
    }

    public int getTotalPage() {
        return totalPage;
    }

    public void setTotalPage(int totalPage) {
        this.totalPage = totalPage;
    }

    public int getCurrPage() {
        return currPage;
    }

    public void setCurrPage(int currPage) {
        this.currPage = currPage;
    }

    public List<?> getList() {
        return list;
    }

    public void setList(List<?> list) {
        this.list = list;
    }
}두 개의 새로운 메소드 findUsers() 및 getTotalUser() 추가 UserDao 인터페이스에서 코드는 아래와 같습니다:
/**
     * 返回分页数据列表
     *
     * @param pageUtil
     * @return
     */
    List<User> findUsers(PageQueryUtil pageUtil);

    /**
     * 返回数据总数
     *
     * @param pageUtil
     * @return
     */
int getTotalUser(PageQueryUtil pageUtil);UserMapper에 이 두 메소드의 매핑 문을 추가합니다. 표시:
<!--分页-->
    <!--查询用户列表-->
    <select id="findUsers" parameterType="Map" resultMap="UserResult">
        select id,name,password from tb_user
        order by id desc
        <if test="start!=null and limit!=null">
            limit #{start}.#{limit}
        </if>
    </select>
    <!--查询用户总数-->
    <select id="getTotalUser" parameterType="Map" resultType="int">
        select count(*) from tb_user
</select>4.3 제어 계층
페이징 요청을 처리하고 쿼리 결과를 반환하는 데 사용되는 새로운 PageTestController 클래스를 컨트롤러 패키지에 생성합니다. 코드는 다음과 같습니다.
import ltd.newbee.mall.dao.UserDao;
import ltd.newbee.mall.entity.User;
import ltd.newbee.mall.util.PageResult;
import ltd.newbee.mall.util.PageQueryUtil;
import org.springframework.beans.factory.annotation.Autowired;
import org.springframework.stereotype.Service;

import java.util.List;

@Service
public class UserService {

    @Autowired
    private UserDao userDao;

    public PageResult getUserPage(PageQueryUtil pageUtil){
        //当前页面中的数据列表
        List<User> users = userDao.findUsers(pageUtil);
        //数据总条数,用于计算分页数据
        int total = userDao.getTotalUser(pageUtil);
        //分页信息封装
        PageResult pageResult = new PageResult(users,total,pageUtil.getLimit(),pageUtil.getPage());
        return pageResult;
    }
}5.jqGrid 페이징 플러그인
jqGrid는 그리드 데이터를 표시하는 데 사용되는 jQuery 플러그인입니다. 개발자는 jqGrid를 사용하여 프런트 엔드 페이지와 백그라운드 데이터 간의 Ajax 비동기 통신을 쉽게 구현하고 페이징 기능을 구현할 수 있습니다. 동시에 jqGrid는 오픈 소스 페이징 플러그인이며 소스 코드는 반복적인 업데이트 상태에 있습니다.
jqGrid를 다운로드한 후 파일의 압축을 풀고 압축을 푼 파일을 프로젝트의 정적 디렉터리에 직접 드래그합니다.
다음은 jqGrid에서 페이징을 구현하는 단계입니다. 먼저 jqGrid를 소개합니다. 페이징 인 프론트 엔드 페이지 코드 플러그인에 필요한 소스 파일, 코드는 다음과 같습니다.
@RestController
@RequestMapping("users")
public class PageTestController {

    @Autowired
    private UserService userService;

    //分页功能测试
    @RequestMapping(value = "/list",method = RequestMethod.GET)
    public Result list(@RequestParam Map<String,Object> params){
        Result result = new Result();
        if (StringUtils.isEmpty(params.get("page"))||StringUtils.isEmpty(params.get("limit"))){
            //返回错误码
            result.setResultCode(500);
            //错误信息
            result.setMessage("参数异常!");
            return result;
        }
        //封装查询参数
        PageQueryUtil queryParamList = new PageQueryUtil(params);
        //查询并封装分页结果集
        PageResult userPage = userService.getUserPage(queryParamList);
        //返回成功码
        result.setResultCode(200);
        result.setMessage("查询成功");
        //返回分页数据
        result.setData(userPage);
        return result;
    }
}두 번째로 페이지에서 페이징 데이터를 표시해야 하는 영역에 jqGrid 초기화를 위한 코드를 추가합니다.
<link href="plugins/jqgrid-5.8.2/ui.jqgrid-bootstrap4.css" rel="external nofollow"  rel="stylesheet"/>
<!--jqGrid依赖jQuery,因此需要先引入jquery.min.js文件,下方地址为字节跳动提供的cdn地址-->
<script src="http://s3.pstatp.com/cdn/expire-1-M/jquery/3.3.1/jquery.min.js"></script>
<!--grid.locale-cn.js为国际化所需的文件,-cn表示中文-->
<script src="plugins/jqgrid-5.8.2/grid.locale-cn.js"></script>
<script src="plugins/jqgrid-5.8.2/jquery.jqGrid.min.js"></script>
마지막으로 jqGrid 페이징 플러그인의 jqGrid() 메소드를 호출하여 페이징 표시 영역을 렌더링합니다. 코드는 다음과 같습니다.


 resources/static 디렉토리에 새 jqgrid-page-test.html 파일을 만듭니다. 코드는 다음과 같습니다.
<!--jqGrid必要DOM,用于创建表格展示列表数据-->
<table id="jqGrid" class="table table-bordered"></table>

<!--jqGrid必要DOM,分页信息区域-->
<div id="jqGridPager"></div>
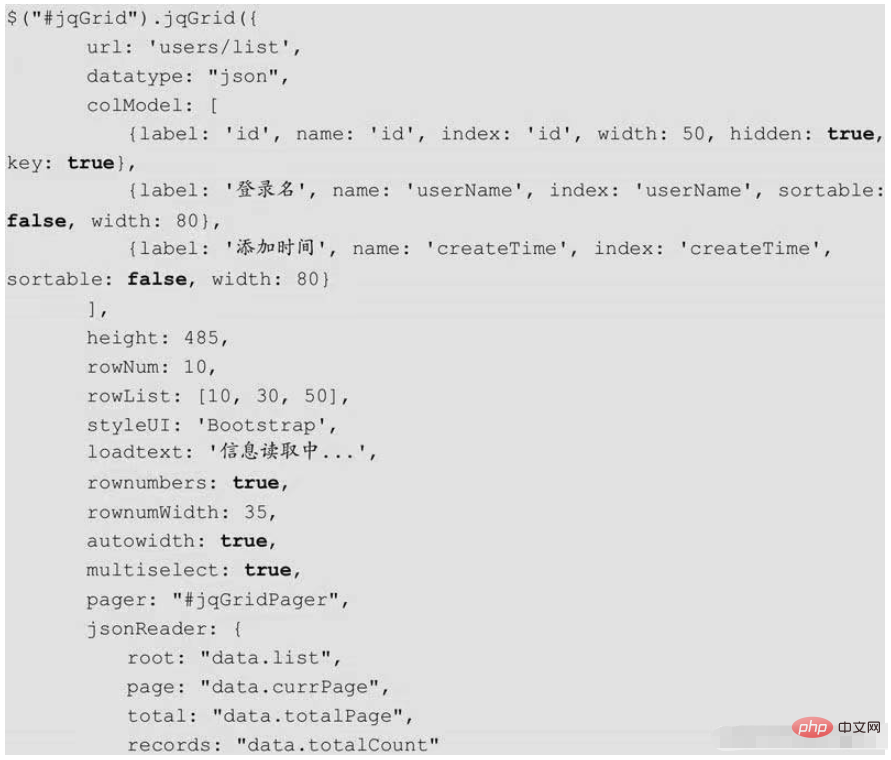
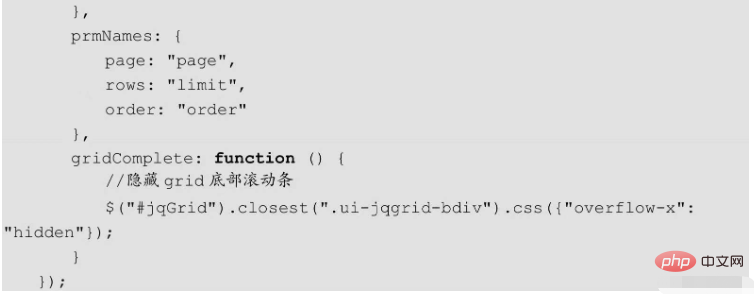
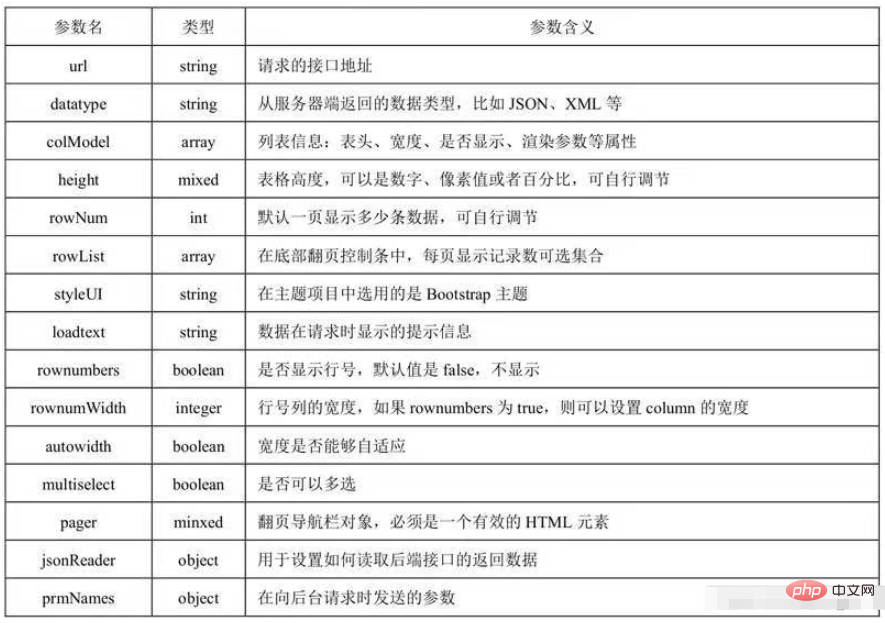
jqGrid 초기화
새 jqgrid 만들기- resources/static 디렉토리 -test.js 파일의 페이지에서 코드는 다음과 같습니다:
<!DOCTYPE html>
<html>
<head>
    <meta charset="UTF-8">
    <title>jqGrid分页测试</title>
    <!--引入bootstrap样式文件-->
    <link rel="stylesheet" href="/static/bootstrap-5.3.0-alpha3-dist/css/bootstrap.css" rel="external nofollow" />
    <link href="jqGrid-5.8.2/css/ui.jqgrid-bootstrap4.css" rel="external nofollow"  rel="stylesheet"/>
</head>
<body>
<div >
    <!--数据展示列表,id为jqGrid-->
    <table id="jqGrid" class="table table-bordered"></table>
    <!--分页按钮展示区-->
    <div id="jqGridPager"></div>
</div>
</body>
<!--jqGrid依赖jQuery,因此需要先引入jquery.min.js文件,下方地址为字节跳动提供的cdn地址-->
<script src="http://s3.pstatp.com/cdn/expire-1-M/jquery/3.3.1/jquery.min.js"></script>
<!--grid.locale-cn.js为国际化所需的文件,-cn表示中文-->
<script src="plugins/jqgrid-5.8.2/grid.locale-cn.js"></script>
<script src="plugins/jqgrid-5.8.2/jquery.jqGrid.min.js"></script>
<script src="jqgrid-page-test.js"></script>
</html>위 내용은 springboot 페이징 기능 구현 방법의 상세 내용입니다. 자세한 내용은 PHP 중국어 웹사이트의 기타 관련 기사를 참조하세요!