

nginx Proxy_pass 역방향 프록시 구성 예제 분석

다음은 간단한 예입니다.
centos7 시스템 라이브러리에는 기본적으로 nginx rpm 패키지가 없으므로 먼저 rpm 종속성 라이브러리를 업데이트해야 합니다.
1) yum을 사용하여 nginx를 설치하려면 nginx를 포함해야 합니다. library , nginx 라이브러리 설치
[root@localhost ~]# rpm -uvh http://nginx.org/packages/centos/7/noarch/rpms/nginx-release-centos-7-0.el7.ngx.noarch.rpm
2) 다음 명령을 사용하여 nginx
[root@localhost ~]# yum install nginx
3) nginx 구성
[root@localhost ~]# cd /etc/nginx/conf.d/
[root@localhost conf.d]# cat test.conf
server {
listen 80;
server_name localhost;
location / {
root /var/www/html;
index index.html;
}
}

[root@localhost conf.d]# cat /var/www/html/index.html
this is page of test!!!!4) nginx 시작
[root@localhost ~]# service nginx start //或者使用 systemctl start nginx.service
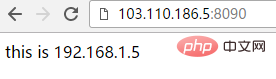
5) 테스트 액세스(103.110.186.23은 192.168입니다.) .1.23 머신 외부 네트워크 IP)
[root@localhost conf.d]# curl http://192.168.1.23
this is page of test!!!!
다음 상황을 살펴보십시오. http://192.168.1.23/proxy/index.html을 사용하여 액세스 테스트를 수행하세요
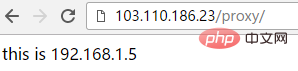
테스트의 편의를 위해 먼저 다른 머신 192.168을 사용하십시오. .1.5 포트 8090에 nginx를 배포합니다. 구성은 다음과 같습니다.
[root@bastion-idc ~]# cat /usr/local/nginx/conf/vhosts/haha.conf
server {
listen 8090;
server_name localhost;
location / {
root /var/www/html;
index index.html;
}
}
[root@bastion-idc ~]# cat /var/www/html/index.html
this is 192.168.1.5
[root@bastion-idc ~]# /usr/local/nginx/sbin/nginx -s reload 테스트 액세스(103.110.186.5는 192.168.1.5의 외부 네트워크 IP입니다.):
[root@bastion-idc ~]# curl http://192.168.1.5:8090
this is 192.168.1.5
192.168.1.23은 는 nginx 역방향 프록시 머신, nginx 구성은 다음과 같습니다.
1) 첫 번째 경우:
[root@localhost conf.d]# cat test.conf
server {
listen 80;
server_name localhost;
location / {
root /var/www/html;
index index.html;
}

location /proxy/ {
 proxy_pass http://192.168.1.5:8090/;
}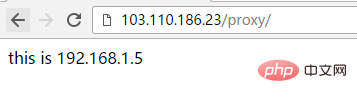
} 이렇게 하면 http://192.168.1.23/proxy/에 대한 액세스가 http://192.168에 대한 프록시가 됩니다. .1.5:8090/. p와 일치하는 프록시 디렉토리는 루트 디렉토리 /var/www/html
에 존재할 필요가 없습니다. 터미널에서 http://192.168.1.23/proxy에 액세스하는 경우(즉, 뒤에 "/"가 없음) ), 액세스가 실패합니다! Proxy_pass
[root@localhost conf.d]# curl http://192.168.1.23/proxy/
this is 192.168.1.5
[root@localhost conf.d]# curl http://192.168.1.23/proxy
<html>
<head><title>301 moved permanently</title></head>
<body bgcolor="white">
<center><h1>301 moved permanently</h1></center>
<hr><center>nginx/1.10.3</center>
</body>
</html>
에서 설정한 url 뒤에 "/"가 추가되기 때문에 페이지가 http://103.110.186.23/proxy에 접속하면 자동으로 "/"가 추가됩니다. (같은 이유는 url 뒤에 "/"가 추가되기 때문입니다. proxy_pass로 구성), http://103.110.186.5:8090
2)의 결과로 역전됩니다. 두 번째 경우, Proxy_pass
[root@localhost conf.d]# cat test.conf
server {
listen 80;
server_name localhost;
location / {
root /var/www/html;
index index.html;
}

location /proxy/ {
 proxy_pass http://192.168.1.5:8090;
}
}
[root@localhost conf.d]# service nginx restart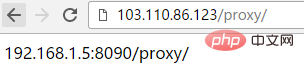
redirecting to /bin/systemctl restart nginx.service로 구성한 URL 뒤에 "/"가 추가되지 않으면 다음을 방문하세요. http://192.168.1.23/proxy 또는 http://192.168.1.23/proxy/는 실패합니다!
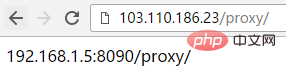
이 구성 후 http://192.168.1.23/proxy/에 대한 액세스는 http://192.168.1.5:8090/proxy/
3) 세 번째 상황
[root@localhost conf.d]# cat test.conf
server {
listen 80;
server_name localhost;
location / {
root /var/www/html;
index index.html;
}
location /proxy/ {
proxy_pass http://192.168.1.5:8090/haha/;
}
}
[root@localhost conf.d]# service nginx restart
redirecting to /bin/systemctl restart nginx.service
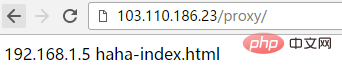
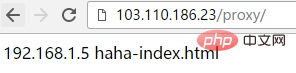
[root@localhost conf.d]# curl http://192.168.1.23/proxy/
192.168.1.5 haha-index.html이렇게 구성한 경우 http://103.110.186.23/proxy를 방문하여 http://192.168.1.5:8090/haha/
4)로 프록시 설정합니다. 4) 네 번째 상황: 세 번째 구성의 URL에 상대적 "/" 추가
[root@localhost conf.d]# cat test.conf
server {
listen 80;
server_name localhost;
location / {
root /var/www/html;
index index.html;
}

location /proxy/ {
 proxy_pass http://192.168.1.5:8090/haha;
}
}
[root@localhost conf.d]# service nginx restart
redirecting to /bin/systemctl restart nginx.service
[root@localhost conf.d]# curl http://192.168.1.23/proxy/index.html
192.168.1.5 hahaindex.html위 구성 후 http://192.168.1.23/proxy/index.html에 액세스하면 http://192.168.1.5:8090/hahaindex.html
로 프록시가 됩니다. 마찬가지로 http:/에 액세스합니다. /192.168.1.23/proxy/test.html은 http://192.168.1.5:8090/hahatest.html
[root@localhost conf.d]# curl http://192.168.1.23/proxy/index.html
192.168.1.5 hahaindex.html
로 프록시됩니다. 이 경우 http://192.168은 1.23/proxy에 직접 액세스할 수 없습니다. /, 기본 index.html 파일도 유지되어야 합니다. 그렇지 않으면 액세스가 실패합니다!

------------------------------- ------ -----------------
위 4가지 경로 뒤에 "/"를 추가합니다. 경로 뒤에 "/"가 없는 상황에 대해 이야기해 보겠습니다.
1) 첫 번째 경우, Proxy_pass 뒤의 URL에 "/"가 있습니다:
[root@localhost conf.d]# cat test.conf
server {
listen 80;
server_name localhost;
location / {
root /var/www/html;
index index.html;
}

location /proxy {
 proxy_pass http://192.168.1.5:8090/;
}
}
[root@localhost conf.d]# service nginx restart
redirecting to /bin/systemctl restart nginx.service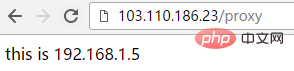
2 ) 두 번째 경우, Proxy_pass 뒤의 url에 "/"
[root@localhost conf.d]# cat test.conf
server {
listen 80;
server_name localhost;
location / {
root /var/www/html;
index index.html;
}

location /proxy {
 proxy_pass http://192.168.1.5:8090;
}
}
[root@localhost conf.d]# service nginx restart
redirecting to /bin/systemctl restart nginx.service
[root@localhost conf.d]#가 포함되어 있지 않은 경우, 이렇게 구성하면 http://103.110.186.23/proxy에 접속하면 자동으로 "/"가 추가됩니다(즉, http://103.110.186.23/proxy/), 192.168.1.5:8090/proxy/
3) 세 번째 경우
[root@localhost conf.d]# cat test.conf
server {
listen 80;
server_name localhost;
location / {
root /var/www/html;
index index.html;
}

location /proxy {
 proxy_pass http://192.168.1.5:8090/haha/;
}
}
[root@localhost conf.d]# service nginx restart
redirecting to /bin/systemctl restart nginx.service이렇게 구성하면 http://103.110에 접속하게 됩니다. .186.23/proxy는 "/"(즉, http://103.110.186.23/proxy/가 됨), http://192.168.1.5:8090/haha/
4)에 대한 프록시를 자동으로 추가합니다. 네 번째 상황: 세 번째 구성과 비교하면 URL이 다릅니다. "/"
[root@localhost conf.d]# cat test.conf
server {
listen 80;
server_name localhost;
location / {
root /var/www/html;
index index.html;
}

location /proxy {
 proxy_pass http://192.168.1.5:8090/haha;
}
}
[root@localhost conf.d]# service nginx restart
redirecting to /bin/systemctl restart nginx.service
이렇게 구성하면 세 번째 결과와 마찬가지로 http://103.110.186.23/proxy에 액세스합니다. http://192.168.1.5:8090/haha/
로 프록시되었습니다.위 내용은 nginx Proxy_pass 역방향 프록시 구성 예제 분석의 상세 내용입니다. 자세한 내용은 PHP 중국어 웹사이트의 기타 관련 기사를 참조하세요!

핫 AI 도구

Undresser.AI Undress
사실적인 누드 사진을 만들기 위한 AI 기반 앱

AI Clothes Remover
사진에서 옷을 제거하는 온라인 AI 도구입니다.

Undress AI Tool
무료로 이미지를 벗다

Clothoff.io
AI 옷 제거제

AI Hentai Generator
AI Hentai를 무료로 생성하십시오.

인기 기사
뜨거운 도구

메모장++7.3.1
사용하기 쉬운 무료 코드 편집기

SublimeText3 중국어 버전
중국어 버전, 사용하기 매우 쉽습니다.

스튜디오 13.0.1 보내기
강력한 PHP 통합 개발 환경

드림위버 CS6
시각적 웹 개발 도구

SublimeText3 Mac 버전
신 수준의 코드 편집 소프트웨어(SublimeText3)
뜨거운 주제
 7540
7540
 15
1381
52
83
11
55
19
21
86
15
1381
52
83
11
55
19
21
86

 nginx가 시작되었는지 확인하는 방법
Apr 14, 2025 pm 01:03 PM
nginx가 시작되었는지 확인하는 방법
Apr 14, 2025 pm 01:03 PM
nginx가 시작되었는지 확인하는 방법 : 1. 명령 줄을 사용하십시오 : SystemCTL 상태 nginx (linux/unix), netstat -ano | Findstr 80 (Windows); 2. 포트 80이 열려 있는지 확인하십시오. 3. 시스템 로그에서 nginx 시작 메시지를 확인하십시오. 4. Nagios, Zabbix 및 Icinga와 같은 타사 도구를 사용하십시오.
 Linux에서 Nginx를 시작하는 방법
Apr 14, 2025 pm 12:51 PM
Linux에서 Nginx를 시작하는 방법
Apr 14, 2025 pm 12:51 PM
Linux에서 Nginx를 시작하는 단계 : Nginx가 설치되어 있는지 확인하십시오. systemctl start nginx를 사용하여 nginx 서비스를 시작하십시오. SystemCTL을 사용하여 NGINX를 사용하여 시스템 시작시 NGINX의 자동 시작을 활성화하십시오. SystemCTL 상태 nginx를 사용하여 시작이 성공했는지 확인하십시오. 기본 환영 페이지를 보려면 웹 브라우저의 http : // localhost를 방문하십시오.
 nginx가 시작되었는지 확인하는 방법은 무엇입니까?
Apr 14, 2025 pm 12:48 PM
nginx가 시작되었는지 확인하는 방법은 무엇입니까?
Apr 14, 2025 pm 12:48 PM
Linux에서는 다음 명령을 사용하여 nginx가 시작되었는지 확인하십시오. SystemCTL 상태 Nginx 판사 명령 출력에 따라 : "active : running"이 표시되면 Nginx가 시작됩니다. "Active : 비활성 (죽음)"이 표시되면 Nginx가 중지됩니다.
 Windows에서 nginx를 구성하는 방법
Apr 14, 2025 pm 12:57 PM
Windows에서 nginx를 구성하는 방법
Apr 14, 2025 pm 12:57 PM
Windows에서 Nginx를 구성하는 방법은 무엇입니까? nginx를 설치하고 가상 호스트 구성을 만듭니다. 기본 구성 파일을 수정하고 가상 호스트 구성을 포함하십시오. 시작 또는 새로 고침 Nginx. 구성을 테스트하고 웹 사이트를보십시오. SSL을 선택적으로 활성화하고 SSL 인증서를 구성하십시오. 포트 80 및 443 트래픽을 허용하도록 방화벽을 선택적으로 설정하십시오.
 Nginx403을 해결하는 방법
Apr 14, 2025 am 10:33 AM
Nginx403을 해결하는 방법
Apr 14, 2025 am 10:33 AM
Nginx 403 금지 된 오류를 수정하는 방법은 무엇입니까? 파일 또는 디렉토리 권한을 확인합니다. 2. 확인 파일을 확인하십시오. 3. nginx 구성 파일 확인; 4. nginx를 다시 시작하십시오. 다른 가능한 원인으로는 방화벽 규칙, Selinux 설정 또는 응용 프로그램 문제가 있습니다.
 Nginx 크로스 도메인의 문제를 해결하는 방법
Apr 14, 2025 am 10:15 AM
Nginx 크로스 도메인의 문제를 해결하는 방법
Apr 14, 2025 am 10:15 AM
Nginx 크로스 도메인 문제를 해결하는 두 가지 방법이 있습니다. 크로스 도메인 응답 헤더 수정 : 교차 도메인 요청을 허용하고 허용 된 메소드 및 헤더를 지정하고 캐시 시간을 설정하는 지시문을 추가하십시오. CORS 모듈 사용 : 모듈을 활성화하고 CORS 규칙을 구성하여 크로스 도메인 요청, 메소드, 헤더 및 캐시 시간을 허용합니다.
 Nginx 액세스 주소를 서버 IP로 설정하는 방법
Apr 14, 2025 am 11:36 AM
Nginx 액세스 주소를 서버 IP로 설정하는 방법
Apr 14, 2025 am 11:36 AM
Nginx에서 서버 IP에 대한 액세스 주소를 설정하려면 서버 블록을 구성하거나 청취 주소를 설정하십시오 (예 : 192.168.1.10:80) 서버 이름 (예 : Server_name example.com www.example.com 등)을 설정하거나 변경 사항을 적용하려면 서버 IP 및 Reload Nginx를 비워 두십시오.
 Nginx의 실행 상태를 확인하는 방법
Apr 14, 2025 am 11:48 AM
Nginx의 실행 상태를 확인하는 방법
Apr 14, 2025 am 11:48 AM
nginx의 실행 상태를 보는 방법은 다음과 같습니다. PS 명령을 사용하여 프로세스 상태를보십시오. nginx 구성 파일 /etc/nginx/nginx.conf를 봅니다. Nginx 상태 모듈을 사용하여 상태 끝점을 활성화하십시오. Prometheus, Zabbix 또는 Nagios와 같은 모니터링 도구를 사용하십시오.
