RHEL8에서 Nginx 웹 서비스를 배포하는 방법

Environment
Red Hat Enterprise Linux 릴리스 8.0 VMware Workstation Pro 14
Building steps
[root@localhost ~]# systemctl stop httpd  #把 httpd 停掉,防止它影响 Nginx[root@localhost ~]# yum install -y nginx[root@localhost ~]# systemctl start nginx[root@localhost ~]# iptables -F[root@localhost ~]# systemctl stop firewalld[root@localhost ~]# systemctl disable firewalld[root@localhost ~]# setenforce 0[root@localhost ~]# ifconfigens33: flags=4163  mtu 1500
       inet 192.168.10.118  netmask 255.255.255.0  broadcast 192.168.10.255
       inet6 fe80::e09a:769b:83f0:8efa  prefixlen 64  scopeid 0x20
       ether 00:50:56:34:0d:74  txqueuelen 1000  (Ethernet)
       RX packets 2908  bytes 1777392 (1.6 MiB)
       RX errors 0  dropped 0  overruns 0  frame 0
       TX packets 1800  bytes 244006 (238.2 KiB)
       TX errors 0  dropped 0 overruns 0  carrier 0  collisions 0

lo: flags=73  mtu 65536
       inet 127.0.0.1  netmask 255.0.0.0
       inet6 ::1  prefixlen 128  scopeid 0x10
       loop  txqueuelen 1000  (Local Loopback)
       RX packets 0  bytes 0 (0.0 B)
       RX errors 0  dropped 0  overruns 0  frame 0
       TX packets 0  bytes 0 (0.0 B)
       TX errors 0  dropped 0 overruns 0  carrier 0  collisions 0

virbr0: flags=4099  mtu 1500
       inet 192.168.122.1  netmask 255.255.255.0  broadcast 192.168.122.255
       ether 52:54:00:9c:ef:c6  txqueuelen 1000  (Ethernet)
       RX packets 0  bytes 0 (0.0 B)
       RX errors 0  dropped 0  overruns 0  frame 0
       TX packets 0  bytes 0 (0.0 B)
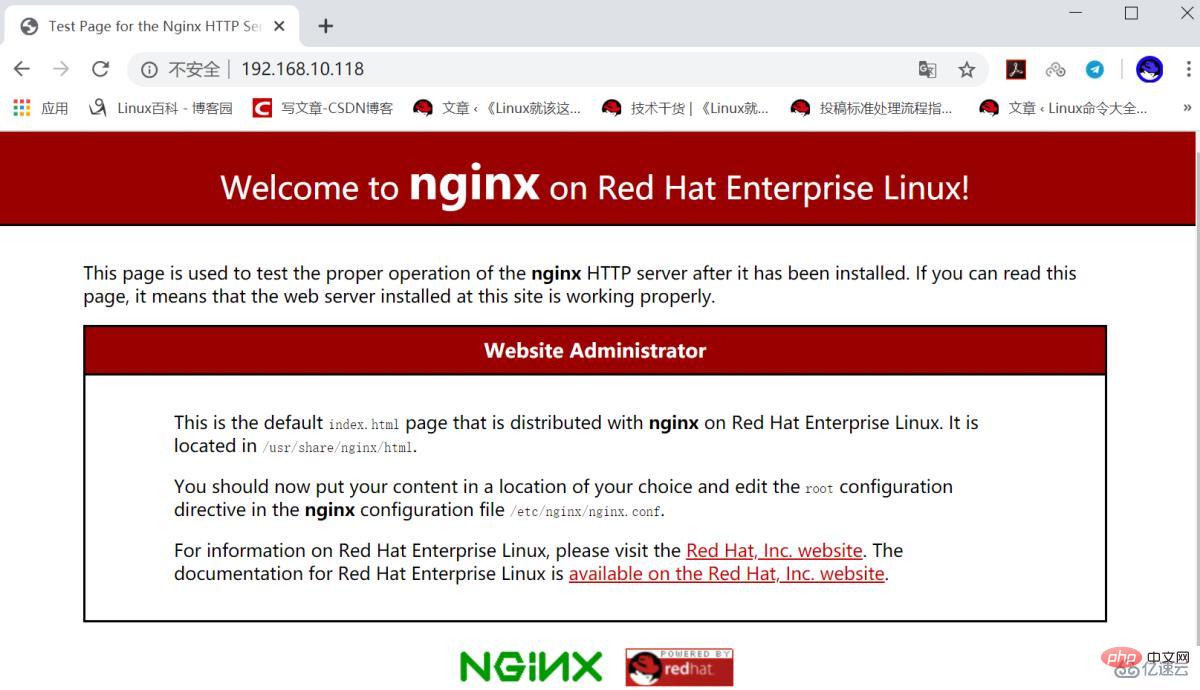
TX errors 0 dropped 0 overruns 0 carrier 0 collisions 0Nginx 웹 서버의 상태를 확인하려면 브라우저에 192.168.10.118을 입력하세요

소프트웨어 패키지의 nginx 파일 목록 보기
[root@localhost ~]# rpm -ql nginx/etc/logrotate.d/nginx
/etc/nginx/fastcgi.conf
/etc/nginx/fastcgi.conf.default
/etc/nginx/fastcgi_params
/etc/nginx/fastcgi_params.default
/etc/nginx/koi-utf
/etc/nginx/koi-win
/etc/nginx/mime.types
/etc/nginx/mime.types.default
/etc/nginx/nginx.conf
/etc/nginx/nginx.conf.default
...省略部分内容...
맞춤형 홈페이지 콘텐츠

[root@localhost ~]# echo "HLLO RHEL8" > /usr/share/nginx/html/index.html[root@localhost ~]# systemctl restart nginx
보려면 브라우저에 192.168.10.118을 입력하세요
파일 공유 서비스 설정
[root@localhost ~]# mv /usr/share/nginx/html/* /var/lib/nginx/tmp/[root@localhost ~]# touch /usr/share/nginx/html/file{1..10}[root@localhost ~]# ls /usr/share/nginx/html/file1  file10  file2  file3  file4  file5  file6  file7  file8  file9
[root@localhost ~]# systemctl restart nginx
구성 파일이 제대로 구성되지 않아 403 Forbidden 오류가 발생했습니다. 해결 방법은 다음과 같습니다.
[root@localhost html]# grep -v "#" /etc/nginx/nginx.confuser nginx;
worker_processes auto;
error_log /var/log/nginx/error.log;
pid /run/nginx.pid;

include /usr/share/nginx/modules/*.conf;

events {
   worker_connections 1024;
}

http {
   log_format  main  '$remote_addr - $remote_user [$time_local] "$request" '                     '$status $body_bytes_sent "$http_referer" '                     '"$http_user_agent" "$http_x_forwarded_for"';

   access_log  /var/log/nginx/access.log  main;

   sendfile            on;
   tcp_nopush          on;
   tcp_nodelay         on;
   keepalive_timeout   65;
   types_hash_max_size 2048;

   include             /etc/nginx/mime.types;
   default_type        application/octet-stream;

   include /etc/nginx/conf.d/*.conf;

   server {
       listen       80 default_server;
       listen       [::]:80 default_server;
       server_name  localhost;
       root         /usr/share/nginx/html;

       include /etc/nginx/default.d/*.conf;


       location / {
            index  index.html index.htm;
            autoindex on;
            autoindex_exact_size on;
            autoindex_localtime on;
            charset utf-8;
            }
        }

}수정하려면 위 구성을 참조하세요
[root@localhost ~]# vim /etc/nginx/nginx.conf[root@localhost ~]# systemctl restart nginx
에 192.168.10.118을 입력하세요. 파일 공유 상태를 확인하려면 브라우저

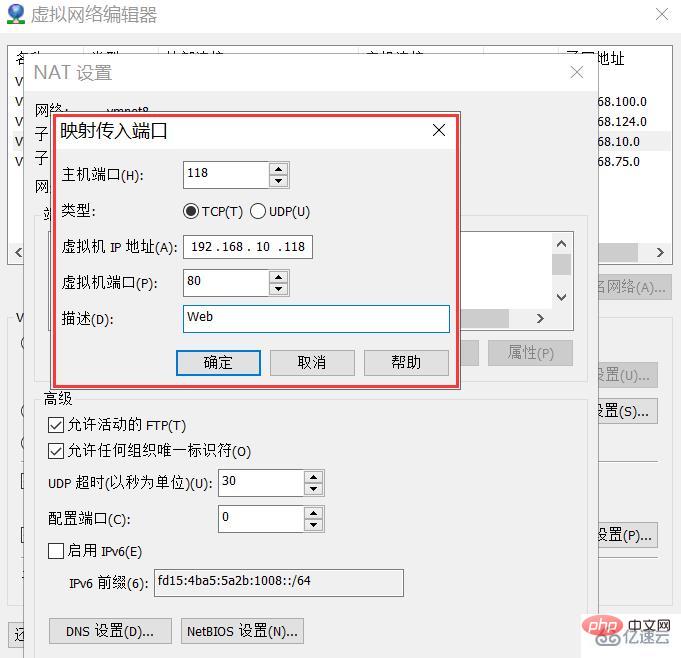
포트 매핑 설정

호스트 IP를 확인하세요

파일 공유 서비스 상태를 테스트하려면 브라우저에 192.168.0.7:118을 입력하세요

RHEL8에서 yum을 사용하여 설치됨 Nginx 웹 서비스는 중국어에 대한 지원이 향상되었습니다

[root@localhost ~]# touch /usr/share/nginx/html/你好红帽8.txt[root@localhost ~]# systemctl restart nginx
위 내용은 RHEL8에서 Nginx 웹 서비스를 배포하는 방법의 상세 내용입니다. 자세한 내용은 PHP 중국어 웹사이트의 기타 관련 기사를 참조하세요!

핫 AI 도구

Undresser.AI Undress
사실적인 누드 사진을 만들기 위한 AI 기반 앱

AI Clothes Remover
사진에서 옷을 제거하는 온라인 AI 도구입니다.

Undress AI Tool
무료로 이미지를 벗다

Clothoff.io
AI 옷 제거제

AI Hentai Generator
AI Hentai를 무료로 생성하십시오.

인기 기사

뜨거운 도구

메모장++7.3.1
사용하기 쉬운 무료 코드 편집기

SublimeText3 중국어 버전
중국어 버전, 사용하기 매우 쉽습니다.

스튜디오 13.0.1 보내기
강력한 PHP 통합 개발 환경

드림위버 CS6
시각적 웹 개발 도구

SublimeText3 Mac 버전
신 수준의 코드 편집 소프트웨어(SublimeText3)

뜨거운 주제
 7540
7540
 15
15
 1380
1380
 52
52
 83
83
 11
11
 55
55
 19
19
 21
21
 86
86
 nginx가 시작되었는지 확인하는 방법
Apr 14, 2025 pm 01:03 PM
nginx가 시작되었는지 확인하는 방법 : 1. 명령 줄을 사용하십시오 : SystemCTL 상태 nginx (linux/unix), netstat -ano | Findstr 80 (Windows); 2. 포트 80이 열려 있는지 확인하십시오. 3. 시스템 로그에서 nginx 시작 메시지를 확인하십시오. 4. Nagios, Zabbix 및 Icinga와 같은 타사 도구를 사용하십시오.
 nginx가 시작되었는지 확인하는 방법은 무엇입니까?
Apr 14, 2025 pm 12:48 PM
Linux에서는 다음 명령을 사용하여 nginx가 시작되었는지 확인하십시오. SystemCTL 상태 Nginx 판사 명령 출력에 따라 : "active : running"이 표시되면 Nginx가 시작됩니다. "Active : 비활성 (죽음)"이 표시되면 Nginx가 중지됩니다.
 Linux에서 Nginx를 시작하는 방법
Apr 14, 2025 pm 12:51 PM
Linux에서 Nginx를 시작하는 단계 : Nginx가 설치되어 있는지 확인하십시오. systemctl start nginx를 사용하여 nginx 서비스를 시작하십시오. SystemCTL을 사용하여 NGINX를 사용하여 시스템 시작시 NGINX의 자동 시작을 활성화하십시오. SystemCTL 상태 nginx를 사용하여 시작이 성공했는지 확인하십시오. 기본 환영 페이지를 보려면 웹 브라우저의 http : // localhost를 방문하십시오.
 Windows에서 nginx를 구성하는 방법
Apr 14, 2025 pm 12:57 PM
Windows에서 Nginx를 구성하는 방법은 무엇입니까? nginx를 설치하고 가상 호스트 구성을 만듭니다. 기본 구성 파일을 수정하고 가상 호스트 구성을 포함하십시오. 시작 또는 새로 고침 Nginx. 구성을 테스트하고 웹 사이트를보십시오. SSL을 선택적으로 활성화하고 SSL 인증서를 구성하십시오. 포트 80 및 443 트래픽을 허용하도록 방화벽을 선택적으로 설정하십시오.
 Nginx403을 해결하는 방법
Apr 14, 2025 am 10:33 AM
Nginx 403 금지 된 오류를 수정하는 방법은 무엇입니까? 파일 또는 디렉토리 권한을 확인합니다. 2. 확인 파일을 확인하십시오. 3. nginx 구성 파일 확인; 4. nginx를 다시 시작하십시오. 다른 가능한 원인으로는 방화벽 규칙, Selinux 설정 또는 응용 프로그램 문제가 있습니다.
 Nginx의 실행 상태를 확인하는 방법
Apr 14, 2025 am 11:48 AM
nginx의 실행 상태를 보는 방법은 다음과 같습니다. PS 명령을 사용하여 프로세스 상태를보십시오. nginx 구성 파일 /etc/nginx/nginx.conf를 봅니다. Nginx 상태 모듈을 사용하여 상태 끝점을 활성화하십시오. Prometheus, Zabbix 또는 Nagios와 같은 모니터링 도구를 사용하십시오.
 nginx 서버를 시작하는 방법
Apr 14, 2025 pm 12:27 PM
Nginx 서버를 시작하려면 다른 운영 체제에 따라 다른 단계가 필요합니다. Linux/Unix System : Nginx 패키지 설치 (예 : APT-Get 또는 Yum 사용). SystemCTL을 사용하여 nginx 서비스를 시작하십시오 (예 : Sudo SystemCtl start nginx). Windows 시스템 : Windows 바이너리 파일을 다운로드하여 설치합니다. nginx.exe 실행 파일을 사용하여 nginx를 시작하십시오 (예 : nginx.exe -c conf \ nginx.conf). 어떤 운영 체제를 사용하든 서버 IP에 액세스 할 수 있습니다.
 Nginx 크로스 도메인의 문제를 해결하는 방법
Apr 14, 2025 am 10:15 AM
Nginx 크로스 도메인 문제를 해결하는 두 가지 방법이 있습니다. 크로스 도메인 응답 헤더 수정 : 교차 도메인 요청을 허용하고 허용 된 메소드 및 헤더를 지정하고 캐시 시간을 설정하는 지시문을 추가하십시오. CORS 모듈 사용 : 모듈을 활성화하고 CORS 규칙을 구성하여 크로스 도메인 요청, 메소드, 헤더 및 캐시 시간을 허용합니다.


