

nginx를 사용하여 컨테이너에 업로드 및 다운로드하기 위한 파일 서버를 구축하는 방법

1. nginx 컨테이너 설치
nginx가 파일 업로드를 지원하려면 nginx-upload-module 모듈을 사용하여 컨테이너를 다운로드하고 실행해야 합니다.
sudo podman pull docker.io/dimka2014/nginx-upload-with-progress-modules:latest
sudo podman -d --name nginx -p 83:80 docker.io/dimka2014/nginx-upload-with-progress-modules
이 컨테이너에는 nginx-upload-module 모듈과 nginx-upload-progress -모듈 모듈.
참고이 컨테이너는 Alpine Linux이고 bash가 없으며 일부 명령이 다른 Linux 배포판과 다릅니다. Alpine Linux ,没有bash,有些命令与其它发行版本的Linux不一样。
使用下面的命令进入容器:
sudo podman exec -it nginx /bin/sh
作为文件服务器, 需要显示本地时间,默认不是本地时间。通过下面一系列命令设置为本地时间:
apk update
apk add tzdata
echo "Asia/Shanghai" > /etc/timezone
rm -rf /etc/localtime
cp /usr/share/zoneinfo/Asia/Shanghai /etc/localtime
apk del tzdata
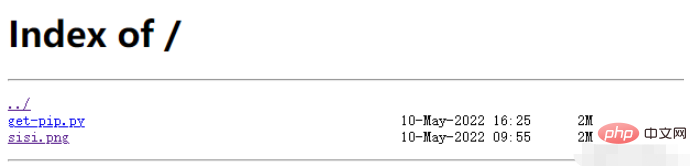
创建文件服务器的根目录:
mkdir -p /nginx/share
二、配置nginx
配置文件的路径为/etc/nginx/conf.d/default.conf
server {
    ……
    charset utf-8; # 设置字符编码,避免中文乱码
    location / {
            root   /nginx/share; # 根目录
            autoindex   on;  # 开启索引功能
            autoindex_exact_size off; # 关闭计算文件确切大小(单位bytes),只显示大概大小(单位kb、mb、gb)
            autoindex_localtime on; # 显示本地时间
        }
}nginx -s reload
 파일 서버의 루트 디렉토리를 생성하십시오:
 server {
……
charset utf-8; # 设置字符编码,避免中文乱码
client_max_body_size 32m;
upload_limit_rate 1M; # 限制上传速度最大1M
# 设置upload.html页面路由
location = /upload.html {
root /nginx; # upload.html所在路径
}
location /upload {
# 限制上传文件最大30MB
upload_max_file_size 30m;
# 设置后端处理交由@rename处理。由于nginx-upload-module模块在存储时并不是按上传的文件名存储的,所以需要自行改名。
upload_pass @rename;
# 指定上传文件存放目录,1表示按1位散列,将上传文件随机存到指定目录下的0、1、2、...、8、9目录中(这些目录要手动建立)
upload_store /tmp/nginx 1;
# 上传文件的访问权限,user:r表示用户只读,w表示可写
upload_store_access user:r;
# 设置传给后端处理的表单数据,包括上传的原始文件名,上传的内容类型,临时存储的路径
upload_set_form_field $upload_field_name.name "$upload_file_name";
upload_set_form_field $upload_field_name.content_type "$upload_content_type";
upload_set_form_field $upload_field_name.path "$upload_tmp_path";
upload_pass_form_field "^submit$|^description$";
# 设置上传文件的md5值和文件大小
upload_aggregate_form_field "${upload_field_name}_md5" "$upload_file_md5";
upload_aggregate_form_field "${upload_field_name}_size" "$upload_file_size";
# 如果出现下列错误码则删除上传的文件
upload_cleanup 400 404 499 500-505;
}
location @rename {
# 后端处理
proxy_pass http://localhost:81;
}
}2. nginx 구성
구성 파일의 경로는 /etc/nginx/conf.d입니다. /default.conf< /code>,
 mkdir -p /tmp/nginx
 cd /tmp/nginx
 mkdir 1 2 3 4 5 6 7 8 9 0
 chown nginx:root . -R
이제 파일 서비스가 구성되었습니다. 구성을 적용하려면 다음 명령을 사용해야 합니다.
<!DOCTYPE html PUBLIC "-//W3C//DTD XHTML 1.0 Transitional//EN" "http://www.w3.org/TR/xhtml1/DTD/xhtml1-transitional.dtd">
<html xmlns="http://www.w3.org/1999/xhtml">
<head>
<title>上传</title>
</head>
<body>
<meta http-equiv="Content-Type" content="text/html; charset=utf-8" />
<form name="upload" method="POST" enctype="multipart/form-data" action="upload">
<input type="file" name="file"/>
<input type="submit" name="submit" value="上传"/>
</form>
</body>
</html>
apk add python3
pip3 install bottle
pip3 install shutilwhich
#!/usr/bin/python3
# -*- coding: utf-8 -*-

from bottle import *
import shutil

@post("/upload")
def postExample():
    try:
        dt = request.forms.dict
        filenames = dt.get('file.name')
        tmp_path = dt.get("file.tmp_path")
        filepaths = dt.get("file.path")
        count = filenames.__len__()
        dir = os.path.abspath(filepaths[0])
        for i in range(count):
            print("rename %s to %s" % (tmp_path[i],  os.path.join(dir, filenames[i])))
            target = os.path.join(dir, filenames[i])
            shutil.move(tmp_path[i], target)
            shutil.chown(target, "nginx", "root") # 由于shutil.move不会保持用户归属,所以需要显示修改,否则访问时会报403无访问权限
    except Exception as e:
        print("Exception:%s" % e)
        redirect("50x.html") # 如果是在容器中部署的nginx且映射了不同的端口,需要指定IP,端口
    redirect('/') # 如果是在容器中部署的nginx且映射了不同的端口,需要指定IP,端口

run(host='localhost', port=81)
로그인 후 복사
2. upload.html을 추가합니다#!/usr/bin/python3
# -*- coding: utf-8 -*-
from bottle import *
import shutil
@post("/upload")
def postExample():
try:
dt = request.forms.dict
filenames = dt.get('file.name')
tmp_path = dt.get("file.tmp_path")
filepaths = dt.get("file.path")
count = filenames.__len__()
dir = os.path.abspath(filepaths[0])
for i in range(count):
print("rename %s to %s" % (tmp_path[i], os.path.join(dir, filenames[i])))
target = os.path.join(dir, filenames[i])
shutil.move(tmp_path[i], target)
shutil.chown(target, "nginx", "root") # 由于shutil.move不会保持用户归属,所以需要显示修改,否则访问时会报403无访问权限
except Exception as e:
print("Exception:%s" % e)
redirect("50x.html") # 如果是在容器中部署的nginx且映射了不同的端口,需要指定IP,端口
redirect('/') # 如果是在容器中部署的nginx且映射了不同的端口,需要指定IP,端口
run(host='localhost', port=81)# 开辟一个空间proxied来存储跟踪上传的信息1MB
upload_progress proxied 1m;
server {
……
location ^~ /progress {
# 报告上传的信息
report_uploads proxied;
}
location /upload {
...
# 上传完成后,仍然保存上传信息5s
track_uploads proxied 5s;
}
}로그인 후 복사
3. 후속 처리 서비스를 추가합니다 먼저 Python과 필수 라이브러리를 설치해야 합니다. # 开辟一个空间proxied来存储跟踪上传的信息1MB
upload_progress proxied 1m;
server {
……
location ^~ /progress {
# 报告上传的信息
report_uploads proxied;
}
location /upload {
...
# 上传完成后,仍然保存上传信息5s
track_uploads proxied 5s;
}
}<form id="upload" enctype="multipart/form-data" action="/upload" method="post" onsubmit="openProgressBar(); return true;">
<input name="file" type="file" label="fileupload" />
<input type="submit" value="Upload File" />
</form>
<div>
<div id="progress" >
<div id="progressbar" > </div>
</div>
<div id="tp">(progress)</div>
</div>
<script type="text/javascript">
var interval = null;
var uuid = "";
function openProgressBar() {
for (var i = 0; i < 32; i++) {
uuid += Math.floor(Math.random() * 16).toString(16);
}
document.getElementById("upload").action = "/upload?X-Progress-ID=" + uuid;
/* 每隔一秒查询一下上传进度 */
interval = window.setInterval(function () {
fetch(uuid);
}, 1000);
}
function fetch(uuid) {
var req = new XMLHttpRequest();
req.open("GET", "/progress", 1);
req.setRequestHeader("X-Progress-ID", uuid);
req.onreadystatechange = function () {
if (req.readyState == 4) {
if (req.status == 200) {
var upload = eval(req.responseText);
document.getElementById('tp').innerHTML = upload.state;
/* 更新进度条 */
if (upload.state == 'done' || upload.state == 'uploading') {
var bar = document.getElementById('progressbar');
var w = 400 * upload.received / upload.size;
bar.style.width = w + 'px';
}
/* 上传完成,不再查询进度 */
if (upload.state == 'done') {
window.clearTimeout(interval);
}
if (upload.state == 'error') {
window.clearTimeout(interval);
alert('something wrong');
}
}
}
}
req.send(null);
}
</script>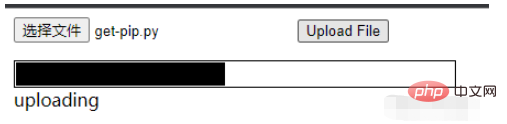 python 서비스 소스 코드: rrreee🎜4. 1. 구성 수정🎜rrreee🎜2. 업로드 페이지 수정🎜rrreee🎜🎜🎜
위 내용은 nginx를 사용하여 컨테이너에 업로드 및 다운로드하기 위한 파일 서버를 구축하는 방법의 상세 내용입니다. 자세한 내용은 PHP 중국어 웹사이트의 기타 관련 기사를 참조하세요!

핫 AI 도구

Undresser.AI Undress
사실적인 누드 사진을 만들기 위한 AI 기반 앱

AI Clothes Remover
사진에서 옷을 제거하는 온라인 AI 도구입니다.

Undress AI Tool
무료로 이미지를 벗다

Clothoff.io
AI 옷 제거제

AI Hentai Generator
AI Hentai를 무료로 생성하십시오.

인기 기사
뜨거운 도구

메모장++7.3.1
사용하기 쉬운 무료 코드 편집기

SublimeText3 중국어 버전
중국어 버전, 사용하기 매우 쉽습니다.

스튜디오 13.0.1 보내기
강력한 PHP 통합 개발 환경

드림위버 CS6
시각적 웹 개발 도구

SublimeText3 Mac 버전
신 수준의 코드 편집 소프트웨어(SublimeText3)
뜨거운 주제
 7518
7518
 15
1378
52
80
11
53
19
21
67
15
1378
52
80
11
53
19
21
67

 Linux에서 Nginx를 시작하는 방법
Apr 14, 2025 pm 12:51 PM
Linux에서 Nginx를 시작하는 방법
Apr 14, 2025 pm 12:51 PM
Linux에서 Nginx를 시작하는 단계 : Nginx가 설치되어 있는지 확인하십시오. systemctl start nginx를 사용하여 nginx 서비스를 시작하십시오. SystemCTL을 사용하여 NGINX를 사용하여 시스템 시작시 NGINX의 자동 시작을 활성화하십시오. SystemCTL 상태 nginx를 사용하여 시작이 성공했는지 확인하십시오. 기본 환영 페이지를 보려면 웹 브라우저의 http : // localhost를 방문하십시오.
 Windows에서 nginx를 구성하는 방법
Apr 14, 2025 pm 12:57 PM
Windows에서 nginx를 구성하는 방법
Apr 14, 2025 pm 12:57 PM
Windows에서 Nginx를 구성하는 방법은 무엇입니까? nginx를 설치하고 가상 호스트 구성을 만듭니다. 기본 구성 파일을 수정하고 가상 호스트 구성을 포함하십시오. 시작 또는 새로 고침 Nginx. 구성을 테스트하고 웹 사이트를보십시오. SSL을 선택적으로 활성화하고 SSL 인증서를 구성하십시오. 포트 80 및 443 트래픽을 허용하도록 방화벽을 선택적으로 설정하십시오.
 nginx가 시작되었는지 확인하는 방법
Apr 14, 2025 pm 01:03 PM
nginx가 시작되었는지 확인하는 방법
Apr 14, 2025 pm 01:03 PM
nginx가 시작되었는지 확인하는 방법 : 1. 명령 줄을 사용하십시오 : SystemCTL 상태 nginx (linux/unix), netstat -ano | Findstr 80 (Windows); 2. 포트 80이 열려 있는지 확인하십시오. 3. 시스템 로그에서 nginx 시작 메시지를 확인하십시오. 4. Nagios, Zabbix 및 Icinga와 같은 타사 도구를 사용하십시오.
 nginx 서버를 시작하는 방법
Apr 14, 2025 pm 12:27 PM
nginx 서버를 시작하는 방법
Apr 14, 2025 pm 12:27 PM
Nginx 서버를 시작하려면 다른 운영 체제에 따라 다른 단계가 필요합니다. Linux/Unix System : Nginx 패키지 설치 (예 : APT-Get 또는 Yum 사용). SystemCTL을 사용하여 nginx 서비스를 시작하십시오 (예 : Sudo SystemCtl start nginx). Windows 시스템 : Windows 바이너리 파일을 다운로드하여 설치합니다. nginx.exe 실행 파일을 사용하여 nginx를 시작하십시오 (예 : nginx.exe -c conf \ nginx.conf). 어떤 운영 체제를 사용하든 서버 IP에 액세스 할 수 있습니다.
 Nginx403을 해결하는 방법
Apr 14, 2025 am 10:33 AM
Nginx403을 해결하는 방법
Apr 14, 2025 am 10:33 AM
Nginx 403 금지 된 오류를 수정하는 방법은 무엇입니까? 파일 또는 디렉토리 권한을 확인합니다. 2. 확인 파일을 확인하십시오. 3. nginx 구성 파일 확인; 4. nginx를 다시 시작하십시오. 다른 가능한 원인으로는 방화벽 규칙, Selinux 설정 또는 응용 프로그램 문제가 있습니다.
 nginx403 오류를 해결하는 방법
Apr 14, 2025 pm 12:54 PM
nginx403 오류를 해결하는 방법
Apr 14, 2025 pm 12:54 PM
서버는 요청 된 리소스에 액세스 할 수있는 권한이 없으므로 Nginx 403 오류가 발생합니다. 솔루션에는 다음이 포함됩니다. 파일 권한 확인 권한을 확인하십시오. .htaccess 구성을 확인하십시오. nginx 구성을 확인하십시오. Selinux 권한을 구성하십시오. 방화벽 규칙을 확인하십시오. 브라우저 문제, 서버 장애 또는 기타 가능한 오류와 같은 다른 원인을 해결하십시오.
 nginx304 오류를 해결하는 방법
Apr 14, 2025 pm 12:45 PM
nginx304 오류를 해결하는 방법
Apr 14, 2025 pm 12:45 PM
질문에 대한 답변 : 304 수정되지 않은 오류는 브라우저가 클라이언트 요청의 최신 리소스 버전을 캐시했음을 나타냅니다. 솔루션 : 1. 브라우저 캐시를 지우십시오. 2. 브라우저 캐시를 비활성화합니다. 3. 클라이언트 캐시를 허용하도록 nginx를 구성합니다. 4. 파일 권한을 확인하십시오. 5. 파일 해시를 확인하십시오. 6. CDN 또는 리버스 프록시 캐시를 비활성화합니다. 7. nginx를 다시 시작하십시오.
 nginx가 시작되었는지 확인하는 방법은 무엇입니까?
Apr 14, 2025 pm 12:48 PM
nginx가 시작되었는지 확인하는 방법은 무엇입니까?
Apr 14, 2025 pm 12:48 PM
Linux에서는 다음 명령을 사용하여 nginx가 시작되었는지 확인하십시오. SystemCTL 상태 Nginx 판사 명령 출력에 따라 : "active : running"이 표시되면 Nginx가 시작됩니다. "Active : 비활성 (죽음)"이 표시되면 Nginx가 중지됩니다.
