

vue2와 vue3의 라이프사이클 실행 순서의 차이점은 무엇입니까?

vue2와 vue3의 라이프사이클 실행 순서 차이
라이프사이클 비교
vue2의 실행 순서
beforeCreate=>created=> ;beforeMount=>마운트됨=>beforeUpdate=>업데이트됨=>Destroy 전=> <code>파괴됨beforeCreate=>created=>beforeMount=>mounted=>beforeUpdate=>updated=>beforeDestroy=>destroyedvue3中执行顺序
setup=>onBeforeMount=>onMounted=>onBeforeUpdate=>onUpdated=>onBeforeUnmount=>onUnmounted
对应关系
vue2->vue3
beforeCreate->setupcreated->setupbeforeMount->onBeforeMountmounted->onMountedbeforeUpdate->onBeforeUpdateupdated->onUpdatedbeforeDestroy->onBeforeUnmountdestroyed->onUnmounted
其中 vue3中的setup相当于vue2中beforeCreate 与created 但是的执行在beforeCreate 与created之前,所以setup无法使用 data 和 methods 中的数据和方法,即无法操作this,setup中的this等于 undefined,又因为setup中创建的变量与方法最后都要通过return返回出去,所以setup中的程序只能是同步的,而不能是异步,除非return 后面只接受一个异步对象,对象返回setup内定义的变量与方法,然后父组件使用Suspense标签包裹异步组件;
vue3中 如果要使用vue2的beforeDestroy与destroyed需要把名称分别改为beforeUnmount,unmounted
如果vue3中同时使用了vue2的写法,vue3的写法会优先执行;
简单例子说明
父组件App.vue
<template>
  <h2 id="App父级组件">App父级组件</h2>
  <button @click="childShow = !childShow">切换child子组件的显示</button>
  <hr />
  <child v-if="childShow" />
</template>
<script lang="ts">
import { defineComponent, reactive, ref } from "vue";
//引入子组件
import child from "./components/child.vue";
export default defineComponent({
  name: "App",
  components: {
    child,
  },
  setup() {
    const childShow = ref(true);
    return {
      childShow,
    };
  },
});
</script><style>
* {
margin: 0;
padding: 0;
}
</style>子组件child.vue
<template>
  <h3 id="child-nbsp-子级组件">child 子级组件</h3>
  <h4 id="nbsp-name-nbsp">{{ name }}</h4>
  <button @click="updateName">更新name</button>
</template>
<script lang="ts">
import {
  defineComponent,
  onBeforeMount,
  onMounted,
  onBeforeUpdate,
  onUpdated,
  onBeforeUnmount,
  onUnmounted,
  ref,
} from "vue";
export default defineComponent({
  name: "child",
  //vue2中的生命周期钩子
  beforeCreate() {
    console.log("vue2 中的生命周期 beforeCreate");
  },
  created() {
    console.log("vue2 中的生命周期 created");
  },
  beforeMount() {
    console.log("vue2 中的生命周期 beforeMount");
  },
  mounted() {
    console.log("vue2 中的生命周期 mounted");
  },
  beforeUpdate() {
    console.log("vue2 中的生命周期 beforeUpdate");
  },
  updated() {
    console.log("vue2 中的生命周期 updated");
  },
  // vue2中的 beforeDestroy与 destroyed已经改名 无法使用
  beforeUnmount() {
    console.log("vue2 中的生命周期 beforeDestroy(beforeUnmount)");
  },
  unmounted() {
    console.log("vue2 中的生命周期 destroyed(unmounted)");
  },
  setup() {
    console.log("vue3中的setup");
    const name = ref("hhh");
    const updateName = () => {
      name.value += "6……6………6";
    };
    onBeforeMount(() => {
      console.log("vue3 中的生命周期 onBeforeMount");
    });
    onMounted(() => {
      console.log("vue3 中的生命周期 onMounted");
    });
    onBeforeUpdate(() => {
      console.log("vue3 中的生命周期 onBeforeUpdate");
    });
    onUpdated(() => {
      console.log("vue3 中的生命周期 onUpdated");
    });
    onBeforeUnmount(() => {
      console.log("vue3 中的生命周期 onBeforeUnmount");
    });
    onUnmounted(() => {
      console.log("vue3 中的生命周期 onUnmounted");
    });
    return {
      name,
      updateName,
    };
  },
});
</script>运行起来的显示效果
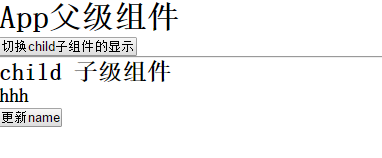
进入页面 按f12 打开调试 刷新页面
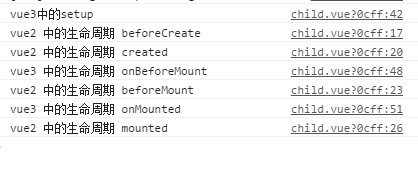
可以看出vue3中
setup执行在beforeCreate与created前面;onBeforeMount执行在beforeMount前面;onMounted执行在mounted前面;
点击 更新name
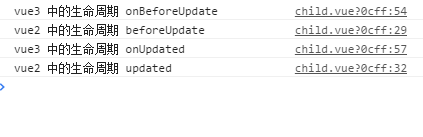
可以看出vue3中
onBeforeUpdate执行在beforeUpdate前面;onUpdated执行在updated前面;点击 切换child子组件的显示
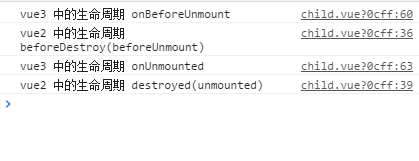
可以看出vue3中
onBeforeUnmount执行在beforeDestroy前面;onUnmounted
setup=>onBeforeMount=>onMounted<의 실행 순서 /code>=>< code>onBeforeUpdate=>onUpdated=>onBeforeUnmount=> vue2->vue3
< code>beforeCreate->설정생성됨->설정beforeMount< /code> -> <code>onBeforeMount마운트됨->onMountbeforeUpdate- >onBeforeUpdate
업데이트됨 -> onUpdated< code>삭제 전 -> >onBeforeUnmount
destroyed->onUnmounted- vue3의 설정 beforeCreate와 동일하며 vue2에서 생성되지만 실행은 이전입니다. beforeCreate 및 생성되었으므로 설정은 데이터 및 메소드에서 데이터 및 메소드를 사용할 수 없습니다. 즉 이를 조작할 수 없습니다. 설정에서 이는 정의되지 않은 것과 동일하며 설정에서 생성된 변수 및 메소드가 마지막으로 있어야 합니다. 반환을 통해 반환되므로 반환이 비동기 개체만 허용하지 않는 한 설정의 프로그램은 비동기가 아닌 동기만 가능합니다. 개체는 설정에 정의된 변수와 메서드를 반환한 다음 상위 구성 요소가 Suspense 태그로 래핑됩니다. . 비동기 컴포넌트;vue3에서 vue2의 beforeDestroy 및 destroy를 사용하려면 각각 beforeUnmount, unmounted로 이름을 변경해야 합니다.
- vue3에서도 vue2를 사용하는 경우 vue3이 먼저 실행됩니다.간단한 예입니다. 설명하기🎜🎜 상위 구성 요소 App.vue🎜
<!DOCTYPE html> <html lang="en"> <head> <meta charset="UTF-8"> <meta name="viewport" content="width=device-width, initial-scale=1.0"> <meta http-equiv="X-UA-Compatible" content="ie=edge"> <title>vue生命周期学习</title> <script src="https://cdn.bootcss.com/vue/2.4.2/vue.js"></script> </head> <body> <div id="app"> <h2 id="message">{{message}}</h2> </div> </body> <script> var vm = new Vue({ el: '#app', data: { message: 'Vue的生命周期' }, beforeCreate: function() { console.group('------beforeCreate创建前状态------'); console.log("%c%s", "color:red" , "el : " + this.$el); //undefined console.log("%c%s", "color:red","data : " + this.$data); //undefined console.log("%c%s", "color:red","message: " + this.message) }, created: function() { console.group('------created创建完毕状态------'); console.log("%c%s", "color:red","el : " + this.$el); //undefined console.log("%c%s", "color:red","data : " + this.$data); //已被初始化 console.log("%c%s", "color:red","message: " + this.message); //已被初始化 }, beforeMount: function() { console.group('------beforeMount挂载前状态------'); console.log("%c%s", "color:red","el : " + (this.$el)); //已被初始化 console.log(this.$el); console.log("%c%s", "color:red","data : " + this.$data); //已被初始化 console.log("%c%s", "color:red","message: " + this.message); //已被初始化 }, mounted: function() { console.group('------mounted 挂载结束状态------'); console.log("%c%s", "color:red","el : " + this.$el); //已被初始化 console.log(this.$el); console.log("%c%s", "color:red","data : " + this.$data); //已被初始化 console.log("%c%s", "color:red","message: " + this.message); //已被初始化 }, beforeUpdate: function () { console.group('beforeUpdate 更新前状态===============》'); console.log("%c%s", "color:red","el : " + this.$el.innerHTML); console.log(this.$el); console.log("%c%s", "color:red","data : " + this.$data); console.log("%c%s", "color:red","message: " + this.message); }, updated: function () { console.group('updated 更新完成状态===============》'); console.log("%c%s", "color:red","el : " + this.$el.innerHTML); console.log(this.$el); console.log("%c%s", "color:red","data : " + this.$data); console.log("%c%s", "color:red","message: " + this.message); }, beforeDestroy: function () { console.group('beforeDestroy 销毁前状态===============》'); console.log("%c%s", "color:red","el : " + this.$el); console.log(this.$el); console.log("%c%s", "color:red","data : " + this.$data); console.log("%c%s", "color:red","message: " + this.message); }, destroyed: function () { console.group('destroyed 销毁完成状态===============》'); console.log("%c%s", "color:red","el : " + this.$el); console.log(this.$el); console.log("%c%s", "color:red","data : " + this.$data); console.log("%c%s", "color:red","message: " + this.message) } }) </script> </html>로그인 후 복사rrreee🎜 하위 구성 요소 child.vue🎜rrreee🎜실행 시 표시 효과🎜🎜<template> <div class="father"> <component-A class="son_A"></component-A> <component-B class="son_B"></component-B> </div> </template> // script部分同上代码,不多写了。
로그인 후 복사로그인 후 복사 🎜🎜페이지에 들어가서 f12를 눌러 디버깅 새로 고침 페이지를 엽니다🎜🎜🎜🎜🎜vue3에서 확인할 수 있습니다 🎜🎜🎜🎜🎜
setupbeforeCreate 앞에서 실행되고 생성됨 🎜🎜🎜🎜onBeforeMountbeforeMount 앞에서 실행됨; > 마운트된 앞에서 실행됨 🎜🎜🎜🎜이름을 업데이트하려면 클릭🎜🎜🎜🎜🎜 vue3에서는 beforeUpdate보다 먼저 🎜🎜🎜🎜🎜onBeforeUpdate가 실행되는 것을 볼 수 있습니다. 🎜🎜🎜 🎜onUpdated는 업데이트 앞에 실행됩니다. 🎜🎜🎜🎜하위 하위 구성 요소 표시를 전환하려면 클릭하세요. 🎜🎜🎜🎜🎜🎜🎜vue3에서는 🎜🎜🎜🎜🎜onBeforeUnmount임을 알 수 있습니다.는 beforeDestroy 앞에서 실행됩니다. 🎜🎜🎜🎜onUnmounted는 destroy 앞에서 실행됩니다. 🎜🎜🎜🎜각 경우에 세 가지 라이프 사이클 실행 순서🎜🎜라이프 사이클: vue 인스턴스에서는 일련의 초기화 프로세스(Vue 인스턴스 생성부터 소멸까지의 프로세스)를 거치게 됩니다. 이 프로세스가 vue의 수명 주기입니다. 🎜🎜Vue는 개발자에게 사용자 정의 로직을 추가할 수 있도록 일련의 콜백 기능을 제공합니다. Vue의 수명 주기는 생성부터 파괴까지, 그리고 중요한 노드 탑재 데이터 업데이트입니다. 🎜🎜🎜🎜단계 생성 전Create, Created🎜🎜🎜🎜마운트 렌더링 페이지 단계 beforeMount, Mounted🎜🎜🎜🎜업데이트 단계 beforeUpdate, 업데이트됨🎜🎜🎜🎜제거 단계 전Destory, 파괴됨🎜🎜🎜🎜1, 단일 페이지의 수명 주기 시퀀스 🎜🎜 각 사이클 후크 함수의 실행 순서를 확인하기 위한 코드 웨이브 제시: 🎜rrreee🎜🎜 (1) 생성 단계: 이벤트 초기화 및 데이터 관찰 🎜🎜🎜🎜🎜new Vue({}) 빈 인스턴스 객체 생성 , 이 객체에는 수명주기 함수와 일부 기본 이벤트만 있습니다🎜🎜🎜🎜beforeCreate에서는 $el도 데이터도 초기화되지 않습니다🎜🎜🎜🎜created가 실행되고 데이터 초기화가 완료되며 템플릿이 렌더링으로 변환됩니다. 함수(렌더링), 렌더링 함수를 실행하여 가상 노드 트리(메모리 내)를 얻을 수 있습니다🎜 如果有模板文件,则编译成渲染函数;如果没有,则使用外部 HTML 作为模板进行渲染。综合排名优先级:render函数选项 > template选项 > outer HTML.
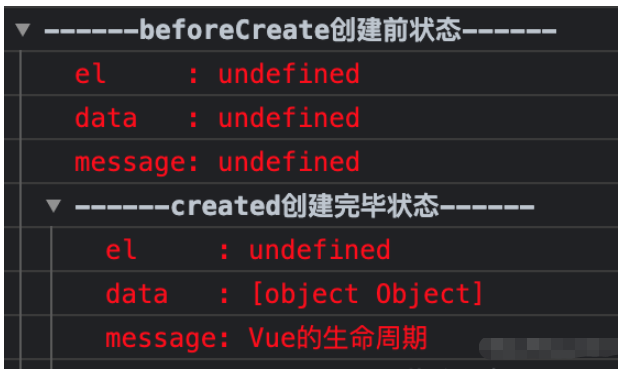
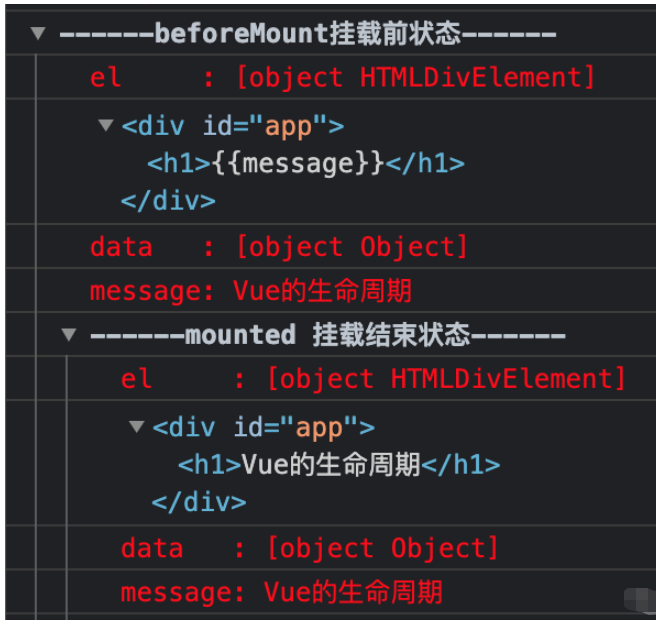
(2)挂载阶段
为vue实例添加$el成员,替换挂载的DOM成员
其中在beforeMount时,初始化el和data,但el和data,但el和data,但el还是使用{{message}}进行占位
mounted执行时,将message的值进行渲染
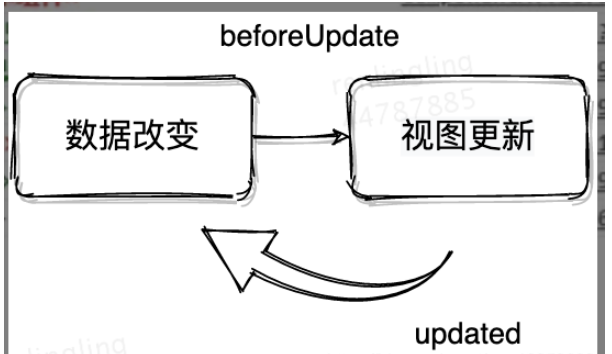
(3)更新阶段:触发对应组件的重新渲染
data 被改变时触发生命周期函数 beforeUpdate 执行,data是最新的,页面还未更新(旧的页面)
根据最新的 data 重新渲染虚拟 DOM,并挂载到页面上,完成 Model 到 View 的更新
updated 执行,此时 data 和页面都是最新的

(4)销毁阶段
beforeDestroy钩子函数在实例销毁之前调用。在这一步,实例仍然完全可用。
destroyed钩子函数在Vue 实例销毁后调用。一旦调用,Vue 实例所绑定的所有内容都将被解绑,包括事件监听器,同时所有子实例都将被销毁。
2、父子、兄弟组件的生命周期顺序
<template>
	<div class="father">
		<component-A class="son_A"></component-A>
		<component-B class="son_B"></component-B>
	</div>
</template>
// script部分同上代码,不多写了。
主要可以从以下几种情况分析:
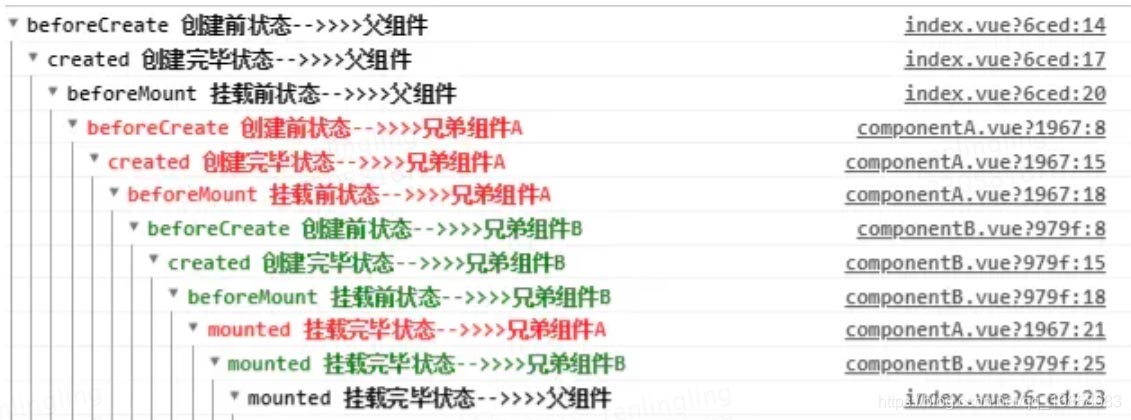
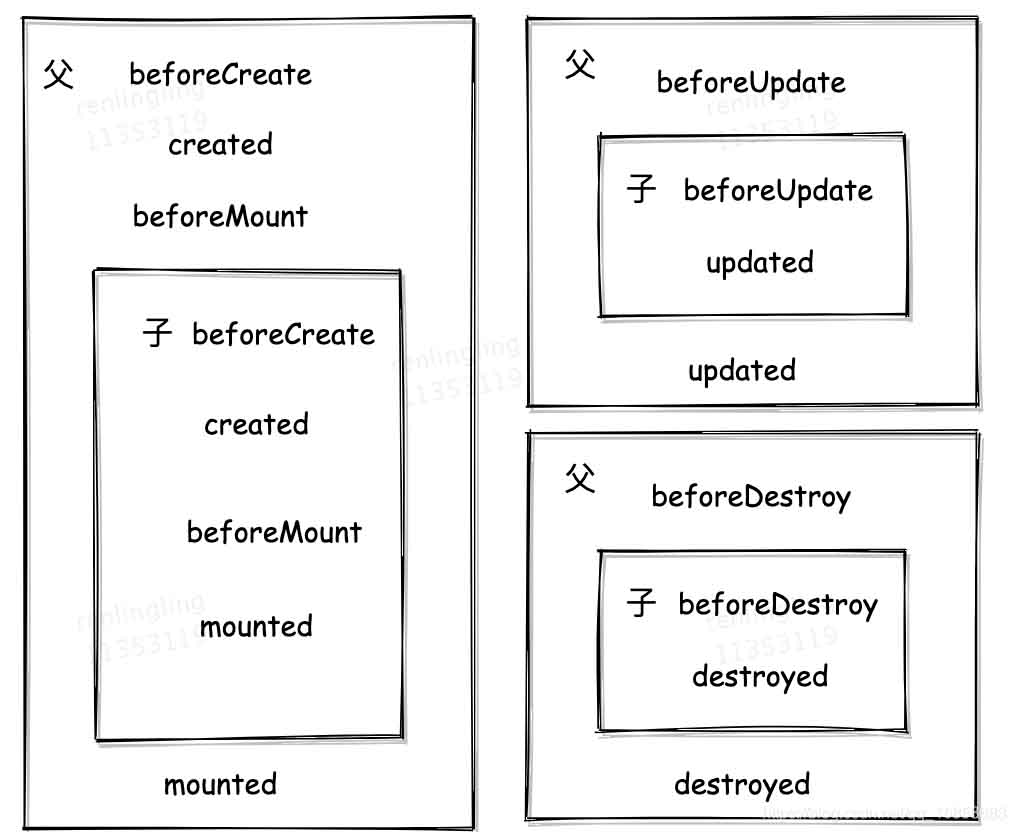
(1)创建过程:
父beforeCreate->父created->父beforeMount->子beforeCreate->子created->子beforeMount->子mounted->父mounted
(2)组件的内部更新:
子组件的内部更新过程是:子beforeUpdate->子updated
同理父组件的内部更新过程也是:父beforeUpdate->父updated
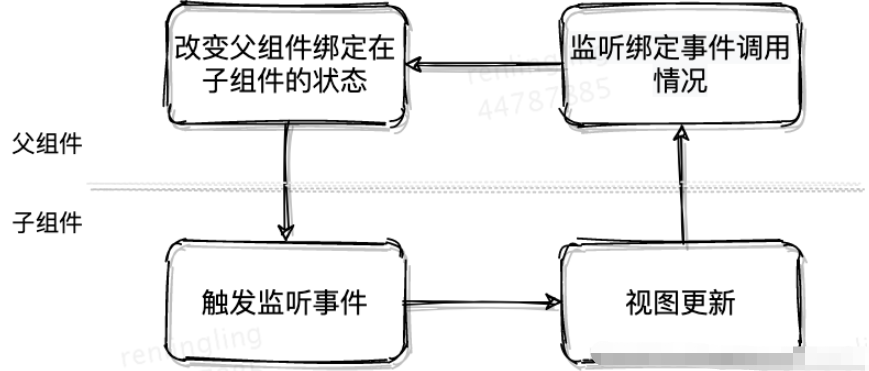
(3)组件之间的更新:
当子组件使用emit修改父组件状态时,刚好这个状态又绑定在子组件的props上,更新过程是:父beforeUpdate->子beforeUpdate->子updated->父updated
(4)父子组件销毁:
父组件被销毁时子组件也同时被销毁,销毁的钩子过程是:父beforeDestroy->子beforeDestroy->子destroyed->父destroyed

父子组件完整的生命周期图如下所示:
从上图可以看出,在父兄子组件挂载前,各组件的实例已经初始化完成。
子组件挂载完成后,父组件还未挂载。因此,在父组件的mounted钩子中获取API数据时,子组件的mounted钩子无法获取到该数据。
仔细看看父子组件生命周期钩子的执行顺序,会发现created这个钩子是按照从外内顺序执行,所以回显场景的解决方案是:在created中发起请求获取数据,依次在子组件的created中会接收到这个数据。
无论嵌套多少层,Vue父子组件的生命周期钩子执行顺序都是从外到内再从内到外。
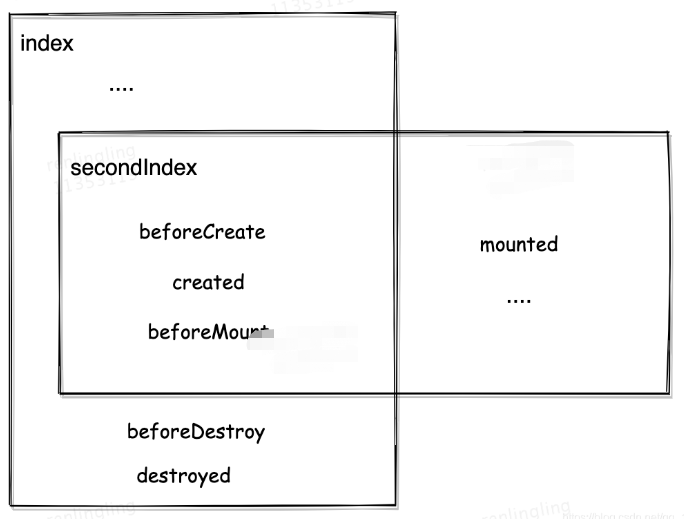
3、不同页面跳转时各页面生命周期的执行顺序
跳转不同页面和part2是相同的原理,从第一个页面(index)跳转到下一个页面(secondIndex)时,回先初始化secondIndex,之后在执行index页面的销毁阶段,最后secondIndex挂载完成.

위 내용은 vue2와 vue3의 라이프사이클 실행 순서의 차이점은 무엇입니까?의 상세 내용입니다. 자세한 내용은 PHP 중국어 웹사이트의 기타 관련 기사를 참조하세요!

핫 AI 도구

Undresser.AI Undress
사실적인 누드 사진을 만들기 위한 AI 기반 앱

AI Clothes Remover
사진에서 옷을 제거하는 온라인 AI 도구입니다.

Undress AI Tool
무료로 이미지를 벗다

Clothoff.io
AI 옷 제거제

AI Hentai Generator
AI Hentai를 무료로 생성하십시오.

인기 기사
뜨거운 도구

메모장++7.3.1
사용하기 쉬운 무료 코드 편집기

SublimeText3 중국어 버전
중국어 버전, 사용하기 매우 쉽습니다.

스튜디오 13.0.1 보내기
강력한 PHP 통합 개발 환경

드림위버 CS6
시각적 웹 개발 도구

SublimeText3 Mac 버전
신 수준의 코드 편집 소프트웨어(SublimeText3)
뜨거운 주제
 7554
7554
 15
1382
52
83
11
59
19
24
96
15
1382
52
83
11
59
19
24
96

 vue3+vite: src에서 이미지를 동적으로 가져오기 위해 require를 사용할 때 오류를 해결하는 방법
May 21, 2023 pm 03:16 PM
vue3+vite: src에서 이미지를 동적으로 가져오기 위해 require를 사용할 때 오류를 해결하는 방법
May 21, 2023 pm 03:16 PM
vue3+vite:src는 require를 사용하여 이미지를 동적으로 가져오고 vue3+vite는 여러 이미지를 동적으로 가져옵니다. vue3을 사용하는 경우 require는 이미지를 사용할 수 없습니다. imgUrl:require(' .../assets/test.png') 와 같은 vue2는 typescript가 require를 지원하지 않기 때문에 가져오므로 이를 해결하는 방법은 다음과 같습니다. waitimport를 사용합니다.
 vue3 프로젝트에서tinymce를 사용하는 방법
May 19, 2023 pm 08:40 PM
vue3 프로젝트에서tinymce를 사용하는 방법
May 19, 2023 pm 08:40 PM
tinymce는 완전한 기능을 갖춘 리치 텍스트 편집기 플러그인이지만,tinymce를 vue에 도입하는 것은 다른 Vue 리치 텍스트 플러그인만큼 원활하지 않습니다.tinymce 자체는 Vue에 적합하지 않으며 @tinymce/tinymce-vue를 도입해야 합니다. 외국 서식 있는 텍스트 플러그인이며 중국어 버전을 통과하지 못했습니다. 공식 웹사이트에서 번역 패키지를 다운로드해야 합니다(방화벽을 우회해야 할 수도 있음). 1. 관련 종속성을 설치합니다. npminstalltinymce-Snpminstall@tinymce/tinymce-vue-S2. 중국어 패키지를 다운로드합니다. 3. 프로젝트 공용 폴더에 스킨과 중국어 패키지를 새로 만들고 다운로드합니다.
 Vue3에서 페이지의 일부 콘텐츠를 새로 고치는 방법
May 26, 2023 pm 05:31 PM
Vue3에서 페이지의 일부 콘텐츠를 새로 고치는 방법
May 26, 2023 pm 05:31 PM
페이지를 부분적으로 새로 고치려면 로컬 구성 요소(dom)의 다시 렌더링만 구현하면 됩니다. Vue에서 이 효과를 얻는 가장 쉬운 방법은 v-if 지시어를 사용하는 것입니다. Vue2에서는 v-if 명령을 사용하여 로컬 DOM을 다시 렌더링하는 것 외에도 새 빈 구성 요소를 만들 수도 있습니다. 로컬 페이지를 새로 고쳐야 할 경우 이 빈 구성 요소 페이지로 점프한 다음 다시 돌아올 수 있습니다. 빈 원본 페이지의 beforeRouteEnter 가드. 아래 그림과 같이 Vue3.X에서 새로 고침 버튼을 클릭하여 빨간색 상자 안에 DOM을 다시 로드하고 해당 로딩 상태를 표시하는 방법입니다. Vue3.X의 scriptsetup 구문에 있는 구성 요소의 가드에는
 Vue3가 마크다운을 구문 분석하고 코드 강조 표시를 구현하는 방법
May 20, 2023 pm 04:16 PM
Vue3가 마크다운을 구문 분석하고 코드 강조 표시를 구현하는 방법
May 20, 2023 pm 04:16 PM
Vue로 블로그 프론트엔드를 구현하려면 마크다운 파싱을 구현해야 합니다. 코드가 있는 경우 코드 하이라이팅을 구현해야 합니다. markdown-it, vue-markdown-loader,marked,vue-markdown 등과 같은 Vue용 마크다운 구문 분석 라이브러리가 많이 있습니다. 이 라이브러리는 모두 매우 유사합니다. 여기서는 Marked가 사용되었고, 코드 하이라이팅 라이브러리로 하이라이트.js가 사용되었습니다. 구체적인 구현 단계는 다음과 같습니다. 1. 종속 라이브러리를 설치합니다. vue 프로젝트에서 명령 창을 열고 다음 명령 npminstallmarked-save//marked를 입력하여 markdown을 htmlnpmins로 변환합니다.
 vue3 프로젝트가 패키징되어 서버에 게시된 후 액세스 페이지가 공백으로 표시되는 문제를 해결하는 방법
May 17, 2023 am 08:19 AM
vue3 프로젝트가 패키징되어 서버에 게시된 후 액세스 페이지가 공백으로 표시되는 문제를 해결하는 방법
May 17, 2023 am 08:19 AM
vue3 프로젝트가 패키징되어 서버에 게시되면 액세스 페이지에 공백 1이 표시됩니다. vue.config.js 파일의 publicPath는 다음과 같이 처리됩니다. const{defineConfig}=require('@vue/cli-service') module.exports=defineConfig({publicPath :process.env.NODE_ENV==='생산'?'./':'/&
 Vue3에서 아바타를 선택하고 자르는 방법
May 29, 2023 am 10:22 AM
Vue3에서 아바타를 선택하고 자르는 방법
May 29, 2023 am 10:22 AM
최종 효과는 VueCropper 컴포넌트 Yarnaddvue-cropper@next를 설치하는 것입니다. 위의 설치 값은 Vue2이거나 다른 방법을 사용하여 참조하려는 경우 공식 npm 주소: 공식 튜토리얼을 방문하세요. 컴포넌트에서 참조하고 사용하는 것도 매우 간단합니다. 여기서는 해당 컴포넌트와 해당 스타일 파일을 소개하기만 하면 됩니다. 여기서는 import{userInfoByRequest}from'../js/api만 소개하면 됩니다. 내 구성 요소 파일에서 import{VueCropper}from'vue-cropper&
 vue3+ts+axios+pinia를 사용하여 무의미한 새로 고침을 달성하는 방법
May 25, 2023 pm 03:37 PM
vue3+ts+axios+pinia를 사용하여 무의미한 새로 고침을 달성하는 방법
May 25, 2023 pm 03:37 PM
vue3+ts+axios+pinia는 무의미한 새로 고침을 실현합니다. 1. 먼저 프로젝트에서 aiXos 및 pinianpmipinia를 다운로드합니다--savenpminstallaxios--save2. AxiosResponse}from"axios";importaxiosfrom'axios';import{ElMess
 Vue3 재사용 가능한 구성 요소를 사용하는 방법
May 20, 2023 pm 07:25 PM
Vue3 재사용 가능한 구성 요소를 사용하는 방법
May 20, 2023 pm 07:25 PM
머리말 Vue든 React든, 여러 개의 반복되는 코드를 접하게 되면, 파일을 중복된 코드 덩어리로 채우는 대신, 이러한 코드를 어떻게 재사용할 수 있을지 고민해 보겠습니다. 실제로 vue와 React 모두 컴포넌트를 추출하여 재사용할 수 있지만, 작은 코드 조각이 발견되어 다른 파일을 추출하고 싶지 않은 경우, 이에 비해 React는 동일한에서 사용할 수 있습니다. 파일에서 해당 위젯을 선언합니다. 또는 다음과 같은 renderfunction을 통해 구현합니다. constDemo:FC=({msg})=>{returndemomsgis{msg}}constApp:FC=()=>{return(
