최신 안정 버전 nginx1.20.2.
메모리를 효율적이고 빠르게 할당하고 메모리 조각화를 줄이기 위해 nginx는 자체 기본 메모리 풀 구성 요소를 구현합니다.
주요 구현 파일 ngx_palloc.h, ngx_palloc.cngx_palloc.h, ngx_palloc.c
typedef struct {
    u_char               *last;
    u_char               *end;
    ngx_pool_t           *next;
    ngx_uint_t            failed;
} ngx_pool_data_t;

struct ngx_pool_s {
    ngx_pool_data_t       d;
    size_t                max;
    ngx_pool_t           *current;
    ngx_chain_t          *chain;
    ngx_pool_large_t     *large;
    ngx_pool_cleanup_t   *cleanup;
    ngx_log_t            *log;
};内存池中第一个成员是一个结构体:
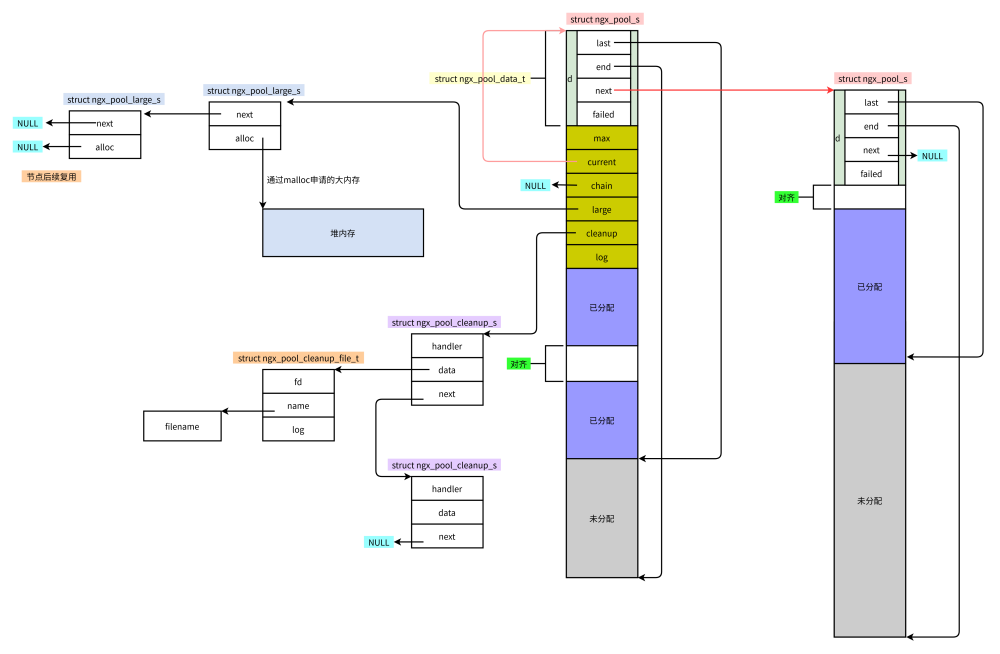
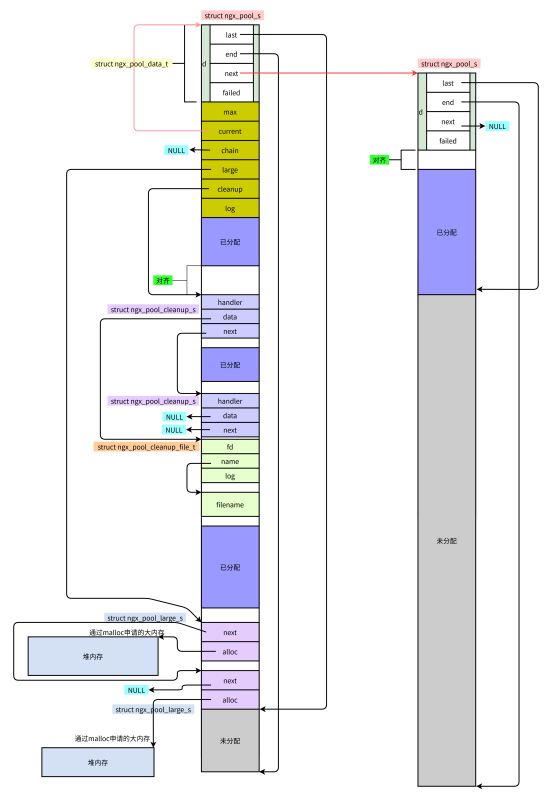
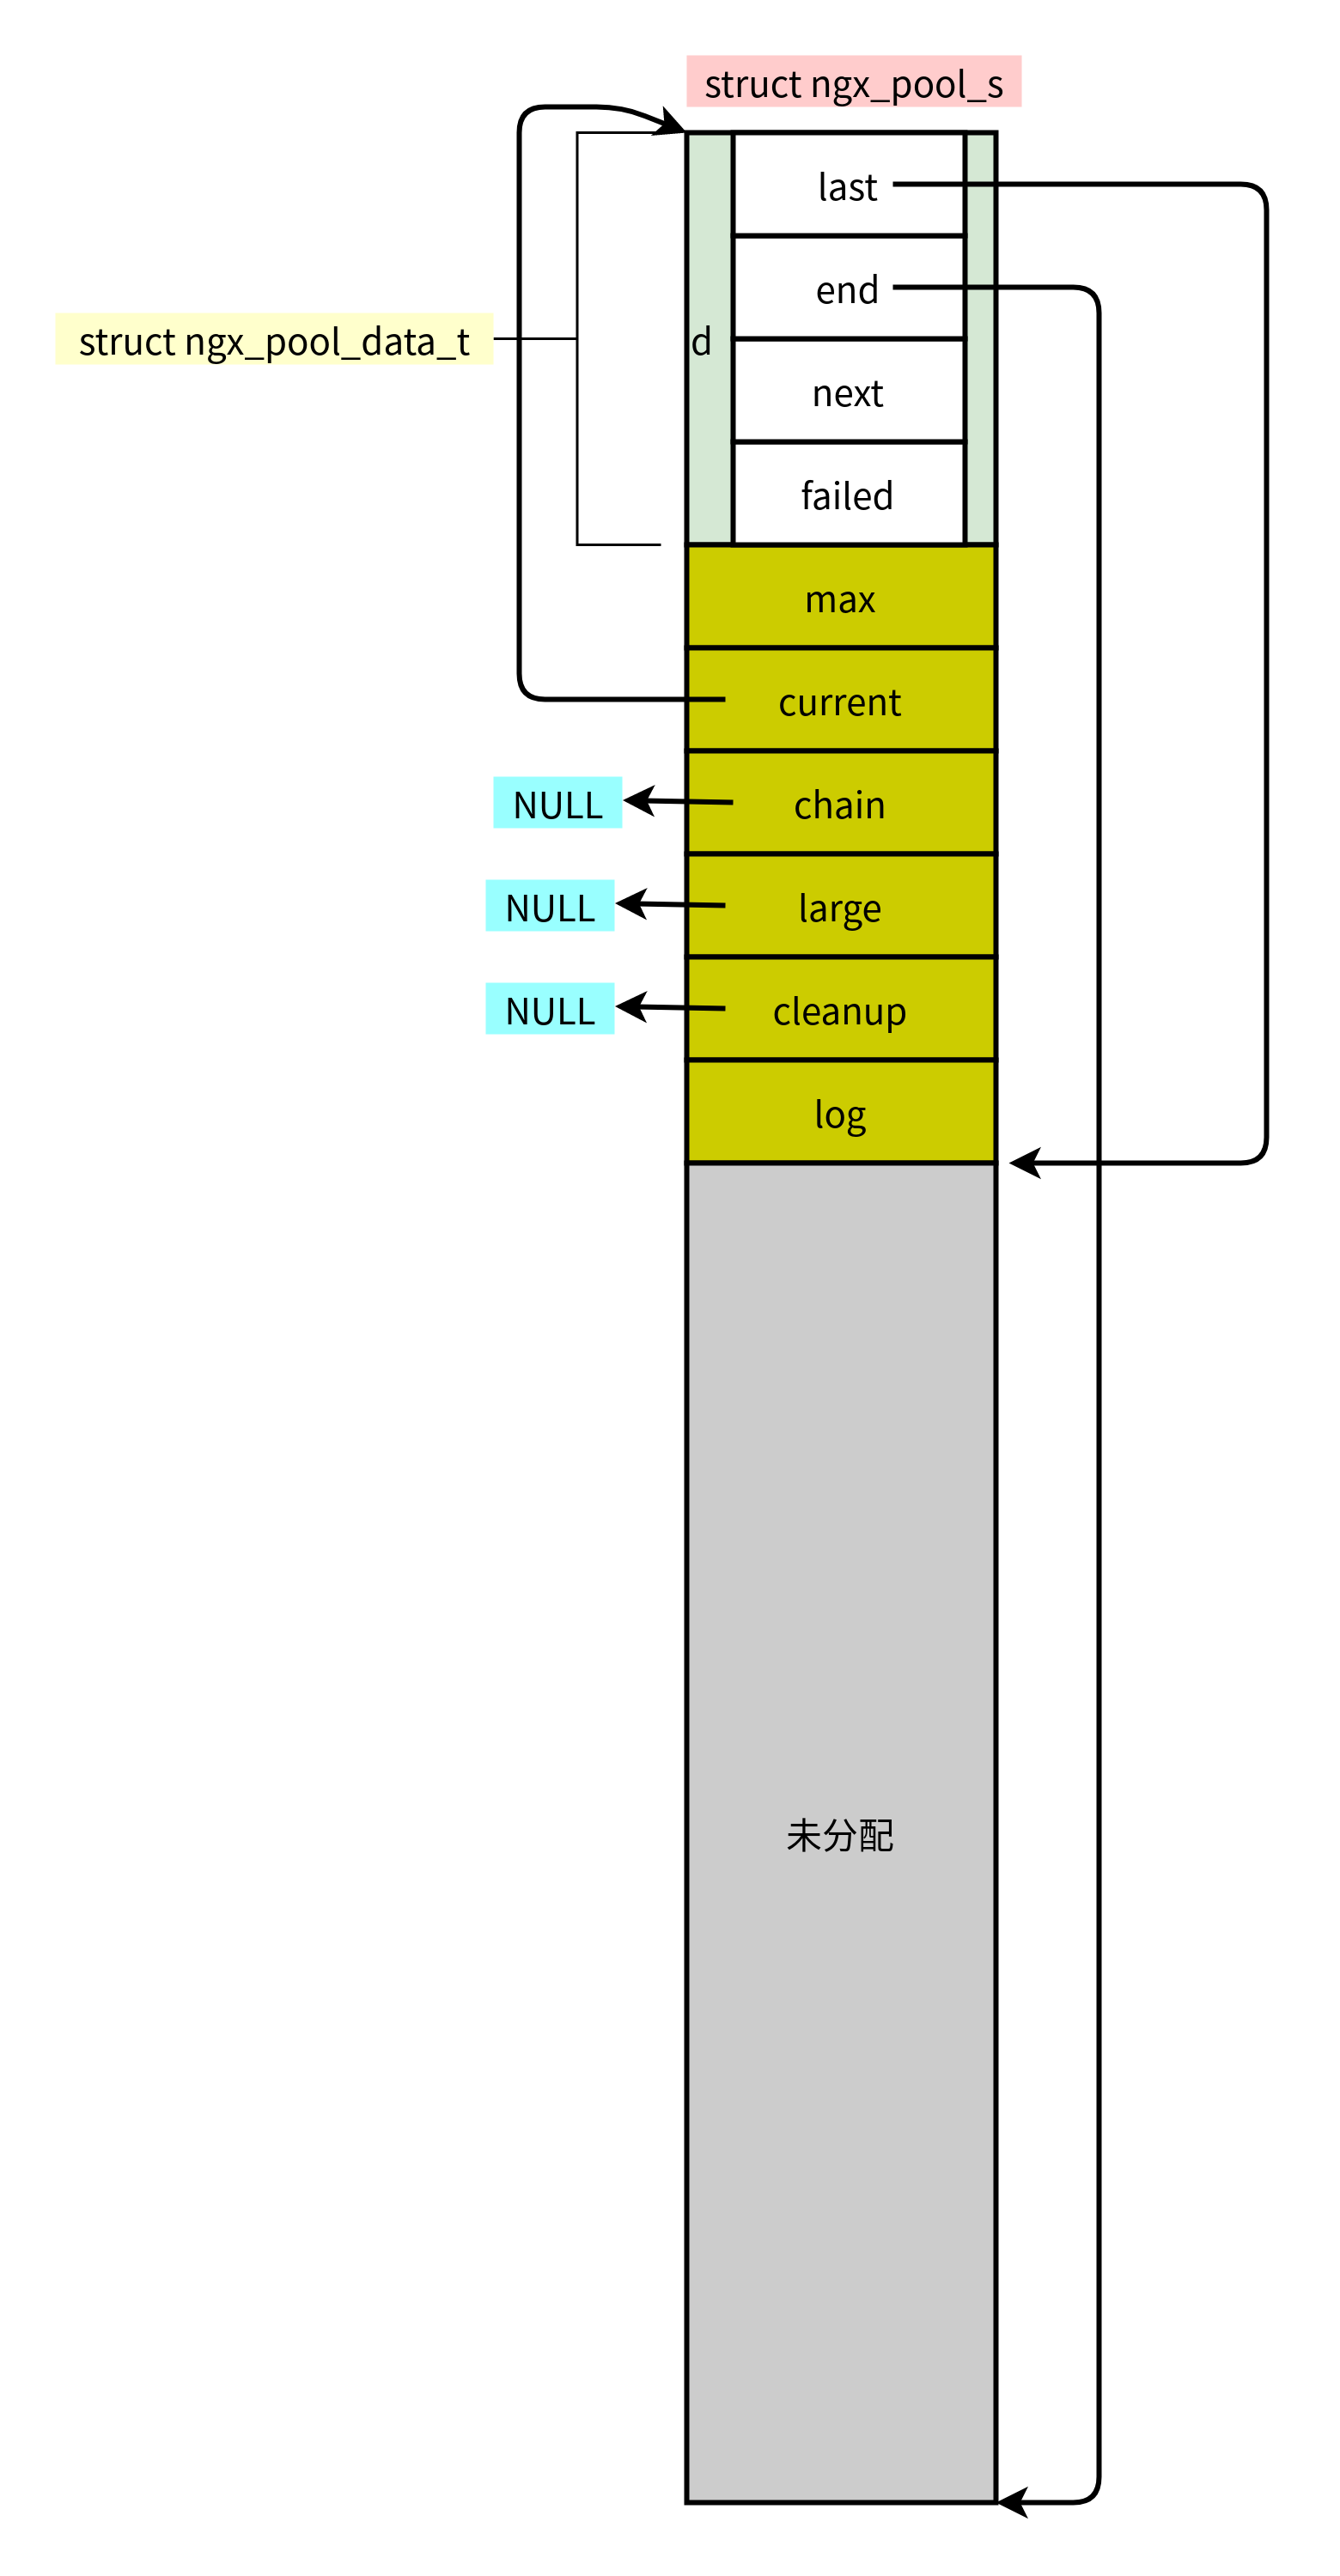
使用ngx_pool_data_t结构体来表示当前内存池信息。
last :下次开始分配的地址
end: 内存池的结束地址
next: 内存池链表,将多个内存池连接起来
max
整个内存池的最大大小
current
指向从当前内存池开始查找可用内存
chain
buffer使用的,这里不涉及
large
当需要的内存大于内存池最大大小时,需要通过malloc直接分配,然后形成链表进行组织
cleanup
清理工作的回调链表
log
日志句柄
当需要分配的内存比内存池的最大大小都大时,内存池无法满足分配,所以直接从系统中分配,然后构成一个链表进行维护。
typedef struct ngx_pool_large_s  ngx_pool_large_t;

struct ngx_pool_large_s {
    ngx_pool_large_t     *next;
    void                 *alloc;
};有一个回调任务的链表,当内存池销毁时,将依次遍历此链表,逐一回调handler进行清理工作。
typedef void (*ngx_pool_cleanup_pt)(void *data);

typedef struct ngx_pool_cleanup_s  ngx_pool_cleanup_t;

struct ngx_pool_cleanup_s {
    ngx_pool_cleanup_pt   handler;
    void                 *data;
    ngx_pool_cleanup_t   *next;
};

可以看出,很多节点都是从内存池中分配的,所以可以把精力都放在实际的数据上而不必在意其他细节上。
/*
 * NGX_MAX_ALLOC_FROM_POOL should be (ngx_pagesize - 1), i.e. 4095 on x86.
 * On Windows NT it decreases a number of locked pages in a kernel.
 */
#define NGX_MAX_ALLOC_FROM_POOL  (ngx_pagesize - 1)

#define NGX_DEFAULT_POOL_SIZE    (16 * 1024)
ngx_pool_t *
ngx_create_pool(size_t size, ngx_log_t *log)
{
    ngx_pool_t  *p;

    p = ngx_memalign(NGX_POOL_ALIGNMENT, size, log);
    if (p == NULL) {
        return NULL;
    }

    p->d.last = (u_char *) p + sizeof(ngx_pool_t);
    p->d.end = (u_char *) p + size;
    p->d.next = NULL;
    p->d.failed = 0;

    size = size - sizeof(ngx_pool_t);
    p->max = (size < NGX_MAX_ALLOC_FROM_POOL) ? size : NGX_MAX_ALLOC_FROM_POOL;

    p->current = p;
    p->chain = NULL;
    p->large = NULL;
    p->cleanup = NULL;
    p->log = log;

    return p;
}从代码中可以看到,内存池最大不超过pagesize的大小

分配函数分了内存对齐和内存不对齐,但这只控制了内存池中分配空间,不控制大内存分配。
(1)分配小空间
内存对齐 ngx_palloc
内存不对齐 ngx_pnalloc
void *
ngx_palloc(ngx_pool_t *pool, size_t size)
{
#if !(NGX_DEBUG_PALLOC)
    if (size <= pool->max) {
        return ngx_palloc_small(pool, size, 1);
    }
#endif

    return ngx_palloc_large(pool, size);
}当需要分配的空间小于max时,将使用小内存分配方式(即从内存池中分配空间),而ngx_pnalloc和ngx_palloc相比只是调用ngx_palloc_small时的最后一个参数为0。
从pool->current指向的内存池开始遍历,寻找满足分配大小的空间,找到则返回首地址
static ngx_inline void *
ngx_palloc_small(ngx_pool_t *pool, size_t size, ngx_uint_t align)
{
    u_char      *m;
    ngx_pool_t  *p;

    p = pool->current;

    do {
        m = p->d.last;

        if (align) {
            m = ngx_align_ptr(m, NGX_ALIGNMENT);
        }

        if ((size_t) (p->d.end - m) >= size) {
            p->d.last = m + size;

            return m;
        }

        p = p->d.next;

    } while (p);

    return ngx_palloc_block(pool, size);
}当现有内存池中都无法满足分配条件时,创建新的内存池
static void *
ngx_palloc_block(ngx_pool_t *pool, size_t size)
{
    u_char      *m;
    size_t       psize;
    ngx_pool_t  *p, *new;

    psize = (size_t) (pool->d.end - (u_char *) pool);

    m = ngx_memalign(NGX_POOL_ALIGNMENT, psize, pool->log);
    if (m == NULL) {
        return NULL;
    }

    new = (ngx_pool_t *) m;

    new->d.end = m + psize;
    new->d.next = NULL;
    new->d.failed = 0;

    m += sizeof(ngx_pool_data_t);
    m = ngx_align_ptr(m, NGX_ALIGNMENT);
    new->d.last = m + size;

    for (p = pool->current; p->d.next; p = p->d.next) {
        if (p->d.failed++ > 4) {
            pool->current = p->d.next;
        }
    }

    p->d.next = new;

    return m;
}其中,创建好新的内存池后,又做了一次遍历,将failed计数加一,当大于4时,将跳过此内存池,下次就不从它开始查找。
即认为超过4次你都不能满足分配,以后都不能满足分配,不再用你了,减少遍历个数,加快成功分配效率
(2)分配大空间
static void *
ngx_palloc_large(ngx_pool_t *pool, size_t size)
{
    void              *p;
    ngx_uint_t         n;
    ngx_pool_large_t  *large;

    p = ngx_alloc(size, pool->log);
    if (p == NULL) {
        return NULL;
    }

    n = 0;

    for (large = pool->large; large; large = large->next) {
        if (large->alloc == NULL) {
            large->alloc = p;
            return p;
        }

        if (n++ > 3) {
            break;
        }
    }

    large = ngx_palloc_small(pool, sizeof(ngx_pool_large_t), 1);
    if (large == NULL) {
        ngx_free(p);
        return NULL;
    }

    large->alloc = p;
    large->next = pool->large;
    pool->large = large;

    return p;
}可以看出,为了避免分配空间,遍历large链查找可重用的节点,但是如果链表过大又可能太慢,所以只查找前三个,如果三个都没有找到,则直接分配(而且节点也是从内存池中分配的,所以后续清理时,不需要管节点,只需要释放申请的大内存本身)
内存对齐
void *
ngx_pmemalign(ngx_pool_t *pool, size_t size, size_t alignment)
{
    void              *p;
    ngx_pool_large_t  *large;

    p = ngx_memalign(alignment, size, pool->log);
    if (p == NULL) {
        return NULL;
    }

    large = ngx_palloc_small(pool, sizeof(ngx_pool_large_t), 1);
    if (large == NULL) {
        ngx_free(p);
        return NULL;
    }

    large->alloc = p;
    large->next = pool->large;
    pool->large = large;

    return p;
}ngx_pool_cleanup_t *
ngx_pool_cleanup_add(ngx_pool_t *p, size_t size)
{
ngx_pool_cleanup_t *c;
c = ngx_palloc(p, sizeof(ngx_pool_cleanup_t));
if (c == NULL) {
return NULL;
}
if (size) {
c->data = ngx_palloc(p, size);
if (c->data == NULL) {
return NULL;
}
} else {
c->data = NULL;
}
c->handler = NULL;
c->next = p->cleanup;
p->cleanup = c;
ngx_log_debug1(NGX_LOG_DEBUG_ALLOC, p->log, 0, "add cleanup: %p", c);
return c;
}可以看出,这里只是分配了一个节点,并没有设置handler以及data数据,所以还得看具体的调用方进行设置,因为这里返回了分配的节点。
比如在函数ngx_create_temp_file中
ngx_int_t
ngx_create_temp_file(ngx_file_t *file, ngx_path_t *path, ngx_pool_t *pool,
    ngx_uint_t persistent, ngx_uint_t clean, ngx_uint_t access)
{
    ...

    cln = ngx_pool_cleanup_add(pool, sizeof(ngx_pool_cleanup_file_t));
    if (cln == NULL) {
        return NGX_ERROR;
    }

       ...
        file->fd = ngx_open_tempfile(file->name.data, persistent, access);
				...
        if (file->fd != NGX_INVALID_FILE) {

            cln->handler = clean ? ngx_pool_delete_file : ngx_pool_cleanup_file;
            clnf = cln->data;

            clnf->fd = file->fd;
            clnf->name = file->name.data;
            clnf->log = pool->log;

            return NGX_OK;
        }
			...
}生成临时文件,将fd以及文件名注册到清理任务中,后续文件不使用了则不需要特殊处理,内存内存池释放时将统一清理。
释放大内存
重置内存中last
重置failed计数
void
ngx_reset_pool(ngx_pool_t *pool)
{
    ngx_pool_t        *p;
    ngx_pool_large_t  *l;

    for (l = pool->large; l; l = l->next) {
        if (l->alloc) {
            ngx_free(l->alloc);
        }
    }

    for (p = pool; p; p = p->d.next) {
        p->d.last = (u_char *) p + sizeof(ngx_pool_t);
        p->d.failed = 0;
    }

    pool->current = pool;
    pool->chain = NULL;
    pool->large = NULL;
}这里有个现象:
在内存池中空间不足时,将调用ngx_palloc_block创建一个新的内存池,而last指向的是m += sizeof(ngx_pool_data_t);, 因此当前新分配的内存池将比第一个内存池可用大小多了(max,current,chain,large,cleanup,log)这几个字段大小(可能没有那么多,因为要对齐,可能对齐后就完全一样了),而现在重置时,p->d.last = (u_char *) p + sizeof(ngx_pool_t);
void
ngx_destroy_pool(ngx_pool_t *pool)
{
    ngx_pool_t          *p, *n;
    ngx_pool_large_t    *l;
    ngx_pool_cleanup_t  *c;

    for (c = pool->cleanup; c; c = c->next) {
        if (c->handler) {
            ngx_log_debug1(NGX_LOG_DEBUG_ALLOC, pool->log, 0,
                           "run cleanup: %p", c);
            c->handler(c->data);
        }
    }


    for (l = pool->large; l; l = l->next) {
        if (l->alloc) {
            ngx_free(l->alloc);
        }
    }

    for (p = pool, n = pool->d.next; /* void */; p = n, n = n->d.next) {
        ngx_free(p);

        if (n == NULL) {
            break;
        }
    }
}last: 다음에 할당될 주소
end: 메모리 풀의 끝 주소max
전체 메모리 풀의 최대 크기포인트 현재 메모리 풀에서 사용 가능한 메모리 찾기 시작
🎜chain🎜버퍼가 사용되며 여기서는 관련되지 않습니다🎜🎜large🎜필요한 메모리가 메모리 풀의 최대 크기보다 클 경우 malloc을 통해 직접 할당해야 합니다. , 연결리스트로 정리🎜🎜cleanup🎜정리 작업을 위한 콜백 연결리스트 🎜🎜log🎜로그 핸들🎜🎜2.2 대용량 메모리 체인🎜🎜할당해야 할 메모리가 메모리 풀의 최대 크기보다 큰 경우 , 메모리 풀이 할당을 만족할 수 없으므로 시스템에서 직접 할당한 후 연결 리스트를 구성하여 유지 관리합니다. 🎜ngx_int_t
ngx_pfree(ngx_pool_t *pool, void *p)
{
ngx_pool_large_t *l;
for (l = pool->large; l; l = l->next) {
if (p == l->alloc) {
ngx_log_debug1(NGX_LOG_DEBUG_ALLOC, pool->log, 0,
"free: %p", l->alloc);
ngx_free(l->alloc);
l->alloc = NULL;
return NGX_OK;
}
}
return NGX_DECLINED;
}void *
ngx_pcalloc(ngx_pool_t *pool, size_t size)
{
void *p;
p = ngx_palloc(pool, size);
if (p) {
ngx_memzero(p, size);
}
return p;
} 🎜🎜3.2 실제🎜🎜
 🎜🎜메모리 풀에서 많은 노드가 할당된 것을 볼 수 있으므로 다른 세부 사항에 대해 걱정하지 않고 실제 데이터에 집중할 수 있습니다. 🎜🎜4. 구현🎜🎜4.1 메모리 풀 만들기🎜
void
ngx_pool_run_cleanup_file(ngx_pool_t *p, ngx_fd_t fd)
{
ngx_pool_cleanup_t *c;
ngx_pool_cleanup_file_t *cf;
for (c = p->cleanup; c; c = c->next) {
if (c->handler == ngx_pool_cleanup_file) {
cf = c->data;
if (cf->fd == fd) {
c->handler(cf);
c->handler = NULL;
return;
}
}
}
}void
ngx_pool_cleanup_file(void *data)
{
ngx_pool_cleanup_file_t *c = data;
ngx_log_debug1(NGX_LOG_DEBUG_ALLOC, c->log, 0, "file cleanup: fd:%d",
c->fd);
if (ngx_close_file(c->fd) == NGX_FILE_ERROR) {
ngx_log_error(NGX_LOG_ALERT, c->log, ngx_errno,
ngx_close_file_n " \"%s\" failed", c->name);
}
} 🎜🎜4.2 메모리 풀에서 공간 할당🎜🎜할당 기능은 메모리 정렬과 메모리 오정렬로 나누어지며, 그러나 메모리 풀만 제어합니다. 중간 크기의 공간을 할당하고 대용량 메모리 할당을 제어하지 않습니다. 🎜🎜(1) 작은 공간 할당 🎜🎜🎜🎜메모리 정렬
 ngx_palloc🎜🎜🎜🎜메모리 정렬 ngx_pnalloc🎜🎜void
ngx_pool_delete_file(void *data)
{
ngx_pool_cleanup_file_t *c = data;
ngx_err_t err;
ngx_log_debug2(NGX_LOG_DEBUG_ALLOC, c->log, 0, "file cleanup: fd:%d %s",
c->fd, c->name);
if (ngx_delete_file(c->name) == NGX_FILE_ERROR) {
err = ngx_errno;
if (err != NGX_ENOENT) {
ngx_log_error(NGX_LOG_CRIT, c->log, err,
ngx_delete_file_n " \"%s\" failed", c->name);
}
}
if (ngx_close_file(c->fd) == NGX_FILE_ERROR) {
ngx_log_error(NGX_LOG_ALERT, c->log, ngx_errno,
ngx_close_file_n " \"%s\" failed", c->name);
}
}ngx_create_temp_file 함수에서 🎜rrreee🎜는 임시 파일을 생성하고 정리 작업에 fd와 파일 이름을 등록하며 후속 파일을 사용하지 않는 경우 특별한 처리가 필요하지 않습니다. 메모리 풀은 출시되면 통합될 예정입니다. 🎜🎜4.4 메모리 풀 재설정🎜🎜🎜🎜대용량 메모리 해제🎜🎜🎜🎜Reset last in memory🎜🎜🎜🎜Reset failed count🎜🎜rrreee🎜여기에 현상이 있습니다. 🎜메모리 풀에 공간이 있습니다. 충분하지 않으면 ngx_palloc_block이 호출되어 새 메모리 풀을 생성하고 마지막으로 m += sizeof(ngx_pool_data_t);를 가리키므로 현재 새로 할당된 메모리 풀이 첫 번째 메모리 풀의 사용 가능한 크기는 훨씬 더 크고(최대, 현재, 체인, 대형, 정리, 로그) 이러한 필드의 크기(정렬해야 하기 때문에 그다지 많지 않을 수도 있고, 아마도 그렇게 될 수도 있음) 정렬 후 정확히 동일), 이제 재설정됩니다. p->d.last = (u_char *) p + sizeof(ngx_pool_t); 각 메모리 풀의 사용 가능한 크기가 동일해지면 다시. 🎜🎜4.5 메모리 풀 삭제🎜🎜🎜🎜콜백 정리 작업🎜🎜🎜🎜대용량 메모리 해제🎜🎜🎜🎜메모리 풀 자체 해제🎜void
ngx_destroy_pool(ngx_pool_t *pool)
{
ngx_pool_t *p, *n;
ngx_pool_large_t *l;
ngx_pool_cleanup_t *c;
for (c = pool->cleanup; c; c = c->next) {
if (c->handler) {
ngx_log_debug1(NGX_LOG_DEBUG_ALLOC, pool->log, 0,
"run cleanup: %p", c);
c->handler(c->data);
}
}
for (l = pool->large; l; l = l->next) {
if (l->alloc) {
ngx_free(l->alloc);
}
}
for (p = pool, n = pool->d.next; /* void */; p = n, n = n->d.next) {
ngx_free(p);
if (n == NULL) {
break;
}
}
}通过遍历找到要释放的节点,将内存释放,并且将alloc设置成NULL,则有了节点重用的情况。
ngx_int_t
ngx_pfree(ngx_pool_t *pool, void *p)
{
    ngx_pool_large_t  *l;

    for (l = pool->large; l; l = l->next) {
        if (p == l->alloc) {
            ngx_log_debug1(NGX_LOG_DEBUG_ALLOC, pool->log, 0,
                           "free: %p", l->alloc);
            ngx_free(l->alloc);
            l->alloc = NULL;

            return NGX_OK;
        }
    }

    return NGX_DECLINED;
}void *
ngx_pcalloc(ngx_pool_t *pool, size_t size)
{
void *p;
p = ngx_palloc(pool, size);
if (p) {
ngx_memzero(p, size);
}
return p;
}正常分配的空间中都是垃圾数据,所以当前函数在分配空间后,将分配的空间清零。
(1) 手动关闭指定fd
遍历清理任务,找到ngx_pool_cleanup_file的handler,如果是要关闭的fd,则回调
void
ngx_pool_run_cleanup_file(ngx_pool_t *p, ngx_fd_t fd)
{
    ngx_pool_cleanup_t       *c;
    ngx_pool_cleanup_file_t  *cf;

    for (c = p->cleanup; c; c = c->next) {
        if (c->handler == ngx_pool_cleanup_file) {

            cf = c->data;

            if (cf->fd == fd) {
                c->handler(cf);
                c->handler = NULL;
                return;
            }
        }
    }
}(2) 关闭fd
void
ngx_pool_cleanup_file(void *data)
{
    ngx_pool_cleanup_file_t  *c = data;

    ngx_log_debug1(NGX_LOG_DEBUG_ALLOC, c->log, 0, "file cleanup: fd:%d",
                   c->fd);

    if (ngx_close_file(c->fd) == NGX_FILE_ERROR) {
        ngx_log_error(NGX_LOG_ALERT, c->log, ngx_errno,
                      ngx_close_file_n " \"%s\" failed", c->name);
    }
}(3) 删除文件并关闭fd
void
ngx_pool_delete_file(void *data)
{
    ngx_pool_cleanup_file_t  *c = data;

    ngx_err_t  err;

    ngx_log_debug2(NGX_LOG_DEBUG_ALLOC, c->log, 0, "file cleanup: fd:%d %s",
                   c->fd, c->name);

    if (ngx_delete_file(c->name) == NGX_FILE_ERROR) {
        err = ngx_errno;

        if (err != NGX_ENOENT) {
            ngx_log_error(NGX_LOG_CRIT, c->log, err,
                          ngx_delete_file_n " \"%s\" failed", c->name);
        }
    }

    if (ngx_close_file(c->fd) == NGX_FILE_ERROR) {
        ngx_log_error(NGX_LOG_ALERT, c->log, ngx_errno,
                      ngx_close_file_n " \"%s\" failed", c->name);
    }
}위 내용은 nginx 메모리 풀 구현 방법의 상세 내용입니다. 자세한 내용은 PHP 중국어 웹사이트의 기타 관련 기사를 참조하세요!